Loading...
Loading...
Loading...
Loading...
Loading...
Loading...
Loading...
Loading...
Loading...
Loading...
Loading...
Loading...
Loading...
Loading...
Loading...
Loading...
Loading...
Loading...
Loading...
Loading...
Loading...
Loading...
DocBits excels in adapting document layouts according to their geographical origins while standardizing elements like currency formats based on user browser settings. Let’s explore how you can leverage the Layout Builder to customize layouts for different origins, such as the U.S. and Germany.
Currency and Format Standardization: Regardless of the original document’s currency or format, DocBits converts these elements into a standardized ISO format on the server, in line with the user’s browser settings.
Geographical Layout Customization: The system allows customization of document layouts based on their geographical origin. This means you can define specific fields and formats for documents from different countries.
U.S. Layout: For a U.S. invoice, you might include fields for city tax, aligning with the common tax structure in the U.S.
Germany Layout: In contrast, a German invoice layout may omit the city tax field, as it’s not a standard charge in Germany.
Select Origin Layout: In the Layout Builder, choose the base layout corresponding to the document’s origin.
Customize Fields: Adapt the layout by adding or removing fields. For instance, include ‘City Tax’ for a U.S. layout.
Apply and Test: Once customized, apply the layout to your documents and test to ensure accuracy.
Understand Regional Differences: Familiarize yourself with the tax and format nuances of different regions.
Consistent Updates: Regularly update your layouts to reflect any changes in regional regulations.
User Feedback: Utilize feedback from users in different regions to refine layouts further.
First of all, ensure that the Layout Builder feature is activated. This can be done by navigating to Settings → Document Processing → Module → Document Type and ensure that the Layout Builder slider is set too active as shown below.
After this is done you can access the Layout Builder via Settings → Document Types, once on this page, you can select from the various document types you have created and either select “Edit Layout” as shown below
or if you have sub-document types within a created document type you can select “Document Sub Types” and select “Edit Layout” for the sub document type layout you wish to edit as shown below.
After following the previous steps you will reach a page like the one shown below.
In order to upload a document to the layout builder, simply navigate to the right on the screen
Click on the “Upload Documents” button or drag and drop your desired document into the provided area
Groups can be created by selecting the following icon.
Groups allow you to create different sections on a layout, this makes it easier to separate different groups of data or information to make a layout easier to follow. You can create a title for each group so that a user can know what information they will find in that group.
These are a set of default fields that can be dragged and dropped into the layout builder and are available to you to create your desired layout. These include:
Text – This is a text box which creates a field in the layout that can have text entered into it once on the validation screen.
Label – This is a field that can be used to create uneditable text, this could be used to create sub-headings or any other desired uneditable text when on the validation screen.
Checkbox – This creates a boolean type field which can be checked or unchecked.
Multi Checkbox – This functions the same way as the “Checkbox” but can be used when the user knows they will be adding multiple checkboxes in one section.
Horizontal Separator – This creates a horizontal line on the layout that can be used to split up sections within a group on the layout.
Table of Checkboxes – This lets the user create a table of checkboxes consisting of custom x- and y-axis values, eg.
Button – This creates a clickable button on the validation screen within the layout that can be set to one of three functions, including: Export, Export mit Sonderwunsch or Reject.
Extracted Tables -This allows you to place an area on the document layout that illustrates the table that gets extracted from the document. For information click here.
Invoice Buttons – This element lets you drag and drop a set of buttons that are optimized for invoices. When on the validation screen, when you select the invoice type (either cost or purchase) the PO Matching or Auto Accounting will disappear accordingly.
QR Code Fields – This element allows you to drag and drop a block that will display all the extracted information from a document when a QR code is present.
The user is able to create their own custom groups and fields for a document type, this can be done when originally creating a document type but also by selecting “Fields” when on the Document Types page in Settings.
In order to create the above space on the layout, a “Label” from the Form Elements must be used in a special way. The reason for this is that the Layout Manager operates according to a 100 space per line system in that 1 space represents 1 percent of a line, this means that fields can only take up 100 spaces per line as show below.
This means that the user must build the layout line by line according to this rule. For example let's say you would like to add the fields “Name” and “Date” in the same line but would like the “Name” field to be larger. This can be done by dragging and dropping the “Text” field from the Field Elements drop down and naming each field “Name” and “Date” as shown.
The problem now exists that they are both the same size of 33 (this is the default size of all dragged and dropped fields) but you would like the “Name” field to be larger than the “Date” field and both fields should take up the entire line on the layout. Therefore, by following the 100 percent rule, you can set the “Name” and “Date” fields to any combination of 100 that you would desire. This of course depends on how large you would like each individual field but for the purpose of this example we will set the “Name” field to 70 and the “Date” field to 30, the results are:
This same rule applies to all fields in the Layout Builder.
Now that this rule has been explained, creating blank spaces will make more sense. As previously mentioned, in order to create a blank space you have to use a “Label” from the Form Elements.
For example, let’s say that you would like to create a blank space between these two fields.
Step one is to drag and drop a “Label” between these two fields, once added you can click on the “Label” field you just added and on the left you will be presented with the properties of the field. Now, in the same way you would create or change the name of a field as shown previously, you will remove any name from the “Label” property like so
The result from doing this will then be
There is now a gap between the two fields. This gap can be extended or shortened according to the 100 percent rule discussed earlier, and with these functions you can create any desired layout.
A guide to training new documnets with DocBits.
Format: JSON
Purpose: This step involves defining the structure of the EDI data. It includes specifying segments such as SAC, N1, and PO1, and details the fields contained within each segment. For segments that contain nested structures, loops are defined to properly organize the data hierarchy.
Format: XSLT
Purpose: This step involves transforming the structured JSON data into a structured XML format, specifically tailoring the output to meet the requirements for further processing or integration. This transformation helps in extracting precise information like acknowledgement types, order details, and conditional elements based on specific values.
Format: XSLT (outputting HTML)
Purpose: Converts the XML data from Step 2 into an HTML format for previewing the transformed data in a readable and visually appealing format. The HTML layout includes styles for presentation and structures data like purchase orders, supplier details, and order terms for easy viewing.
Format: JSON
Purpose: Specifies JSON paths for extracting key values from the XML data produced in Step 2. These paths are used to retrieve specific data points such as purchase orders and currency, which are crucial for downstream processing and integration into other systems.
This updated sequence ensures a thorough process, transforming raw EDI data into structured, actionable information using JSON for data structuring, XSLT for transformation and HTML preview, followed by JSON paths for data extraction and integration.
When using our table extraction tool, you can choose between training mode and correction mode. Here’s what you need to know about each mode:
In training mode, mapped columns are read-only, and you cannot manually change the text. Additionally, the delete row button is not visible.
In correction mode, you can delete and add rows, and you can manually change the text of mapped columns.
Here’s an example of a table in correction mode, with the first row deleted and a new row added:
Once you have uploaded your document and it is ready for validation, you will enter. the validation screen.
You will notice some fields are already extracted, this is due to DocBits swarm intelligence, but other fields still remain empty. This is due to this document not being correctly trained yet, meaning DocBits is unsure where to extract the information for those empty fields.
However, with your help, you can train DocBits to know where to search for this data on that specific type of document. Do keep in mind that some fields may be empty due to the required information not being present on the document you uploaded, but if the information is present on your document then it can be trained by doing the following.
Click on the field you would like to train and either double click on the information on the document or, using your cursor, create a block around the information to populate the field.
Repeat this until you have populated all the fields you require and then your document is ready to be exported, once exported, DocBits will remember this document type in future meaning that you will not need to manually train these fields again as DocBits learns where to extract this data.
If you need to manually map columns to rows (fields) on an extracted document, you can do so easily in DocBits. Follow our step-by-step guide below to learn how to add a new column to a table in DocBits.
To get started, import your document into DocBits and open it. Then, navigate to the table extraction view by clicking on the “LINE ITEMS” button.
To add a new column to your table, you’ll need to activate training mode. Click on the “TRAINING MODE” button to do so.
Once you’re in training mode, you can create a new column by clicking on the “ADD COLUMN” button. In the window that appears, you can specify a name for the column, set whether it’s optional or mandatory, and choose the column type (STRING, AMOUNT, or DATE).
After you’ve created your new column, you can use it for manual mappings by following our guide on Manual Row Selection.
This feature by DocBits gives you an alternative to model classification as it allows you to write searchable regular expressions for a document type for classification and other purposes.
Document Type: The Regex Manager allows you to write regular expressions and this regex will then be searched for in the document, if it finds a match to the regex of a defined document, it then classifies that document to the corresponding document type. For example, if you wrote a regular expression to find “Gutschrift”. If DocBits found this term in a document it would classify that document as a credit note.
Document Origin: This lets DocBits know the country of origin of a document through regular expressions. For example, if a regular expression for a Spanish document contains the term “Factura”. If DocBits searches a document and finds this term then it would know that the document is of Spanish origin and classify it as such.
To find this feature in DocBits, from your Dashboard, navigate to Settings → Global Settings → Document Types. Within each of the created document types, there is a “Regex” option.
By clicking on “Regex” you will be taken to this menu, which displays the existing regex models that have been created as well as an “ADD” button for you to create new regex models.
If a customer requires a new document type or additional fields to be added to an existing document type layout, this section will go through all the information required to do so.
In DocBits you will find the SETTINGS menu in the upper bar on the DASHBOARD.
If you are logged in to DocBits as an admin, you will find all fields of a document that can be extracted under the respective document type.
Open the menu for Document Types.
In the following overview you will find all standard document types available for you
Activate/Extraction Type
To the right of each document type, you will see Activate and Extraction Type sliders.
Activate: This document type is active in your DocBits environment.
Extraction Type: This slider allows you to enable or disable a set of predefined rules for the document type when it is processed by DocBits. By selecting the gear icon to the right of the slider, the following menu will appear.
To see which fields can be extracted, for example from an invoice, click on FIELDS for this document type.
Field Settings
Here you will find all the fields that can be extracted
You can also CREATE FIELDS like freight, postage or any field with an amount you want to extract from your invoices.
For each field you can check the boxes if they are:
REQUIRED: Here you can define if the field must contain a value to continue.
READ ONLY: Here you can define if a field can only be displayed but not edited.
HIDDEN: Here you can define whether a field should be hidden or displayed in the extraction view.
FORCE VALIDATION: Here you can define whether a field must always be validated manually, even if it has been read 100% by DocBits.
OCR and MATCH SCORE: Setting as described below, per field.
FORMULA: Creation of a formula per field.
If all settings are made and should be saved, please confirm this with the SAVE SETTINGS button at the bottom of the page, otherwise the settings will not be applied.
Recognition Settings
OCR
Here you can set the sensitivity of the OCR (Optical Character Recognition) function for all fields at once. This value determines the sensitivity with which a field is marked in red if it could not be extracted with 100% certainty (OCR related!).
Match Score
This is where you can set the sensitivity of the MATCH SCORE function for all fields at once. This value determines when a field is marked in red if DocBits has not extracted the field with 100% probability. In this case the field needs to be validated manually.
The button RESTORE DEFAULTS will set back both values to “50”.
Profile
Here you can define the profile that shall be used. Either Default or ZUGFeRD. In profile ZUGFeRD there are predefined fields that are mandatory for this type of invoice. If you do not explicitly use ZUGFeRD, please select “Default”.
If you’re using DocBits for document/table extraction, it’s important to save and delete rules properly to ensure your data is extracted accurately. This guide will walk you through the process.
Once you’ve trained a document in DocBits and defined all the rules for table extraction, you can save those rules for future imports. This means that the tables in your documents will be extracted automatically, without any manual training required.
To save your rules, simply click the “SAVE RULES” button. You’ll see a rule indicator that shows how many rules have been defined and saved for that document.
If you need to delete rules for a document, you can do so using the “DELETE RULES” button. This may be necessary if rules have been saved incorrectly or if you need to retrain a document.
However, it’s important to note that deleting rules will affect all documents with the same or similar format. This means that you’ll need to retrain those documents from scratch. So, be sure to use this feature with caution.
Once a table has been extracted via DocBits and the columns have been mapped, the obtained data can be grouped to get a structured result set of all extracted data.
All documents from order confirmations to invoices can vary enormously in complexity from company to company. For example, in documents, information may be presented in tables in some columns across multiple rows and in other columns across only one row.
As an example, you can see the German invoice below, where the information in column “Bezeichnung” extends over several lines (positions).
At this point, another advantage of DocBits comes into play. It extracts the data in the first step 1 to 1. The result looks like this:
BUT now there is the possibility to group data based on a specific column. That means in this case it can be grouped by the column “Position” as shown in the following video. This in turn groups the rows of the “Description” column into one row. So that at the end you get a structured overall picture of the export and the data can now be processed further.
The result of grouping looks like this:
\
It is possible that on some documents text in rows is not only written under one column. It might happen that it is written through different columns like in the example below.
On the screenshot you can see that the table and columns have already been defined. Having a detailed look at the highlighted information (PRAEF) you will recognize that the text is written through columns “Bezeichnung”, “Menge”, “ME” and “Preis in EUR”.
In that case it is not possible for the system to automatically define to which column the information belongs.
To solve this issue DocBits offers a possibility to manually select and map information on a document to any column.
First of all make sure training mode is activated
In addition you need to activate the row edit mode
Please note that the manual mapping of text to a column is only possible for extractable columns (blue color).
The violet ones can not be mapped manually as the mapping has already been done via the columns defined on the document.
In the table extraction view, you will find the menu item Settings in the upper action bar (make sure that the training mode is activated). If you click on the gear icon, a window will open in which you will find the Advanced Settings.
Below functionalities are available in general settings:
Here you can define the number of lines of a table header. For example, the table header line can be two lines:
Accordingly, the value in “Header row count” is set to two
Why is this needed? It might be that DocBits does not recognize the second line in the table header as part of the header line. In this case, it incorrectly inserts it into the table as an extracted value. This can be easily prevented with this function.
Example before
Example after
In this example, the item description in the table spans several rows, but you only need the first one. To extract only this and include it in the Description column, select Move Extra Rows to Trash.
After naming the columns and mapping them to position, you get the following result
The functionalities below are available in the advanced settings:
Enter the minimum number of rows in your grouped column here.
In this table you see six rows of which only three are relevant for you. In the first two columns there are two criteria that have to be extracted separately. These will be your mapped columns all the other ones have to be trained as custom columns. And this is how it works step by step:
Select the two header rows as well as two minimum grouped rows as these should be grouped to one row.
Also select the Move extra rows to Trash option to be able to train all the other columns as custom columns.
Name the first column Position and group on that one.
After naming all the columns and training the values, this is your result:
If you want to combine all the rows above the grouped attribute, check the box here.
In this example, the table starts with a row that is above all other information but also needs to be extracted along with the information below it. It could be that DocBits (DOC²) extracts this row as an additional row and the grouping of the information, e.g. by position, does not work properly.
After grouping on net amount, checking the box, selecting the Move extra rows to Trash option
After naming all the columns, this is your result.
To define tables and columns on a document please import a document, open it and go to the table extraction view like already known (via “Line Items”).
You will end up in following screen where you can activate the Training Mode:
Via the “Edit” button table selection mode will be activated and you will be able to edit the document shown on the left side:
In general your are now able to use the autodetect tables functionality and the system will automatically define the tables on the document:
If the system is not able to find the tables automatically you can manually define the tables on the document like shown in the video below:
Once the tables are defined you can manually define the columns via the following button:
Define and sort the columns via drag and drop on the document. Repeat this for the tables on the other pages as well. As an alternative if the tables are equal on each page you can use the following button to use the same column for all tables defined in the document. This functionality copies the columns that you have defined to all other pages as well:
If the document is very confusing, it can be zoomed in and out using the “Zoom in” and “Zoom out” functionality. This is helpful, for example, when a lot of information is close together and this makes it difficult to define the columns:
If you defined a column by mistake it can be selected by clicking it and deleted via the following button:
Note: The button is only visible if the column is selected.
If you are done defining all tables and all columns on your document use the “Save” button to activate your changes and to extract the data from the document:
The data of all defined areas will be extracted and shown on the right side:
In the next section you will learn how to adjust the data that has been extracted.
Mapping columns is a crucial step in accurate table extraction using DocBits. Once you’ve extracted data from a document, you can map the extracted columns with the columns given by DocBits. This ensures that the extracted data is correctly placed in the corresponding columns.
To map columns, simply select the header of a column in the extraction view. A dropdown menu will appear, allowing you to select the column you want to map. If you’ve mapped a column incorrectly, you can easily remap it by clicking the dropdown menu again.
A guide on testing DocBits features once they are configured.
Login Details to Cloud
Credentials are mandatory for accessing the Infor Cloud environment. The user should have the roles "Infor-SystemAdministrator" and "UserAdmin".
Config Admin Details (DocBits)
You should have received an email from FellowPro AG with the login details for the DocBits SSO Settings page. You will need a login and password.
Certificate
You can download the certificate in DocBits under SSO Service Provider Settings
URL starts with https://mingle-portal.eu1.inforcloudsuite.com/<TENANT_NAME> followed by your personal extension
Choose the option Cloud Identities and use your login details
After login you will have access to the Infor Cloud. In this case we enter this page, but on the burger menu you will find access to all applications.
On the right hand side of the bar menu, you will find the user menu and there you can access the user management
Then you need to select in the left hand side menu the option Security Administration and Service Provider.
You will see this window with the Service Providers.
Now click on the “+” sign and add our DocBits as Service Provider.
Log in on URL https://app.docbits.com/ with the login details you received from us.
Go to SETTINGS (on top bar) and select INTEGRATION, under SSO Service Provider Settings you will find all the information you need for the following steps.
Download the certificate
Filling the Service Provider with the help of SSO Service Provider Settings in DocBits
Application Type
DEFAULT_SAML
Display Name
DocBits
Entity ID
See Entity ID under SSO SERVICE SETTINGS
SSO Endpoint
Copy the SSO URL from SSO SERVICE SETTINGS and paste it in the SSO Endpoint field.
Signing Certificate
Upload the appropriate .cer file you have downloaded in step 3c) from SSO SERVICE SETTINGS
Name ID Format and Mapping
email address
When you have filled out everything remember to save it with the disk icon above Application Type
Enter the service provider DocBits again.
Click on view the Identity Provider Information underneath.
File looks like this: ServiceProviderSAMLMetadata_10_20_2021.xml
Import the SAML METADATA in the SSO Settings.
Go to IDENTITY SERVICE PROVIDER SETTINGS, which is located under INTEGRATIONS in SETTINGS. Enter your Tenant ID (e.g. FELLOWPRO_DEV) and underneath that line you see the Upload file and the IMPORT Button, where you need to upload the previously exported SAML METADATA file.
Click on IMPORT and then choose the METADATA file that you have already downloaded from the SSO SERVICE PROVIDER SETTINGS
Click on CONFIGURE
Go to Admin settings
Click on ADD APPLICATION in the top right corner
Fill out all fields like on the following image but with your own SSO Url, don’t forget to choose an icon and click on SAVE.
Final Step
Log out of DocBits.
Go back to the burger menu in Infor and select the icon you just created.
And you will be taken to the Dashboard of DocBits.
When it comes to testing your PO Matching configuration, you will need to create a Purchase order in LN/M3 in order to check whether INFOR is synced with DocBits.
LN: https://docs.infor.com/ln/10.4/en-us/lnolh/docs/ln_10.4_procpoug__en-us.pdf
M3: https://docs.infor.com/m3udi/16.x/en-us/m3beud/default.html?helpcontent=ois610.html
Once you have created your purchase order, go to Settings → Master Data Lookup and search for the purchase order number of the PO you just created as it should now appear in your purchase order master data in DocBits.
You should see your unique PO number here, this means that DocBits and INFOR are correctly synced.
Now upload your invoice that matches the quantity and unit prices of the purchase order you created. Validate the document and select PO Matching on the validation screen.
The PO and invoice line items should automatically match, then simply select the export option and check whether or not the document gets exported without any errors. If you do encounter an export error, create a ticket for the DocBits support team to assist you. If you are unsure of how to create a ticket within DocBits, please consult our DocBits Overview documentation for assistance.
\
Once you have validated and exported a document, sign in to INFOR and type in the APS450 command.
You will be taken to the following page where you will see the document you have just exported.
Once you find your document, right-click on the document and select “Related” and then the “Lines” option.
You will be taken to the menu that displays all the line items from the invoice you exported, ensuring all the line items are there and are correct. Lastly ensure that all these line items are classified as Type 8, this can be seen by looking at the following column in the table.
Once you have configured auto accounting for your DocBits environment, it is very important that all functionalities are tested to ensure a smooth hand-over process.
From the Dashboard, navigate to Settings → Document Processing → Module.
Under the Purchase Order / Auto Accounting tab you will find the slider to enable the feature as well as a drop down box to select LN or M3
After you have uploaded your document and entered the validation screen, select the following icon to enter auto accounting.
You will then be taken to this screen, this will only occur if the table has been properly trained in order to distinguish between the various line items correctly.
From here, you have two choices:
Split the invoice using the total amount
Split the invoice via each individual line item
This selection is done by clicking on which option you prefer
In order for the Auto Accounting feature to function, certain data and information must be configured. To assist in this process or to let you know what configuration you are missing, we have created a “Validate Setup” button which is located as shown below.
Once pressed, DocBits will run a check of your environment to see if everything is correctly configured.
A menu that will look as follows will appear
All items with the green check mark in front of them mean that they are configured and working, the above image should only be used as an example and should not be followed item by item for your environment. This is due to each user having their own set of accounts, dimensions, and dimension options as categorized above.
Splitting Amounts
This is done by clicking on the following icon next to the total amount or specific line item
Once you select the splitting icon, a new menu will appear underneath the selected item
Accounts
The first block of the new menu gives you access to a dropdown list where you can select an account/department from your pre configured accounts/departments which you would like to split the amount between. DocBits will group similar account types together, making it easier to find certain types of accounts or accounts related to one another.
Amounts
The second block allows you to manually type in the respective amounts for which the parent amount will be split into.
Percentage Split
The third and final block allows you to manually enter the percentage split you would like the parent amount to be split into, the amount is automatically set to 50% when entering the splitting menu but can be changed to suit your preferences. If you enter a percentage value in the block, the amount will automatically be calculated in the second block.
Keep in mind that the new amount will only be calculated once you press the ‘Enter key’ on your keyboard and that the other percentage(s) are not altered by this change, this can result in amounts that do not add up to the parent amount. For this reason, we have created an “Unsettled amount” counter in this menu which is discussed later.
Other Features
Add Row
A plus icon next to the splitting icon, this can be used in situations where an amount needs to be split between more than two accounts/departments.
Delete Row
A trash can icon that is used to delete unwanted or incorrect rows
Unsettled Amount
An “Unsettled amount” indicator at the bottom in case of any unaccounted value or amount outstanding from the parent amount.
Once you have validated and exported a document, sign in to INFOR. From the Home page of LN, navigate to Financials → Process Payables → Process Payables Workbench.
Press the following icon to view the individual line items of the invoice.
Here you can confirm the line items with what you exported using auto accounting.
Z panelu sterowania wybierz Ustawienia.
Przetwarzanie dokumentów → Moduł
Następnie aktywuj Portal Dostawcy, włączając suwak.
Po włączeniu funkcji Portalu Dostawcy, nowy obszar Ustawień staje się dostępny. Jeśli przewiniesz na dół listy Ustawień, zobaczysz następujące.
W tej sekcji uzyskasz dostęp do następujących opcji.
Tutaj możesz zarządzać wszystkimi dostawcami, grupując ich, co ułatwia zarządzanie wszystkimi dostawcami. Użytkownicy mogą być również przypisani do różnych grup dostawców, które tworzysz w tej sekcji.
Aby ułatwić zarządzanie wszystkimi dostawcami, w tej sekcji możesz tworzyć grupy i przypisywać dostawców do tych grup na podstawie ich lokalizacji geograficznej, rodzaju dostawcy itp. Wybór należy do Ciebie!
Aby utworzyć nową grupę dostawców, kliknij przycisk +Nowa w prawym górnym rogu ekranu.
Następnie po prostu nadaj tej grupie nazwę, która dokładnie opisuje dostawców, którzy zostaną przypisani do tej grupy.
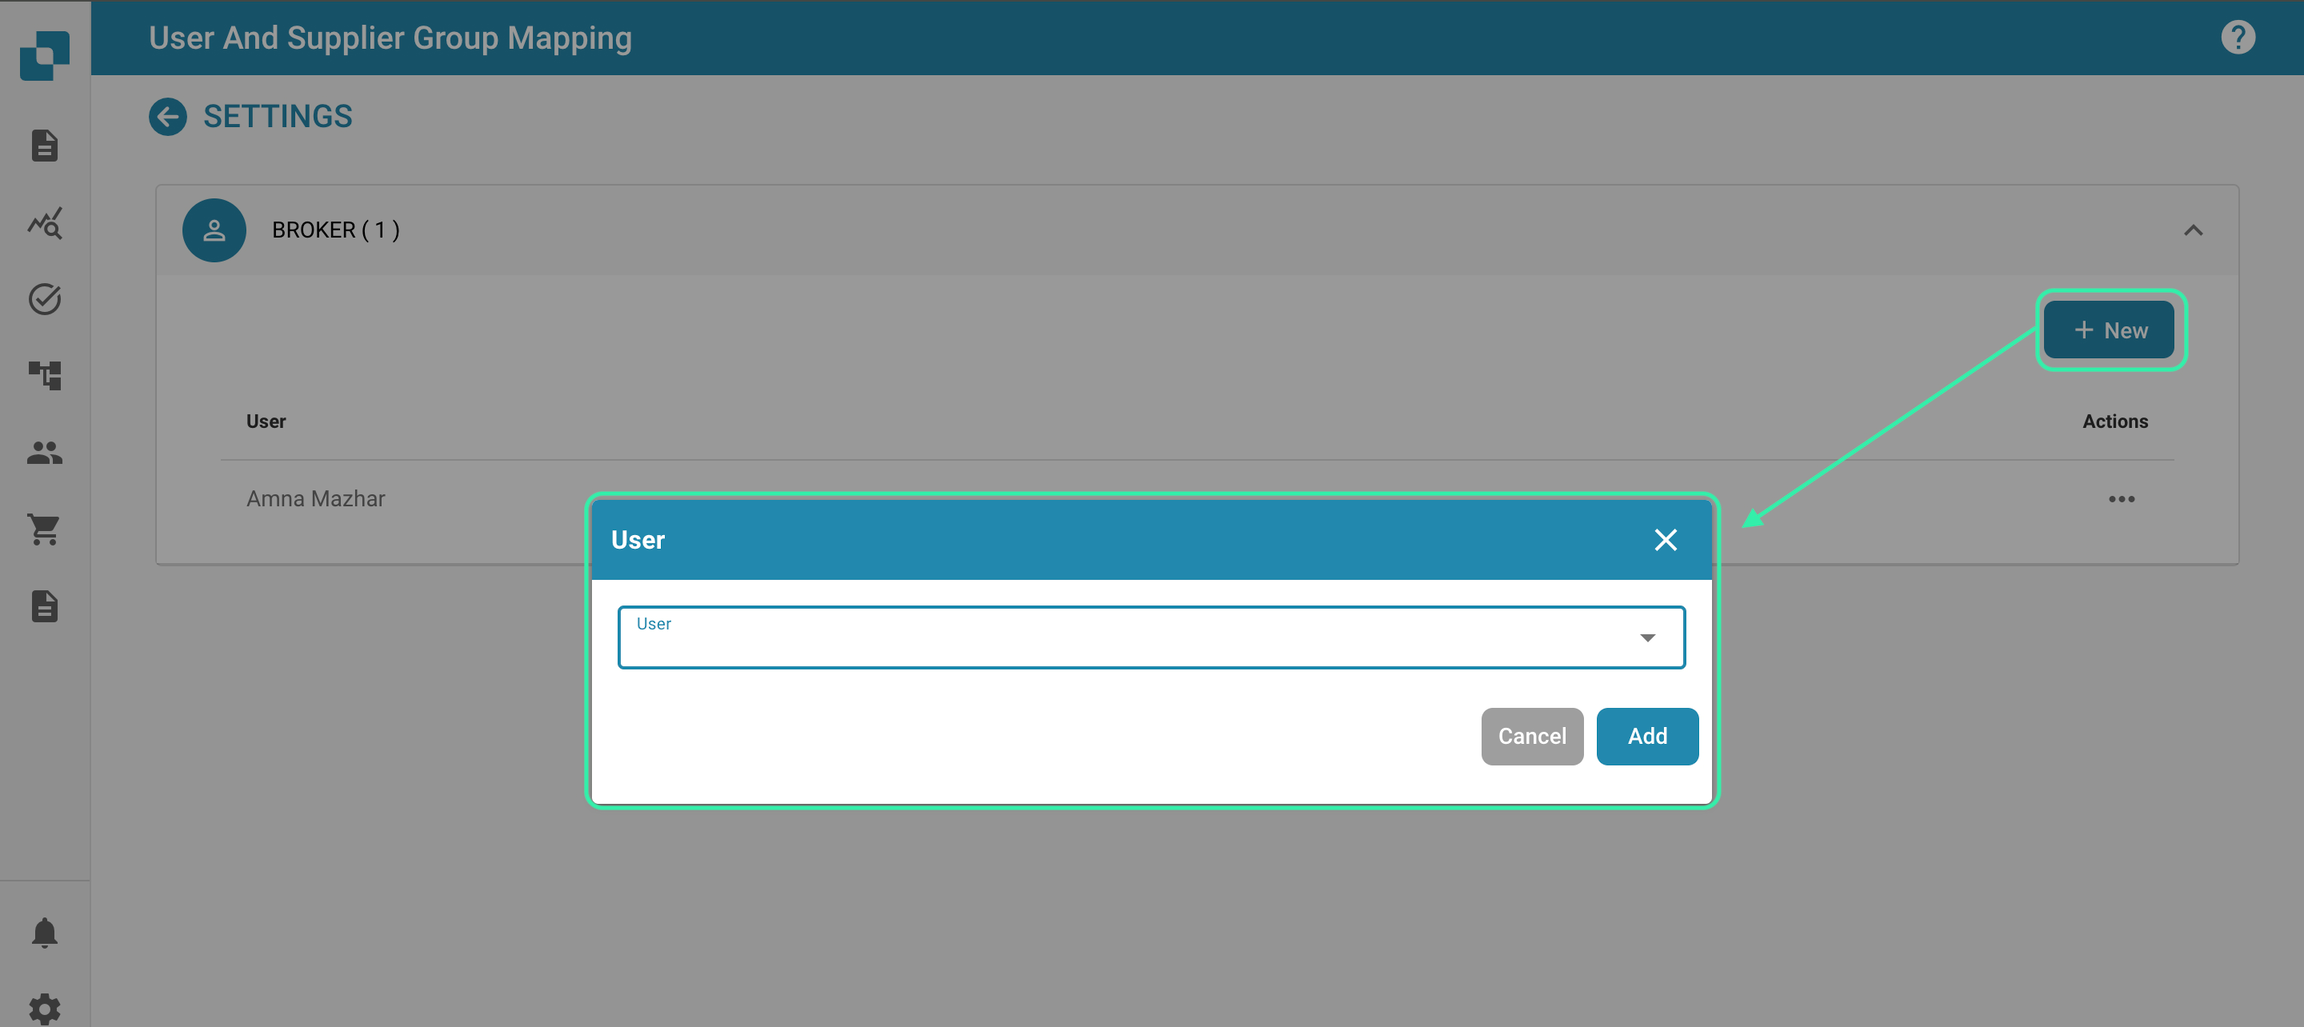
Wszystkie grupy dostawców, które utworzyłeś, będą tutaj wyświetlane, ponieważ tutaj możesz przypisywać użytkowników DocBits do grup dostawców, które tworzysz.
Aby przypisać nowego użytkownika do grupy dostawców, kliknij przycisk +Nowa i wybierz użytkownika, którego chcesz przypisać.
Wybierz użytkownika, którego chcesz przypisać do grupy dostawców z rozwijanej listy, a następnie kliknij Dodaj, aby przypisać tego użytkownika.
Tutaj możesz przesłać swoją politykę i oświadczenie o prywatności dla dostawców, których zaprosisz za pośrednictwem portalu dostawcy. Aby przesłać dokument, po prostu kliknij Prześlij dokument w prawym górnym rogu ekranu.
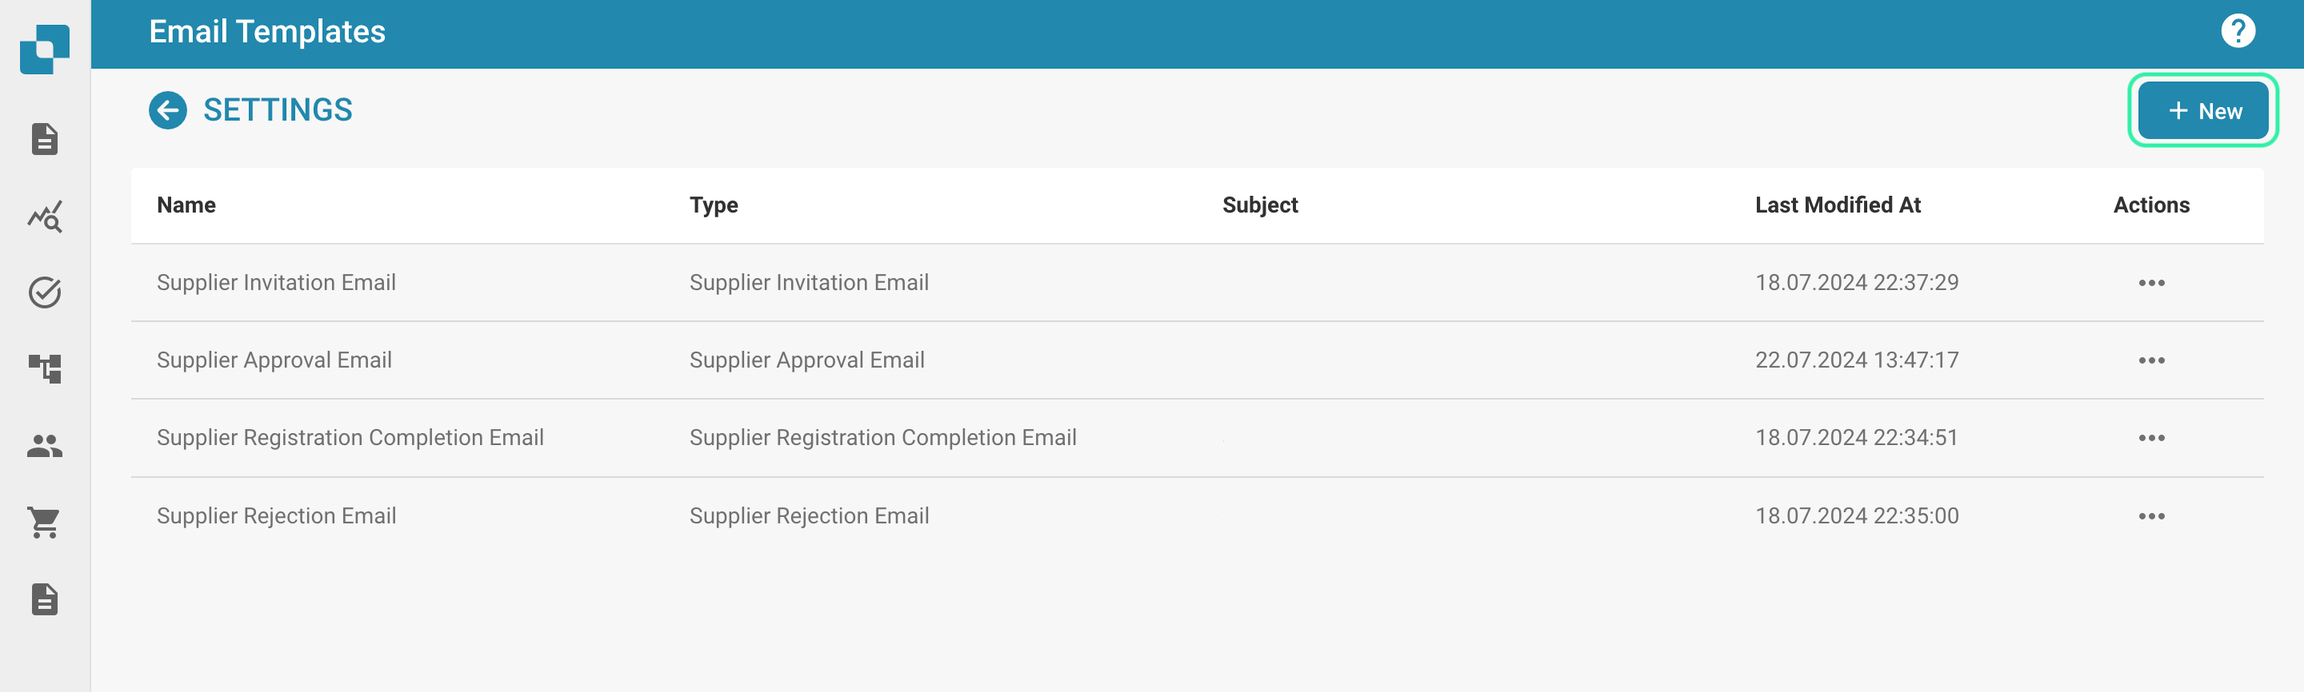
W tej sekcji możesz przesłać różne szablony e-mail, ponieważ będą one stanowić strukturę e-maili otrzymywanych przez dostawcę, gdy zapraszasz go do dołączenia do portalu dostawcy. Wymagane szablony obejmują: zaproszenie, zatwierdzenie, zakończenie rejestracji i odrzucenie, ponieważ są to wszystkie możliwe e-maile, które dostawca może otrzymać. Aby przesłać szablon, kliknij +Nowa.
Możesz dostosować układ formularza rejestracyjnego, który zobaczą dostawcy, których zapraszasz do rejestracji w portalu dostawcy. Oznacza to, że możesz dodawać lub usuwać pola w zależności od wymagań dotyczących dostawców, których zapraszasz. Kreator układów dostawcy działa dokładnie tak samo jak kreator układów typów dokumentów, aby uzyskać więcej informacji na ten temat, kliknij tutaj.
Poniżej możesz zobaczyć, że możesz skonfigurować wiele układów w zależności od swoich potrzeb.
W ramach układu możesz dodać listy rozwijane, które można utworzyć za pomocą funkcji Lista wartości.
Tylko wartości, które istnieją w INFOR, mogą być używane w tych listach, aby eksport działał. W przykładzie pokazanym powyżej, wartości wybieralne dla pola „Grupa dostawców” istnieją wszystkie w INFOR. Ta sama zasada dotyczy wszystkich list, niezależnie od tego, czy chodzi o warunki płatności, waluty itp. Aby zapewnić brak problemów podczas eksportu, najpierw skonsultuj się z wartościami przechowywanymi w INFOR przed skonfigurowaniem tych list.
Tutaj możesz przesłać swoje logo firmy lub alternatywne, które będzie wyświetlane w nagłówku wszystkich szablonów e-mail wysyłanych, a także na ekranie logowania DocBits, gdy dostawcy rozpoczną proces rejestracji. Jeśli pozostawisz to pole puste, zostanie wyświetlone standardowe logo DocBits.
Dodatkowe pola zaproszenia Portalu Dostawcy: Ta opcja umożliwia dodanie dodatkowych pól do zaproszenia, które wysyłasz do dostawców, lista dostępnych pól jest pokazana poniżej.
Prześlij tutaj swój plik API ION oraz plik mapowania IDM, a plik mapowania M3 zostanie wygenerowany po prawej stronie.