Loading...
Loading...
Loading...
Loading...
Loading...
Loading...
Loading...
Loading...
Here are some reasons why this is important:
Data Integrity:
Proper configuration of fields ensures that the data entered into the system is correct and meets the required standards.
This helps to avoid errors and inaccuracies that could lead to incorrect analysis or decisions.
Data Consistency:
Consistent field configuration ensures that data is captured in a uniform manner, making it easier to compare and analyze.
For example, if a field for date inputs is incorrectly configured to allow different date formats, this can lead to confusion and inconsistencies.
Data Validation:
Configuring fields allows validation rules to be set to ensure that only valid data can be entered. This helps to detect errors early and improve data quality.
Data processing efficiency:
Accurate configuration of fields enables efficient data processing as systems are better able to understand and process the data. This improves efficiency in data extraction, transformation, and loading (ETL).
Data security:
Proper configuration of fields can also help ensure the security of data, for example by encrypting or masking sensitive information.
Overall, accurate configuration of fields in DocBits is critical to ensure data quality, consistency, integrity, and security. It helps organizations make informed decisions by accessing reliable and accurate data.
Here are instructions for using the Force Validation and Match Value settings to improve data integrity and recognition accuracy in a document processing system:
This setting allows you to set rules that check whether the data entered meets certain criteria.
To set this up:
Go to the settings of the field in question.
Enable the Force Validation option.
Define the validation rules to check. These can be, for example, numeric limits, regular expressions for text fields, or relationships to other fields.
Impact:
Enforcing validation rules helps detect errors early and improves data quality. Users are prompted to enter correct data, which increases the integrity of the database.
This setting allows you to match the entered value against a predefined reference value.
To set this up:
Navigate to the field's settings.
Enable the Match Value option.
Enter the reference value to compare the entered value against.
Impact:
Setting a match value allows you to ensure that the entered data matches a known standard or predefined norm. This is especially useful when you want to ensure that the data is consistent and meets certain criteria.
Using these settings can improve data integrity and recognition accuracy in your document processing system.
You ensure that only correct and valid data is captured, increasing the quality of your database and improving the reliability of your analytics and reports.
Analyze your document workflow thoroughly to identify the different phases and steps a document goes through, from capture to processing to storage or release.
Identify the specific data that needs to be captured, reviewed, processed, or extracted at each step of the workflow.
Determine the key data that is critical to your business process or analysis.
Prioritize fields according to their importance to the business process or analysis to ensure they are captured and processed correctly.
Match field properties to specific data requirements, including their type (text, date, numeric, etc.), validation rules, and any required properties such as required or read-only.
Also consider security requirements, privacy regulations, and legal requirements when configuring field properties.
Design the fields to be flexible and extensible to accommodate future customizations or changes in document workflow or data requirements.
Make sure the configuration of the fields allows new data points or changed requirements to be easily and efficiently incorporated.
Perform extensive testing to ensure that the configured fields work correctly and produce the expected results.
Validate the field configuration by processing a large number of documents and verifying that the data captured meets the requirements.
By understanding the document workflow and data requirements and applying best practices in field configuration, you can ensure that your document processing system functions efficiently and accurately. This will help improve the quality of your data, optimize workflow, and increase the overall performance of your business.
Here is advice for troubleshooting common problems in a document processing system, including fields not capturing data correctly, OCR errors, and validation rule issues:
Check the configuration of the field in question to ensure the correct field type is being used and that all required properties are set correctly.
Make sure users have the correct instructions to enter data correctly into the field, and provide training or guidelines if necessary.
If the problem persists, run tests to verify whether the problem is systemic or only occurs with certain inputs. This can help you more accurately determine the cause of the problem.
Check the quality of the scanned documents, including the readability of the text and any distortion or blurring.
Adjust the OCR settings, including the language, text recognition algorithm, and other parameters, to improve accuracy. Perform OCR preview or test runs to check the performance of the OCR system and identify potential sources of errors.
If OCR errors persist, you may want to consider implementing an advanced OCR system or looking into external OCR services.
Review the configuration of validation rules to make sure they are set up correctly and meet the desired criteria.
Make sure validation rules are not too restrictive and that they carefully consider the actual data.
Run tests to make sure validation rules work as expected and check that they respond appropriately to unexpected data or edge cases.
Provide users with guidance and error messages to alert them to any validation errors and help them enter the correct data.
By systematically reviewing and troubleshooting these common issues, you can improve the performance and accuracy of your document processing system and ensure that it runs smoothly and efficiently.
Log in and access Document Management:
Add a new field:
Click the "Create Field" option.
Basic Configuration:
Enter a name for the field and set other basic properties, such as whether it is required or whether it should be visible when editing.
Select Field Type:
Select the type of new field, such as text, date, dropdown, checkbox, etc.
Advanced Configuration:
Here you can set other properties such as validation rules, match values, read-only mode, hiding, and OCR settings.
Save:
After you have made all the necessary configurations, click "Save" or a similar button to create the new field.
Access field editing:
Navigate to the list of existing fields and find the field you want to edit.
Select a field:
Click the appropriate field to access the editing options.
Change the configuration:
Change the properties of the field as needed. This may include changing the name, the field type, adding or removing validation rules, setting match values, or adjusting other advanced settings.
Save:
Click "Save" to save the changes you made to the field.
By providing steps to add new fields and edit existing fields, as well as access to advanced configuration options, you can maximize the flexibility and adaptability of your document processing system. This allows you to structure and process your data exactly as you need it.
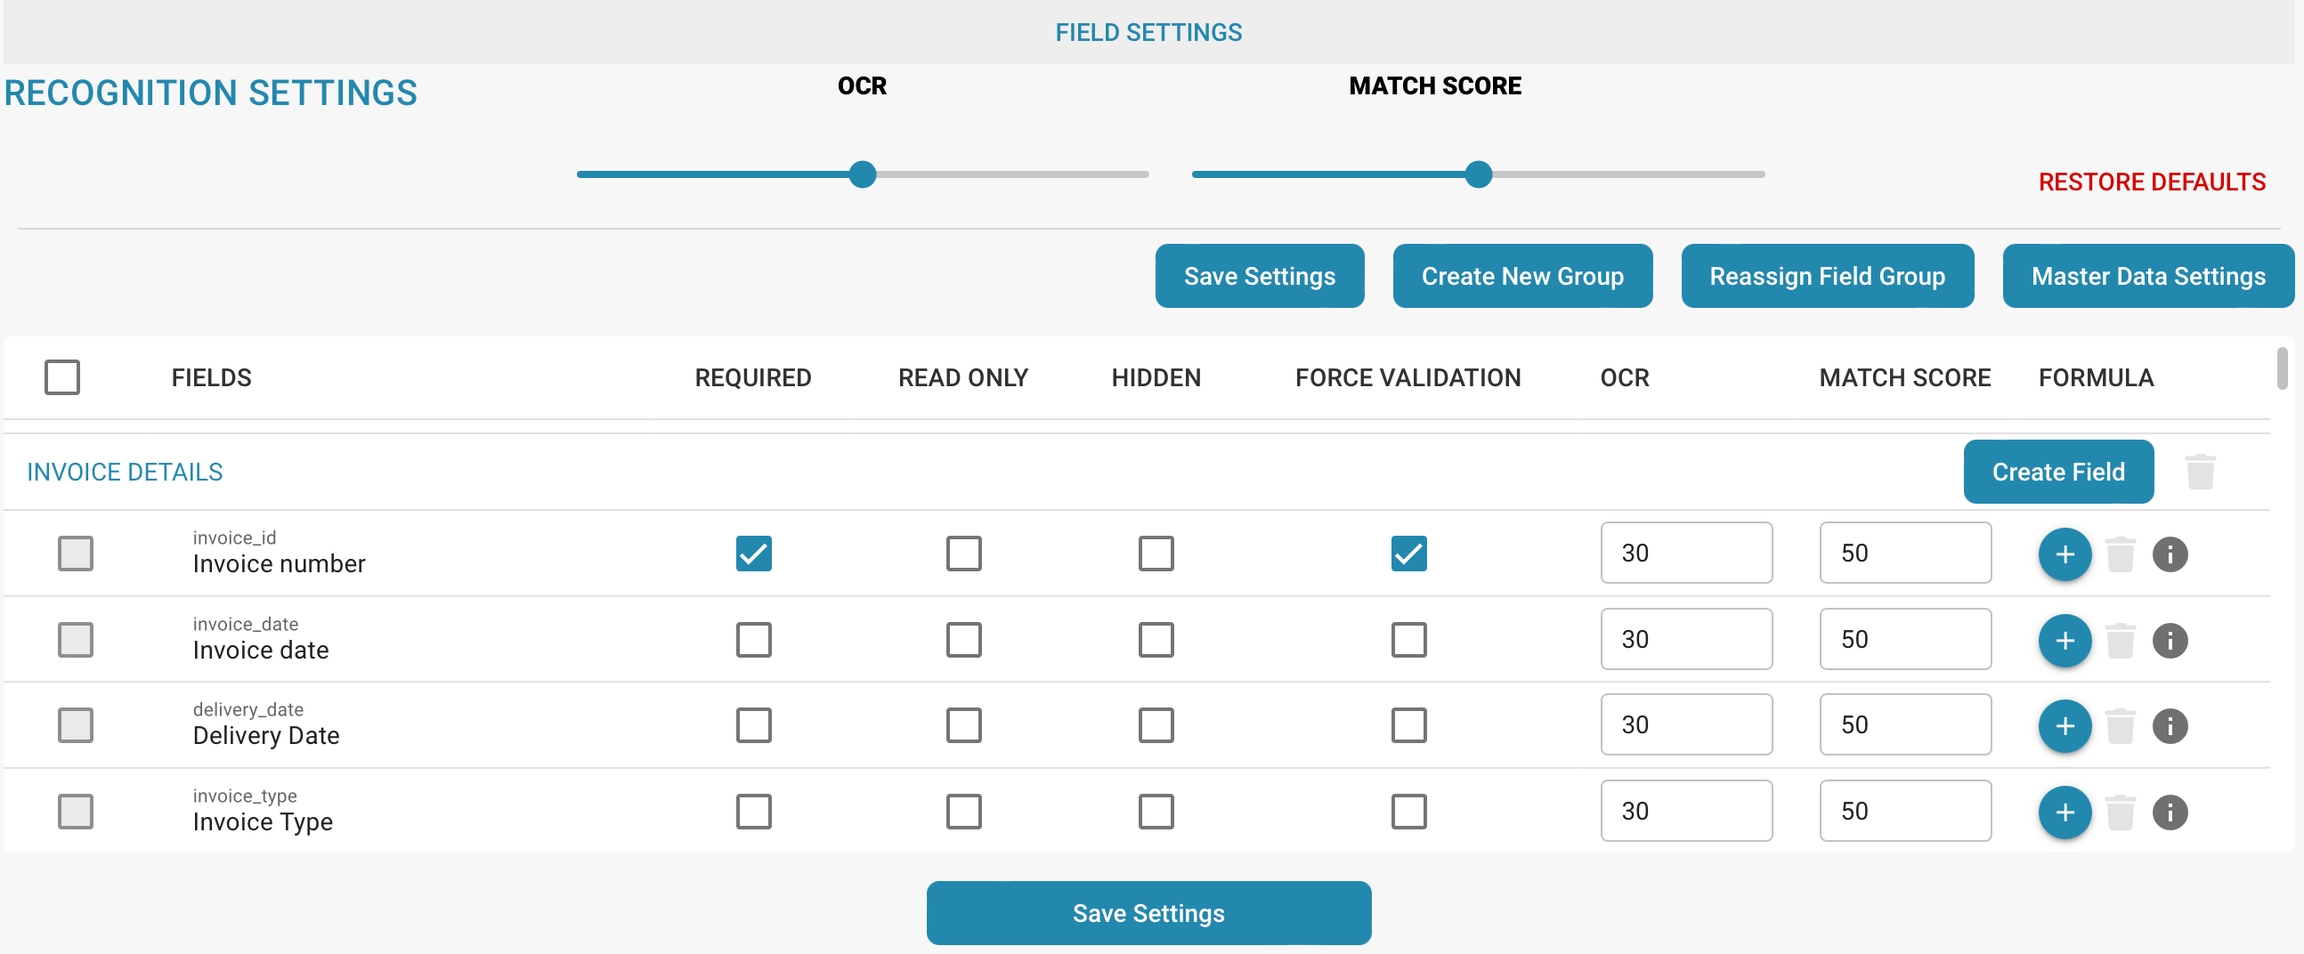
1. Navigate to Fields:
• From the main dashboard, click on the “Fields” option located in the sidebar.
• This will open the Field Settings page where you can manage document types and recognition settings.
2. Select Document Type:
• Under the “DOCUMENT TYPES” section, select the specific document type you wish to add or modify a field for.
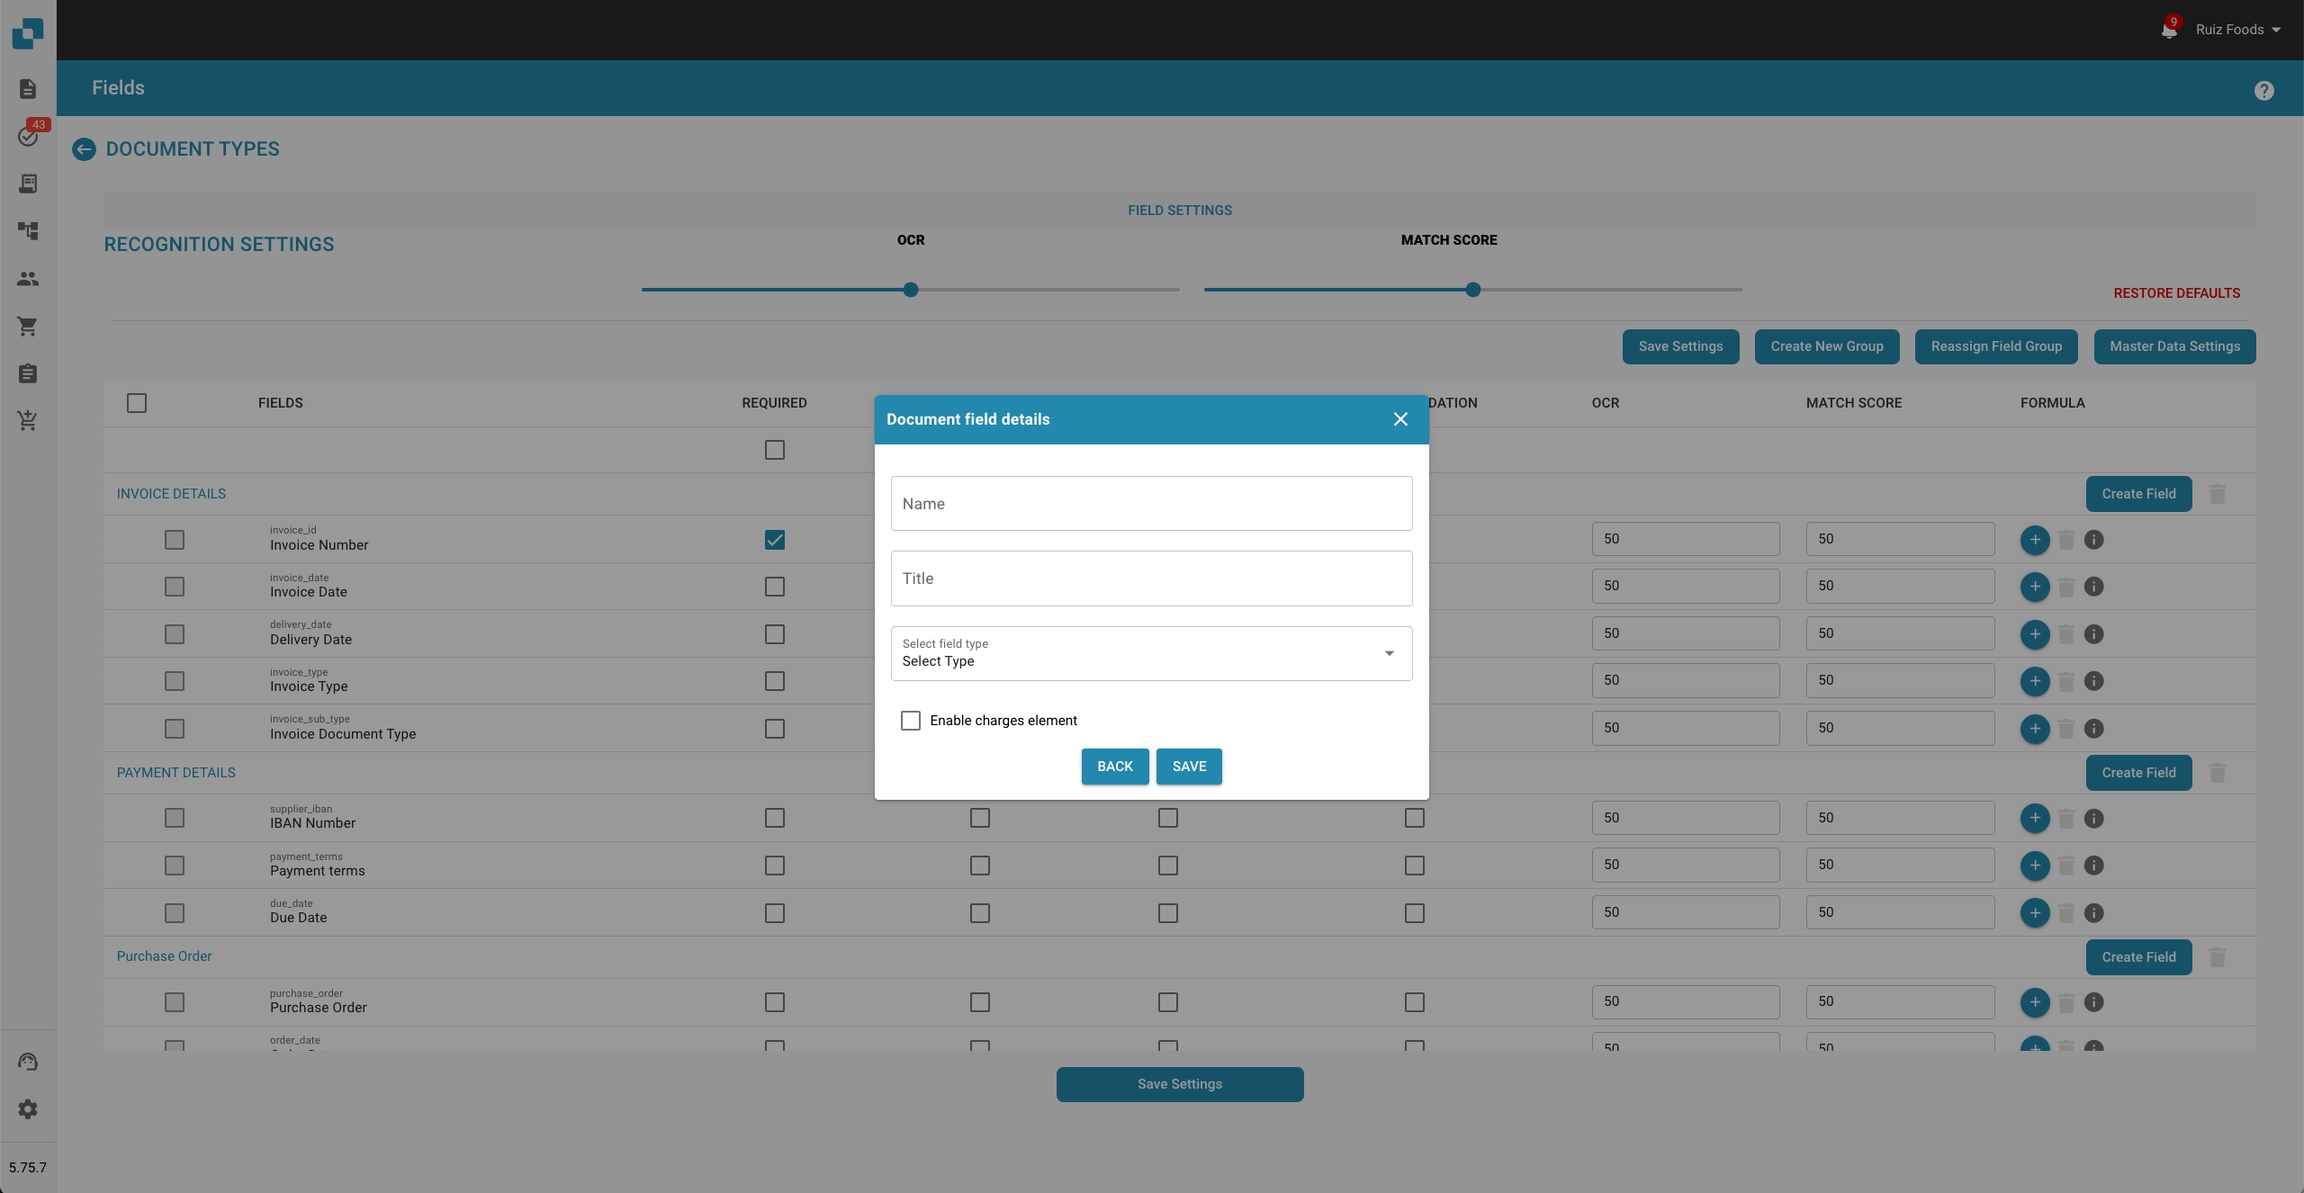
1. Open the Add Field Dialog:
• Click on the “Create Field” button located in the respective section (e.g., Invoice Details, Payment Details, Purchase Order).
2. Enter Field Details:
• A dialog box titled “Document field details” will appear.
• Fill in the required details:
• Name: Enter the name of the new field.
• Title: Enter a descriptive title for the field.
• Select field type: Choose the appropriate field type from the dropdown menu.
3. Enable Charges Element:
• If this field is associated with a charge, check the “Enable charges element” box.
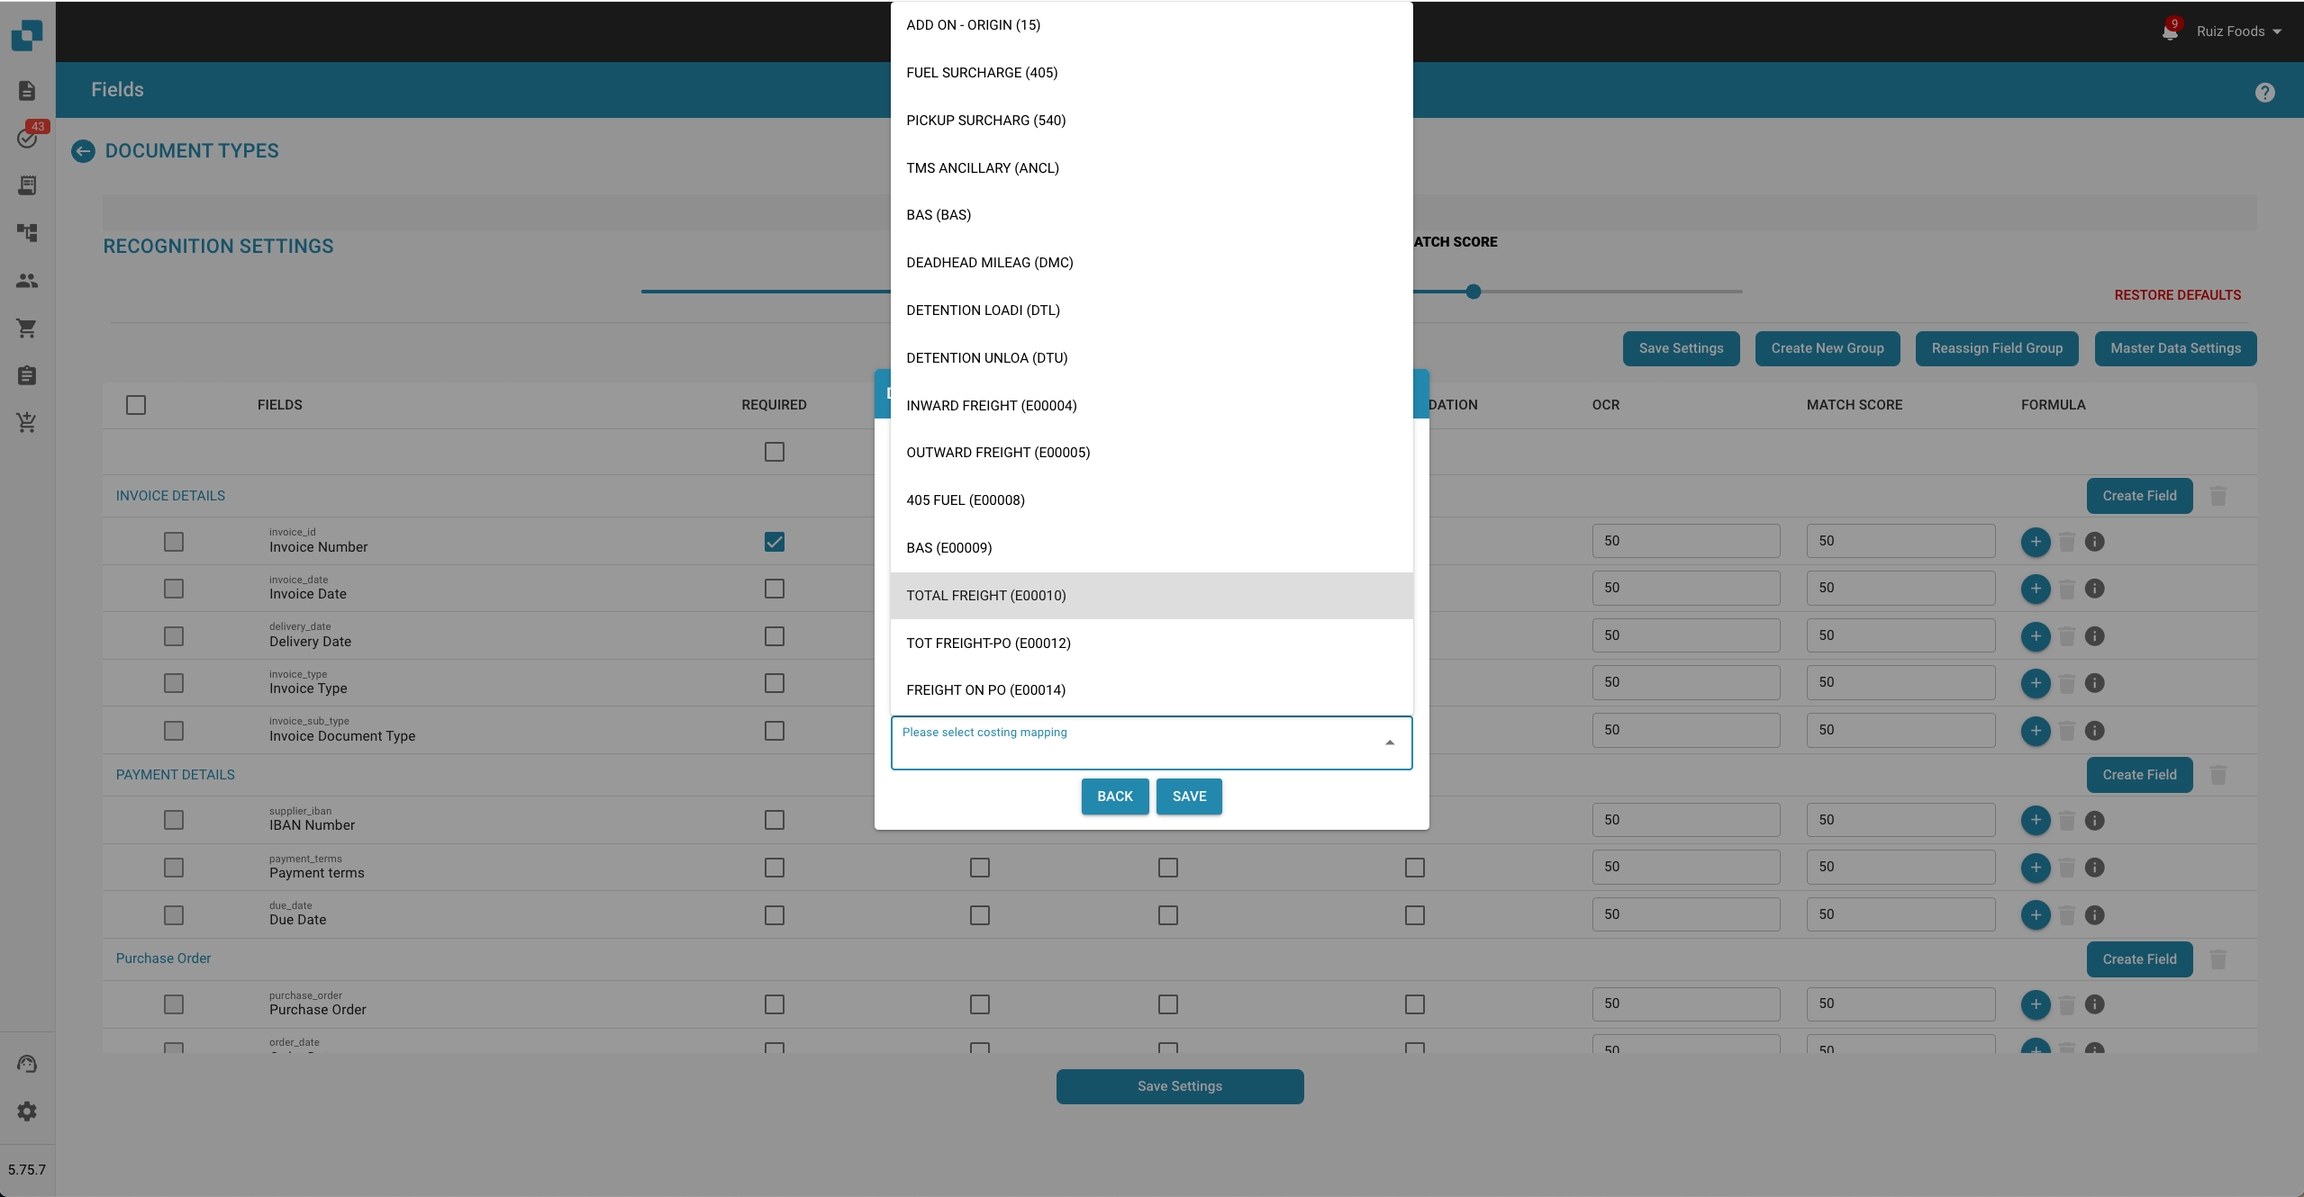
4. Select Costing Mapping:
• Upon enabling charges, a dropdown menu will appear.
• Select the appropriate charge type from the list (e.g., ADD ON - ORIGIN, FUEL SURCHARGE, TOTAL FREIGHT).
1. Save Settings:
• Click the “SAVE” button to add the new field with the specified charge mapping.
• If you need to make changes, click the “BACK” button to return to the previous screen.
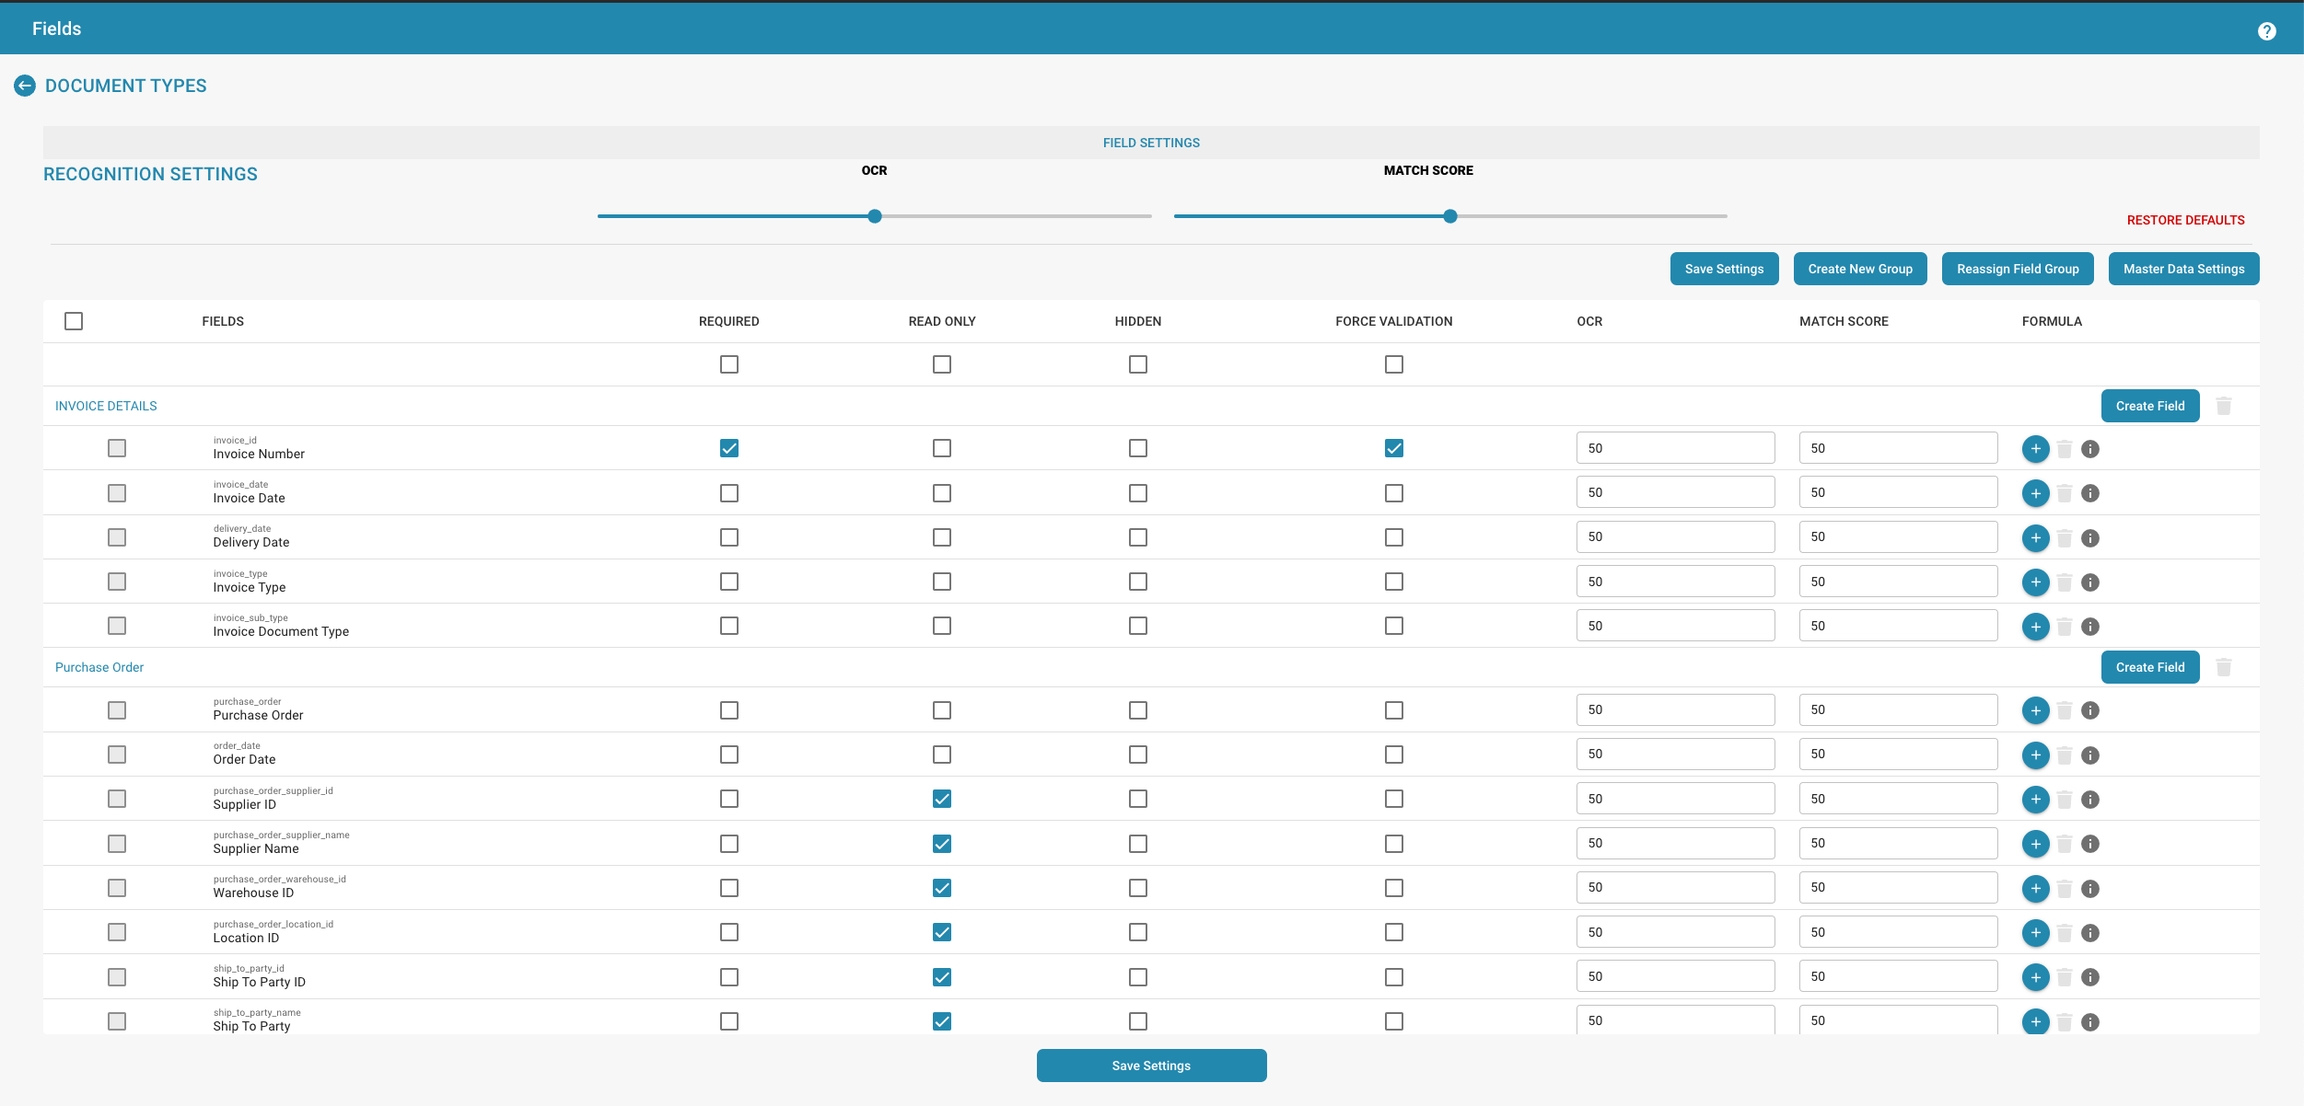
2. Finalize Field Creation:
• After saving, the new field will appear in the list under the specified document type.
• Ensure that the OCR and Match Score settings are configured as needed for accurate recognition.
3. Complete the Setup:
• Once all desired fields are added and configured, click the “Save Settings” button at the bottom of the Field Settings page to apply your changes.
• Required Fields:
• If a field is mandatory, check the “REQUIRED” box next to the field name.
• Editing Existing Fields:
• To edit an existing field, click on the field name, update the details, and save the changes.
• Reassign Field Group:
• Use the “Reassign Field Group” option to change the grouping of fields if necessary.
• Master Data Settings:
• For advanced configuration, access the “Master Data Settings” to manage overall field and document type settings.
If a field is marked as Required, it means that this field must be filled in before the document can be saved or processed.
To set this property:
Navigate to the field's settings in your DocBits system.
Enable the Required option for the relevant field.
Impact:
This setting ensures that important information is captured and that no documents can be processed without the required data.
If a field is marked as Read Only, it means that users can view the contents of this field, but cannot make any changes to it.
To set this property:
Go to the Field Options. Enable the Read Only option for the desired field.
Impact:
This setting can be useful to protect sensitive information or to ensure that important data is not accidentally changed.
If a field is marked as "Hidden", it means that the field will be hidden in the user interface and users will not be able to see or access it.
To set this property:
Go to the field options.
Enable the "Hidden" option for the corresponding field.
Impact:
This setting is often used to hide internal or technical fields that are irrelevant to the end user or are only needed for internal processing.
If a field is configured for OCR, it means that the system will try to extract the text from the document and insert it into this field. This setting is usually used for fields that are intended to be auto-filled.
To set this up:
Enable the OCR option for the corresponding field.
If necessary, configure the OCR parameters such as language, font, etc.
Impact:
Using OCR allows documents to be processed automatically by extracting information from texts and entering it into the appropriate fields, reducing manual effort and increasing efficiency.
Configure the validation rules accordingly, such as numeric limits, regular expressions, or relationships with other fields.
To set this up:
Save the changes.
Impact:
Forced validation checks the entered data against the specified criteria to ensure it is valid. This helps to detect errors early and improve data quality.
By comparing input data with reference data, the Match Score can help confirm the accuracy and validity of the data. If the Match Score exceeds a certain threshold, the match is considered successful.
To set this up:
Enable the Match Score option and set the desired threshold.
Save the changes.
Impact:
The Match Score is used to evaluate the accuracy of matches between input data and reference values. If the score obtained exceeds the set threshold, the match is considered successful. This is especially useful for fields that require data validation or data matching, such as fields with a name, email address, or e-mail address. B. when checking customer data.
By carefully configuring these field properties, you can optimize document processing workflows and ensure that your data is correctly captured, protected, and processed efficiently.
De instellingen voor Velden bieden een gebruikersinterface waar beheerders de eigenschappen en het gedrag van individuele gegevensvelden die aan een documenttype zijn gekoppeld, kunnen beheren. Elk veld kan worden aangepast om de nauwkeurigheid en efficiëntie van gegevensinvoer en validatie te optimaliseren.
Configuratie van Velden:
Veldnamen: Lijst met de namen van de velden, die doorgaans overeenkomen met de gegevenselementen binnen het document, zoals "Factuurnummer" of "Inkoopordernummer".
Verplicht: Beheerders kunnen velden als verplicht markeren, zodat ervoor gezorgd wordt dat gegevens moeten worden ingevoerd of vastgelegd voor deze velden om de documentverwerking te voltooien.
Alleen-lezen: Velden kunnen als alleen-lezen worden ingesteld om wijziging na gegevensinvoer of tijdens bepaalde fasen van documentverwerking te voorkomen.
Verborgen: Velden kunnen uit het zicht in de gebruikersinterface worden verborgen, nuttig voor gevoelige informatie of om gebruikersworkflows te vereenvoudigen.
Geavanceerde Instellingen:
Dwing Validatie af: Zorgt ervoor dat gegevens die in een veld worden ingevoerd voldoen aan bepaalde validatieregels voordat ze worden geaccepteerd.
OCR (Optische Karakterherkenning): Deze schakelaar kan worden ingeschakeld om OCR-verwerking voor een specifiek veld mogelijk te maken, nuttig voor geautomatiseerde gegevensextractie uit gescande of digitale documenten.
Overeenkomstscores: Beheerders kunnen een overeenkomstscores definiëren, een drempel die wordt gebruikt om het vertrouwensniveau van gegevensherkenning of -overeenstemming te bepalen, wat van invloed is op hoe gegevensvalidatie en kwaliteitscontroles worden uitgevoerd.
Actieknoppen:
Nieuw Veld Aanmaken: Maakt het mogelijk om nieuwe velden aan het documenttype toe te voegen.
Bewerkpictogrammen: Elk veld heeft een bewerkpictogram waarmee beheerders de veldspecifieke instellingen verder kunnen configureren, zoals gegevenstype, standaardwaarden of verbonden bedrijfslogica.
Instellingen Opslaan: Bevestigt de aangebrachte wijzigingen in de veldconfiguraties.