Loading...
Loading...
Loading...
Loading...
Loading...
Loading...
Loading...
Loading...
Loading...
Loading...
Loading...
The role of an administrator is crucial for managing IT systems, networks and digital platforms in an organization. An administrator has advanced permissions and responsibilities that allow them to control various aspects of the technical infrastructure and ensure that it is operated efficiently and securely. Here are some of the main responsibilities of an administrator:
User management: Administrators manage user accounts, access rights and permissions. They create new user accounts, assign them the necessary permissions and manage access control to ensure that only authorized users can access certain resources.
Security: Administrators are responsible for the security of IT systems to protect against data loss and unauthorized access.
Troubleshooting and support: The administrator is often the first point of contact for technical issues. They help users troubleshoot and resolve problems and ensure that the system is running smoothly.
In addition to these responsibilities, administrators are also tasked with managing sensitive settings and ensuring that systems meet compliance requirements and information security best practices. This includes managing sensitive data, configuring access controls and permissions, and monitoring and analyzing system logs to identify and address potential security risks.
Security is an essential aspect of any organization, especially when it comes to managing user accounts and access rights. Here are some best practices to maintain a secure user management protocol:
Regular password updates: Encourage users to update their passwords regularly to keep their accounts secure. Establish password complexity policies and require the use of strong passwords that include a combination of letters, numbers, and special characters.
Monitor administrator actions: Implement mechanisms to monitor administrator activities to detect suspicious or unusual activity. Log all administrator actions, including access to sensitive data or settings, to ensure accountability and identify potential security breaches.
Limit the number of administrators: Reduce the number of administrators to a minimum and grant administrative privileges only to those who really need them. By limiting the number of administrators, you minimize the risk of security breaches and make it easier to manage and monitor user accounts.
Zwei-Faktor-Authentifizierung (2FA): Implementieren Sie eine Zwei-Faktor-Authentifizierung für Administratorkonten, um die Sicherheit zusätzlich zu erhöhen. Dadurch wird ein zusätzlicher Sicherheitsschritt eingeführt, der sicherstellt, dass selbst bei Kompromittierung eines Kennworts ein Angreifer keinen unbefugten Zugriff auf das Konto erhält.
Regelmäßige Sicherheitsüberprüfungen: Führen Sie regelmäßige Sicherheitsüberprüfungen und Audits durch, um potenzielle Sicherheitslücken oder Schwachstellen zu identifizieren und zu beheben. Überprüfen Sie die Zugriffsrechte und Berechtigungen von Benutzerkonten, um sicherzustellen, dass sie den aktuellen Anforderungen und Best Practices entsprechen.
Training and awareness: Regularly train employees and administrators on security best practices and awareness of phishing attacks and other cyber threats. Make them aware of the importance of security and encourage them to report suspicious activity.
By implementing these best practices, organizations can improve the security of their user management protocol and minimize the risk of security breaches and data loss. It is important to view security as an ongoing process and make regular updates and adjustments to keep up with ever-changing threats and security requirements.
Het creëren van suborganisaties binnen een documentbeheersysteem dient om de structuur en het beheer van gebruikersaccounts, documenten en workflows binnen een organisatie verder te organiseren en te differentiëren. Hier zijn enkele doeleinden en voordelen van het creëren van suborganisaties:
Structurering en organisatie: Suborganisaties maken het mogelijk om een hiërarchische structuur binnen het documentbeheersysteem te creëren. Dit kan helpen om gebruikersaccounts en documenten te organiseren op basis van afdeling, team, locatie of andere relevante criteria voor duidelijker en efficiënter beheer.
Beheer van rechten: Door suborganisaties te creëren, kunnen beheerders gedetailleerde rechten en toegangscontroles instellen voor verschillende groepen gebruikers. Dit betekent dat specifieke gebruikers of groepen alleen toegang hebben tot de documenten en middelen die relevant zijn voor hun respectieve suborganisatie, wat de beveiliging en privacy verbetert.
Workflows en samenwerking: Suborganisaties kunnen samenwerking en communicatie binnen specifieke teams of afdelingen vergemakkelijken door toegang tot gedeelde documenten, projecten of taken te centraliseren. Dit bevordert efficiëntie en coördinatie bij het samenwerken aan gemeenschappelijke projecten of workflows.
Rapportage en analyse: Door gebruikersaccounts en documenten in suborganisaties te organiseren, kunnen gedetailleerde rapporten en analyses worden gemaakt over de activiteiten en prestaties van individuele teams of afdelingen. Dit stelt beheerders en managers in staat om inzicht te krijgen in het gebruik van het documentbeheersysteem op organisatieniveau.
Schaalbaarheid en flexibiliteit: Suborganisaties bieden een schaalbare structuur die kan meegroeien met de groei en veranderingen van de organisatie. Nieuwe teams of afdelingen kunnen eenvoudig worden toegevoegd en op de juiste manier worden geïntegreerd in het bestaande suborganisatieschema zonder de algehele structuur van het documentbeheersysteem te beïnvloeden.
Over het algemeen stellen suborganisaties in staat tot een effectievere beheer en organisatie van gebruikersaccounts, documenten en workflows binnen een documentbeheersysteem door de structuur, beveiliging en samenwerking te verbeteren.
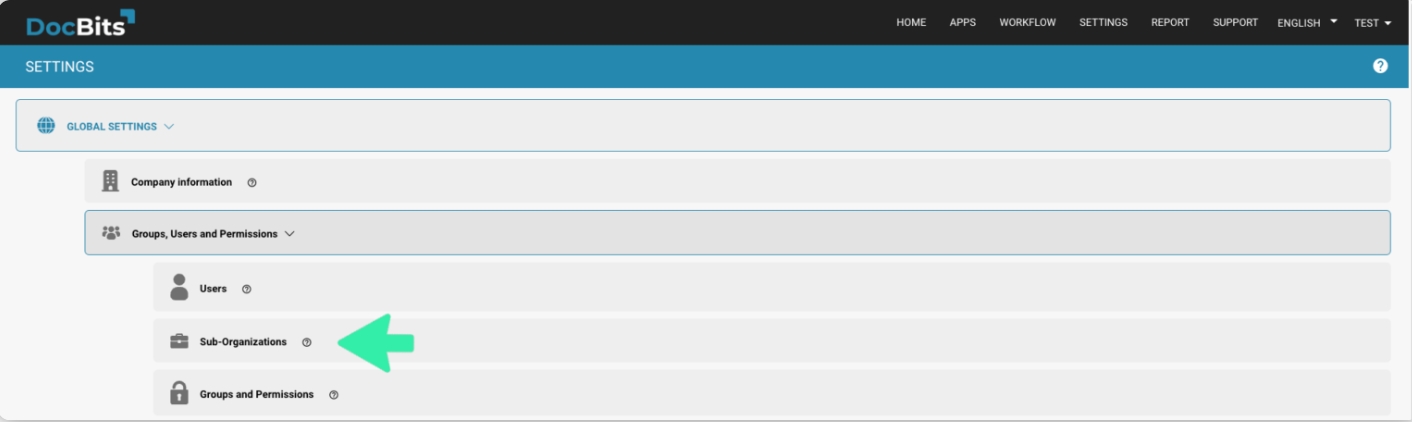
Ga naar Instellingen, Globale Instellingen → Groepen, Gebruikers en Rechten → Suborganisaties zoals hieronder weergegeven.
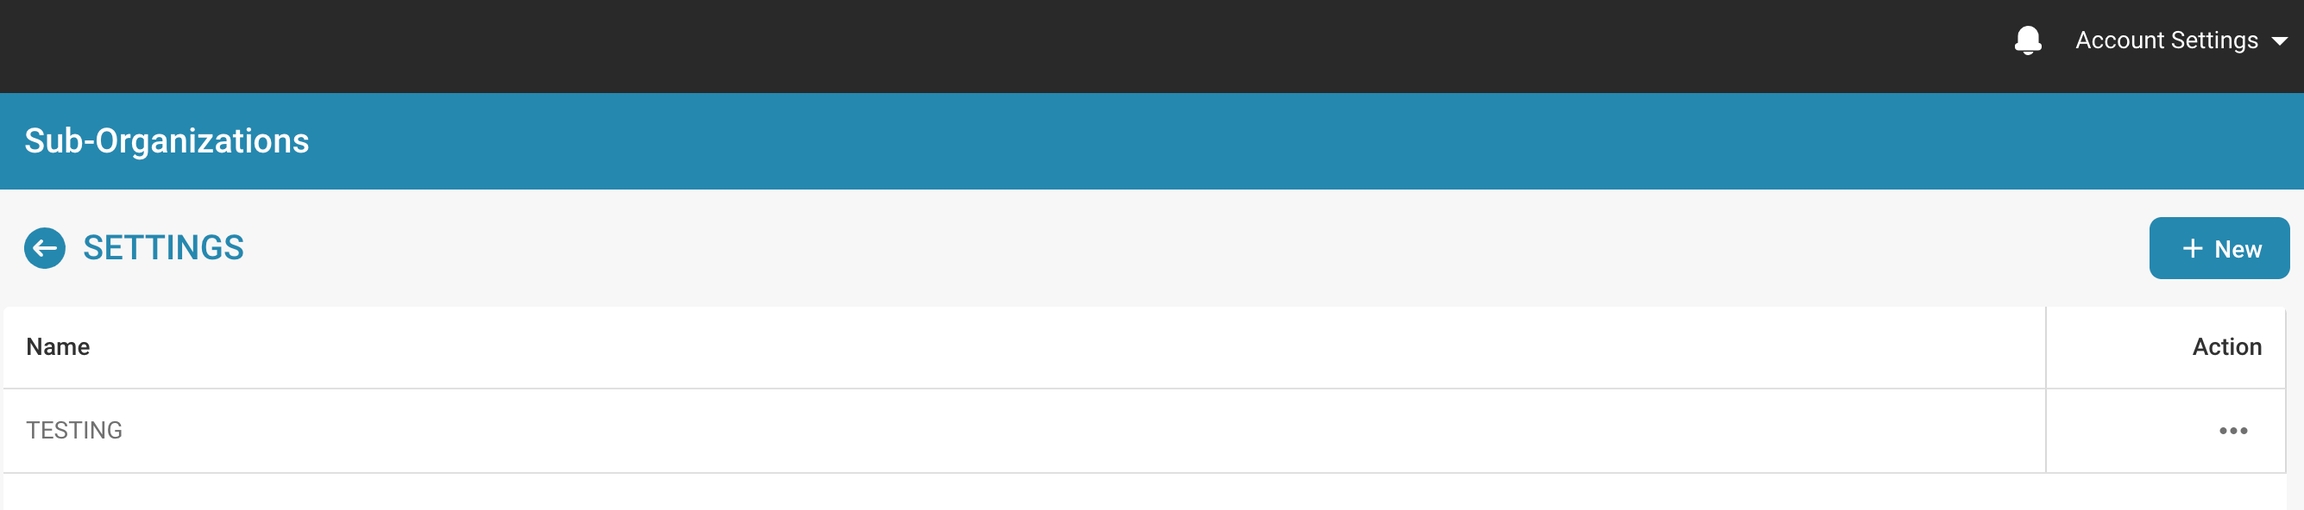
U wordt vervolgens naar een pagina geleid die er ongeveer zo uitziet:
Hier vindt u uw eerder gemaakte suborganisaties, evenals waar u nieuwe suborganisaties kunt creëren.
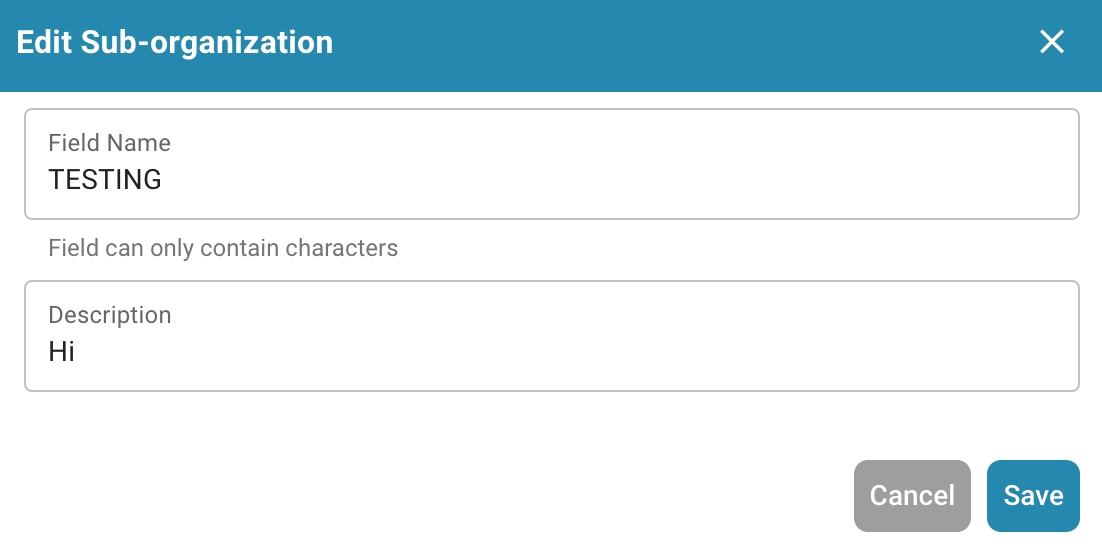
Click on the + NEW button
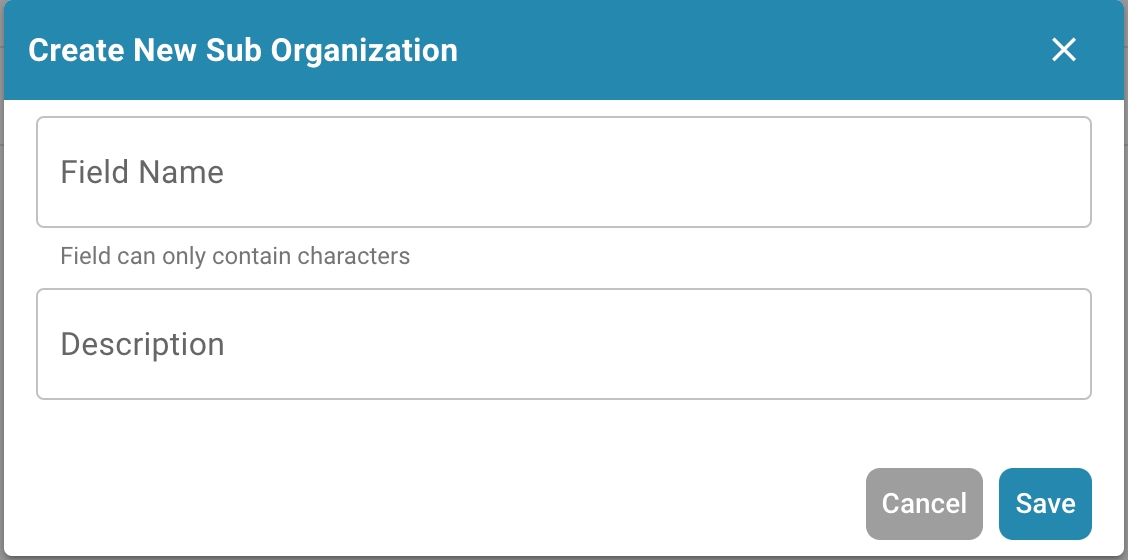
The following menu will be displayed:
Enter the details of the sub-organization you want to create, the name and description, then click on the SAVE button. You should then find your newly created sub-organization at the bottom of the list of existing sub-organizations.
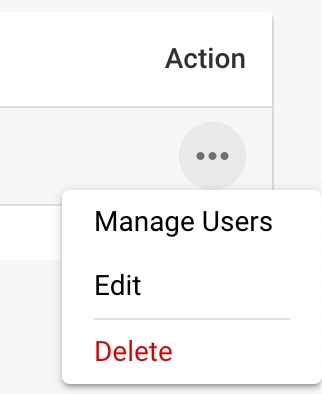
Manage Users:
Adding Users: Administrators can create new user accounts and assign them to the appropriate sub-organization.
Assigning Roles and Permissions: Administrators can set the roles and permissions for users within a suborganization. This typically involves assigning access rights to specific documents, folders or functions in the document management system.
Manage profile details: Administrators can edit profile details of users within the sub-organization, such as: B. Contact information or department affiliation. This allows for updated and accurate management of user data.
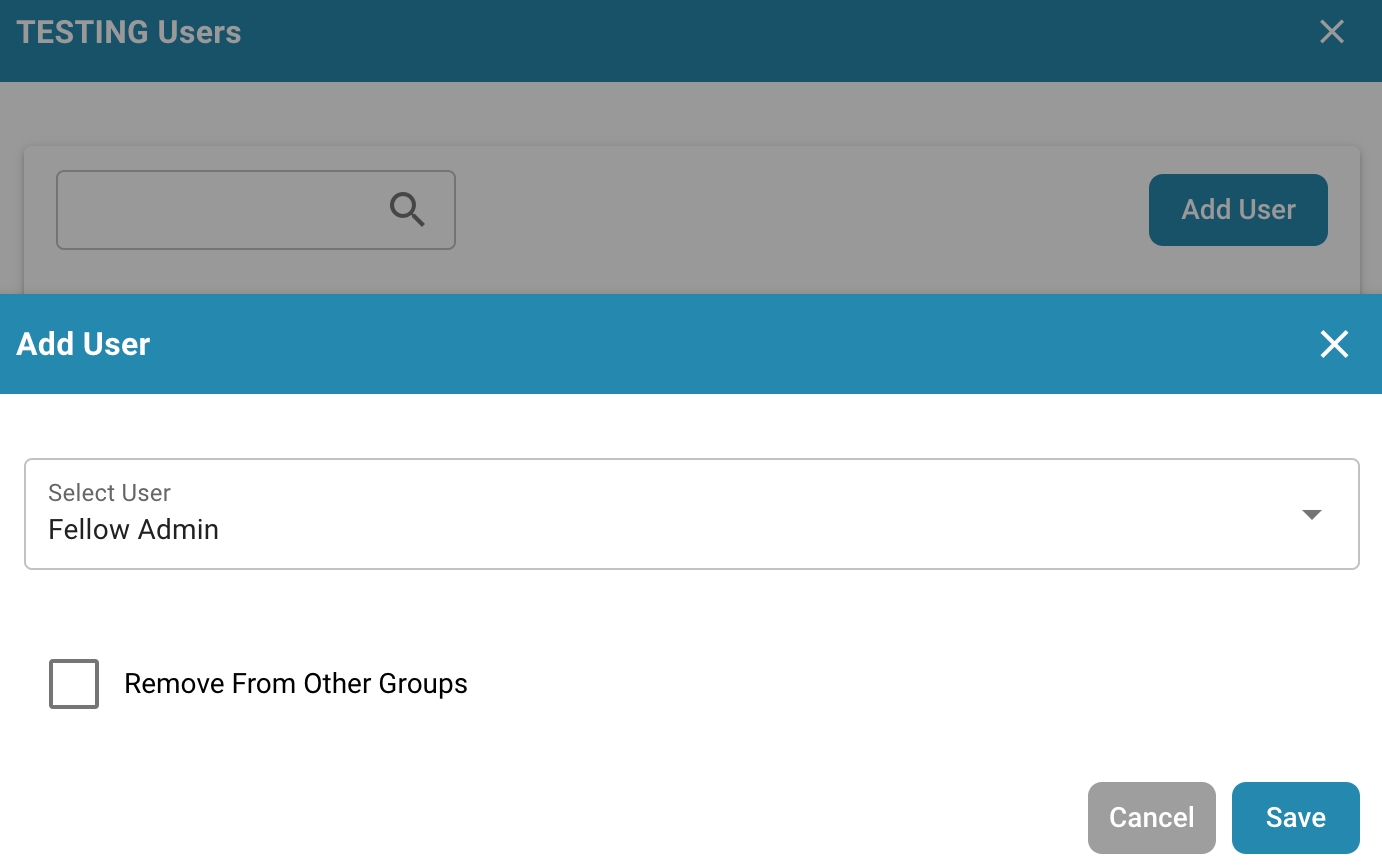
You can add a new user to the organization and have the option of whether to remove the user from other groups.
Edit User:
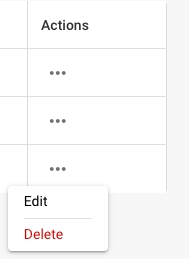
Editing suborganization settings: Administrators can edit the settings and properties of a suborganization, including its name, description, or hierarchy level within the system.
Edit user details: Administrators can edit the details of individual users within a sub-organization, for example to adjust their access rights or update their contact information.
Delete User:
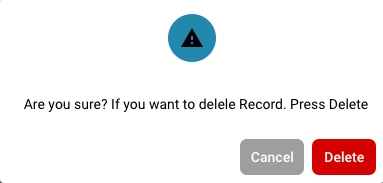
Deleting sub-organizations: Administrators may also have the ability to delete sub-organizations if they are no longer needed or if a restructuring of the organizational structure is required. When deleting a suborganization, administrators must ensure that all users and data associated with it are handled properly.
These management features enable administrators to effectively manage and adapt the user accounts and organizational structures within a document management system to meet the company's changing needs and processes.
Logging in as an administrator: Log in with your administrator privileges.
Accessing user management: Navigate to user settings where you can edit existing users.
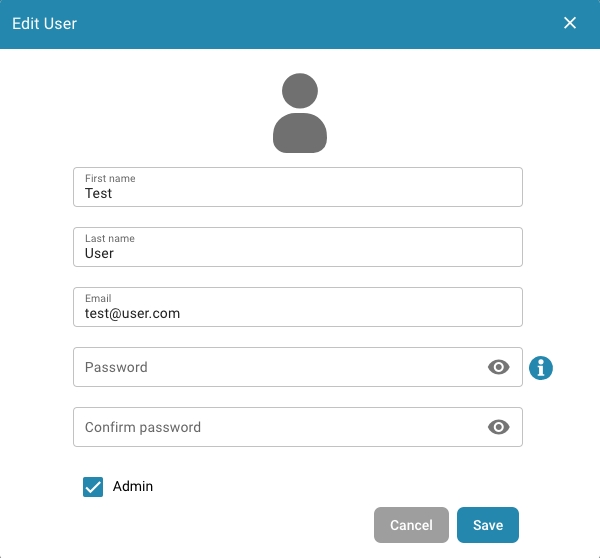
Selecting users: Find and select the user whose details you want to change. This can be done by clicking on the username or an edit button next to the user.
Editing user details: A form will appear containing the user’s current details. Edit the required fields according to the changes you want to make. Typical details to edit include:
First and last name
Email address
User role or permission level
Saving Changes: Review any changes you made and click Save to save the new user details.
Review the impact of role changes: If you changed the user's user role, review the impact of that change on security access levels. Make sure that after the role change, the user has the permissions required to continue performing their duties.
Send notification (optional): You can send a notification to the user to inform them of the changes made.
After completing these steps, the user details are successfully updated and the user has the new information and permissions according to the changes made.
Selecting Users: Find and select the user whose access you want to remove. This can be done by clicking the user name or an edit button next to the user.
Removing Access: Click "delete" to remove the user.
Confirmation: You are asked to confirm the user’s removal.
Optional Notification: You can optionally send a notification to the user to inform them of the removal of their access.
Review Tasks and Documents: Before removing the user, review what tasks or documents are assigned to the user. Move or transfer responsibility for those tasks or documents to another user to make sure nothing gets lost or left unfinished.
Save Changes: Confirm the user’s removal and save the changes.
By following these steps, you can ensure that the user’s access is safely removed while properly managing all relevant tasks and documents.
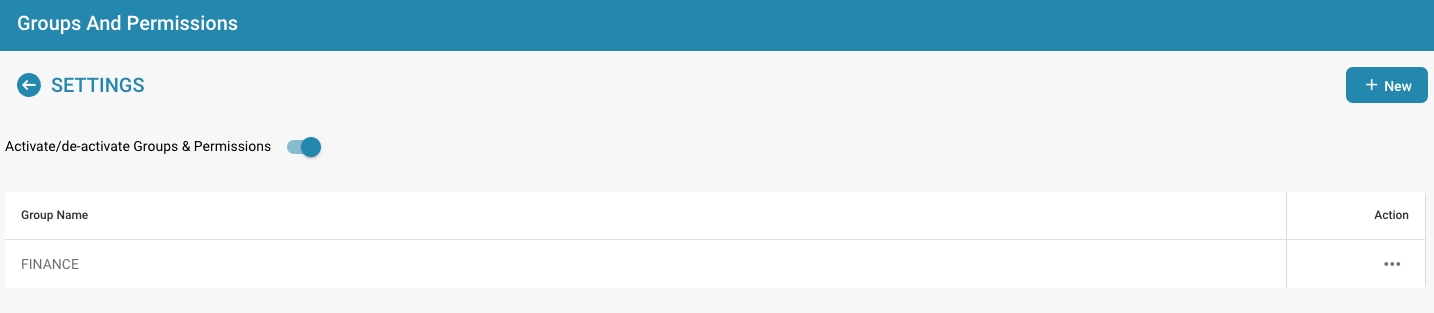
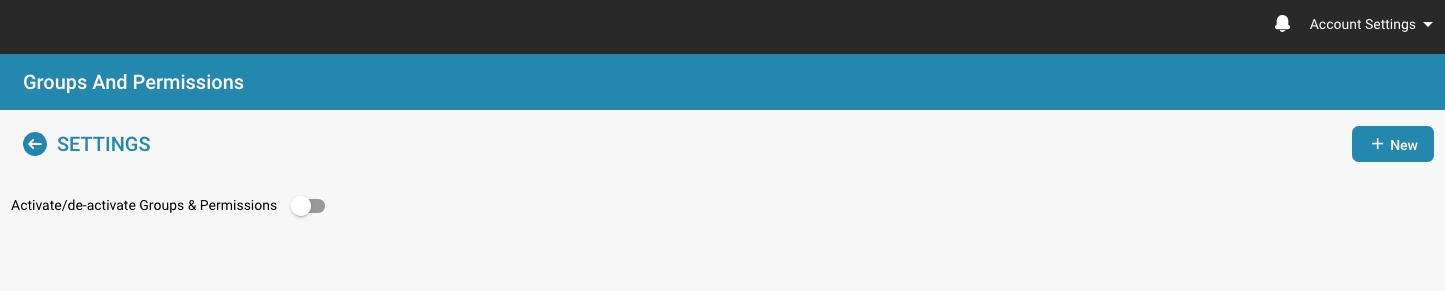
Groepen en Machtigingen Activeren/Deactiveren: Een schakelaar die de systeembeheerder in staat stelt om het gebruik van groepen en machtigingen op het platform in te schakelen of uit te schakelen. Wanneer deze is uitgeschakeld, kan het systeem standaard terugvallen op een minder gedetailleerd toegangscontrolesysteem.
Groepenlijst: Toont de lijst van beschikbare gebruikersgroepen binnen de organisatie. Elke groep kan worden geconfigureerd met specifieke machtigingen. Beheerders kunnen nieuwe groepen toevoegen door op de knop "+ Nieuw" te klikken.
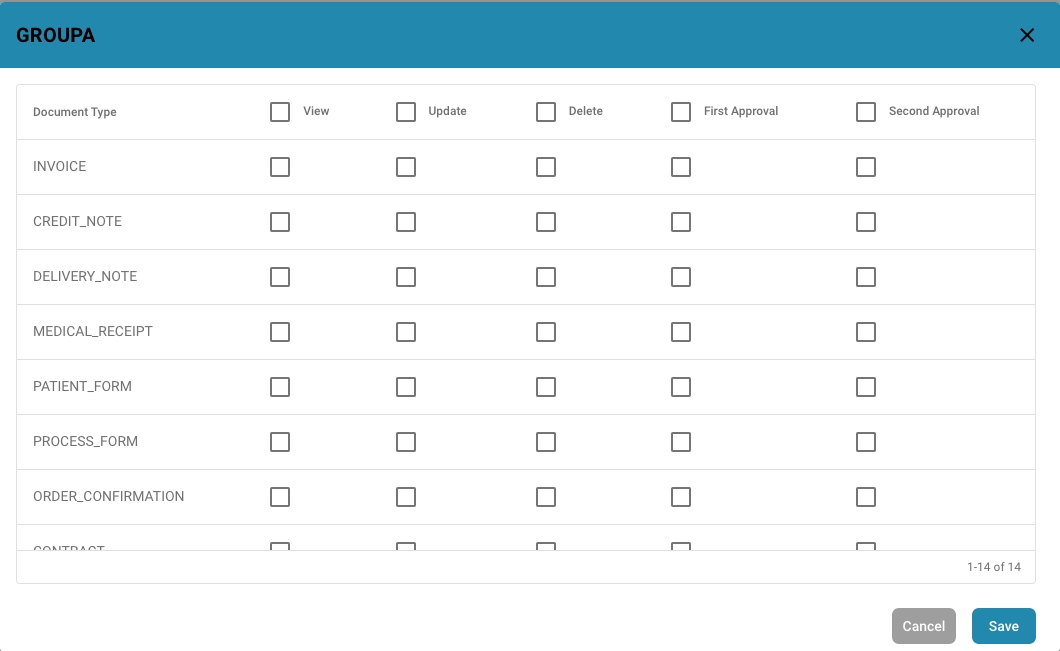
Machtigingentabel:
Wordt weergegeven zodra een groep is geselecteerd of een nieuwe groep wordt geconfigureerd.
Lijst alle documenttypes die door het systeem worden herkend (bijv. FACTUUR, KREDIETNOTA, LEVERINGSCONFIRMATIE).
Voor elk documenttype zijn er selectievakjes voor verschillende machtigingen:
Bekijken: Machtiging om het document te zien.
Bijwerken: Machtiging om het document te wijzigen.
Verwijderen: Machtiging om het document uit het systeem te verwijderen.
Eerste Goedkeuring: Machtiging om de initiële goedkeuring van het document uit te voeren.
Tweede Goedkeuring: Machtiging om een secundaire goedkeuring uit te voeren (indien van toepassing).
Gebruikersinstellingen is een gebied in een systeem waar gebruikers persoonlijke voorkeuren, accountinstellingen en beveiligingsinstellingen kunnen aanpassen. Typisch omvatten gebruikersinstellingen opties zoals wachtwoordwijzigingen, profielinformatie, meldingsvoorkeuren en mogelijk individuele machtigingen om toegang te krijgen tot bepaalde functies of gegevens.
In de meeste organisaties hebben alleen geautoriseerde personen toegang tot gebruikersinstellingen, meestal beheerders of systeembeheerders. Dit komt omdat de instellingen gevoelige informatie kunnen bevatten die de beveiliging van het systeem in gevaar kan brengen als deze door ongeautoriseerde personen worden gewijzigd. Beheerders kunnen gebruikersinstellingen beheren om ervoor te zorgen dat ze voldoen aan de beleidslijnen en vereisten van de organisatie en dat de integriteit van het systeem behouden blijft.
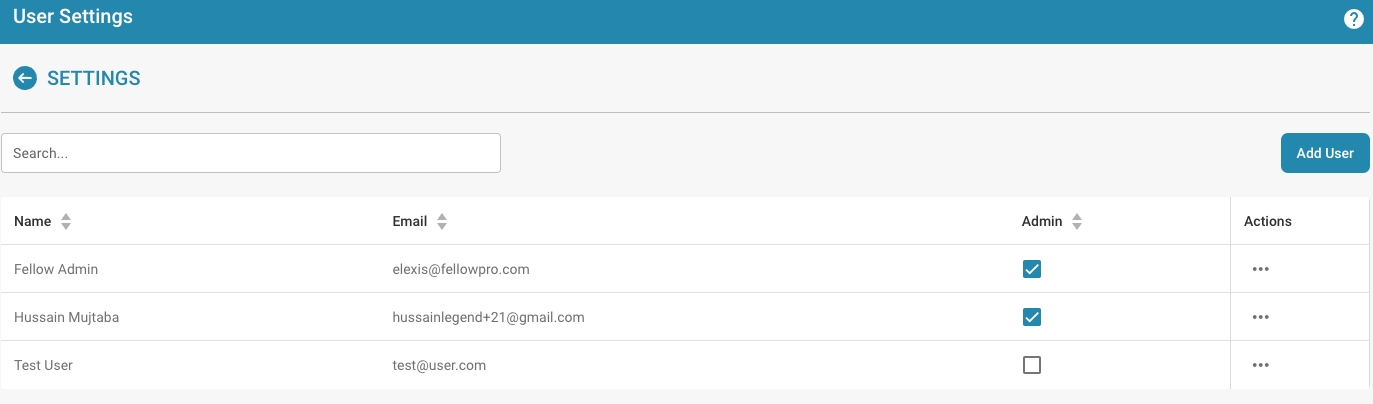
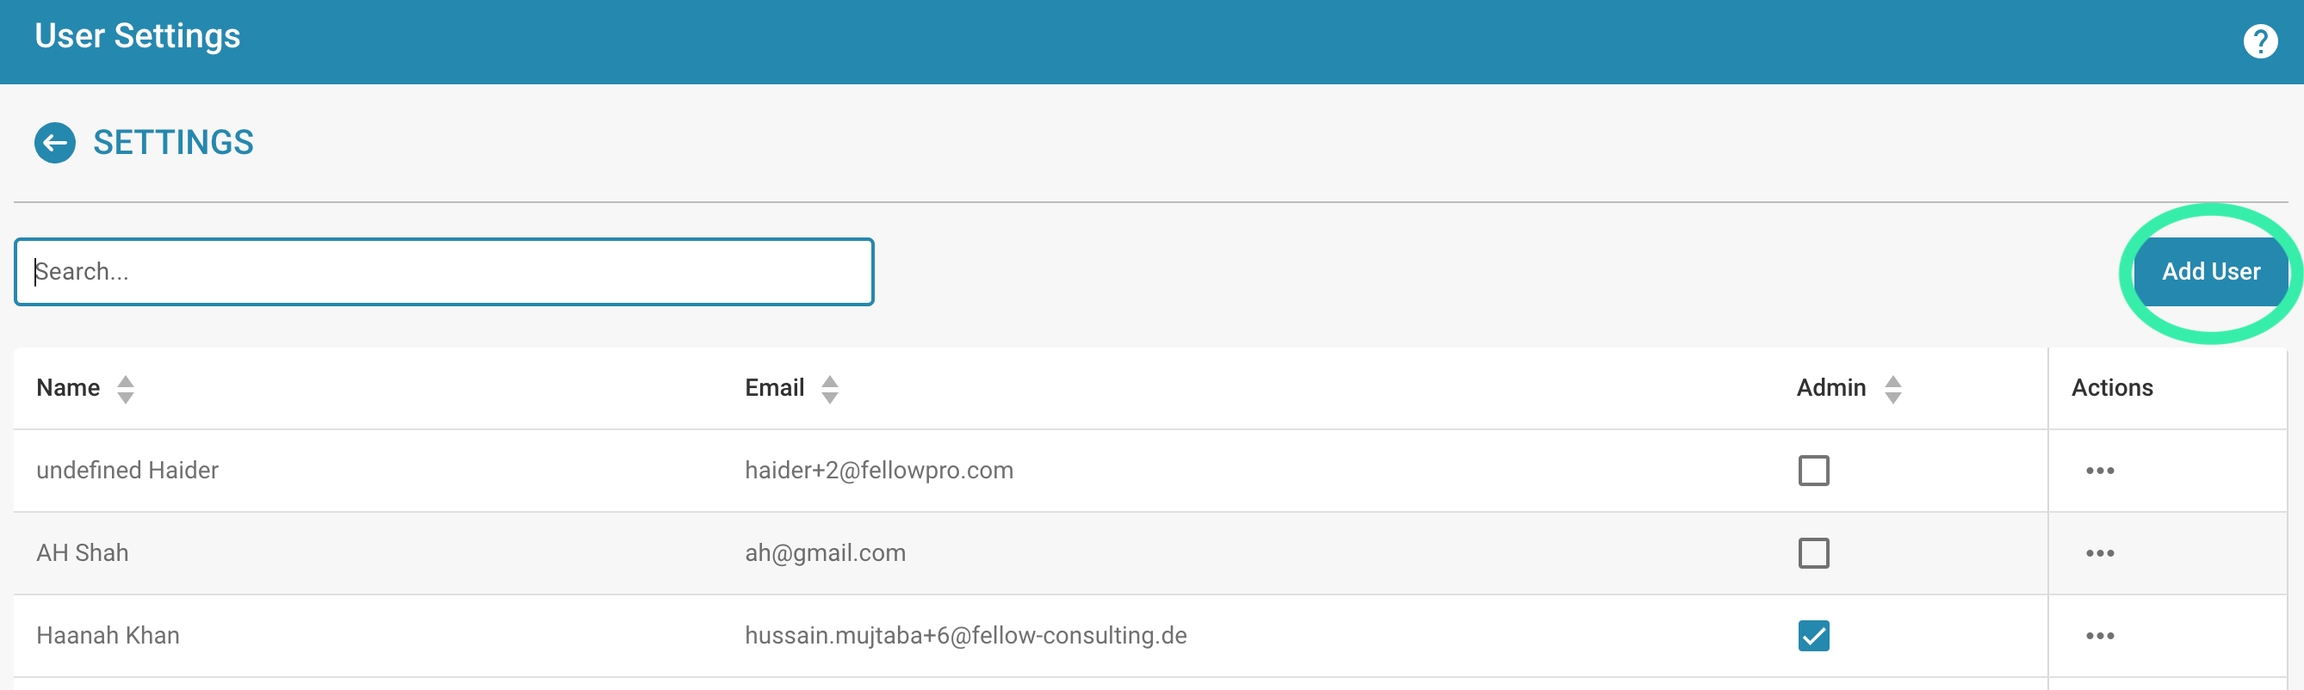
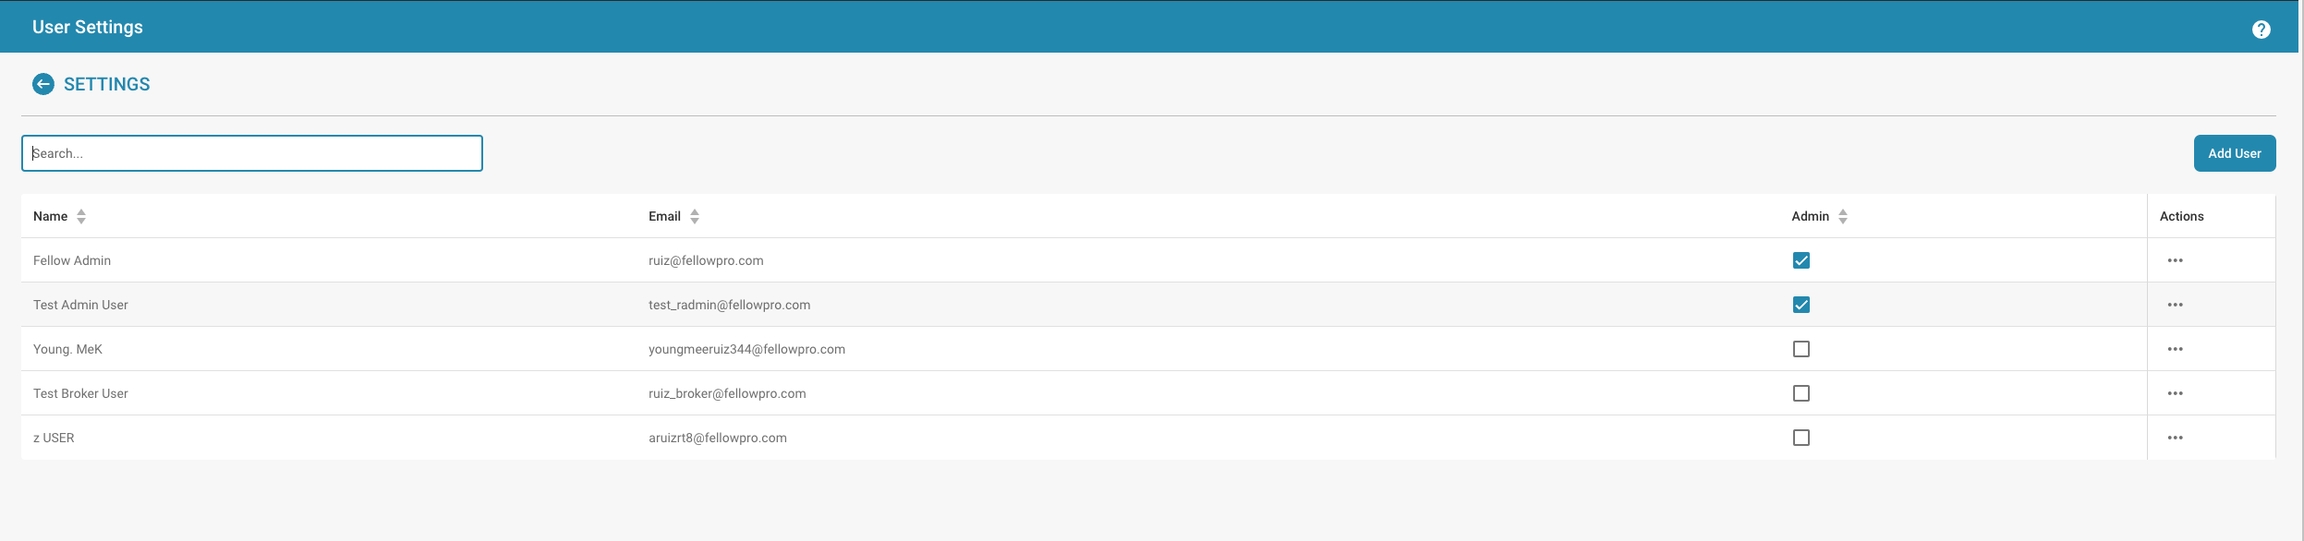
Zoekbalk: Hiermee kunnen beheerders snel gebruikers vinden door naar hun namen of andere details te zoeken.
Gebruikerslijst: Toont een lijst van gebruikers met de volgende kolommen:
Naam: De volledige naam van de gebruiker.
E-mail: Het e-mailadres van de gebruiker, dat waarschijnlijk wordt gebruikt als hun inlogidentificatie.
Beheerder: Een selectievakje dat aangeeft of de gebruiker administratieve bevoegdheden heeft. Beheerders hebben doorgaans toegang tot alle instellingen en kunnen andere gebruikersaccounts beheren.
Acties: Deze kolom bevat doorgaans knoppen of links voor het uitvoeren van acties zoals het bewerken van gebruikersgegevens, het resetten van wachtwoorden of het verwijderen van het gebruikersaccount.
Gebruiker toevoegen-knop: Deze knop wordt gebruikt om nieuwe gebruikersaccounts aan te maken. Door erop te klikken verschijnt doorgaans een formulier waarin je de gegevens van de nieuwe gebruiker kunt invoeren, zoals hun naam, e-mail en of ze beheerdersrechten moeten hebben.
Toegang tot gebruikersbeheer: Navigeer naar Instellingen - Globale instellingen - Groepen, Gebruiker en Machtigingen - Gebruiker, waar je nieuwe gebruikers kunt toevoegen.
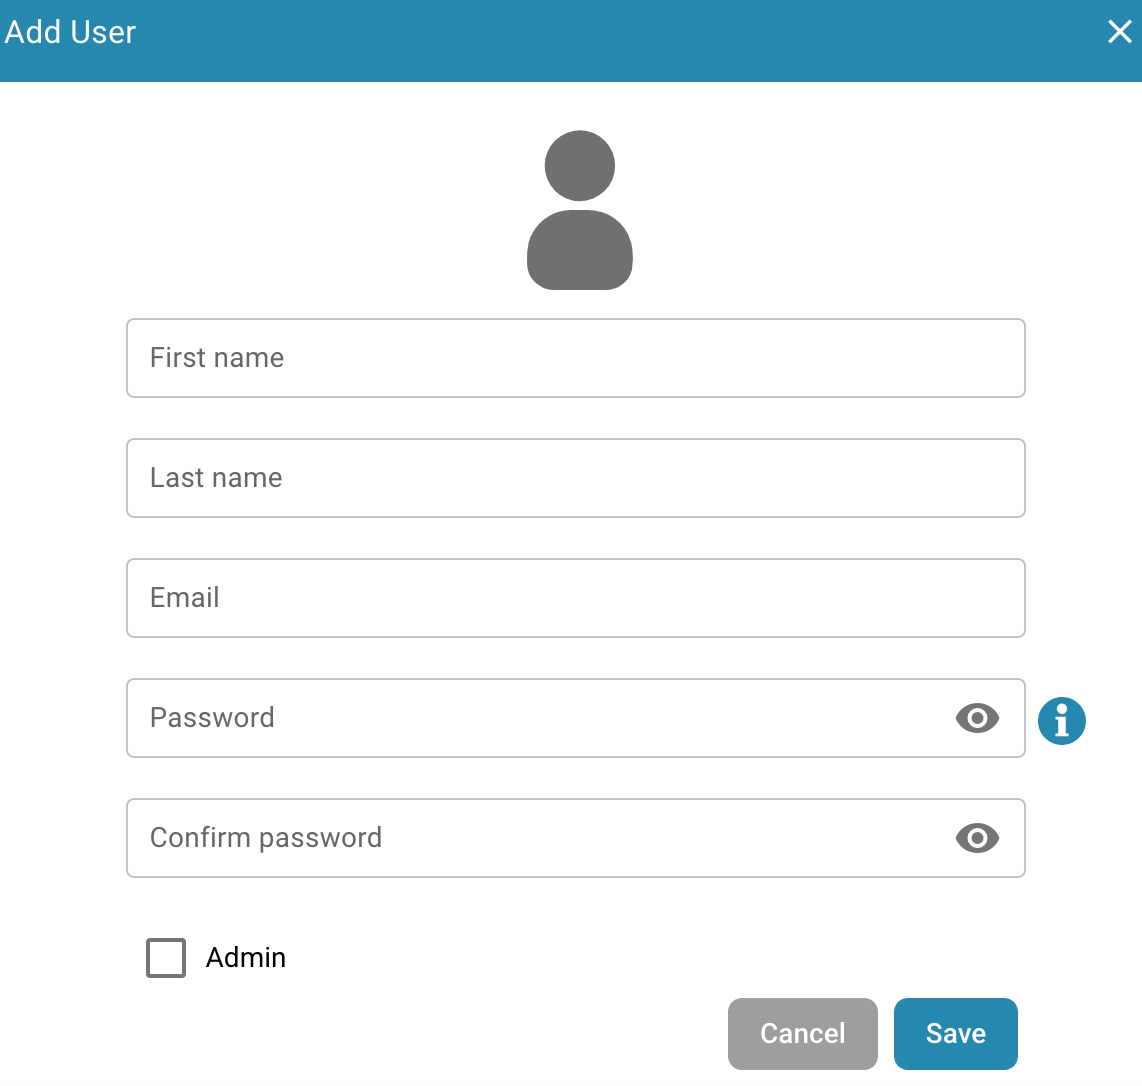
Nieuwe gebruiker toevoegen: Klik in de gebruikersinstellingen op “Voeg gebruiker toe”
Vul het formulier in: Er verschijnt een formulier waarin je de informatie voor de nieuwe gebruiker kunt invoeren. Typische informatie omvat:
Gebruikersnaam: Unieke naam voor de gebruiker die wordt gebruikt om in te loggen.
Voornaam en Achternaam: Naam van de gebruiker.
E-mailadres: Het e-mailadres van de gebruiker dat wordt gebruikt voor communicatie en meldingen.
Wachtwoord: Een wachtwoord voor de gebruiker dat moet voldoen aan de beveiligingsbeleid.
Gebruikersrol: Stel de rol van de gebruiker in, bijv. Standaard gebruiker of beheerder.
Check the permission settings for the documents or resources in question to ensure that users have the necessary permissions.
Make sure that users have access either directly or through group membership.
Check that the affected users are actually members of the groups that have been granted access.
Make sure that users have not been accidentally removed from relevant groups.
Check that individual permissions have been set at the user level that could override group permissions.
Make sure that these individual permissions are configured correctly.
Make sure that permissions are inherited correctly and are not blocked by parent folders or other settings.
Check permission history or logs to see if there have been any recent changes to permissions that could be causing the current issues.
Try accessing the affected documents with a different user account to see if the issue is user-specific or affects all users.
Make sure users are getting accurate error messages indicating permission issues. This can help you pinpoint and diagnose the problem more accurately.
If all other solutions fail, try reconfiguring permissions for the affected users or groups and ensure that all required permissions are granted correctly.
By following these troubleshooting tips, you can identify and resolve permission-related issues to ensure that users have the required access rights and can work effectively.
Groups and permissions allow administrators to control access to sensitive data and resources.
By assigning permissions at the group level, administrators can exercise granular control over who can access what information.
This helps prevent unauthorized access and data leaks.
The Least Privilege Principle states that users should only be given the permissions they need to perform their jobs.
By using groups, administrators can efficiently manage permissions and ensure that users can only access the resources relevant to their particular role or department.
Using groups makes it easier to manage user permissions in large organizations with many users and resources.
Instead of setting permissions individually for each user, administrators can assign permissions at the group level, simplifying administration and reducing administrative overhead.
Using groups and permissions allows organizations to monitor access activities and meet compliance requirements.
Logging access events allows administrators to perform audits to ensure that permissions are properly managed and that unauthorized access is not occurring.
Groups and permissions provide flexibility to adapt to changing needs and organizational structures.
Administrators can create groups based on departments, teams, projects, or other criteria and dynamically adjust permissions to ensure users always have access to the resources they need.
Overall, groups and permissions play a key role in increasing the security of IT infrastructure, improving operational efficiency, and ensuring compliance with policies and regulations. By managing groups and permissions wisely, organizations can effectively protect their data and resources while promoting employee productivity.
In a company with different departments such as finance, marketing, and human resources, employees in each department will need access to different types of documents and resources.
For example, the finance team needs access to financial reports and invoices, while HR needs access to employee data and payroll.
In a healthcare organization, different groups of employees will need different levels of access to patient data.
For example, doctors and nurses will need access to medical records and patient histories, while administrative staff may only need access to billing data and scheduling.
In an educational institution such as a university, different groups of users will need different levels of access to educational resources.
For example, professors will need access to course materials and grades, while administrators will need access to financial data and student information.
Companies may need to implement different levels of access to meet legal and compliance requirements.
For example, financial institutions may need to ensure that only authorized employees have access to sensitive financial data to ensure compliance with regulations such as the General Data Protection Regulation (GDPR).
In a project team, different members may require different levels of access to project materials.
For example, project managers may need access to all project resources, while external consultants may only have access to certain parts of the project.
In these scenarios, it is important that access levels are defined according to the roles and responsibilities of user groups to ensure the security of data while improving employee efficiency. By implementing role-based access control, organizations can ensure that users can only access the resources required for their respective function.
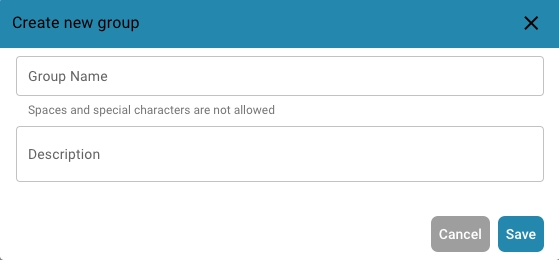
Navigate to Group Settings: Log in to your admin account and go to Group Settings in the admin panel.
This window will open:
Click the + New button: If you want to add a new group, click the + New button to start the process of adding a new group.
Fill out the table: Provide the group name and a description of the group.
Save the details: Once you have filled in the group and description, click the "Save" button.
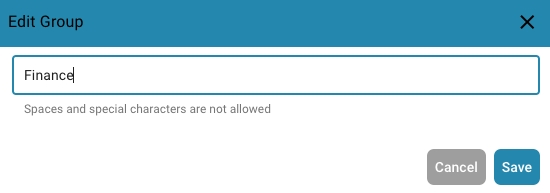
Edit Groups: To edit groups, click on "edit", here you can change the group name
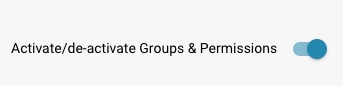
Enable Groups & permissions: To make the group visible, "Groups & permissions" must be enabled.
Check the results: After saving, review the results to make sure the group was successfully added, edited, or updated.
Het in- of uitschakelen van het machtigingssysteem met de schakelaar heeft verschillende effecten op de functionaliteit in DocBits.
Wanneer het machtigingssysteem is ingeschakeld, worden de toegangsrechten voor gebruikers en groepen toegepast.
Gebruikers krijgen alleen toegang tot de bronnen waarvoor ze expliciet zijn geautoriseerd op basis van de toegewezen machtigingen.
Beheerders kunnen de machtigingen voor individuele gebruikers en groepen beheren en ervoor zorgen dat alleen geautoriseerde personen de gegevens kunnen bekijken of bewerken.
Wanneer het machtigingssysteem is uitgeschakeld, worden alle toegangsrechten verwijderd en hebben gebruikers doorgaans onbeperkte toegang tot alle bronnen.
Dit kan nuttig zijn wanneer open samenwerking tijdelijk vereist is zonder de beperkingen van toegangscontrole.
Er kan echter een verhoogd risico zijn op gegevenslekken of ongeautoriseerde toegang, aangezien gebruikers mogelijk toegang hebben tot gevoelige informatie waarvoor ze niet zijn geautoriseerd.
Het in- of uitschakelen van het machtigingssysteem is een belangrijke beslissing op basis van de beveiligingseisen en de manier waarop de organisatie opereert. In omgevingen waar privacy en toegangscontrole cruciaal zijn, is het gebruikelijk om het machtigingssysteem ingeschakeld te laten om de integriteit en vertrouwelijkheid van gegevens te waarborgen. In andere gevallen kan het tijdelijk noodzakelijk zijn om het machtigingssysteem uit te schakelen om samenwerking te vergemakkelijken, maar dit moet met voorzichtigheid worden gedaan om mogelijke beveiligingsrisico's te minimaliseren.
Deze gids legt uit hoe beheerders toegangscontrole-instellingen kunnen definiëren voor verschillende gebruikersgroepen in DocBits. Elke groep kan worden geconfigureerd met aangepaste machtigingen op document- en veldniveau.
Het toegangscontrolepaneel stelt de beheerder in staat om gebruikersgroepen en hun respectieve machtigingen te beheren. Elke groep kan specifieke configuraties hebben met betrekking tot:
Documenttoegang: Of de groep toegang heeft tot een documenttype.
Veldniveau-machtigingen: Of de groep bepaalde velden binnen een document kan lezen, schrijven of bekijken.
Actiemachtigingen: Welke acties de groep kan uitvoeren, zoals bewerken, verwijderen, massaal bijwerken en goedkeuren van documenten.
Navigeer naar Instellingen.
Selecteer Documentverwerking.
Selecteer Module.
Activeer Toegangscontrole door de schuifregelaar in te schakelen.
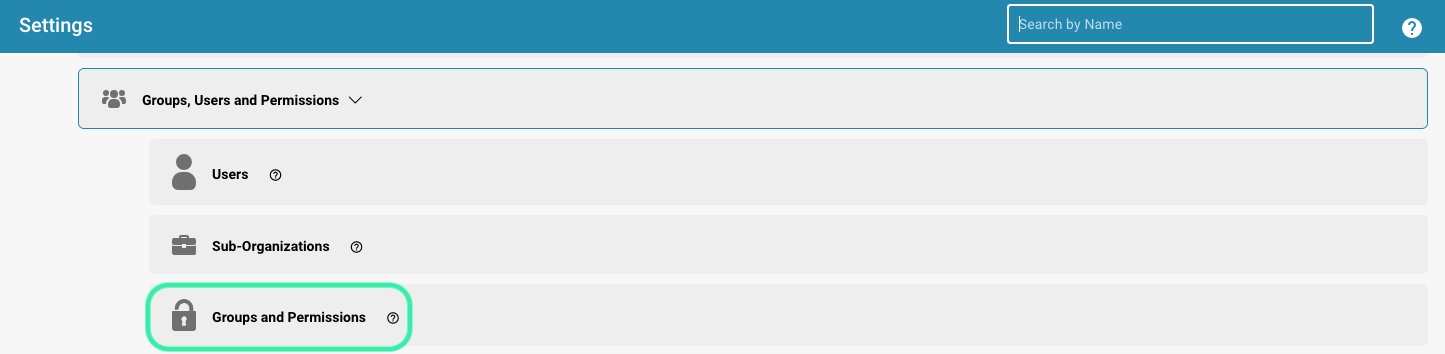
Navigeer naar Instellingen.
Navigeer Algemene Instellingen.
Selecteer Groepen, Gebruikers en Machtigingen.
Selecteer Groepen en rechten.
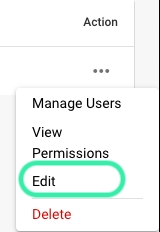
Om machtigingen voor een groep, zoals PROCUREMENT_DIRECTOR, te beheren, klik op de drie stippen aan de rechterkant van het scherm.
Selecteer Toegangscontrole Weergeven.
Overzicht van Toegangscontrole:
In deze sectie kunt u de toegang voor alle documenttypes inschakelen of uitschakelen, zoals Invoice, Credit Note, Purchase Order, en meer.
U kunt toegangslevels definiëren zoals:
Toegang: Geeft toegang tot het documenttype.
Lijst: Bepaalt of het documenttype zichtbaar is in de lijstweergave.
Weergave: Specificeert de standaardweergave voor het document.
Bewerken: Geeft toestemming om het document te bewerken.
Verwijderen: Staat de groep toe documenten te verwijderen.
Massa-update: Maakt massa-update van het documenttype mogelijk.
Goedkeuringsniveaus: Stelt het vermogen van de groep in om documenten goed te keuren (Eerste en Tweede goedkeuring).
Document ontgrendelen: Bepaalt of de groep een document kan ontgrendelen voor verdere bewerkingen.
Voorbeeldinstellingen voor PROCUREMENT_DIRECTOR:
Invoice: Ingeschakeld voor alle machtigingen, inclusief bewerken en verwijderen.
Purchase Order: Ingeschakeld met normale machtigingen voor alle acties.
Veldniveau-machtigingen:
Binnen elk documenttype kunnen specifieke velden worden geconfigureerd met verschillende niveaus van machtigingen.
Machtigingen omvatten:
Lezen/Schrijven: Gebruikers kunnen zowel lezen als schrijven naar het veld.
Lezen/Eigenaar Schrijven: Alleen de eigenaar van het document of veld kan schrijven, anderen kunnen lezen.
Alleen Lezen: Gebruikers kunnen het veld alleen bekijken maar niet wijzigen.
Eigenaar Lezen/ Eigenaar Schrijven: Alleen de eigenaar van het document of veld kan schrijven en lezen.
Goedkeuring: Wijzigingen moeten worden goedgekeurd door bevoegde gebruikers of de beheerder.
Geen: Er zijn geen specifieke machtigingen van toepassing op het veld.