Documenttypes
Overzicht
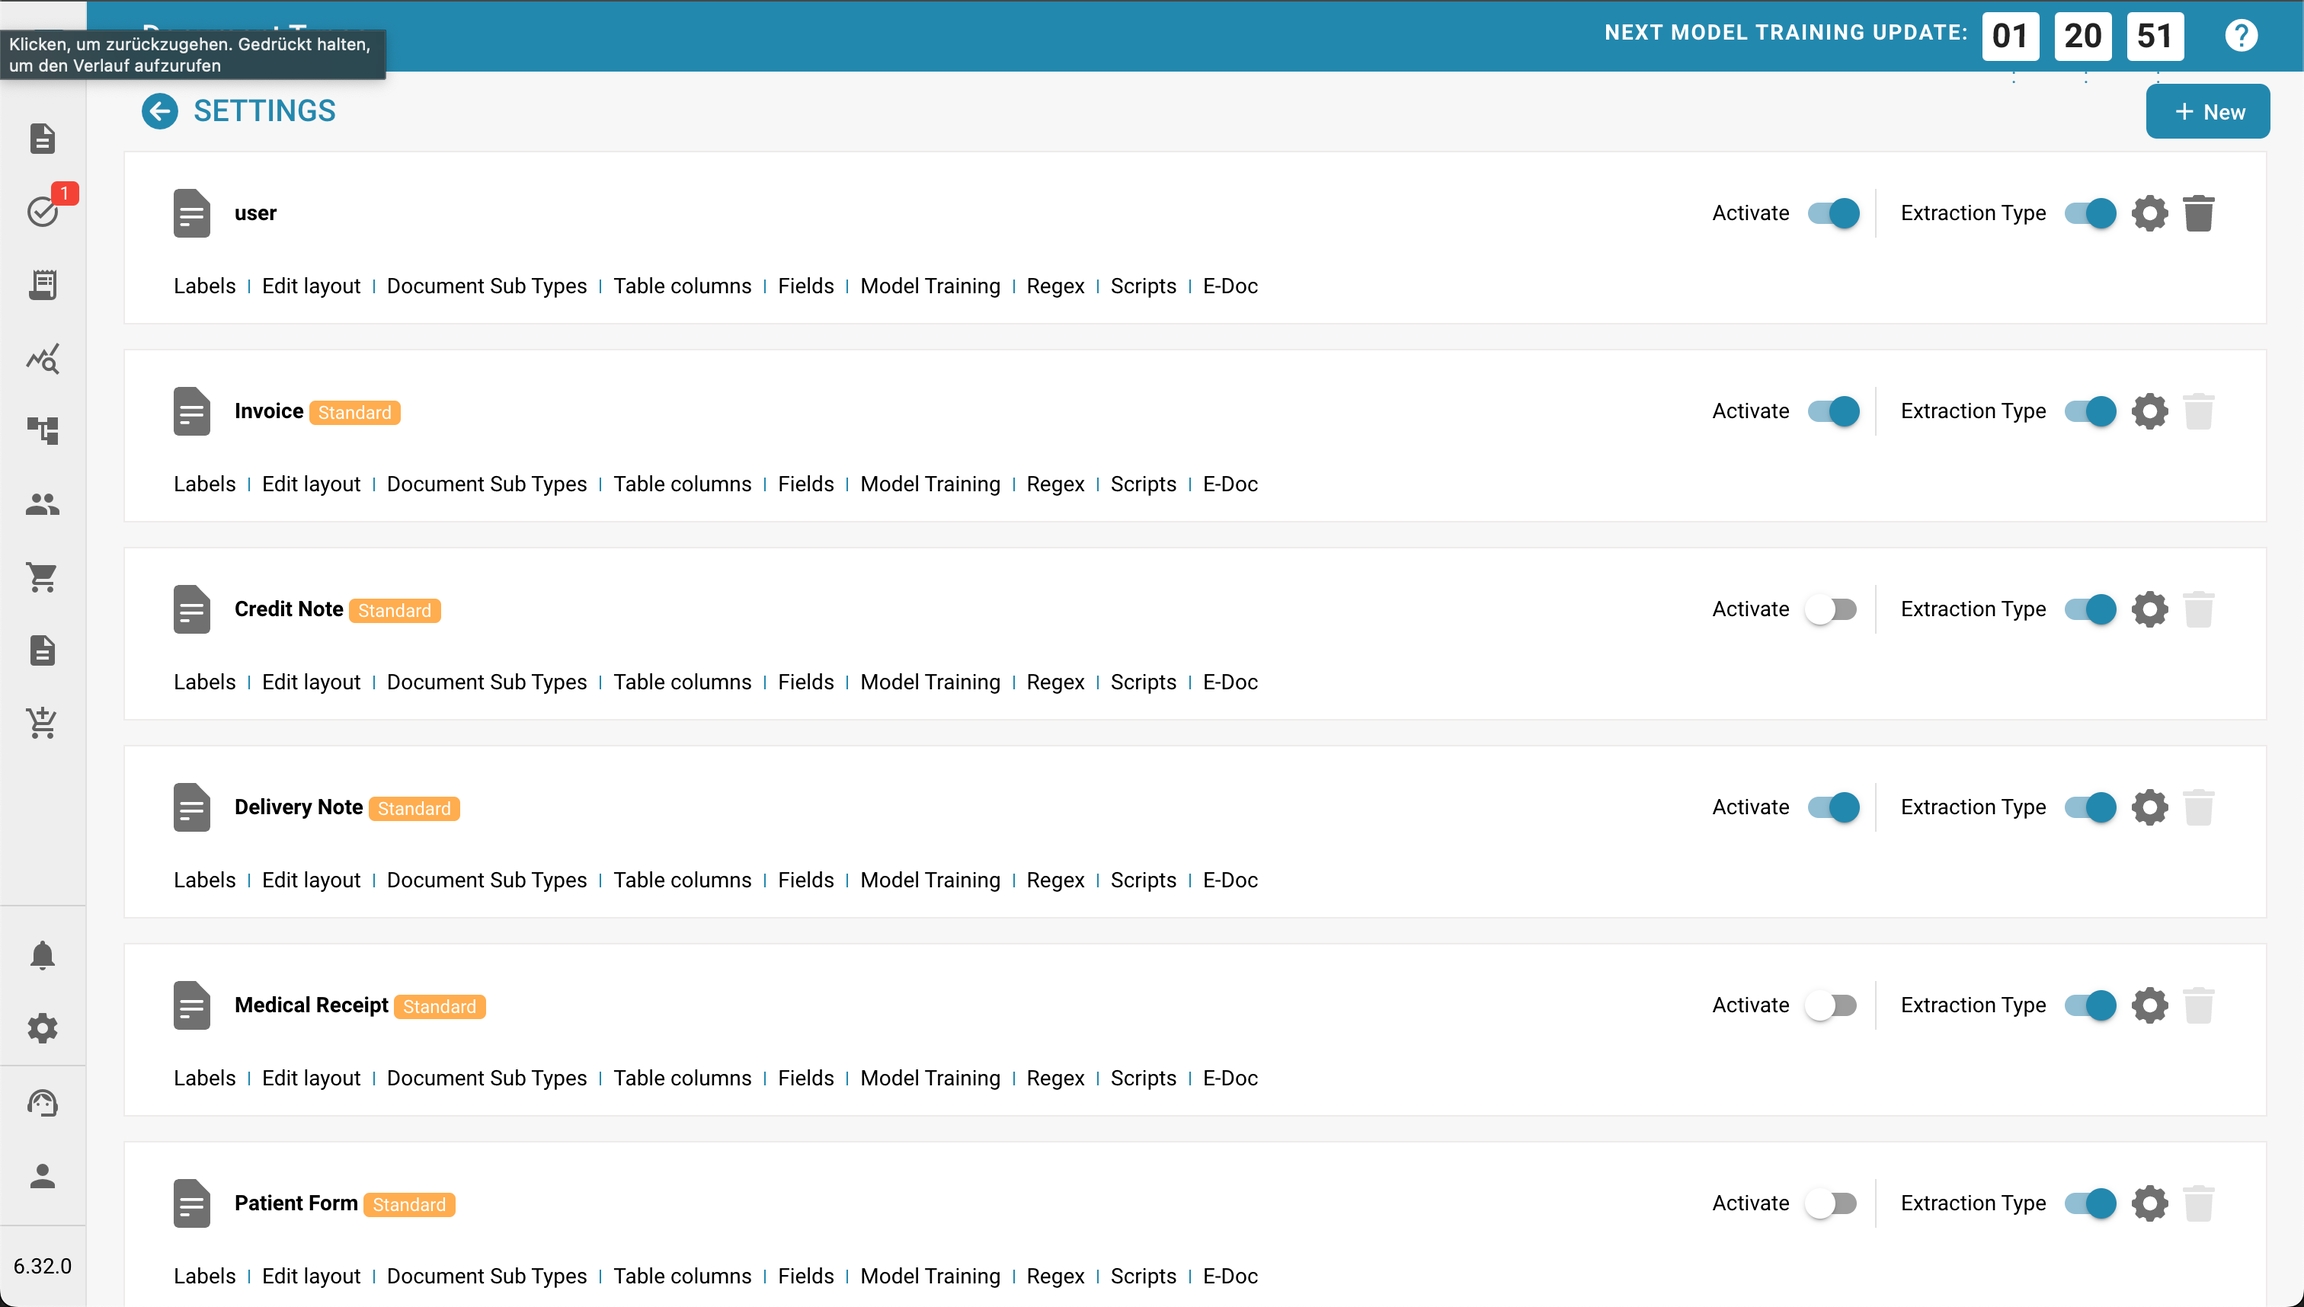
De sectie Documenttypes vermeldt alle documenttypes die door Docbits worden herkend en verwerkt. Beheerders kunnen verschillende aspecten beheren, zoals lay-out, velddefinities, extractieregels en meer voor elk type document. Deze aanpassing is essentieel voor een nauwkeurige gegevensverwerking en naleving van de organisatorische normen.
Belangrijkste Kenmerken en Opties
Documenttype Lijst:
Elke rij vertegenwoordigt een documenttype zoals Factuur, Creditnota, Leveringsbon, enz.
Documenttypes kunnen standaard of op maat zijn, zoals aangegeven door labels zoals "Standaard."
Lay-out bewerken: Deze optie stelt beheerders in staat om de instellingen voor de documentlay-out te wijzigen, waaronder het definiëren van hoe het document eruitziet en waar de gegevensvelden zich bevinden.
Document Subtypes: Als er documenttypes zijn met subcategorieën, kan deze optie beheerders in staat stellen om instellingen specifiek voor elk subtype te configureren.
Tabelkolommen: Pas aan welke datakolommen moeten verschijnen wanneer het documenttype in lijsten of rapporten wordt bekeken.
Velden: Beheer de gegevensvelden die aan het documenttype zijn gekoppeld, inclusief het toevoegen van nieuwe velden of het wijzigen van bestaande.
Modeltraining: Configureer en train het model dat wordt gebruikt voor het herkennen en extraheren van gegevens uit de documenten. Dit kan inhouden dat parameters worden ingesteld voor machine learning-modellen die in de loop van de tijd verbeteren met meer gegevens.
Regex: Stel reguliere expressies in die worden gebruikt om gegevens uit documenten te extraheren op basis van patronen. Dit is bijzonder nuttig voor gestructureerde gegevensextractie.
Scripts: Schrijf of wijzig scripts die aangepaste verwerkingsregels of workflows voor documenten van dit type uitvoeren.
E-DOC: Configureer instellingen met betrekking tot de uitwisseling van documenten in gestandaardiseerde elektronische formaten. U kunt XRechnung, EDI, FakturaPA of EDI configureren.
Purpose and Scope
The purpose and scope of correctly setting up document types in DocBits is critical to ensure the accuracy and efficiency of document processing.
Here are some key points that explain the importance of this process:
Purpose of correctly setting up document types Improved document organization
By accurately classifying documents into specific types, they can be easily categorized and managed. This makes it easier to find and retrieve documents when they are needed.
Automated workflows:
Many document management systems, including DocBits, use document types to drive automated workflows. For example, invoices can be automatically routed for approval while contract documents are sent for signature. Correct document type mapping allows these processes to be carried out efficiently and without errors.
Rights management and security:
Different document types can be subject to different access controls and security levels. By correctly typecasting documents, it can be ensured that only authorized people have access to sensitive information.
Compliance and legal requirements:
Many industries are subject to strict legal and regulatory requirements regarding the handling of documents. Setting up document types correctly helps ensure that all necessary compliance requirements are met by handling and storing documents according to their category.
Scope of setting up document types correctly
Defining specific document types:
Every type of document managed in the system should have a clearly defined document type. This includes, for example, invoices, contracts, reports, emails and technical drawings.
Attribution and metadata:
Each document type should have specific attributes and metadata that facilitate its classification and processing. For example, invoices could contain attributes such as invoice number, date and amount, while contracts have attributes such as contract parties, term and conditions.
Automation rules and workflows:
Specific rules and workflows should be defined for each document type. This can include automatic notifications, approval processes or archiving policies.
Training and user guidance:
Users should be trained to use the document types correctly and understand the importance of correct classification. This helps to minimize errors and maximize efficiency.
Regular review and adjustment:
The document types and associated processes should be regularly reviewed and adjusted as necessary to ensure they continue to meet current business needs and processes.
Setting up document types correctly is a key aspect of effectively using a document management system like DocBits. Not only does it make documents better organized and easier to find, it also enables automated processes, increases security, and ensures regulatory compliance. To fully realize the benefits, document types must be carefully defined, the corresponding processes implemented, and users trained regularly.
Adding/Editing Document Types
Adding or editing document types in DocBits involves several steps. These steps include defining layouts, fields and extraction rules.
Here is a detailed guide:
Accessing Document Types Management
Log in: Log in to DocBits with your administrator rights.
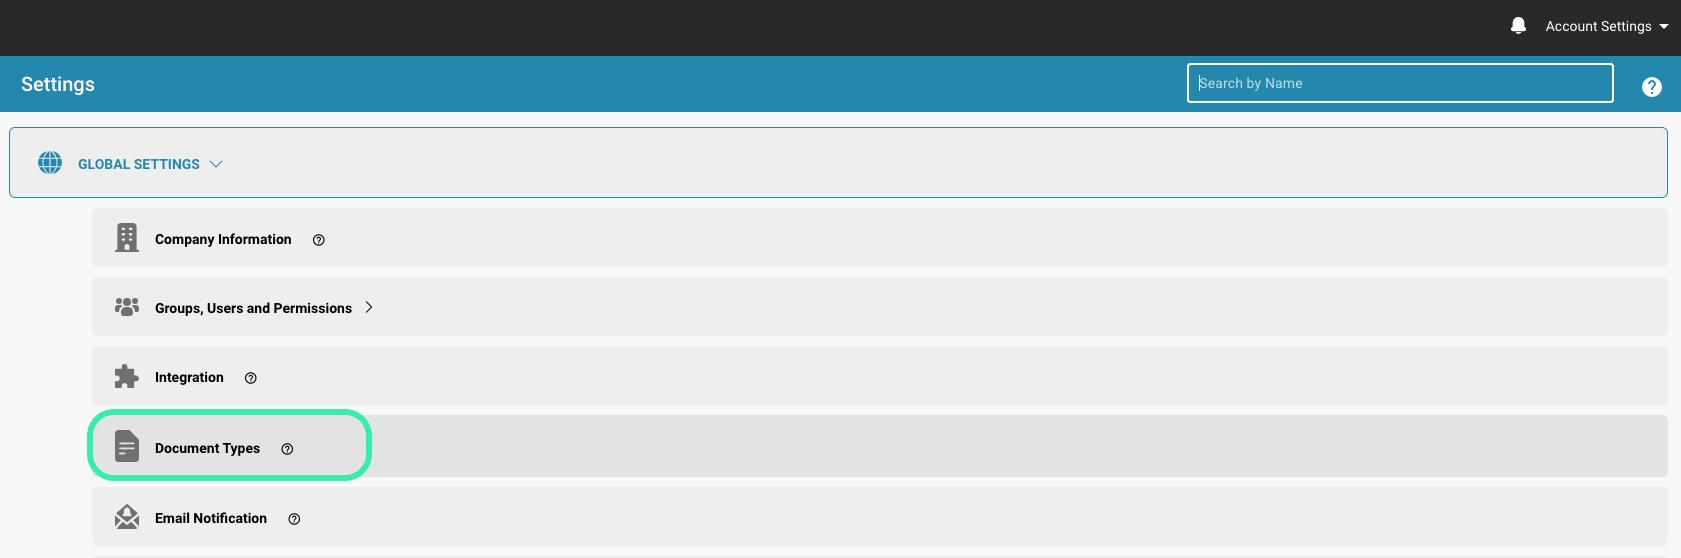
Navigate: Go to Settings.
Document Types: Find the "Document Types" section.

Adding a new document type
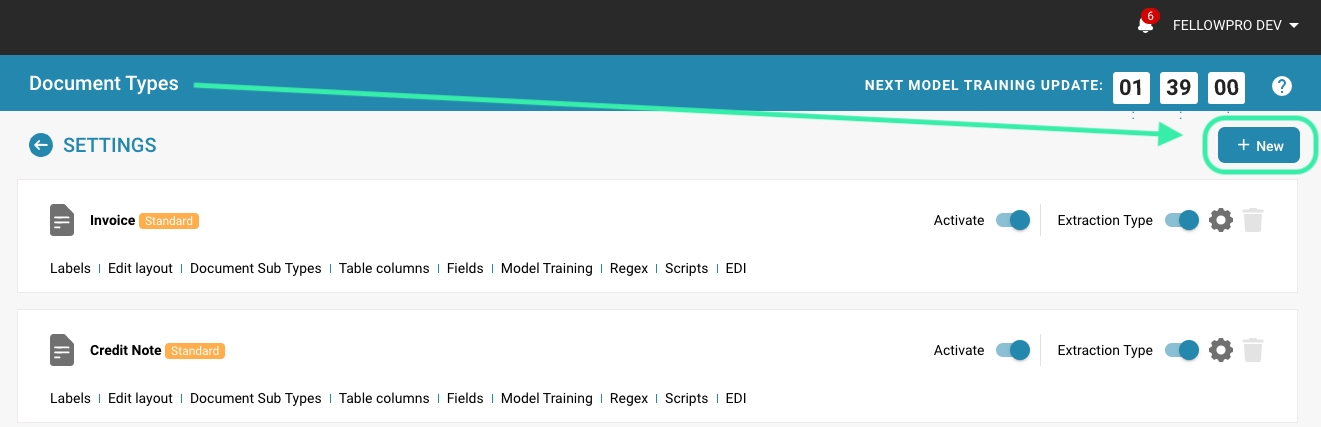
Create a new document type:
Click the "+ New" button.
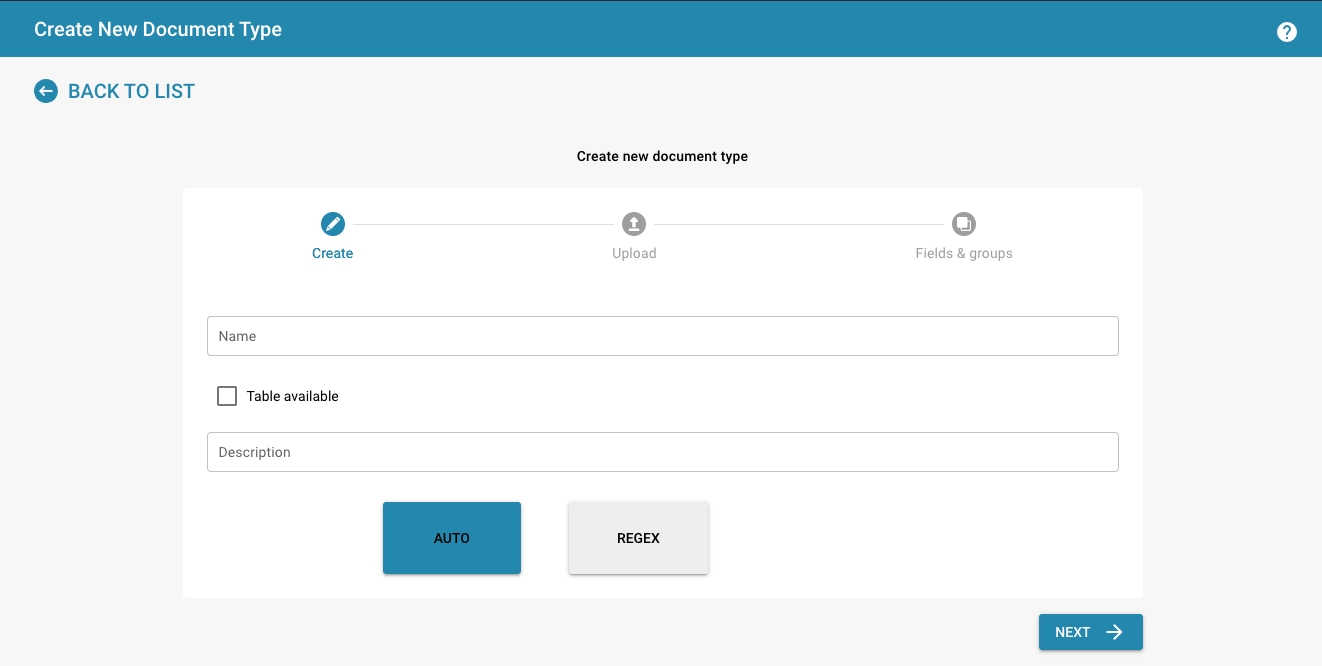
Basic information:
Enter a name for the new document type (e.g. "Invoice", "Contract", "Report").
Add a description explaining the purpose and use of the document type.
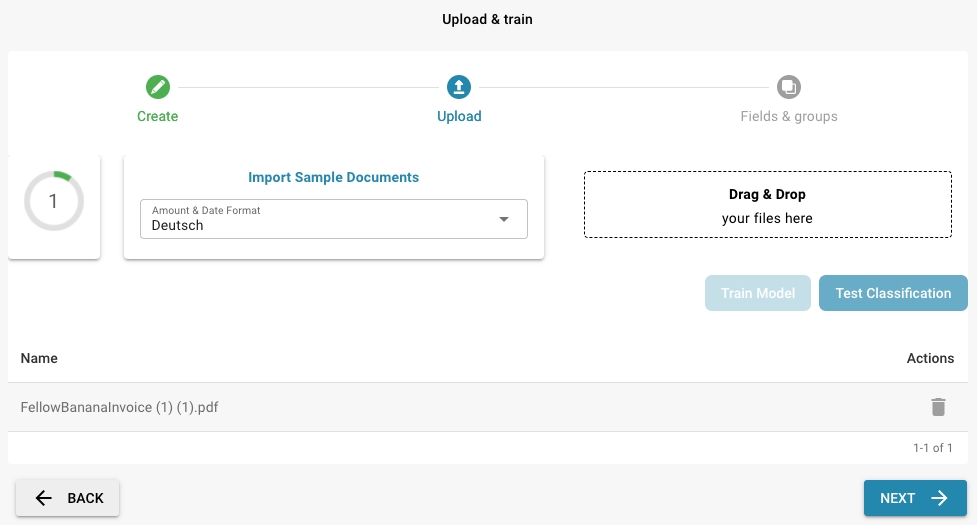
Amount and date format
Enter the format for the amount and date
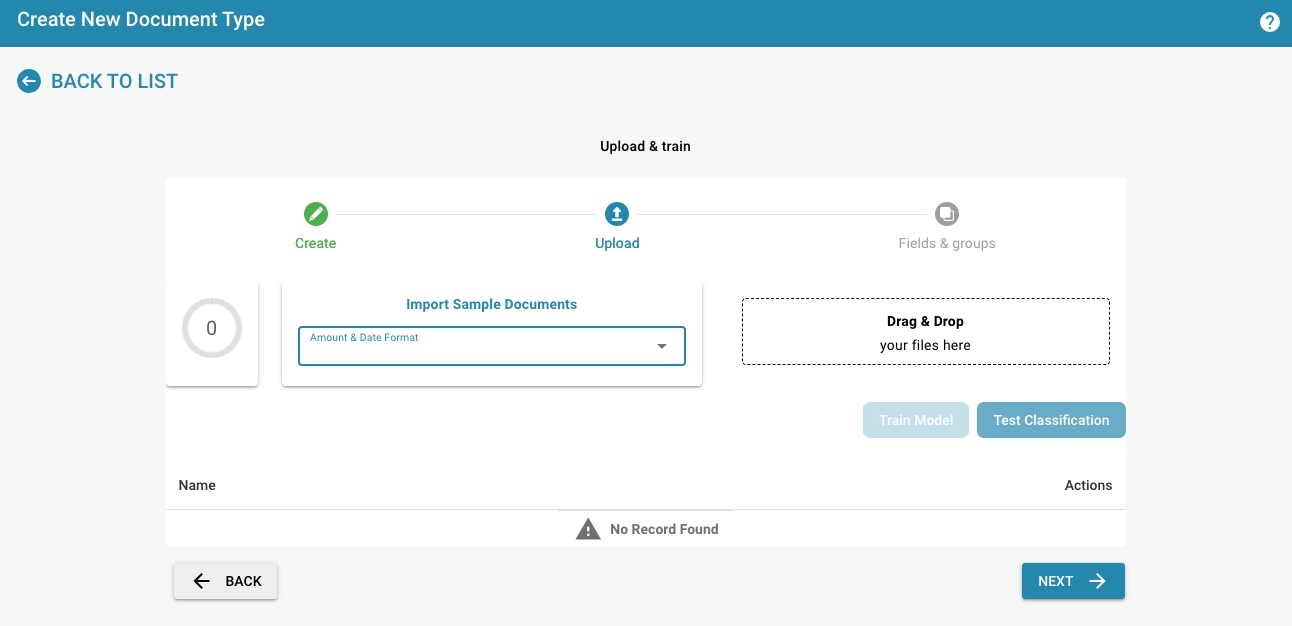
Import Sample Documents
Upload sample documents via drag & drop
At least 10 documents must be uploaded for the training
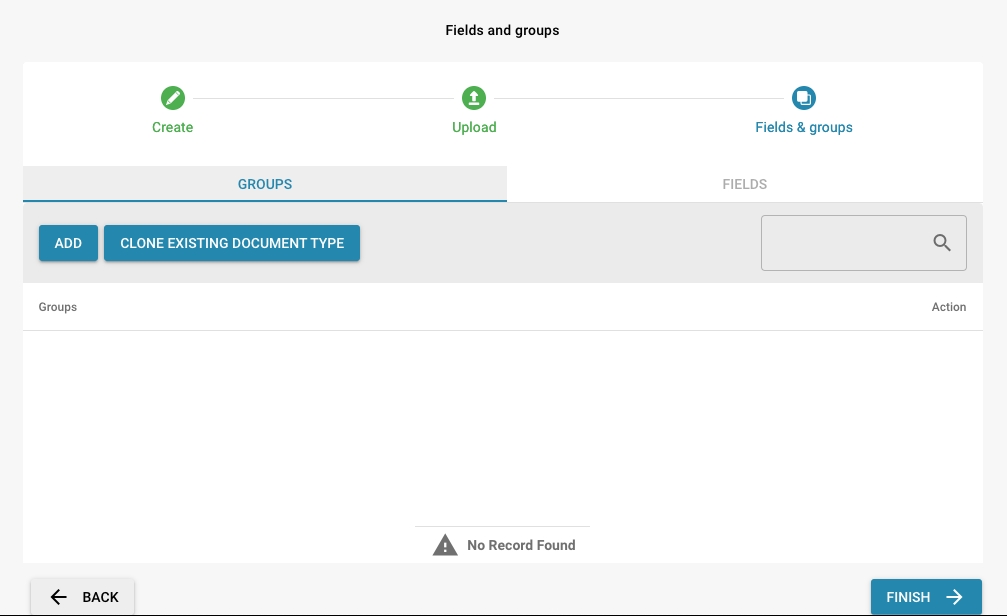
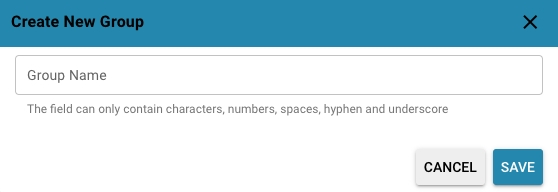
Add Groups
Click the "Add" button and enter the group name.
You can also clone an existing document type.
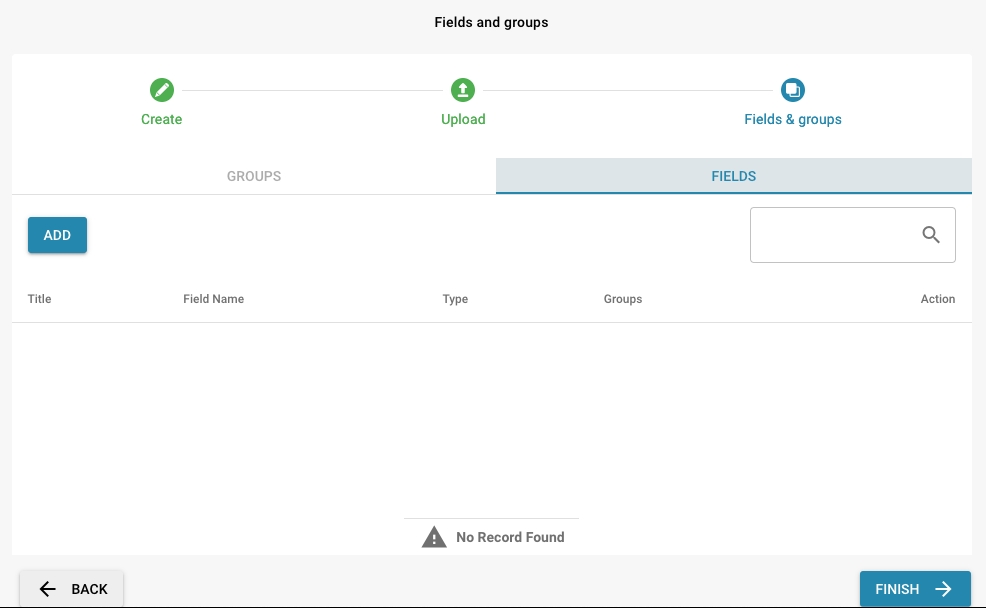
Add fields:
Add new fields by clicking "Add".
Enter the name of the field (e.g. "Invoice number", "Date", "Amount") and the data type (e.g. Text, Number, Date).
Finish
Once all the details are entered, click "Finish" and the new document type is created

Edit an existing document type
Select a document type:
Select the document type you want to edit from the list of existing document types.
Under the document type you will find various editing options, for example editing the layout, fields, table columns, etc.

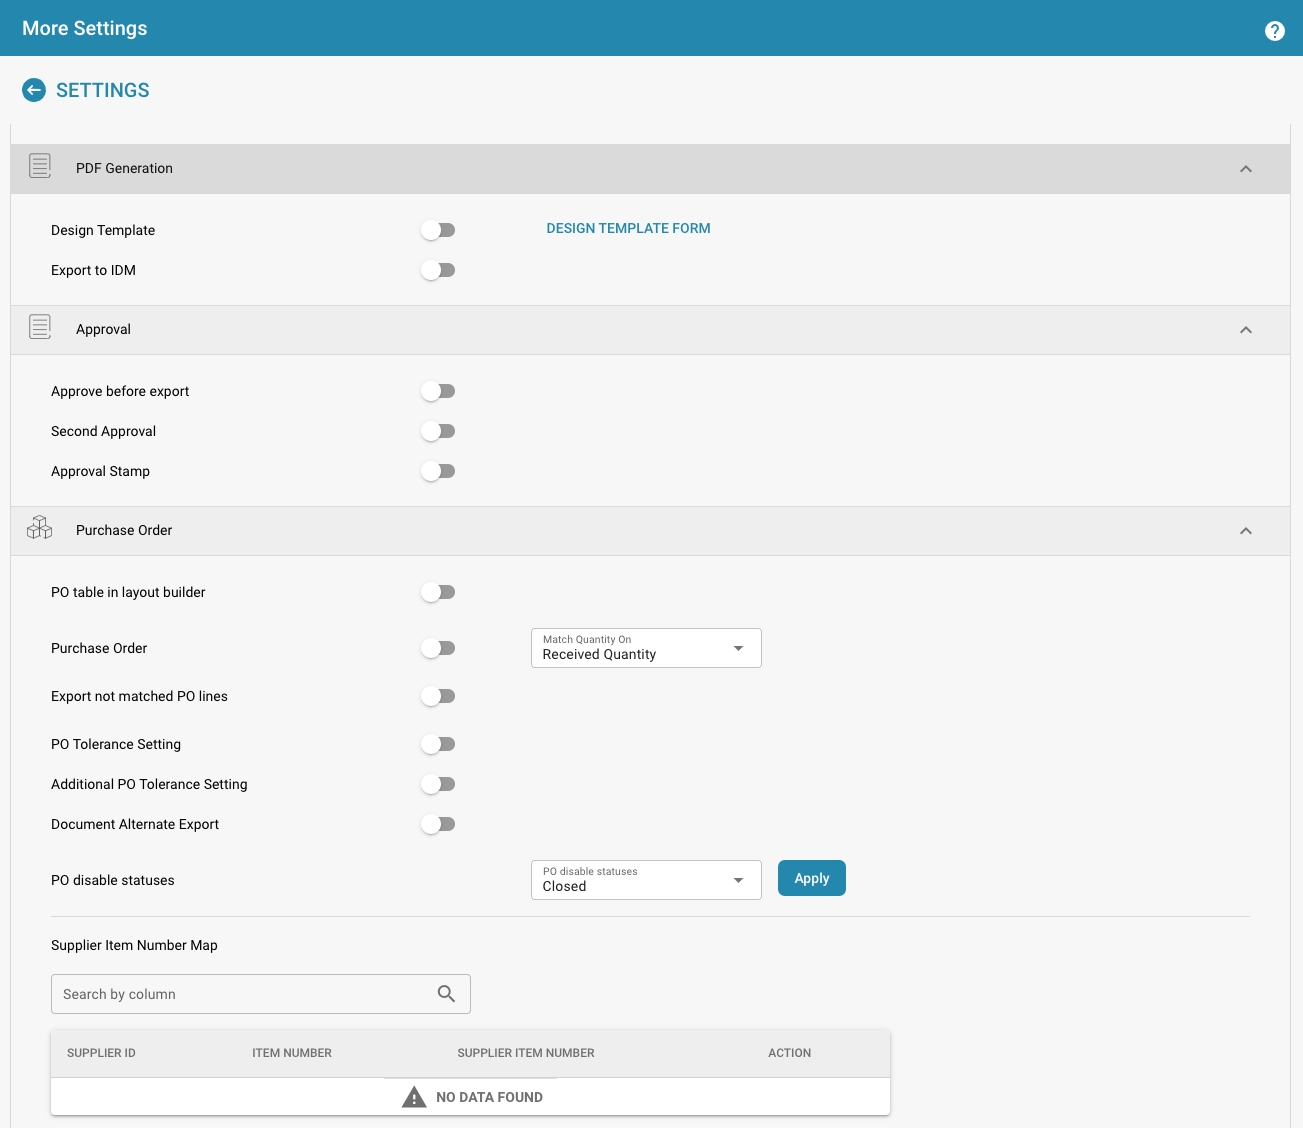
More Settings:
Click the Edit button next to the document type.

Here you can make further settings for the document type, such as design template, whether a document must be approved before export and many other details.
Define extraction rules
Define rules:
Go to the Extraction Rules section.
Create rules that specify how to extract data from documents. This may include using regular expressions or other pattern recognition techniques.
Test rules:
Test the extraction rules with sample documents to ensure that the data is correctly recognized and extracted.
Fine-tuning:
Adjust the extraction rules based on the test results to improve accuracy and efficiency.
Training and Documentation
Inform users:
Inform users of the new or changed document type and provide training if necessary.
Documentation:
Update system documentation to describe the new or changed document types and their usage. By carefully setting up and managing document types in DocBits, you can ensure that documents are correctly classified and processed efficiently. This improves the overall performance of the document management system and contributes to the accuracy and productivity of your organization.
Activation
Enabling or disabling document types in a document management system like Docbits allows an organization to keep only the document types it needs active to ensure efficient management and clarity.
Here are the steps to enable and disable document types, along with an explanation of the toggle function in the user interface:
Access Document Type Management
Log in: Log in to DocBits with administrator rights.
Navigate: Go to Settings.
Document Types: Find the Document Types section.
Access Document Types List
Access the list of existing document types. This list shows all defined document types, both active and inactive.

Activating or deactivating a document type Select Document Type:
Select the document type you want to enable or disable.

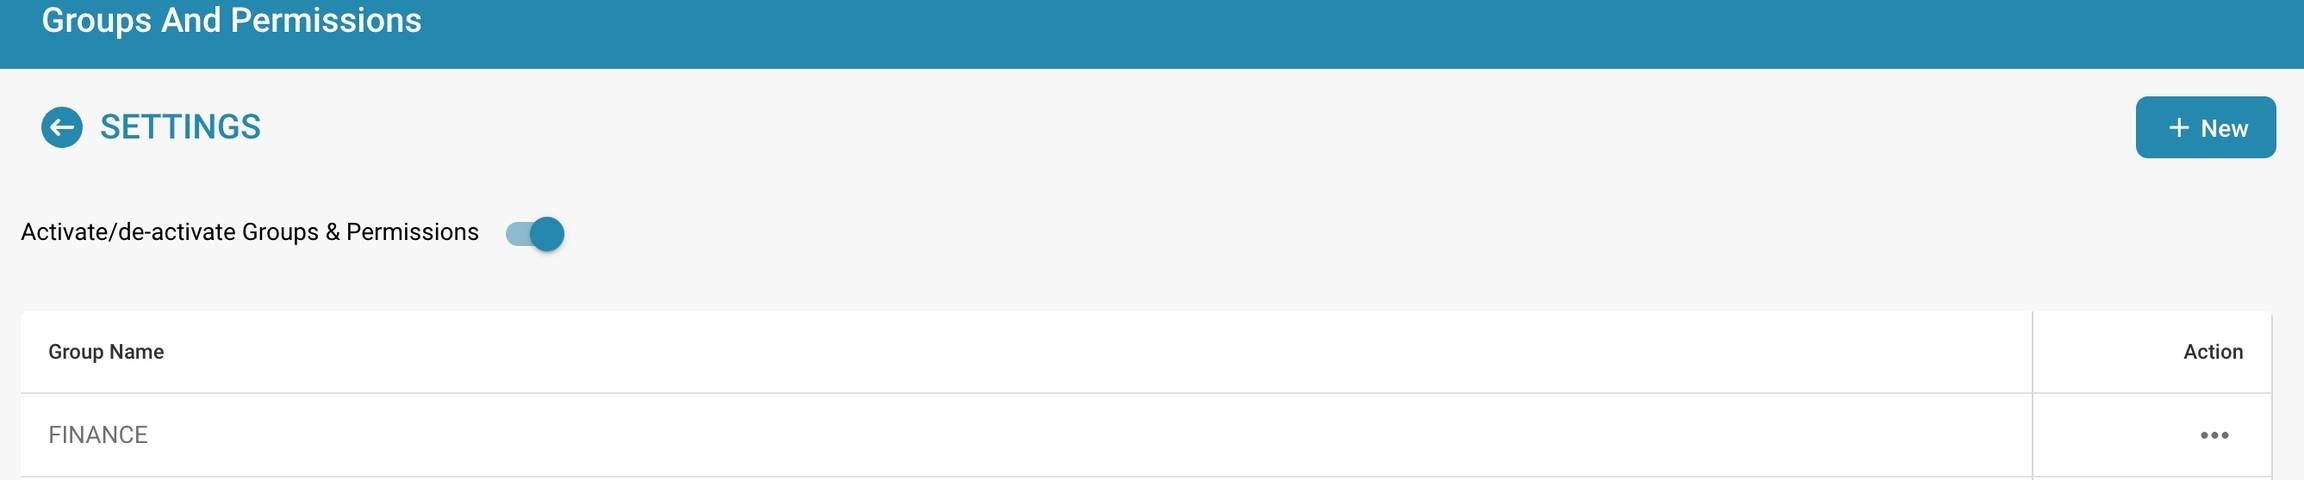
Use the toggle function:
In the user interface, there is a toggle switch next to each document type that allows activation and deactivation.
Activation:
If the document type is currently deactivated, the switch may show a gray or off position.
Click the switch to activate the document type. The switch changes its position and color to indicate activation.

Deactivation:
If the document type is currently activated, the switch shows a colored or on position.
Click the switch to deactivate the document type. The switch changes its position and color to indicate deactivation.

Save:
Make sure all changes are saved. Some systems save changes automatically, while others require explicit confirmation.
Notification and documentation
Inform users:
Inform users about the activation or deactivation of the document type, especially if it impacts their work processes.
Update documentation:
Update system documentation to reflect the current status of document types.
Conclusion The ability to enable or disable document types depending on the organization's needs is a useful tool for managing document processing in Docbits. By simply using the toggle function in the user interface, administrators can react flexibly and efficiently and ensure that the system is optimally aligned with current business needs.
Customization Options
The customization options for each document type in DocBits is crucial to optimize document processing and data extraction.
Here are the most important customization options in detail and their impact on document processing and data extraction:
Layout Configuration Description:
The layout configuration determines the structure and appearance of a document type.
Options:
Templates:
Upload or create document templates that define the general layout.
Zones:
Specify specific areas (zones) on the document, e.g. header, footer, content area.
Impact:
Improved accuracy:
By accurately defining layouts, systems can better identify where to find certain information, improving the accuracy of data extraction.
Consistency:
Ensuring that all documents of a type have a consistent layout makes processing and review easier.
Field Definitions Description:
Fields are specific data points extracted from documents.
Options:
Field name: The name of the field (e.g. "Invoice number", "Date", "Amount").
Data type: The type of data contained in the field (e.g. text, number, date).
Format: The format of the data (e.g. date in DD/MM/YYYY format).
Required field: Indicates whether a field is mandatory.
Impact:
Data extraction accuracy:
By defining fields precisely, the correct data can be extracted precisely.
Error reduction:
Clear specification of field formats and data types reduces the likelihood of errors during data processing.
Automated validation:
Required fields and specific formats enable automatic validation of the extracted data.
Extraction rules Description:
Rules that determine how data is extracted from documents.
Options:
Regular expressions:
Using regular expressions to match patterns.
Anchor points: .
Using specific text anchors to identify the position of fields. Artificial intelligence: Using AI models for data extraction based on pattern recognition and machine learning
Impact:
Precision:
By applying specific extraction rules, data can be extracted precisely and reliably.
Flexibility:
Customizable rules make it possible to adapt the extraction to different document layouts and contents.
Efficiency:
Automated extraction rules reduce manual effort and speed up data processing.
Validation rules Description:
Rules for checking the correctness and completeness of the extracted data.
Options:
Format check: Validating the data format (e.g. whether a date is correctly formatted).
Value check: Checking whether the extracted values are within a certain range.
Cross-check: Comparing the extracted data with other data sources or data fields in the document.
Impact:
Data quality:
Ensuring that only correct and complete data is stored.
Error prevention:
Automatic validation reduces the risk of human error.
Compliance:
Adhering to regulations and standards through accurate data validation.
Automation workflows Description:
Workflows that automate the processing steps of a document type.
Options:
Approval processes:
Automatic forwarding of documents for approval.
Notifications:
Automatic notifications for certain events (e.g. receipt of an invoice).
Archiving:
Automatic archiving of documents according to certain rules. Impact:
Increased efficiency:
Automated workflows speed up processing and reduce manual effort.
Transparency:
Clear and traceable processes increase the transparency and traceability of document processing.
Compliance:
Automated workflows ensure that all steps are carried out in accordance with internal guidelines and legal regulations.
User rights and access control Description:
Control of access to document types and their fields.
Options:
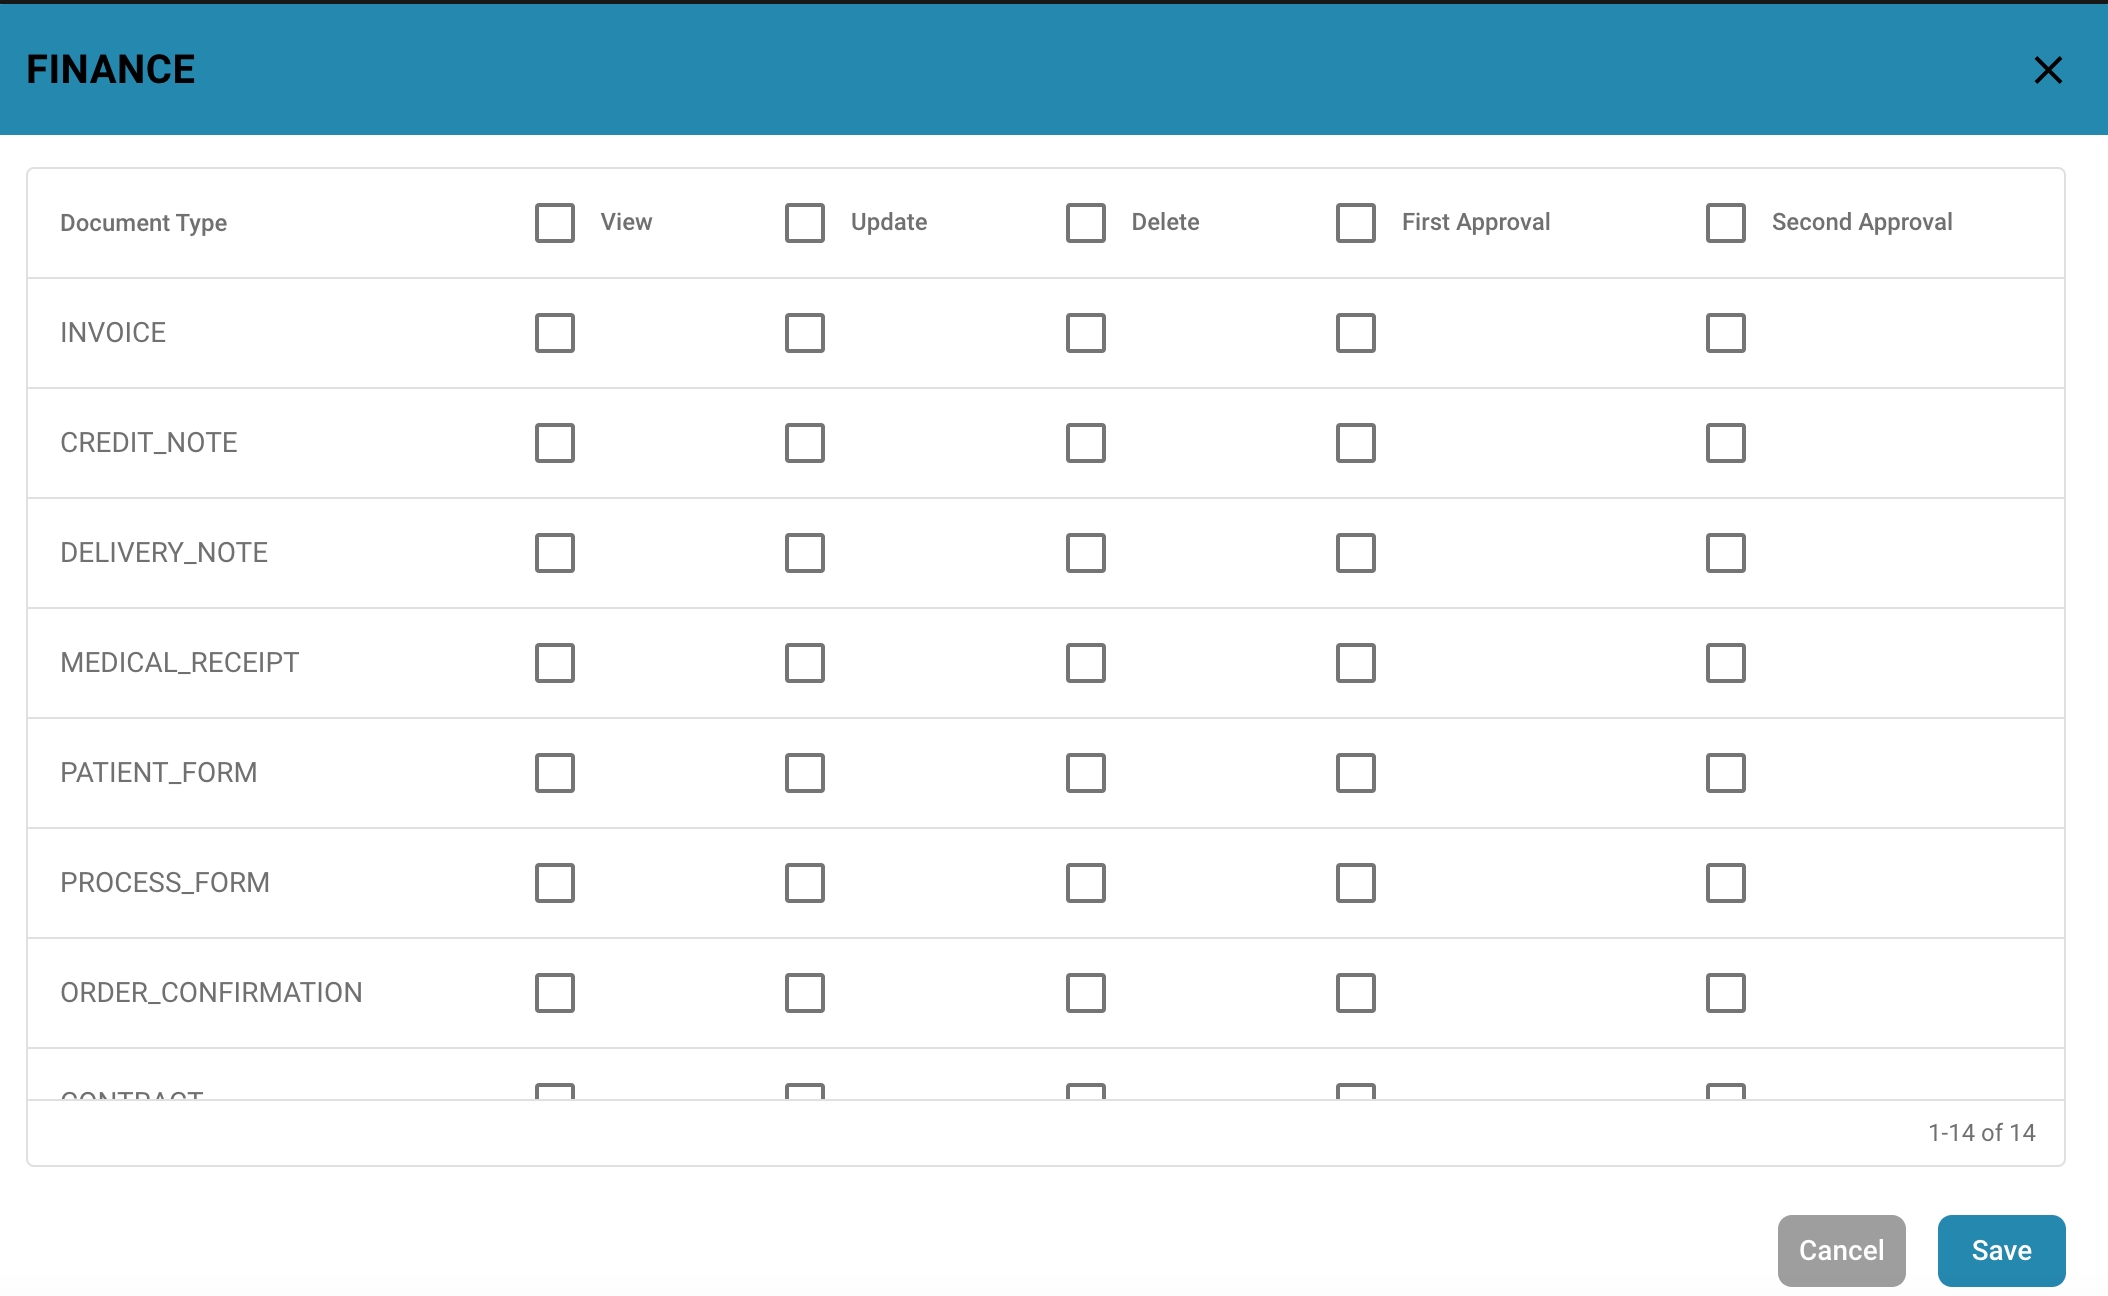
Role-based access control:
Specify which users or user groups can access certain document types.
Security levels:
Assign security levels to document types and fields.
Impact:
Data security:
Protect sensitive data through restricted access.
Compliance:
Compliance with data protection regulations through targeted access controls.
User-friendliness:
Adaptation of the user interface depending on role and authorization increases user-friendliness.
The extensive customization options for document types in DocBits enable precise control of document processing and data extraction. By carefully configuring layouts, fields, extraction and validation rules, automation workflows, and user rights, organizations can ensure that their documents are processed efficiently, accurately, and securely. These customization options go a long way in optimizing the overall performance of the document management system and meeting the specific needs of the organization.
Best Practice
Configuring document types in Docbits requires care and expertise to ensure that document processing is efficient and accurate. Here are some best practices for configuring document types, including recommendations for setting up effective regex patterns and tips for training models to improve accuracy:
Planning and analysis
Best practices
Requirements analysis:
Conduct a thorough analysis of the requirements to understand which document types are needed and what information needs to be extracted from them.
Pilot projects:
Start with pilot projects to test the configuration and extraction rules before applying them to the entire system.
Setting up layouts
Best practices
Consistency:
Make sure that documents of one type have a consistent layout. This makes configuration and data extraction easier.
Use templates:
Use document templates to ensure consistency and simplify setup.
Field definitions and metadata
Best practices
Unique field names:
Use unique and meaningful names for fields to avoid confusion.
Relevant metadata:
Define only the fields that are really necessary to reduce complexity and increase efficiency.
Formatting guidelines:
Set clear formatting guidelines for each field to facilitate validation and extraction
Training models for data extraction
Best practices
Use quality data:
Use high-quality and representative data to train the models.
Data enrichment:
Enrich the training dataset by adding different document examples to increase the robustness of the model.
Iterative training:
Train the model iteratively and evaluate the results regularly to achieve continuous improvements.
Tips:
Transfer learning:
Leverage pre-trained models and tune them with specific document examples to reduce training time and increase accuracy.
Hyperparameter tuning:
Experiment with different hyperparameters to find the optimal configuration for your model.
Validation and extraction rules
Best practices
Multi-step validation:
Implement multi-step validation rules to check the correctness of the extracted data.
Combine rule-based and ML-based approaches:
Use a combination of rule-based and machine learning approaches to extract and validate data.
Error management:
Set up mechanisms to detect and fix faulty extractions.
Automation workflows
Best practices
Clearly defined workflows:
Define clear and traceable automation workflows for each document type.
Continuous monitoring:
Monitor automation workflows regularly to evaluate their performance and identify optimization potential.
Incorporate user feedback:
Integrate user feedback to continuously improve workflows.
User rights and access control
Best practices
Role-based access:
Implement role-based access controls to ensure that only authorized users have access to certain document types and fields.
Regular review:
Regularly review access controls and adapt them to changing requirements.
Configuring document types in Docbits requires careful planning and continuous adjustment to achieve optimal results. By applying the best practices above, you can significantly increase the efficiency and accuracy of document processing and data extraction.
Troubleshooting
Troubleshooting document type configuration in DocBits can be complex because various factors can affect data recognition and extraction.
Here are some general troubleshooting tips that can help identify and resolve common issues:
Check layout configuration
Check consistency:
Make sure all documents of the type have a consistent layout. Variations in layout can affect recognition.
Check zones and areas:
Check that the defined zones and areas are positioned correctly and cover the relevant information.
Update templates:
If the layout of the documents changes, update the templates accordingly.
Check field definitions and metadata
Field names and data types:
Make sure field names are correct and data types are properly defined.
Formatting guidelines:
Check that the formatting guidelines for the fields are correct and match the actual data.
Check required fields:
Make sure all required fields are correctly recognized and filled in.
Adjust regex patterns and extraction rules
Test regex patterns:
Use a regex tool to test the patterns and make sure they capture the desired data correctly.
Increase specificity:
Adjust the regex patterns to be more specific and avoid misinterpretation.
Check anchor points:
Make sure the anchor points for data extraction are set correctly. If the pattern is not working correctly, check if special characters or different formats need to be considered.
Adjust validation rules
Analyze error messages:
Examine the error messages and log files for evidence of incorrect validations.
Refine rules:
Adjust the validation rules to make them more flexible or stricter if necessary.
Multi-step validation:
Implement additional validation steps to improve data quality.
Improve training data and models
Collect representative data:
Make sure the training data covers a wide range of examples that reflect all possible variations.
Retrain models:
Retrain the models regularly, especially when new document variants are added.
Feedback loops:
Use feedback loops to continuously improve the models.
Review automation workflows
Review workflow steps:
Review each step in the workflow to ensure that the data is processed and routed correctly.
Analyze logs:
Analyze the workflow logs to identify and resolve sources of errors.
Collect user feedback:
Ask users about their experiences and issues with the workflows to identify potential weak points.
Review user rights and access control
Review access rights:
Make sure the right users have access to the relevant document types and fields.
Track changes:
Check whether recent changes in access rights may have affected document processing.
Regular review:
Perform regular access rights reviews to ensure everything is configured correctly.
General troubleshooting tips
Consult documentation:
Use DocBits system documentation and support resources to find solutions to problems.
Provide training:
Make sure all users are adequately trained to avoid common errors.
Updates and patches:
Keep the system up to date by regularly applying updates and patches that contain bug fixes and improvements.
Troubleshooting document type configuration requires a systematic approach and careful review of all aspects of the configuration. By applying the tips above, you can identify and fix common problems to improve the accuracy and efficiency of document processing in DocBits.
Layout Manager
Overview
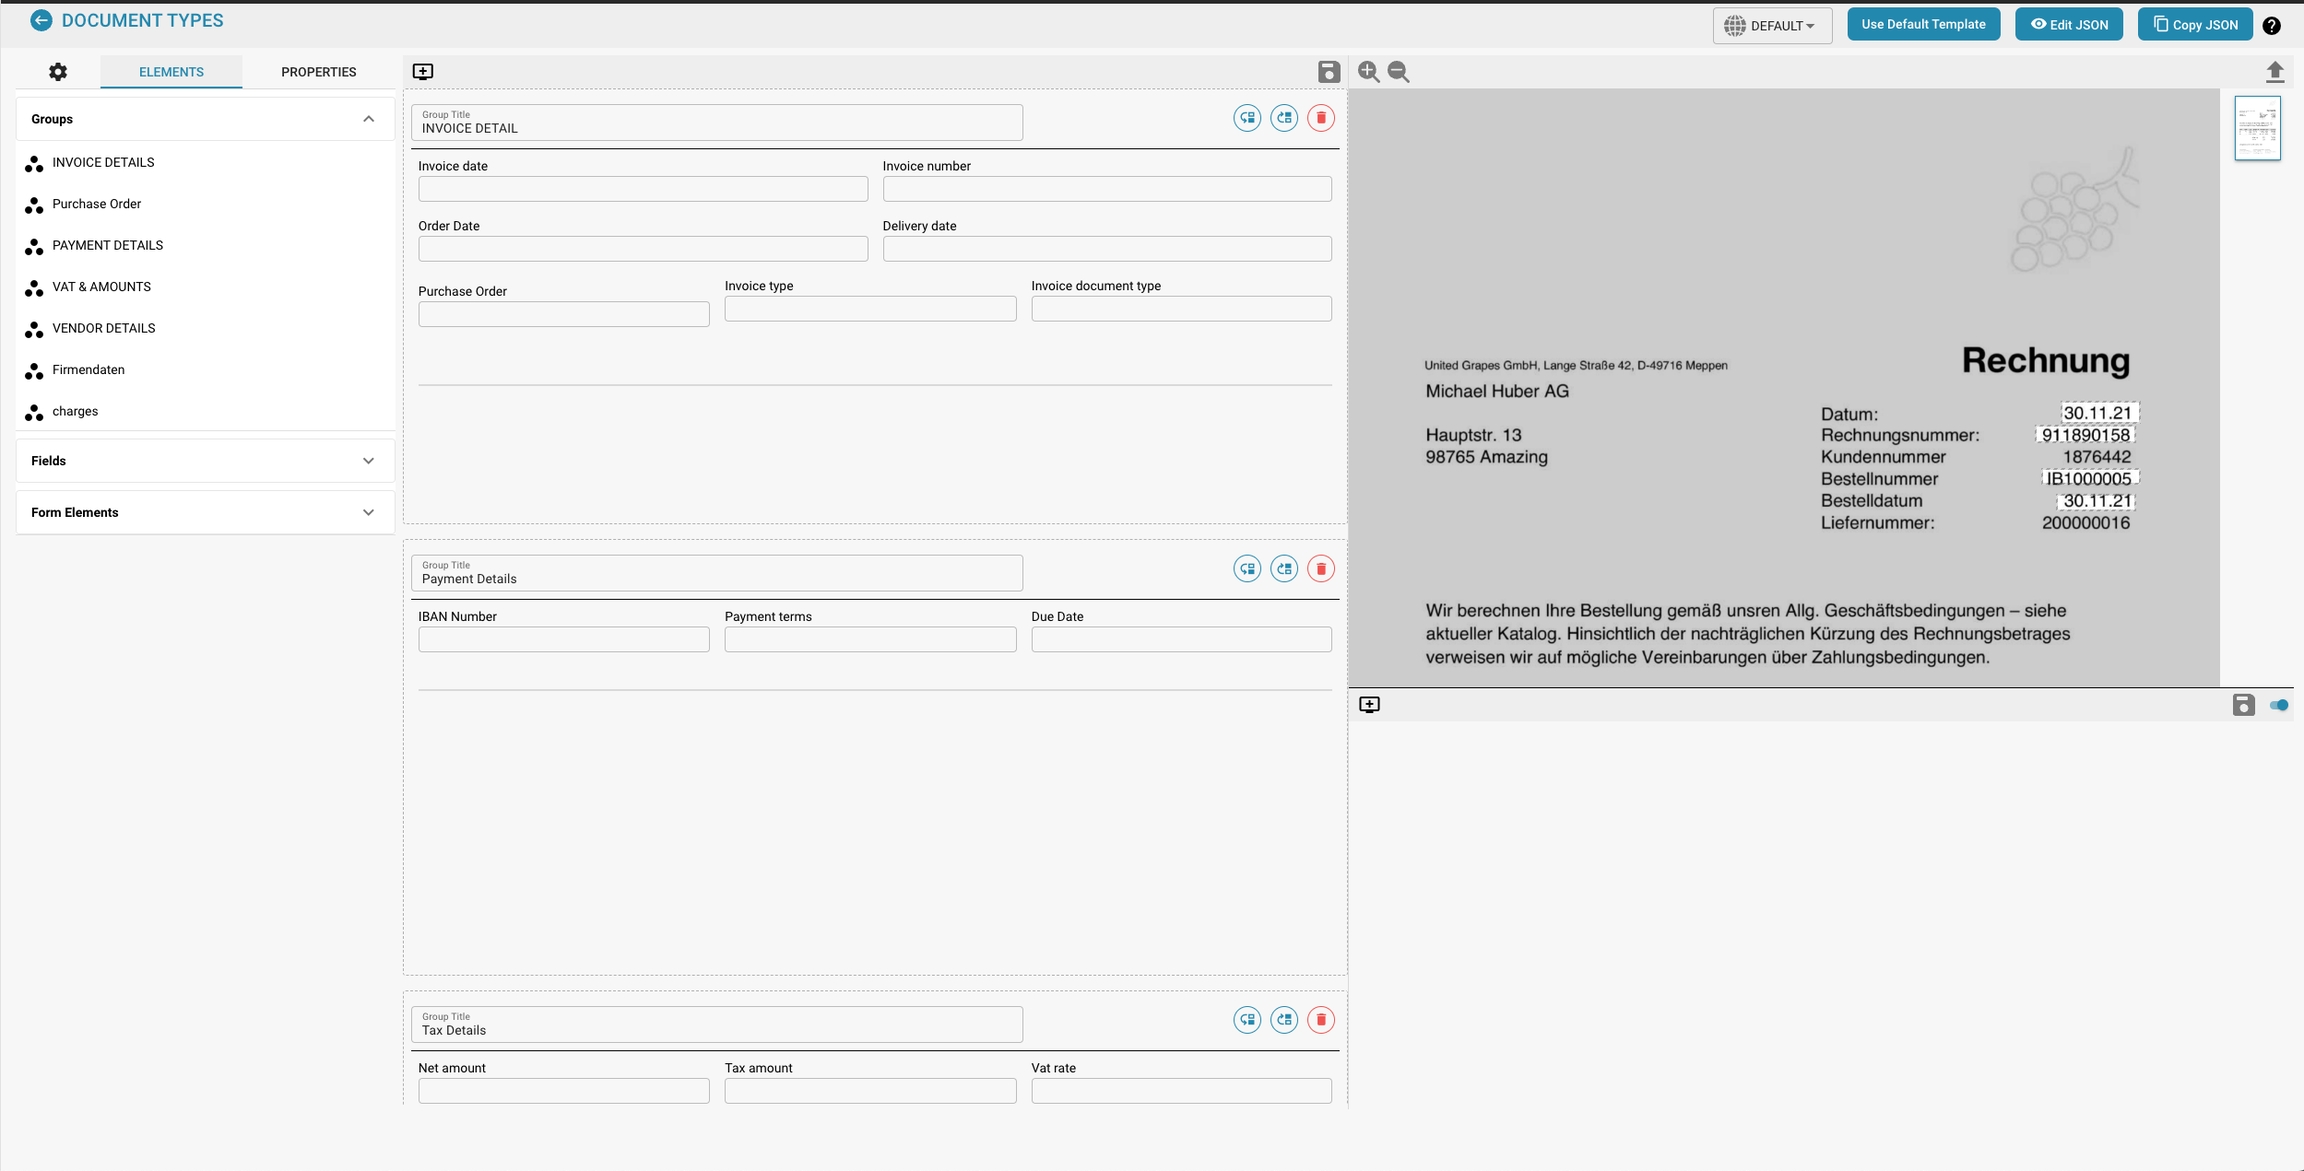
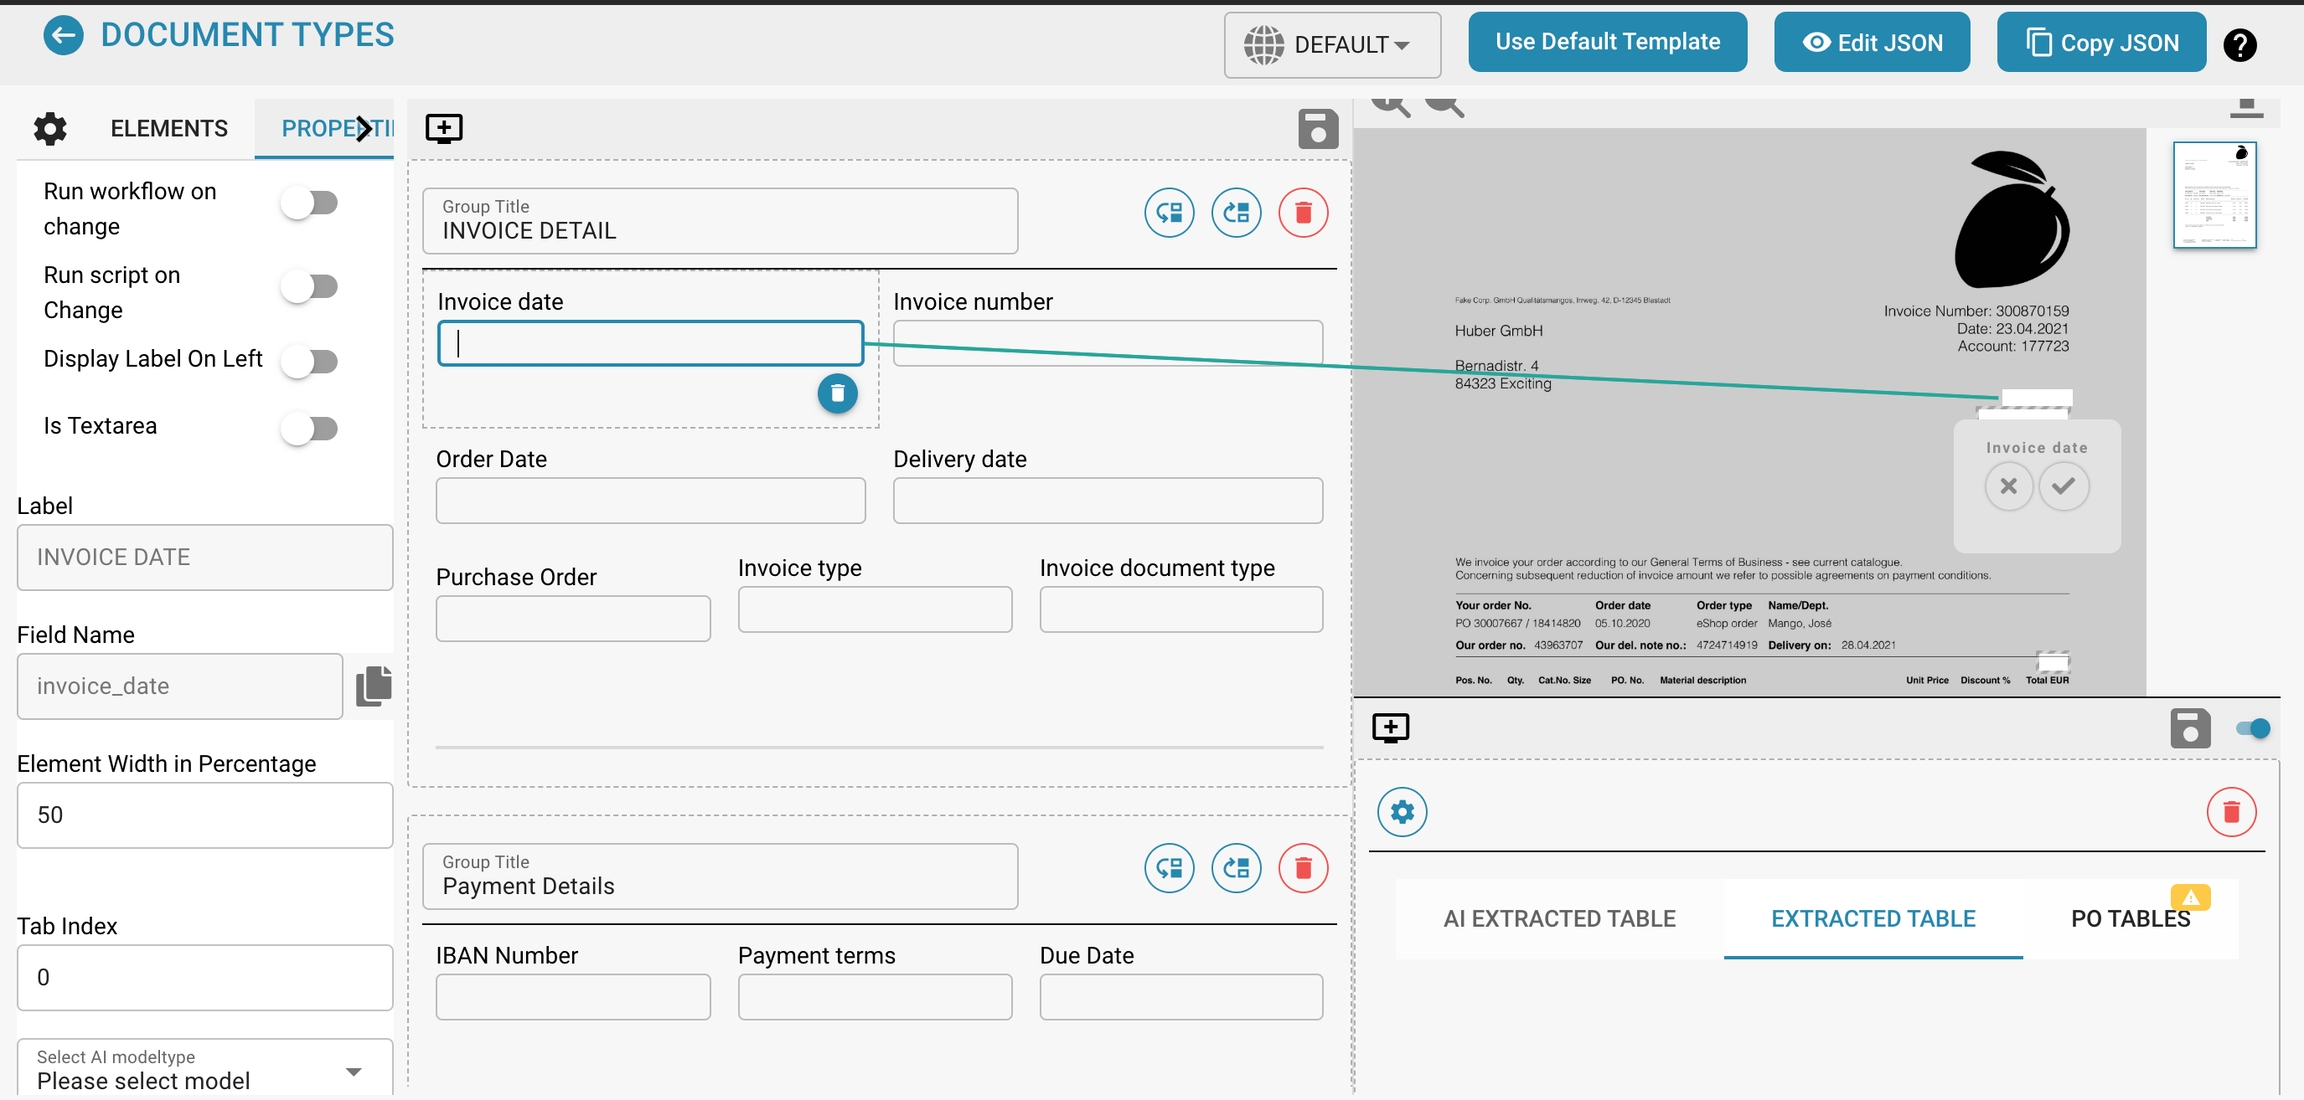
The Layout Manager allows administrators to visually configure and modify the layout of document types by setting properties for various data fields and groups within a document. This interface helps ensure that the extraction models and manual data entry points align precisely with the document's structure as scanned or uploaded into Docbits.
Key Components
Groups and Fields:
Groups: Organizational units within a document type that categorize related fields (e.g., Invoice Details, Payment Details). These can be expanded or collapsed and arranged to mirror the logical grouping in the actual document.
Fields: Individual data points within each group (e.g., Invoice Number, Payment Terms). Each field can be customized for how data is captured, displayed, and processed.
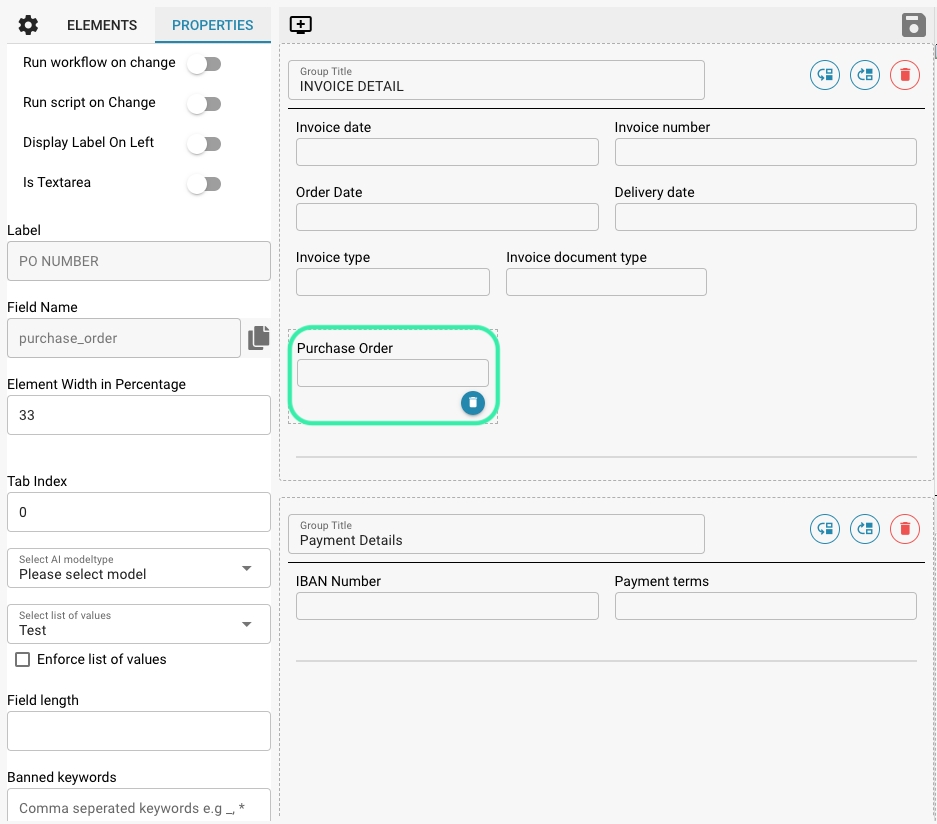
Properties Panel:
This panel displays the properties of the selected field or group, allowing for detailed configuration, such as:
Label: The visible label for the field in the user interface.
Field Name: The technical identifier used within the system.
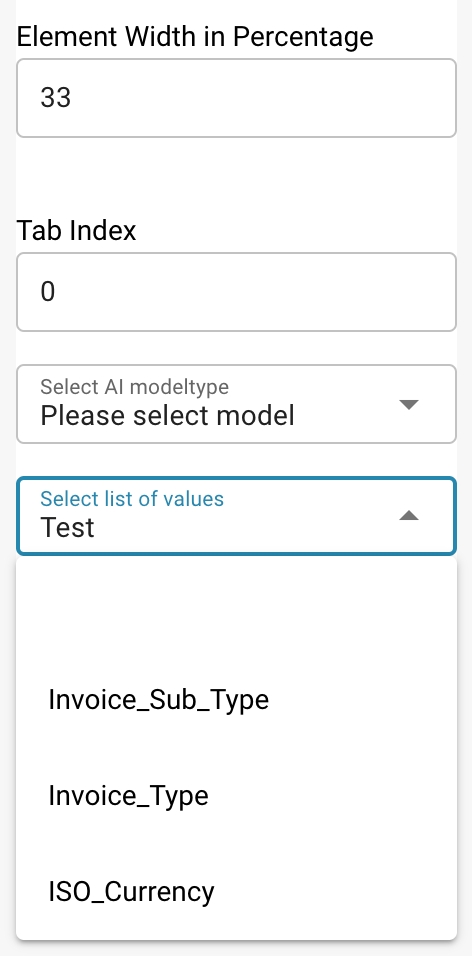
Element Width in Percentage: Determines the width of the field in relation to the document layout.
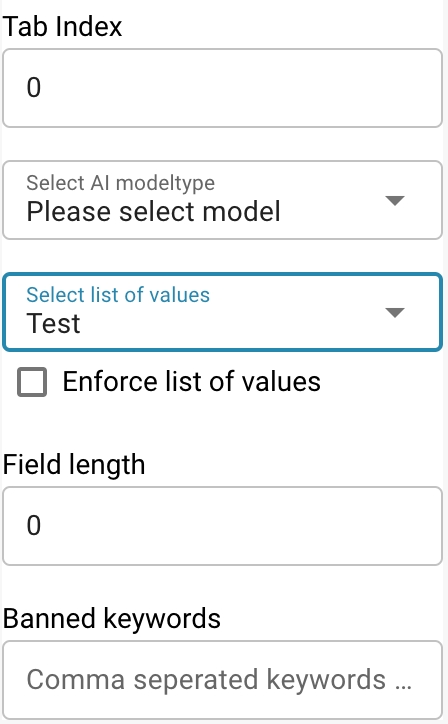
Tab Index: Controls the tabbing order for navigation.
Run Script on Change: Whether to execute a script when the field value changes.
Display Label On Left: Whether the label is displayed to the left of the field or above it.
Is Textarea: Specifies if the field should be a textarea, accommodating larger amounts of text.
Select Model Type: Option to select which model type will handle the extraction of this field.
Field Length: Maximum length of data to be accepted in this field.
Banned Keywords: Keywords that are not allowed within the field.
Template Preview:
Shows a real-time preview of how the document will appear based on the current layout configuration. This helps in ensuring that the layout matches the actual document structure and is vital for testing and refining the document processing setup.
Purpose and Use
The Layout Manager is an essential tool for ensuring that document types are properly configured to accurately capture and organize data. Here are some reasons why using a Layout Manager is important:
Structured Presentation:
A Layout Manager enables an orderly and structured presentation of information.
Setting placement rules for different data elements ensures that information is presented consistently and clearly.
Efficient Data Capture:
Using a Layout Manager enables users to capture information more efficiently.
A well-designed layout results in users knowing intuitively where to enter specific data, which speeds up data capture and reduces the risk of errors.
Consistency:
Consistent layouts ensure consistency in documentation.
When different documents use the same Layout Manager, a consistent presentation of information across different documents is ensured.
This is especially important in environments where many different users access or collaborate on documents.
Adaptability:
A Layout Manager enables the appearance of documents to be customized depending on requirements.
Depending on the type of document or specific requirements, layouts can be customized to better present different types of data or information.
Scalability:
A well-configured layout manager makes it easier to scale documents.
When new data needs to be added or requirements change, the layout manager can be customized to easily handle those changes without the need for a major redesign.
Overall, using a layout manager is critical to ensure that data is captured and organized accurately. A well-designed layout improves the user experience, promotes efficiency in data entry, and contributes to the consistency and adaptability of documents.
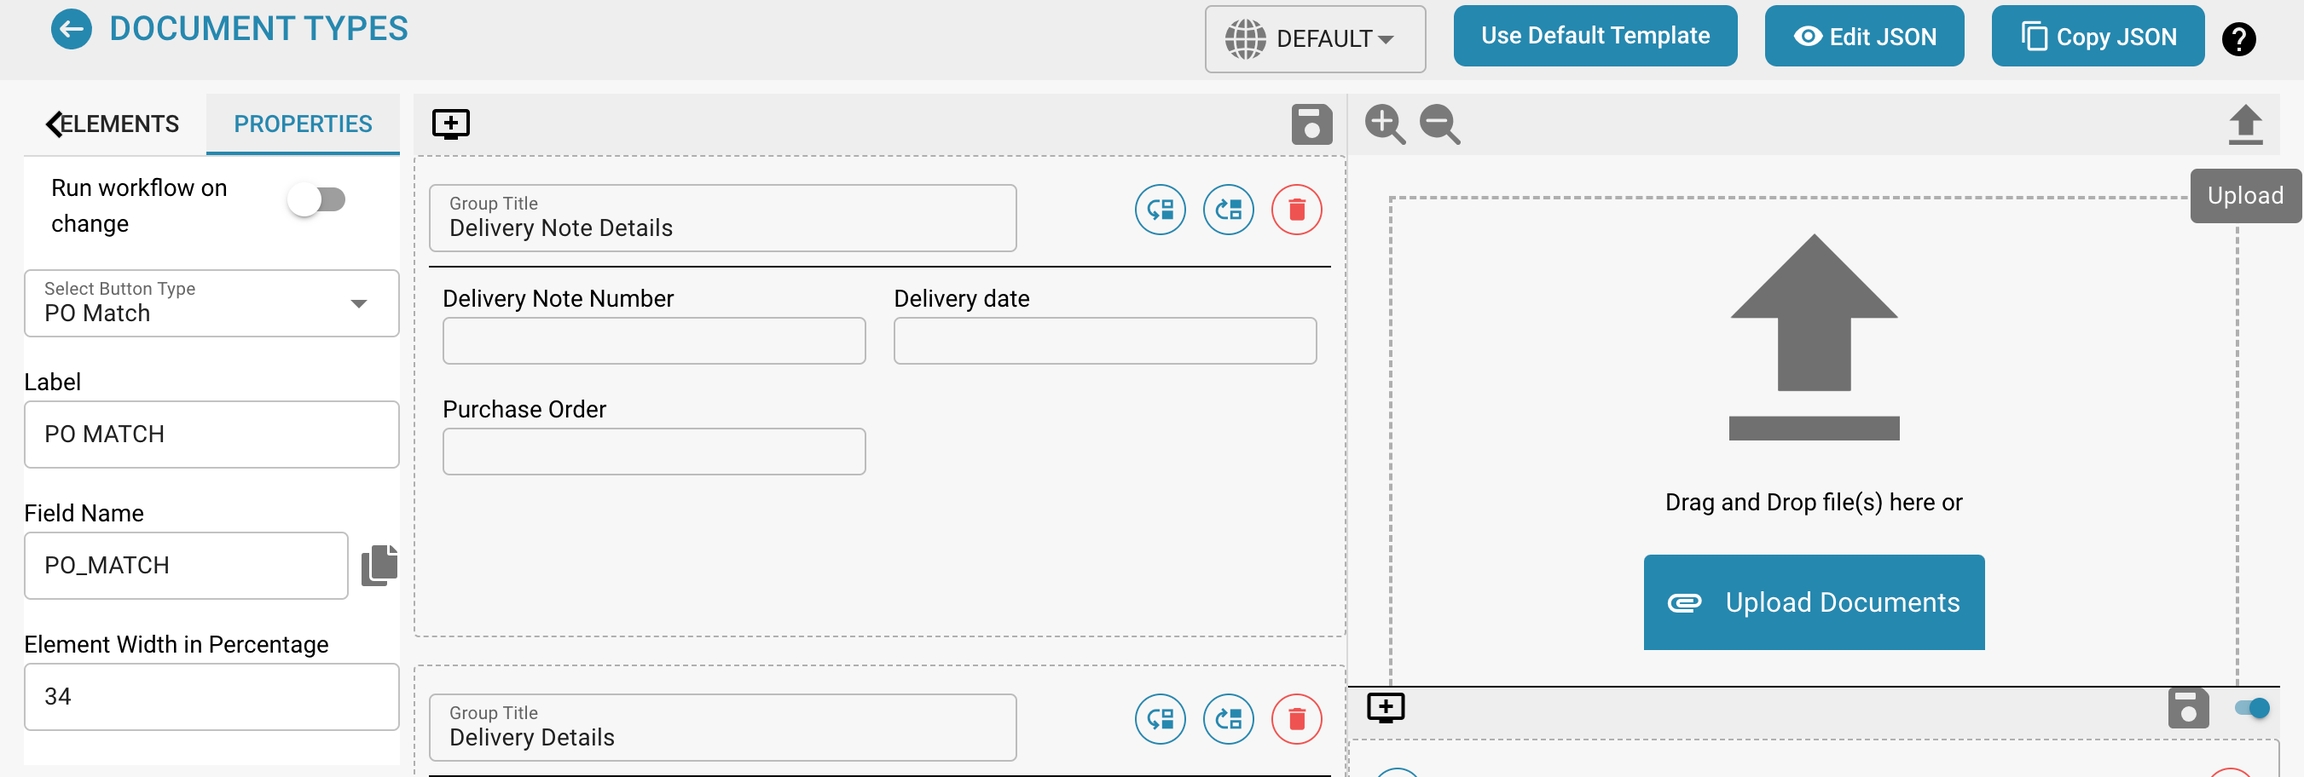
Navigeren in de Lay-outbeheerder
In staat zijn om te navigeren in de Lay-outbeheerder in DocBits en groepen en velden te bewerken is cruciaal voor het beheersen van de structuur en het uiterlijk van documenten.
Hier zijn de stappen om de Lay-outbeheerder te gebruiken en groepen en velden te bewerken:
Navigeren in de Lay-outbeheerder:
De Lay-outbeheerder openen:
Log in op DocBits en navigeer naar het gebied waar je de Lay-outbeheerder wilt gebruiken.
Je kunt deze optie vinden in "Beheer Documenttypen".


Het Documenttype selecteren:
Selecteer het documenttype dat je wilt bewerken.
De Lay-outbeheerder toont de structuur van dat documenttype.

Navigeren door Groepen en Velden:
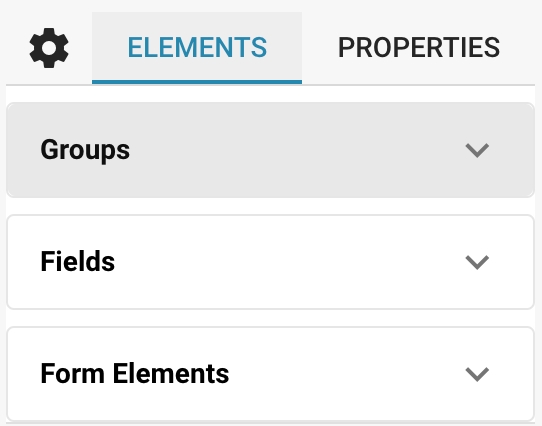
In de Lay-outbeheerder zie je een boomstructuur die de groepen en velden van het geselecteerde documenttype vertegenwoordigt.

Je kunt door deze structuur navigeren om de gebieden die je wilt bewerken aan te passen.

Groepen en velden bewerken:
Opmerking: wanneer de Titel van een veld is gewijzigd, moet je het veld in de lay-outbouwer verwijderen en opnieuw toevoegen om de wijzigingen effect te laten hebben.
Een groep of veld toevoegen:
Klik op de knop "Nieuwe groep maken", afhankelijk van of je een nieuwe groep of veld wilt toevoegen.

Voer de naam van de nieuwe groep of veld in en selecteer eventuele instellingen die je wilt, zoals het type veld (tekst, nummer, datum, enz.).


Een groep of veld verwijderen:
Selecteer de groep of het veld dat je wilt verwijderen.
Klik op de knop "Verwijderen" of gebruik de juiste sneltoets (meestal "Delete" of "Del").

Een groep of veld wijzigen:
Dubbelklik op de groep of het veld dat je wilt wijzigen.
Wijzig eventuele eigenschappen die je wilt, zoals de naam, positie, grootte of instellingen van het veldtype.

Groepen en velden rangschikken:
Sleep en zet groepen of velden neer om hun volgorde te wijzigen of ze binnen of buiten andere groepen te plaatsen.

Wijzigingen opslaan:
Vergeet niet je wijzigingen op te slaan voordat je de Lay-outbeheerder verlaat.
Klik op de knop "Opslaan".

Door deze stappen te volgen, kun je effectief navigeren in de Lay-outbeheerder van DocBits en groepen en velden binnen een documenttype bewerken. Dit stelt je in staat om de structuur en het uiterlijk van je documenten aan te passen aan jouw behoeften.
Configuring Field Properties
Configuring field properties is critical to ensure that the data captured in a document meets specific requirements and processing processes.
Here are the steps to configure field properties to meet specific data processing needs:
Select a field type:
Start by selecting the right field type for your data.
This depends on what type of information the field will contain.

Possible field types include text, number, date, drop-down menu, checkbox, etc.

Set validation and formatting:
Set validation rules to ensure that the data entered meets the expected criteria.
This may include checking for certain string patterns, numeric limits, date formats, or other conditions.
Define default values:
If certain fields typically have a default value, you can set that as the default value.
This makes data entry easier because users don't have to enter the same value every time.
Set user permissions:
Determine which user groups should have access to the field and what type of access rights they have.
This can include read, write, or edit rights.
Link to other data:
In some cases, data from one field needs to be linked to data from another field or data source.
Configure appropriate links or relationships to ensure consistent data integration.
Apply visibility rules:
Determine under what conditions a field should be visible or hidden.
This can be useful for dynamically adapting the user interface based on certain data or user actions.
Enable historization:
If necessary, enable historization of fields to track changes historically.
This allows you to track changes to the data and monitor the history of data changes.
Add documentation notes:
Add notes or descriptions to explain to users how to use the field or what type of data is expected.
By following these steps and configuring the appropriate field properties, you can ensure that your documents meet specific requirements for data handling, user access, and data accuracy.
Using the Template Preview
The Template Preview is an extremely useful tool for checking and adjusting layout settings in real time before making changes to a document or template.
Here's an explanation of how you can use the Template Preview:
Opening the Template Preview:
You can usually find the Template Preview option in the template editor interface.
Selecting the template:
Select the template whose layout you want to check.
This can be an existing template you want to make changes to or a new template you want to create.

Adjusting the layout settings:
Change the layout settings as needed. This can include adding, removing or adjusting groups, fields, columns, rows, fonts, etc.
Real-time preview:
As you change the layout settings, the preview updates in real time.
You can immediately see how your changes affect the look and structure of the template.
Interactive customization:
Take advantage of the ability to interactively customize the layout by moving, resizing, or making other adjustments to elements while checking the effects in real time in the preview.
Testing different configurations:
Experiment with different layout configurations to find the best design for your needs.
Use the template preview to see how each change affects the final look.
Saving and committing changes:
Once you are happy with the layout, save your changes.
Depending on the software, you may also be able to find the option to commit your changes directly to update the template for use in other documents or processes.
Using the template preview allows you to make sure your layout meets your desired needs before committing changes. This allows you to efficiently customize the design and structure of your documents and ensure that they meet the desired visual and functional standards.
Save and apply changes
Saving and applying changes made in the Layout Manager is an important step to ensure that your layout customizations are effectively applied in the document processing workflow.
Here are the steps to save and apply changes:
Saving the changes:
After you have made the desired customizations in the Layout Manager, look for the "Save" button to save the changes.
Click this button to save your changes in the Layout Manager. This backs up your layout customizations and ensures that they are available for future editing sessions.

Applying the changes to the document processing workflow:
Once your changes are saved in the Layout Manager, they are usually automatically applied to the document processing workflow that uses that specific document type.
New documents based on this template will inherit the updated layout settings when they are created. This means that the new documents will include the new groups, fields, or other layout customizations you made in Layout Manager.
Existing documents already created using this template may be treated differently depending on your software and configuration. In some cases, changes may be automatically applied to pre-existing documents, while in other cases, manual adjustments may be required to bring existing documents into line with the updated layout settings.
Testing the changes:
After you have saved the layout changes and they have been applied to the document processing workflow, it is advisable to test the changes to ensure that they work as intended.
Create new test documents or review existing documents to ensure that the updated layout settings are applied correctly and that data is captured and displayed as expected.
By following these steps, you can effectively save changes in Layout Manager and apply them to the document processing workflow. This ensures a smooth integration of your layout customizations into the document creation and processing process.
Best practices
Best practices for efficient and precise document layouts.
Logical organization of fields:
Group related fields together to create a logical and intuitive structure. This makes it easier for users to navigate and enter data.
Arrange fields so that frequently used or important information is easily accessible and placed in a prominent location.
Ensuring data completeness:
Identify all required data fields and mark them accordingly. Ensure users are prompted to enter all necessary information to avoid incomplete records.
Use validation rules to ensure that entered data conforms to expected formats and criteria.
Clear labels and instructions:
Use clear and precise labels for fields to help users enter the expected data.
Add instructions or notes when additional information is required to ensure users provide the correct data.
Test and optimize:
Test the layout and data entry thoroughly to ensure that all data is captured and stored correctly. Collect feedback from users and make adjustments to continuously improve user experience and data integrity.
Troubleshooting
Troubleshooting common issues
Fields do not match the scanned documents:
Check the configuration of the fields in the Layout Manager and make sure they match the actual fields in the scanned documents.
Check that the positions and dimensions of the fields in the layout are correct and that they cover all relevant information.
Data is not extracted correctly:
Check the validation rules and format settings for the affected fields to make sure that the expected data can be captured correctly.
Make sure that the OCR (Optical Character Recognition) or other data capture technologies are properly configured and calibrated to ensure accurate extraction of the data.
Faulty data validation:
Check the validation rules for fields to make sure they are appropriate and configured correctly.
Adjust the validation rules if necessary to ensure that they meet the requirements and formats of the captured data.
Document layouts are confusing or inefficient:
Revise the layout to improve the structure and organization of fields and ensure that important information is easily accessible.
Run user testing to get feedback on the usability of the layout and make adjustments to increase efficiency.
By applying these best practices and troubleshooting as appropriate, you can create efficient and accurate document layouts that enable smooth data capture and processing.
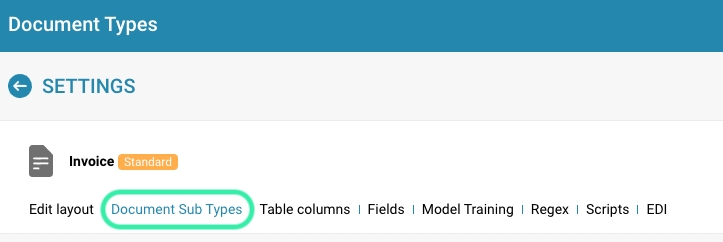
Document Sub Types

Overzicht
Document Sub Types zijn in wezen gespecialiseerde versies van de hoofd documenttypes. Bijvoorbeeld, onder het hoofd documenttype "Factuur", kunnen er subtypes zijn zoals "Standaard Factuur", "Pro-forma Factuur" en "Credit Factuur", elk met iets andere gegevensvereisten of verwerkingsregels.
Hier zijn enkele redenen waarom subtypes belangrijk zijn:
Specifieke verwerkingsvereisten: Vaak vereisen verschillende variaties van hetzelfde documenttype verschillende verwerkingsvereisten. Bijvoorbeeld, verschillende soorten facturen kunnen specifieke velden, goedkeuringsworkflows of validatieregels vereisen op basis van de interne beleidslijnen van een bedrijf of de vereisten van externe partners.
Organisatorische aanpassing: Het gebruik van subtypes stelt organisaties in staat om hun documentverwerking aan te passen aan hun specifieke behoeften. Ze kunnen subtypes creëren die precies zijn afgestemd op hun individuele bedrijfsprocessen, in plaats van te vertrouwen op generieke oplossingen die mogelijk niet aan alle vereisten voldoen.
Duidelijke structurering: Het gebruik van subtypes zorgt voor een duidelijkere structurering van documentbeheer. Gebruikers kunnen gemakkelijker navigeren tussen verschillende variaties van een documenttype en de specifieke informatie vinden die ze nodig hebben zonder afgeleid te worden door irrelevante gegevens of opties.
Consistentie en nauwkeurigheid: Subtypes kunnen helpen om consistentie en nauwkeurigheid in documentcaptatie en -verwerking te waarborgen. Door subtypes te standaardiseren, kunnen organisaties ervoor zorgen dat alle relevante informatie wordt vastgelegd en dat gegevens op een uniforme manier zijn gestructureerd.
Efficiënte verwerking: Het gebruik van subtypes kan de efficiëntie in documentverwerking verhogen omdat gebruikers toegang hebben tot vooraf gebouwde sjablonen en workflows die zijn geoptimaliseerd voor specifieke documenttypes. Dit vermindert handmatige inspanning en minimaliseert fouten of vertragingen in het proces.
Document subtypes in Docbits stellen gebruikers in staat om flexibeler en op maat gemaakt om te gaan met documentvariaties, wat resulteert in verbeterde efficiëntie, nauwkeurigheid en aanpassingsvermogen. Ze bieden een krachtige manier om de complexiteit van documentverwerking te beheren en de productiviteit binnen een organisatie te verhogen.
Belangrijkste Kenmerken en Opties
Lijst van Sub Types:
Elke rij vertegenwoordigt een sub-type van een primair documenttype.
Bevat de naam van het sub-type en een set acties die erop kunnen worden uitgevoerd.
Acties:
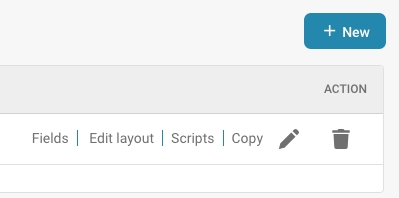
Velden: Configureer welke gegevensvelden zijn opgenomen in het sub-type en hoe ze worden beheerd.
Bewerk Lay-out: Wijzig de visuele lay-out voor hoe informatie wordt weergegeven en ingevoerd voor dit sub-type.
Scripts: Koppel of bewerk scripts die specifieke bewerkingen uitvoeren wanneer documenten van dit sub-type worden verwerkt.
Kopie: Dupliceer een bestaande sub-type configuratie om als basis voor een nieuwe te gebruiken.
Document Sub Type bewerken: Bewerk de naam of titel van het sub-type.
Verwijderen: Verwijder het sub-type als het niet langer nodig is.
Nieuwe Sub Types Toevoegen:
De "+ Nieuw" knop stelt beheerders in staat om nieuwe sub-types te creëren, waarbij unieke eigenschappen en regels worden gedefinieerd indien nodig.
Creating a new Sub Type
Here are step-by-step instructions to create a new subtype:
Navigate to the Settings area: Log in to DocBits as an administrator and navigate to the Document Type Management area.
Select the option to add a subtype: Click the “+ New” button to add a new subtype.

Name the subtype: Enter a descriptive name for the new subtype. This name should clearly describe the purpose of the subtype so that users can easily understand what type of documents it represents.


Configure initial settings: Set the initial settings for the new subtype, including the default fields, options, and templates to use for this subtype. This can include adding specific metadata fields, specifying approval workflows, or configuring user permissions.
Make optional configurations: Depending on your company's requirements or the nature of the documents, you can make additional configurations to customize the new subtype to your specific needs. This may include setting default values, validation rules, or custom actions.

Save the new subtype: Once you have entered all the required information, save the new subtype to create it in the document management system.
After the new subtype is created, users can add and manage documents of that type according to the initial settings you specified. Make sure you inform users about the new subtype and provide training or guidance, if necessary, to help them use it effectively.
Configure subtypes
Configuring subtypes allows you to customize the structure and behavior of the documents within a specific type. Here is an explanation of how you can use the "Fields", "Edit Layout", and "Scripts" options to customize each subtype to specific needs:
Fields: The "Fields" option allows you to add, edit or remove custom metadata fields for the subtype. These fields can contain information about the documents of that type such as title, author, date, category, etc. You can use different field types such as text boxes, dropdown lists, date values, etc. to capture the data according to your requirements.

Edit Layout: The Edit Layout option allows you to customize the appearance and arrangement of fields on the user interface. You can change the order of fields, create groups of fields to group related information, and adjust the size and position of fields on the page. This allows you to optimize the user experience and improve usability.

Scripts: The "Scripts" option allows you to add custom logic or automation for the subtype. You can use scripts to trigger specific actions when a document of this type is created, edited or deleted. This can be useful for implementing complex business rules, performing validations or integrating external systems.

Using Actions
Here is a guide on how to properly use the "Copy" and "Delete" actions for efficient subtype management:
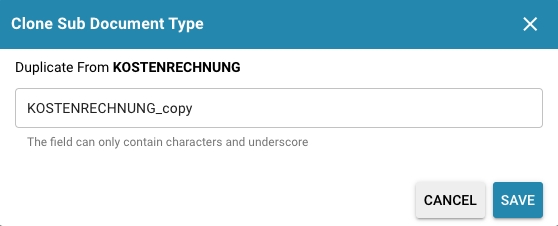
Copying a sub-type:
Navigate to the sub-type management settings in your document management system.
Select the subtype you want to copy, click "Copy" and enter a new name for the copied subtype if necessary.
Confirm the action and the system will create a copy of the selected sub-type with all existing settings, fields, layouts and scripts.
Deleting a sub-type:
Navigate to the subtype management settings and select the subtype you want to delete.
Click the trash can icon on the right of the action menu.
Confirm the deletion action by accepting a confirmation message if prompted.
Note that deleting a subtype can irreversibly remove all documents and data associated with it. Make sure you take all necessary security precautions and check that the subtype is no longer needed before deleting it.
Proper use of these actions allows you to streamline sub-type management. Copying allows you to leverage existing configurations for new sub-types, while deleting allows for efficient cleanup of sub-types that are no longer needed. However, it is important to be careful when deleting to avoid data loss. \
Best Practices
Here are some best practices for organizing document types and subtypes:
Use naming conventions: Use consistent and meaningful naming conventions for your document types and subtypes. This makes it easier for users and administrators to navigate and identify the different types.
Use subtypes only when necessary: Create a subtype only when it is necessary to manage variations within a main document type. If the differences between the documents are minimal, it may be more efficient to treat them as separate instances of the main type.
Logically divide documents: Subtypes should be used to create logical groupings of documents that have similar processing requirements. This can make organization and management easier by grouping similar documents together.
Regularly review and clean up: Regularly review your document types and subtypes to ensure they are up to date and meet your organization's needs. Remove types or subtypes that are no longer needed to optimize system performance and improve the user experience.
Create documentation policies: Create clear documentation policies for the use of document types and subtypes in your organization. This can include guidance on creating new types, assigning permissions, and using metadata.
Train users: Regularly train your users on the use of document types and subtypes, including proven methods and best practices. This helps increase efficiency and reduce errors.
By following these best practices, you can effectively organize and manage your document types and subtypes, resulting in better use of your document management system.
Troubleshooting
Here are some troubleshooting tips for managing sub-types:
Resolve conflicts between similar subtypes: Check for conflicts between similar subtypes that could cause confusion. Make sure that the differences between subtypes are clearly defined and that they are different in their usage. If necessary, adjust configurations to resolve conflicts.
Resolve script execution errors: Check scripts configured to run when creating or editing subtypes for errors or inconsistencies. Check the syntax and logic of the scripts to make sure they work correctly. Test the scripts in a development environment to identify and fix problems before applying them to the production environment.
Ensure configuration consistency: Make sure that configurations for subtypes are consistent and do not have inconsistencies or contradictions. Check fields, layouts, permissions, and other settings to make sure they are configured correctly and meet the requirements of the subtypes.
Implement logging and auditing: Implement logging and auditing capabilities to identify and resolve subtype management errors and issues. Monitor subtype changes and track logs to identify and resolve potential issues early.
Provide user training and support: Provide training and support to users tasked with subtype management. Ensure they have the knowledge and skills required to effectively configure and manage subtypes. Provide support for any issues or questions that arise.
By applying these troubleshooting tips, you can identify and resolve subtype management issues to ensure the efficiency and effectiveness of your document management system.
Tabelkolommen
Overzicht
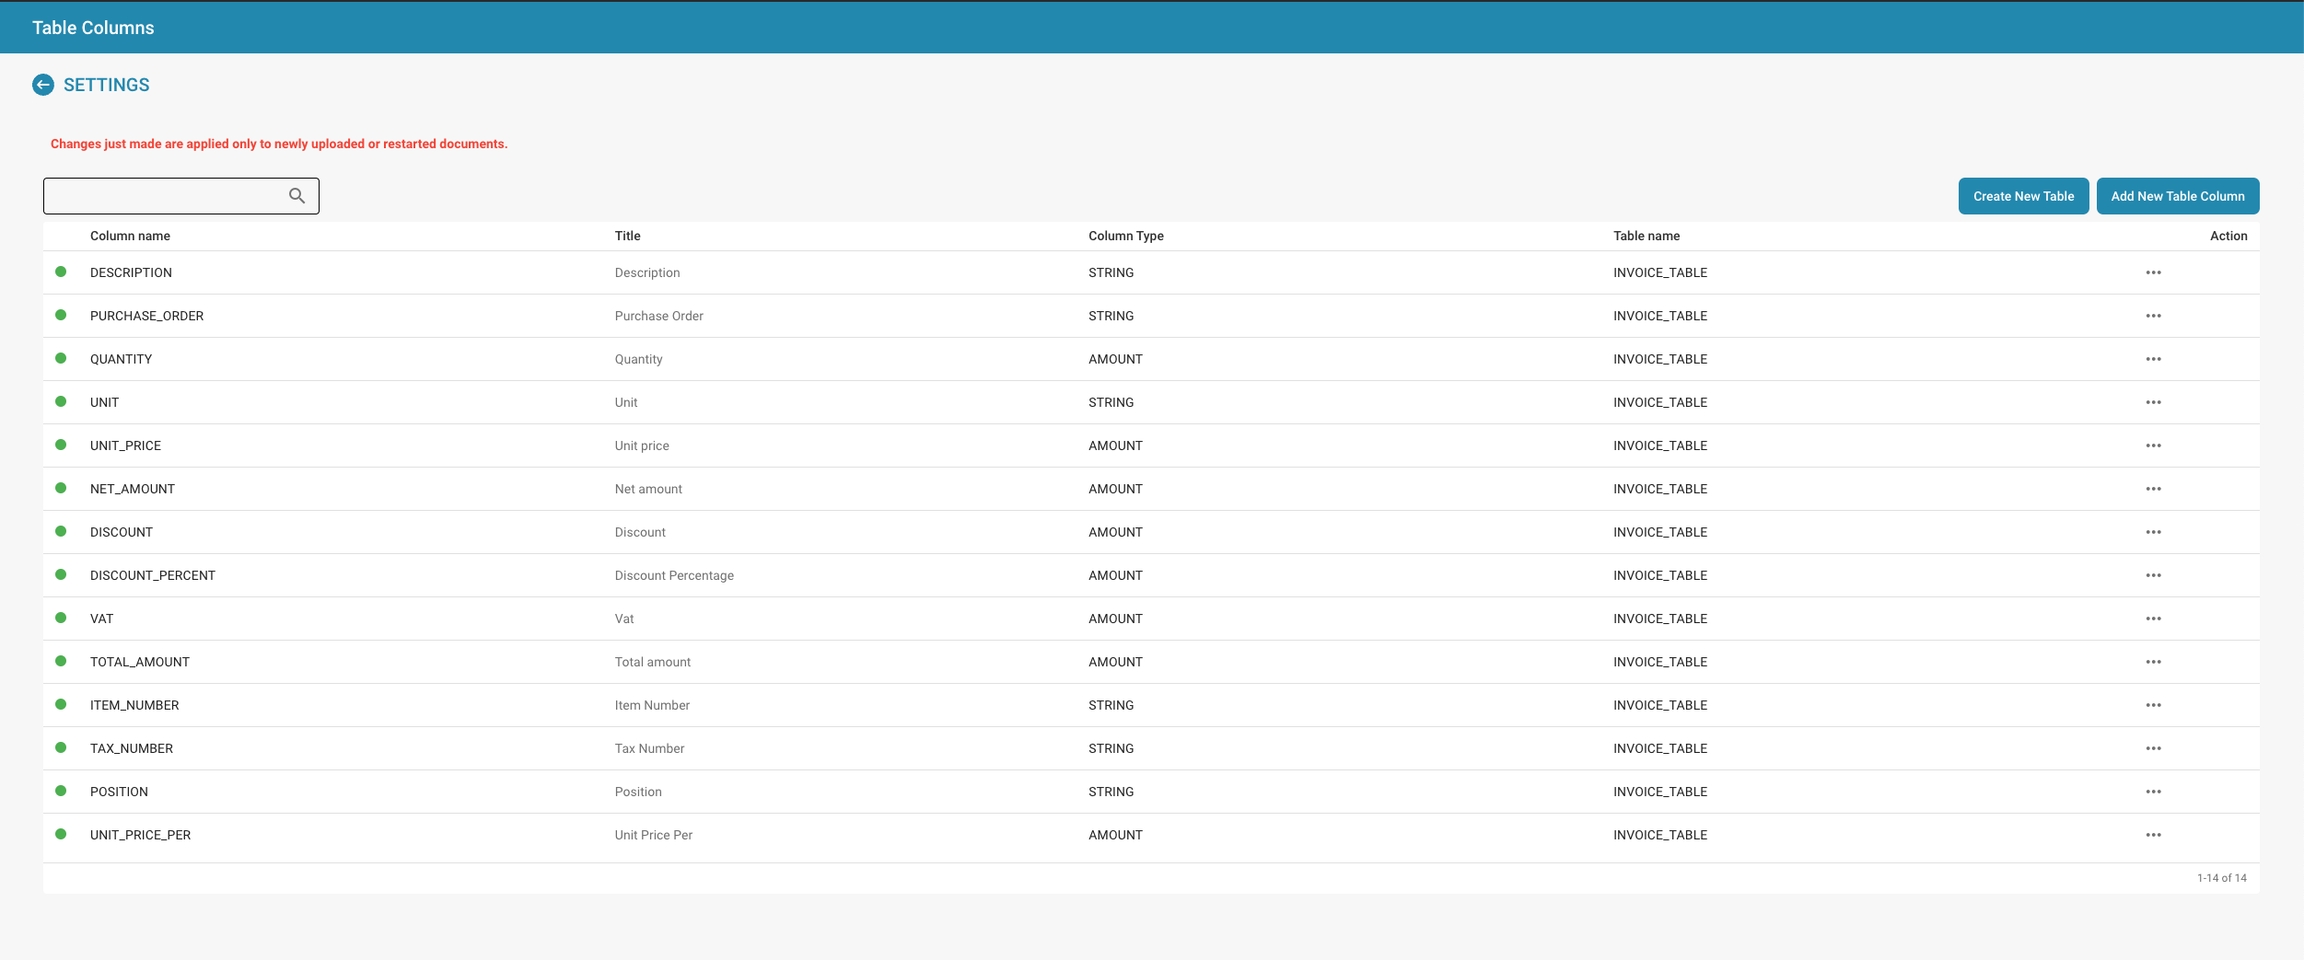
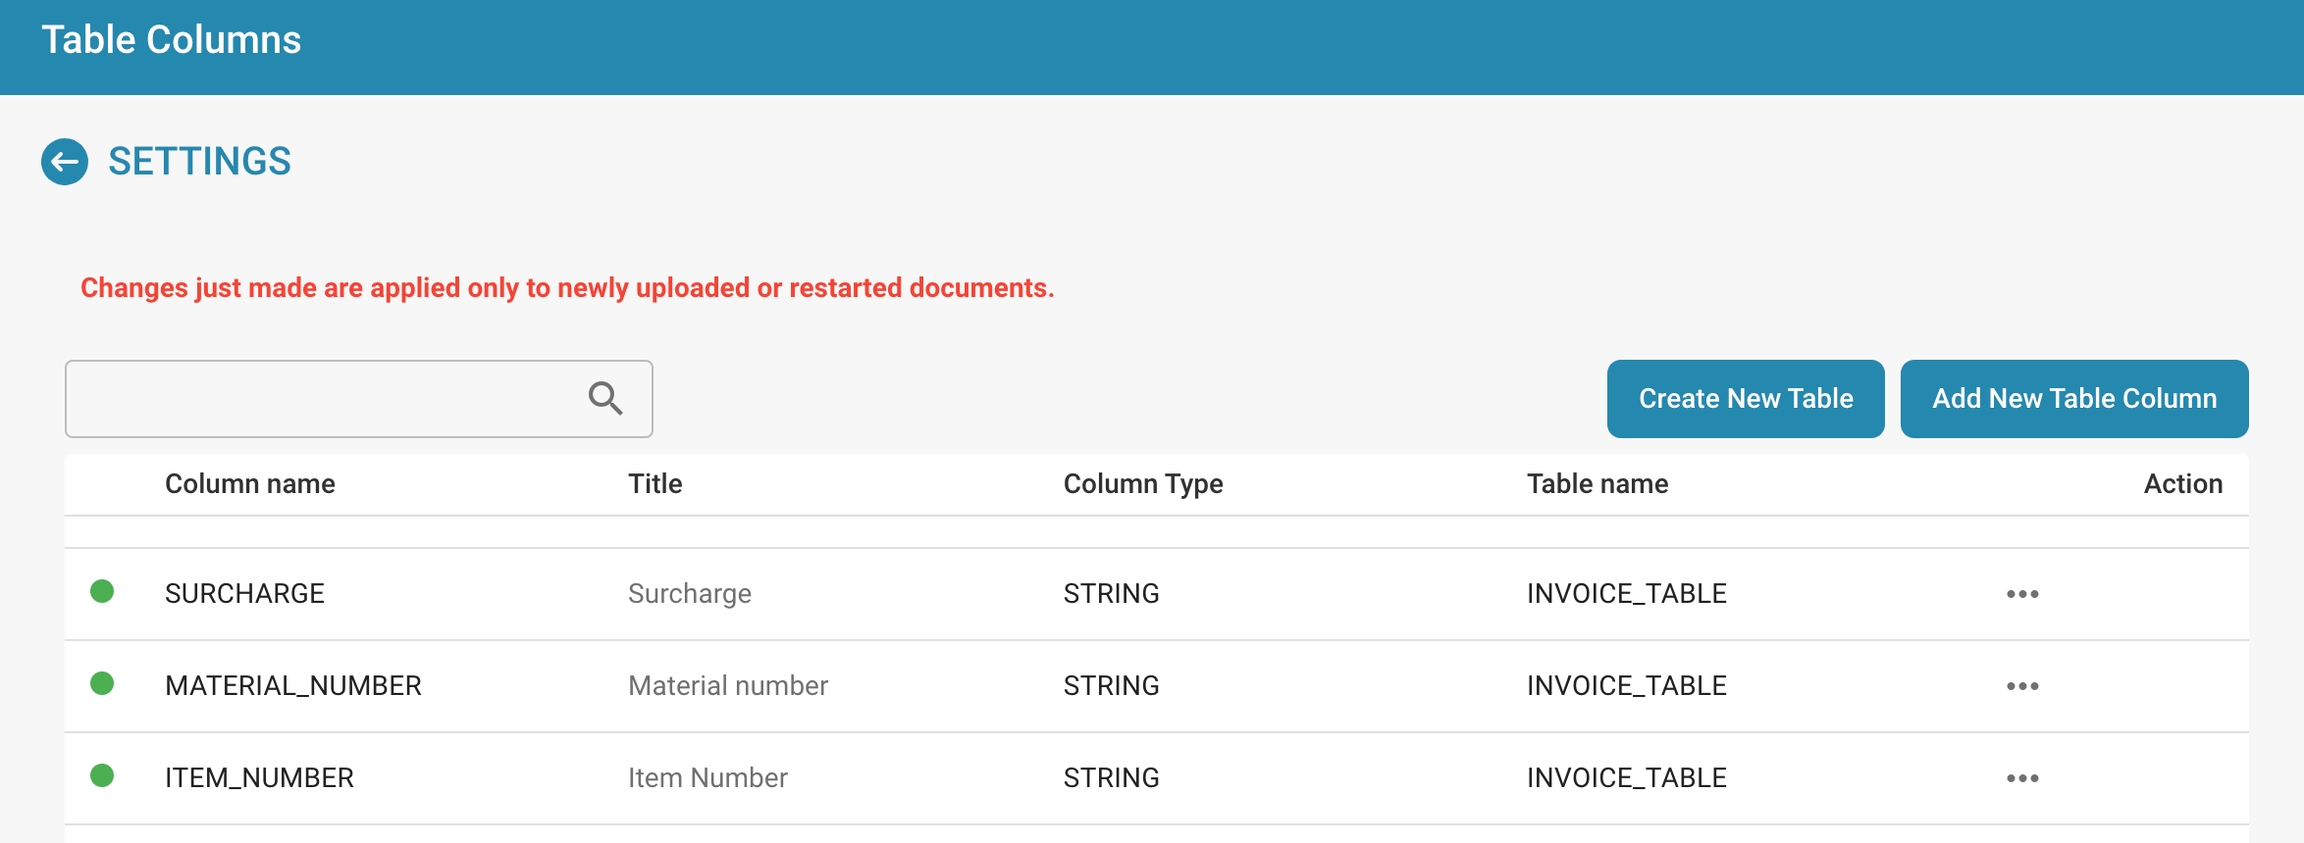
De Tabelkolommen-interface in Docbits wordt gebruikt om de kolommen te specificeren die verschijnen in datatabellen voor elk documenttype. Elke kolom kan worden geconfigureerd om specifieke soorten gegevens vast te houden, zoals strings of numerieke waarden, en kan essentieel zijn voor sorteer-, filter- en rapportagefuncties binnen Docbits.
Belangrijkste Kenmerken en Opties
Kolomconfiguratie:
Kolomnaam: De identificator voor de kolom in de database.
Titel: De leesbare titel voor de kolom die in de interface zal verschijnen.
Kolomtype: Bepaalt het gegevenstype van de kolom (bijv. STRING, BEDRAG), wat bepaalt welk soort gegevens in de kolom kan worden opgeslagen.
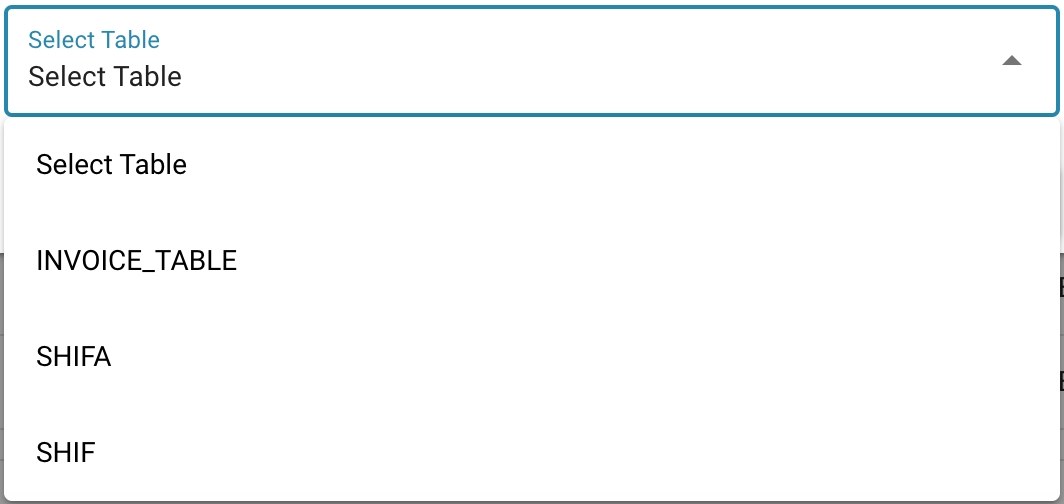
Tabelnaam: Geeft aan bij welke tabel de kolom hoort, en koppelt deze aan een specifiek documenttype zoals INVOICE_TABLE.
Acties:
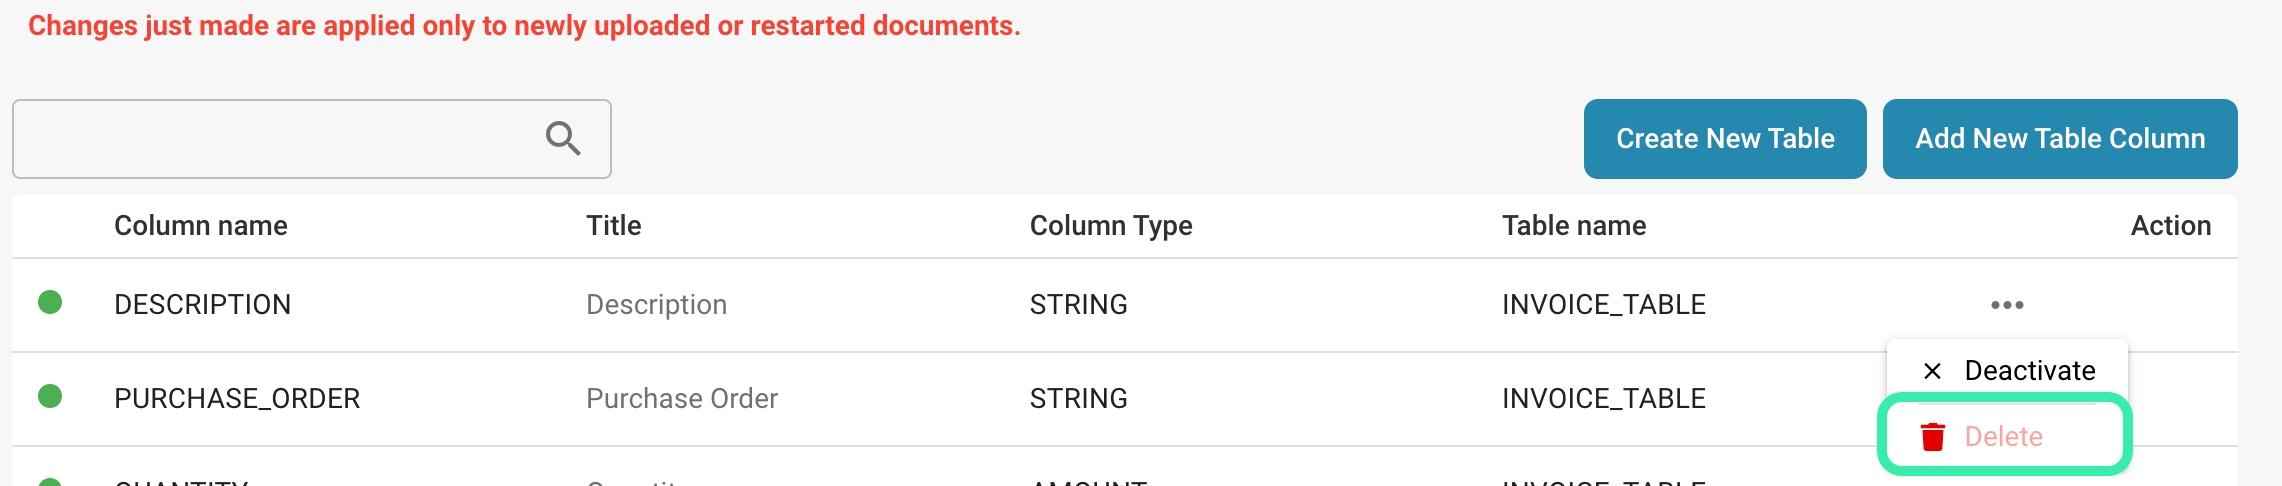
Bewerken: Wijzig de instellingen van een bestaande kolom.
Verwijderen: Verwijder de kolom uit de tabel, wat nuttig is als de gegevens niet langer nodig zijn of als de gegevensstructuur van het documenttype verandert.
Nieuwe Kolommen en Tabellen Toevoegen:
Nieuwe Tabelkolom Toevoegen: Opent een dialoogvenster waarin je een nieuwe kolom kunt definiëren, inclusief de naam, of deze verplicht is, het gegevenstype en de tabel waartoe deze behoort.
Nieuwe Tabel Maken: Maakt het mogelijk om een nieuwe tabel te creëren, waarbij een unieke naam wordt gedefinieerd die zal worden gebruikt om gegevens op te slaan die verband houden met een specifieke set documenttypes.


Deze sectie is van vitaal belang voor het behouden van de structurele integriteit en bruikbaarheid van gegevens binnen het Docbits-systeem, en zorgt ervoor dat de gegevens die uit documenten zijn gehaald op een goed georganiseerde en toegankelijke manier worden opgeslagen.
Purpose and Use
Setting up table columns correctly is critical to ensure efficient data storage, querying, and reporting.
Here are the main reasons why:
Space optimization:
Carefully selecting and arranging columns can help you minimize the amount of space your database requires.
This is especially important when working with large amounts of data, as unnecessary or redundant columns can waste resources.
Data consistency:
By ensuring that each column only contains data that is relevant to its specific purpose, you can improve the consistency of your database.
This means that your data is cleaner and more reliable, which in turn improves the quality of your reporting.
Query performance:
Well-designed table columns can significantly improve the performance of database queries. For example, putting indexes on frequently queried columns can help queries run faster.
Avoiding unnecessary columns in query results can also increase query performance.
Easier reporting:
Organizing your data into meaningful column structures makes it easier to create reports and analyses.
Well-designed table columns can also increase the readability of reports and ensure that important information is easy to find.
Future-proofing:
By setting up the right table columns from the start, you can better prepare your database for future needs.
You can more easily add new features and make changes to the data model without affecting existing data.
Overall, setting up table columns correctly helps improve the efficiency, consistency and performance of your database, which in turn increases the quality of your data storage, querying and reporting.
Adding a new Column
Adding a new column to an existing table requires careful planning and execution to ensure that data integrity is maintained and application requirements are met.


Here are detailed steps to add a new column:

Requirements analysis:
Review your application's requirements and identify the purpose of the new column. What type of data will be stored? How will this column be used in the application?
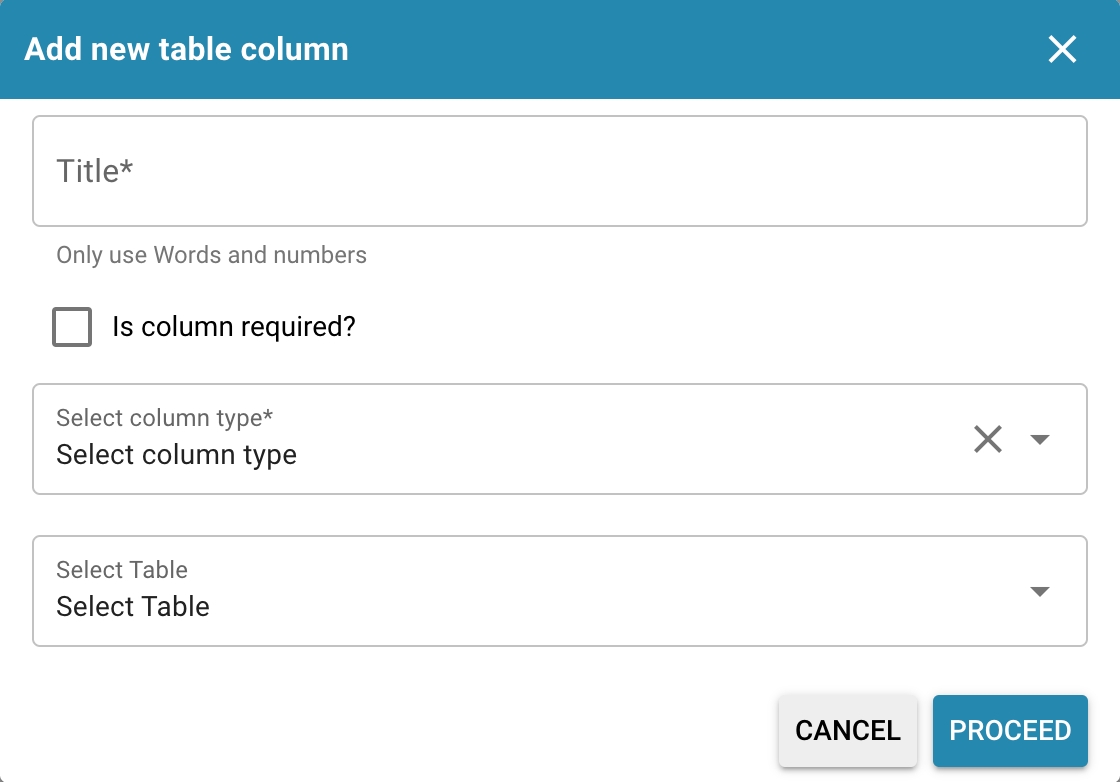
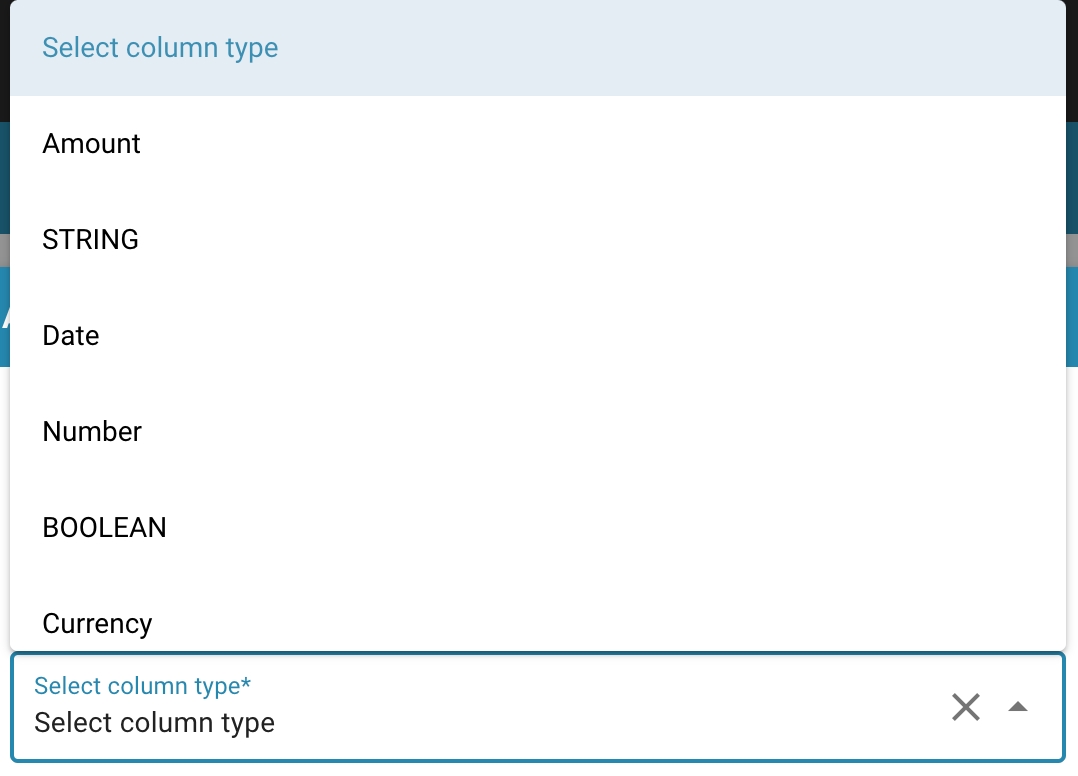
Choosing the right column type:
Choose the most appropriate column type based on the data that will be stored in the column. This can be AMOUNT for amount, STRING for strings, DATE for dates, etc.
Choosing the right column type is important to ensure data integrity and use storage space efficiently.
Choosing the right table:
To select the correct column type in a particular table, such as the invoice table, it is important to consider the specific requirements of the data to be stored in that table.
Deciding on column necessity:
Consider whether the new column is required or whether it should allow NULL values. If the column is mandatory, it should be marked as NOT NULL to ensure that important data is not missing.
Also consider whether the column may become a required field for your application in the future.
Database backup:
Before adding the new column, make a backup of your database to ensure that you have a working version to fall back on in case of any issues.
Executing the SQL statement:
Use the ALTER TABLE SQL statement to add the new column. The exact syntax depends on the database platform you are using, but in general the SQL statement looks like this:

Replace table_name with the name of your table, new_column_name with the name of the new column, and data_type with the column type you selected. The [NOT NULL] keyword indicates whether the column is mandatory.
Testing and validating:
After the new column is added, thoroughly verify that your application is working properly. Run tests to ensure that data is stored and retrieved correctly and that the new column is working as expected.
By carefully following these steps, you can successfully and effectively add a new column to your database table, choosing the correct column type and ensuring that the column is required when it is required.
Editing and deleting columns
Editing and deleting columns in a database table are important operations that must be performed carefully to ensure data integrity and consider potential impacts on application logic and reporting.
Here are detailed steps for both actions:
Editing a column:
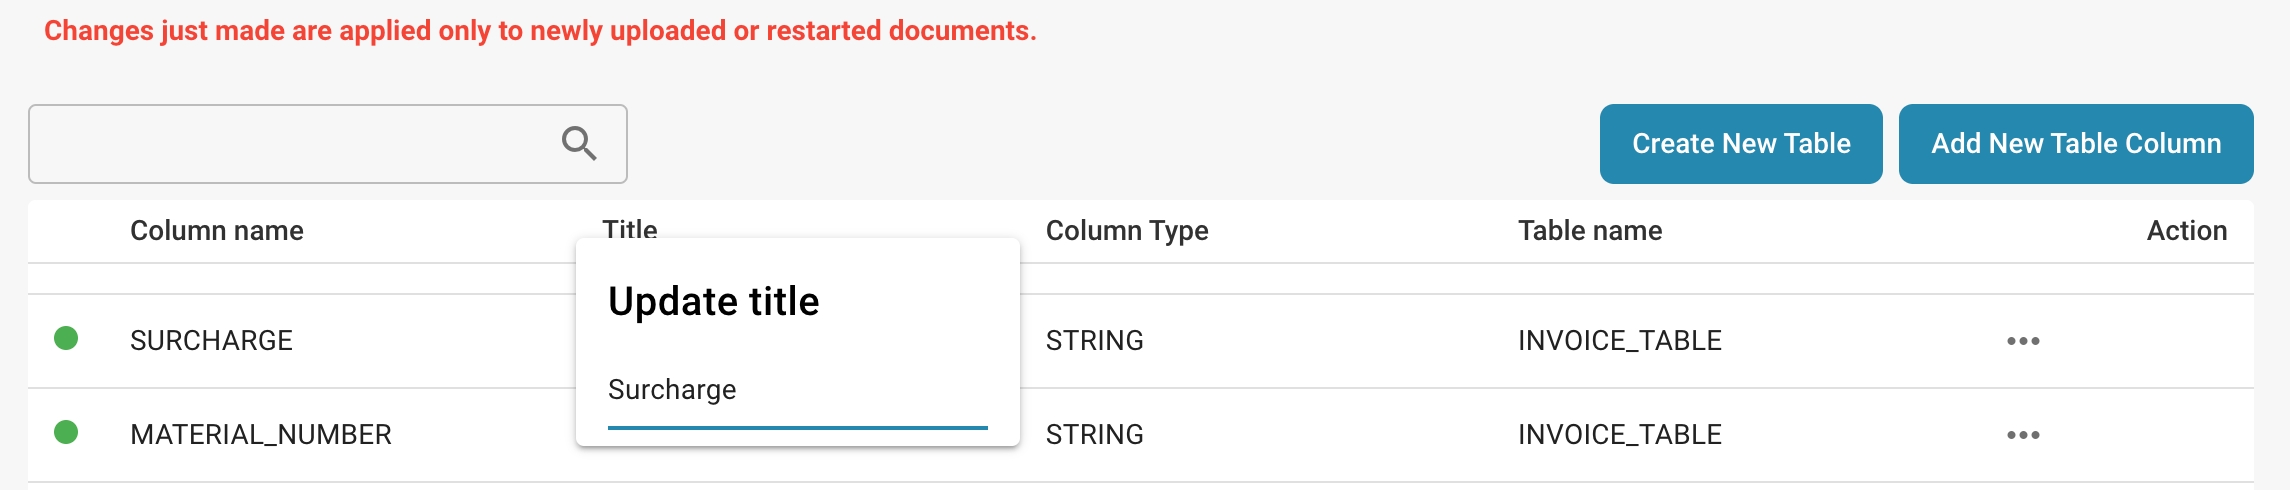
Change title:
Click on the title of the column you want to change, a window will open and you can change the title of the column.
Requirement analysis:
Identify the reason for editing the column. You may need to change the data type, add or remove constraints, or change the column name.
Impact review:
Before making any changes, review how they will affect existing data and application logic. For example, changes to the data type may cause data to be converted or lost.
Database backup:
Back up your database to ensure you have a working version to revert to in case of any problems.
Executing the SQL statement:
Use the ALTER TABLE SQL statement to make the desired changes to the column. The exact syntax depends on the database platform you are using and the changes you want to make.
Data migration:
If you change the data type of a column, you may need to perform data migration to convert existing data to the new format.
Testing and validating:
After editing the column, thoroughly verify that your application is working properly and that the data is being stored and retrieved correctly.
Deleting a column:
Requirement analysis:
Make sure you understand the reasons for deleting the column. Is the column no longer relevant or are there other ways to consolidate it?
Impact review:
Analyze how deleting the column will affect existing data, application logic, and reporting. This may result in data loss or affect queries and reports.
Database backup:
Make a full backup of your database to ensure you can restore in case of unexpected problems.
Executing the SQL statement:
Use the ALTER TABLE SQL statement to remove the column. The exact syntax varies by database platform.
Data migration (if required):
If you have important data in the column you are deleting, you may need to perform a data migration to move that data to another location or delete it.
Adjusting application logic:
Make sure your application logic is adjusted accordingly to ensure it no longer accesses the deleted column.
Testing and validating:
Verify thoroughly that your application is working correctly and that all data and reporting functions are working as expected.
When editing or deleting columns, it is critical that you fully understand the impact of these actions and take appropriate precautions to maintain the integrity of your database and ensure that your application runs smoothly.
Best practices
Best practices for organizing data in tables help keep the database structure clear, improve data integrity, and optimize performance.
Here are some best practices:
Use meaningful column names:
Choose column names that are clear and descriptive to improve the readability and understandability of your database structure. Avoid abbreviated or cryptic names.
Name columns to accurately reflect the content or meaning of the data stored in them. This makes later querying and reporting easier.
Choose appropriate data types:
Use the smallest possible data type that adequately meets the needs of your data to save storage space and improve performance.
Consider the type of data stored and choose the data type accordingly. For example: use INTEGER for integers, VARCHAR for strings, and DATE for dates.
Understanding required columns:
Mark columns as required (NOT NULL) if they are essential to the proper operation of your application and NULL values are unacceptable.
When deciding whether to mark a column as required, make sure that the application can logically handle NULL values and that NULL values will not cause unexpected errors.
Using foreign keys for relationships:
If your database has relationships between tables, use foreign keys to define those relationships. This improves data integrity and allows referential integrity constraints to be enforced.
Be sure to consider indexing foreign keys to optimize the performance of queries that access those relationships.
Regularly review and update:
Regularly review the database structure to ensure it meets the changing needs of your application. Make updates as needed to improve the efficiency and performance of your database.
Be sure to consider feedback from users and developers to identify and implement areas for improvement.
By applying these best practices, you can create a well-organized and efficient database structure that meets the needs of your application and provides a reliable foundation for storing, querying, and reporting on your data.
Troubleshooting
Here are solutions to common problems related to table column configurations:
Incorrect column configurations:
Problem: Data is not displayed or stored correctly, possibly due to incorrect data types, missing constraints, or insufficient column names.
Solution:
Review the column configurations in the database table and make sure the data types are appropriate for each column.
Add missing constraints such as NOT NULL or UNIQUE to improve data integrity.
Rename columns to use more meaningful and unique names that accurately describe the column's contents.
Problems caused by deleted columns:
Problem: After deleting a column from a table, problems occur because reports, queries, or application logic still reference that column.
Solution:
Review all reports, queries, and application logic to make sure there are no more references to the deleted column.
Update all affected reports, queries, and application logic to reflect or remove the deleted column. If necessary, temporarily restore the deleted column and migrate the data to a new structure before permanently deleting it.
Missing or inconsistent data:
Problem: Data is incomplete or inconsistent due to missing required fields or incorrect data types.
Solution:
Review the table structure and make sure all required fields are marked NOT NULL to ensure that important data is not missing.
Perform data cleanup to correct inconsistent or invalid data and update data types if necessary to improve consistency.
Performance issues due to missing indexes:
Problem: Queries on large tables are slow because important columns are not indexed.
Solution:
Identify the most frequently queried columns and add indexes to improve query performance.
Be aware that too many indexes can also affect write and update performance, so balanced indexing is important.
By applying these solutions, you can resolve common table column-related issues and improve the efficiency, consistency, and performance of your database.
Velden
Overzicht
De instellingen voor Velden bieden een gebruikersinterface waar beheerders de eigenschappen en het gedrag van individuele gegevensvelden die aan een documenttype zijn gekoppeld, kunnen beheren. Elk veld kan worden aangepast om de nauwkeurigheid en efficiëntie van gegevensinvoer en validatie te optimaliseren.
Belangrijkste Kenmerken en Opties
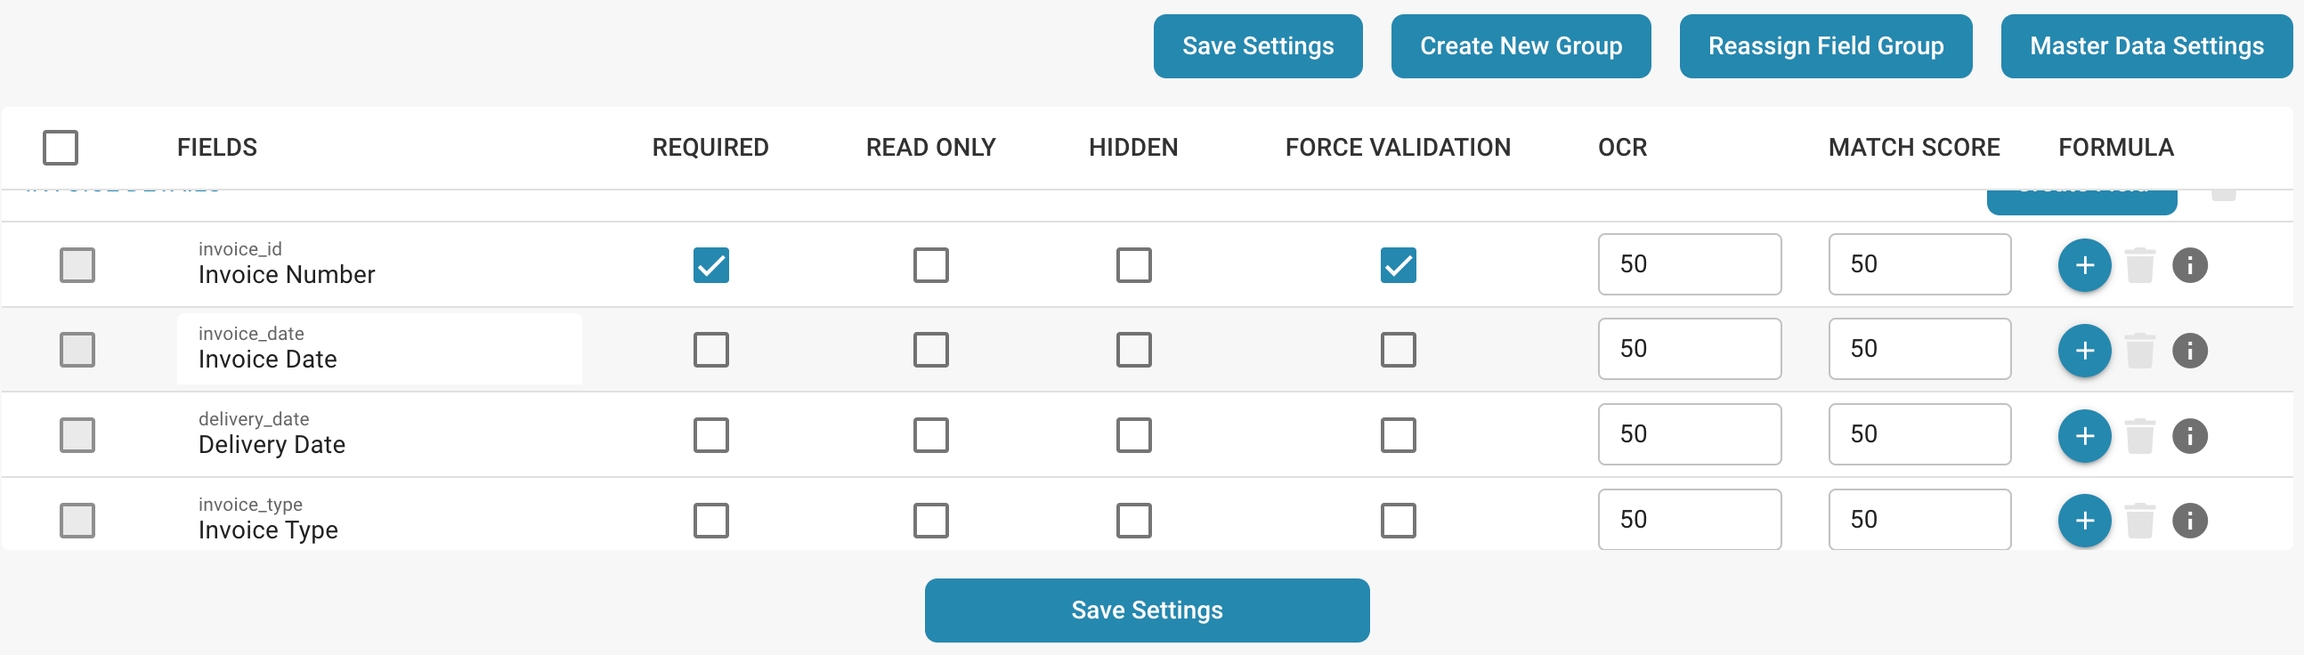
Configuratie van Velden:
Veldnamen: Lijst met de namen van de velden, die doorgaans overeenkomen met de gegevenselementen binnen het document, zoals "Factuurnummer" of "Inkoopordernummer".
Verplicht: Beheerders kunnen velden als verplicht markeren, zodat ervoor gezorgd wordt dat gegevens moeten worden ingevoerd of vastgelegd voor deze velden om de documentverwerking te voltooien.
Alleen-lezen: Velden kunnen als alleen-lezen worden ingesteld om wijziging na gegevensinvoer of tijdens bepaalde fasen van documentverwerking te voorkomen.
Verborgen: Velden kunnen uit het zicht in de gebruikersinterface worden verborgen, nuttig voor gevoelige informatie of om gebruikersworkflows te vereenvoudigen.
Geavanceerde Instellingen:
Dwing Validatie af: Zorgt ervoor dat gegevens die in een veld worden ingevoerd voldoen aan bepaalde validatieregels voordat ze worden geaccepteerd.
OCR (Optische Karakterherkenning): Deze schakelaar kan worden ingeschakeld om OCR-verwerking voor een specifiek veld mogelijk te maken, nuttig voor geautomatiseerde gegevensextractie uit gescande of digitale documenten.
Overeenkomstscores: Beheerders kunnen een overeenkomstscores definiëren, een drempel die wordt gebruikt om het vertrouwensniveau van gegevensherkenning of -overeenstemming te bepalen, wat van invloed is op hoe gegevensvalidatie en kwaliteitscontroles worden uitgevoerd.
Actieknoppen:
Nieuw Veld Aanmaken: Maakt het mogelijk om nieuwe velden aan het documenttype toe te voegen.
Bewerkpictogrammen: Elk veld heeft een bewerkpictogram waarmee beheerders de veldspecifieke instellingen verder kunnen configureren, zoals gegevenstype, standaardwaarden of verbonden bedrijfslogica.
Instellingen Opslaan: Bevestigt de aangebrachte wijzigingen in de veldconfiguraties.
Purpose and Use
Proper configuration of fields in DocBits is critical to ensure that data can be captured, processed and stored correctly.
Here are some reasons why this is important:
Data Integrity:
Proper configuration of fields ensures that the data entered into the system is correct and meets the required standards.
This helps to avoid errors and inaccuracies that could lead to incorrect analysis or decisions.
Data Consistency:
Consistent field configuration ensures that data is captured in a uniform manner, making it easier to compare and analyze.
For example, if a field for date inputs is incorrectly configured to allow different date formats, this can lead to confusion and inconsistencies.
Data Validation:
Configuring fields allows validation rules to be set to ensure that only valid data can be entered. This helps to detect errors early and improve data quality.
Data processing efficiency:
Accurate configuration of fields enables efficient data processing as systems are better able to understand and process the data. This improves efficiency in data extraction, transformation, and loading (ETL).
Data security:
Proper configuration of fields can also help ensure the security of data, for example by encrypting or masking sensitive information.
Overall, accurate configuration of fields in DocBits is critical to ensure data quality, consistency, integrity, and security. It helps organizations make informed decisions by accessing reliable and accurate data.
Configuring Field Properties
Detailed instructions on setting properties such as Required, Read Only, Hidden, and OCR.
Required:

If a field is marked as Required, it means that this field must be filled in before the document can be saved or processed.
To set this property:
Navigate to the field's settings in your DocBits system.
Enable the Required option for the relevant field.
Impact:
This setting ensures that important information is captured and that no documents can be processed without the required data.
Read Only:

If a field is marked as Read Only, it means that users can view the contents of this field, but cannot make any changes to it.
To set this property:
Go to the Field Options. Enable the Read Only option for the desired field.
Impact:
This setting can be useful to protect sensitive information or to ensure that important data is not accidentally changed.
Hidden:

If a field is marked as "Hidden", it means that the field will be hidden in the user interface and users will not be able to see or access it.
To set this property:
Go to the field options.
Enable the "Hidden" option for the corresponding field.
Impact:
This setting is often used to hide internal or technical fields that are irrelevant to the end user or are only needed for internal processing.
OCR (Optical Character Recognition):

If a field is configured for OCR, it means that the system will try to extract the text from the document and insert it into this field. This setting is usually used for fields that are intended to be auto-filled.
To set this up:
Enable the OCR option for the corresponding field.
If necessary, configure the OCR parameters such as language, font, etc.
Impact:
Using OCR allows documents to be processed automatically by extracting information from texts and entering it into the appropriate fields, reducing manual effort and increasing efficiency.
Forced validation:

Configure the validation rules accordingly, such as numeric limits, regular expressions, or relationships with other fields.
To set this up:
Save the changes.
Impact:
Forced validation checks the entered data against the specified criteria to ensure it is valid. This helps to detect errors early and improve data quality.
Match Score:

By comparing input data with reference data, the Match Score can help confirm the accuracy and validity of the data. If the Match Score exceeds a certain threshold, the match is considered successful.
To set this up:
Enable the Match Score option and set the desired threshold.
Save the changes.
Impact:
The Match Score is used to evaluate the accuracy of matches between input data and reference values. If the score obtained exceeds the set threshold, the match is considered successful. This is especially useful for fields that require data validation or data matching, such as fields with a name, email address, or e-mail address. B. when checking customer data.

By carefully configuring these field properties, you can optimize document processing workflows and ensure that your data is correctly captured, protected, and processed efficiently.
Setting Validation and Match Score
Instructions for using the Force Validation and Match Value settings to improve data integrity and recognition accuracy.
Here are instructions for using the Force Validation and Match Value settings to improve data integrity and recognition accuracy in a document processing system:
Force Validation:

This setting allows you to set rules that check whether the data entered meets certain criteria.
To set this up:
Go to the settings of the field in question.
Enable the Force Validation option.
Define the validation rules to check. These can be, for example, numeric limits, regular expressions for text fields, or relationships to other fields.


Impact:
Enforcing validation rules helps detect errors early and improves data quality. Users are prompted to enter correct data, which increases the integrity of the database.
Match Score:

This setting allows you to match the entered value against a predefined reference value.
To set this up:
Navigate to the field's settings.
Enable the Match Value option.
Enter the reference value to compare the entered value against.
Impact:
Setting a match value allows you to ensure that the entered data matches a known standard or predefined norm. This is especially useful when you want to ensure that the data is consistent and meets certain criteria.
Using these settings can improve data integrity and recognition accuracy in your document processing system.
You ensure that only correct and valid data is captured, increasing the quality of your database and improving the reliability of your analytics and reports.
Velden Toevoegen en Bewerken
Hier zijn de stappen om een nieuw veld toe te voegen of bestaande velden in DocBits te wijzigen, inclusief details over hoe je toegang krijgt tot geavanceerde configuratieopties:
Een nieuw veld toevoegen
Log in en ga naar Documentbeheer:


Een nieuw veld toevoegen:
Klik op de optie "Veld maken".

Basisconfiguratie:

Naam
Kies een betekenisvolle en beschrijvende naam.
De naam moet uniek zijn.
Opmerking: Eenmaal gemaakt, kan de naam niet meer worden gewijzigd.
Titel
Dit is de weergegeven naam van het veld.
Het definieert hoe het veld verschijnt in de gebruikersinterface.
Opmerking: De titel kan later indien nodig worden gewijzigd.
Selecteer Veldtype
Kies het type veld uit een dropdownlijst.
De beschikbare veldtypes omvatten verschillende opties om aan verschillende gegevensinvoerbehoeften te voldoen.
Opmerking: Eenmaal gemaakt, kan het Type niet meer worden gewijzigd.

Optioneel: Schakel Kosten Element in
Een selectievakje met de naam Schakel Kosten Element in kan worden geselecteerd.
Als dit is aangevinkt, moet je een kosten element selecteren uit een dropdownlijst.
Belangrijk: Kosten elementen moeten van tevoren worden geconfigureerd.
Geavanceerde Configuratie:
Hier kun je andere eigenschappen instellen, zoals validatieregels, overeenkomende waarden, alleen-lezen modus, verbergen en OCR-instellingen.

Opslaan:
Nadat je alle noodzakelijke configuraties hebt gemaakt, klik je op "Opslaan" of een vergelijkbare knop om het nieuwe veld te maken.

Een bestaand veld bewerken
Toegang tot veldbewerking:
Navigeer naar de lijst met bestaande velden en vind het veld dat je wilt bewerken.

Selecteer een veld:
Klik op het juiste veld om toegang te krijgen tot de bewerkingsopties.

Wijzig de configuratie:
Wijzig de eigenschappen van het veld indien nodig. Dit kan het wijzigen van de naam, het veldtype, het toevoegen of verwijderen van validatieregels, het instellen van overeenkomende waarden of het aanpassen van andere geavanceerde instellingen omvatten.
Opmerking: Als je de Titel van een veld wijzigt, moet je het veld in de lay-outbouwer verwijderen en opnieuw toevoegen om de wijzigingen effect te laten hebben.

Opslaan:
Klik op "Opslaan" om de wijzigingen die je aan het veld hebt aangebracht op te slaan.

Door stappen te bieden om nieuwe velden toe te voegen en bestaande velden te bewerken, evenals toegang tot geavanceerde configuratieopties, kun je de flexibiliteit en aanpasbaarheid van je documentverwerkingssysteem maximaliseren. Dit stelt je in staat om je gegevens precies zo te structureren en te verwerken als je nodig hebt.
Best practices
Here are best practices for field configuration in a document processing system, emphasizing the importance of understanding the document workflow and data requirements.
Understanding the document workflow:
Analyze your document workflow thoroughly to identify the different phases and steps a document goes through, from capture to processing to storage or release.
Identify the specific data that needs to be captured, reviewed, processed, or extracted at each step of the workflow.
Identify key data points:
Determine the key data that is critical to your business process or analysis.
Prioritize fields according to their importance to the business process or analysis to ensure they are captured and processed correctly.
Match fields to data requirements:
Match field properties to specific data requirements, including their type (text, date, numeric, etc.), validation rules, and any required properties such as required or read-only.
Also consider security requirements, privacy regulations, and legal requirements when configuring field properties.
Consider flexibility and extensibility:
Design the fields to be flexible and extensible to accommodate future customizations or changes in document workflow or data requirements.
Make sure the configuration of the fields allows new data points or changed requirements to be easily and efficiently incorporated.
Test and validate:
Perform extensive testing to ensure that the configured fields work correctly and produce the expected results.
Validate the field configuration by processing a large number of documents and verifying that the data captured meets the requirements.
By understanding the document workflow and data requirements and applying best practices in field configuration, you can ensure that your document processing system functions efficiently and accurately. This will help improve the quality of your data, optimize workflow, and increase the overall performance of your business.
Troubleshooting
Fix common problems
Here is advice for troubleshooting common problems in a document processing system, including fields not capturing data correctly, OCR errors, and validation rule issues:
Fields not capturing data correctly:
Check the configuration of the field in question to ensure the correct field type is being used and that all required properties are set correctly.
Make sure users have the correct instructions to enter data correctly into the field, and provide training or guidelines if necessary.
If the problem persists, run tests to verify whether the problem is systemic or only occurs with certain inputs. This can help you more accurately determine the cause of the problem.
OCR errors:
Check the quality of the scanned documents, including the readability of the text and any distortion or blurring.
Adjust the OCR settings, including the language, text recognition algorithm, and other parameters, to improve accuracy. Perform OCR preview or test runs to check the performance of the OCR system and identify potential sources of errors.
If OCR errors persist, you may want to consider implementing an advanced OCR system or looking into external OCR services.
Validation rule issues:
Review the configuration of validation rules to make sure they are set up correctly and meet the desired criteria.
Make sure validation rules are not too restrictive and that they carefully consider the actual data.
Run tests to make sure validation rules work as expected and check that they respond appropriately to unexpected data or edge cases.
Provide users with guidance and error messages to alert them to any validation errors and help them enter the correct data.
By systematically reviewing and troubleshooting these common issues, you can improve the performance and accuracy of your document processing system and ensure that it runs smoothly and efficiently.
New Fields with Charges
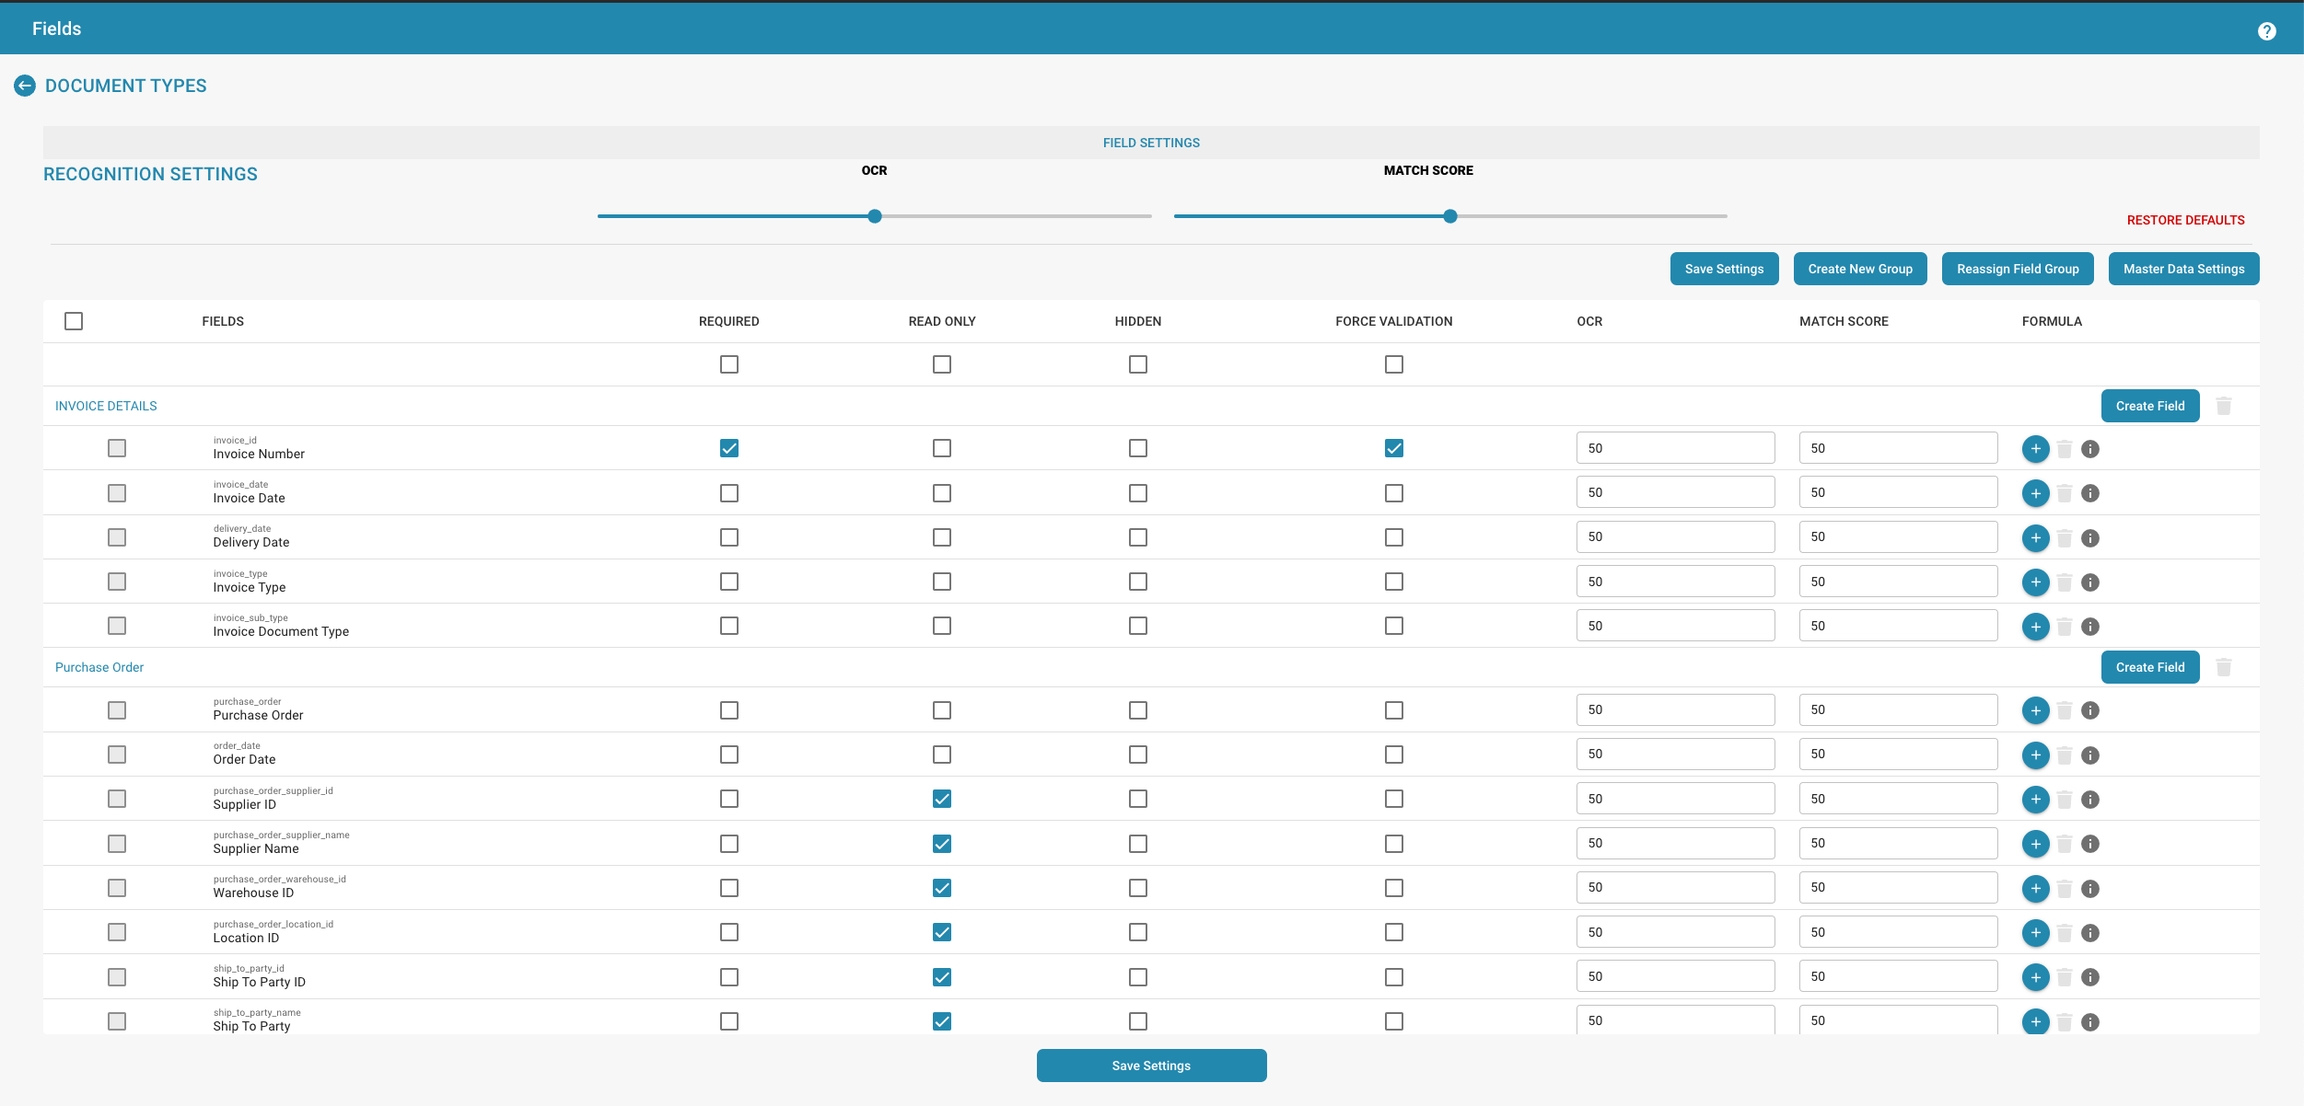
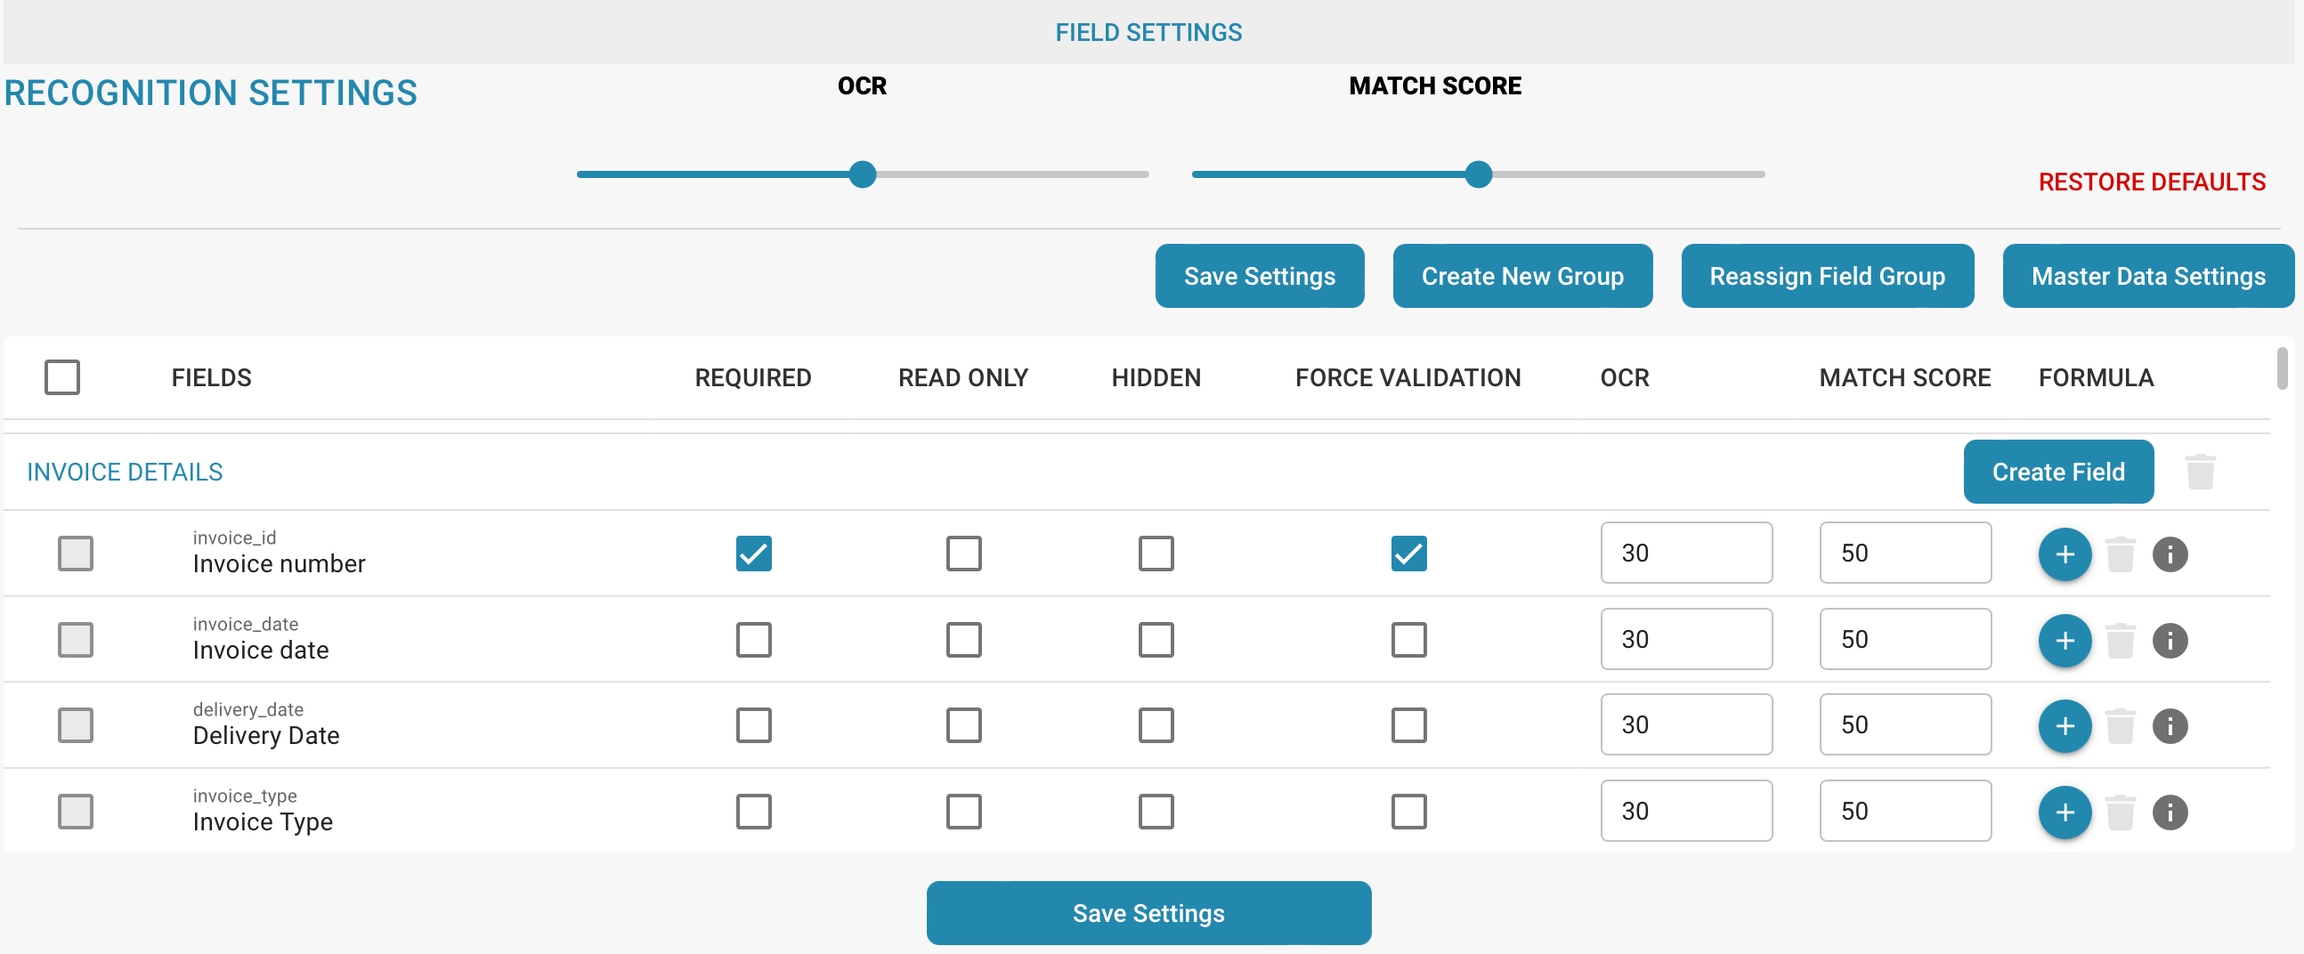
Step 1: Access the Field Settings
1. Navigate to Fields:
• From the main dashboard, click on the “Fields” option located in the sidebar.
• This will open the Field Settings page where you can manage document types and recognition settings.
2. Select Document Type:
• Under the “DOCUMENT TYPES” section, select the specific document type you wish to add or modify a field for.
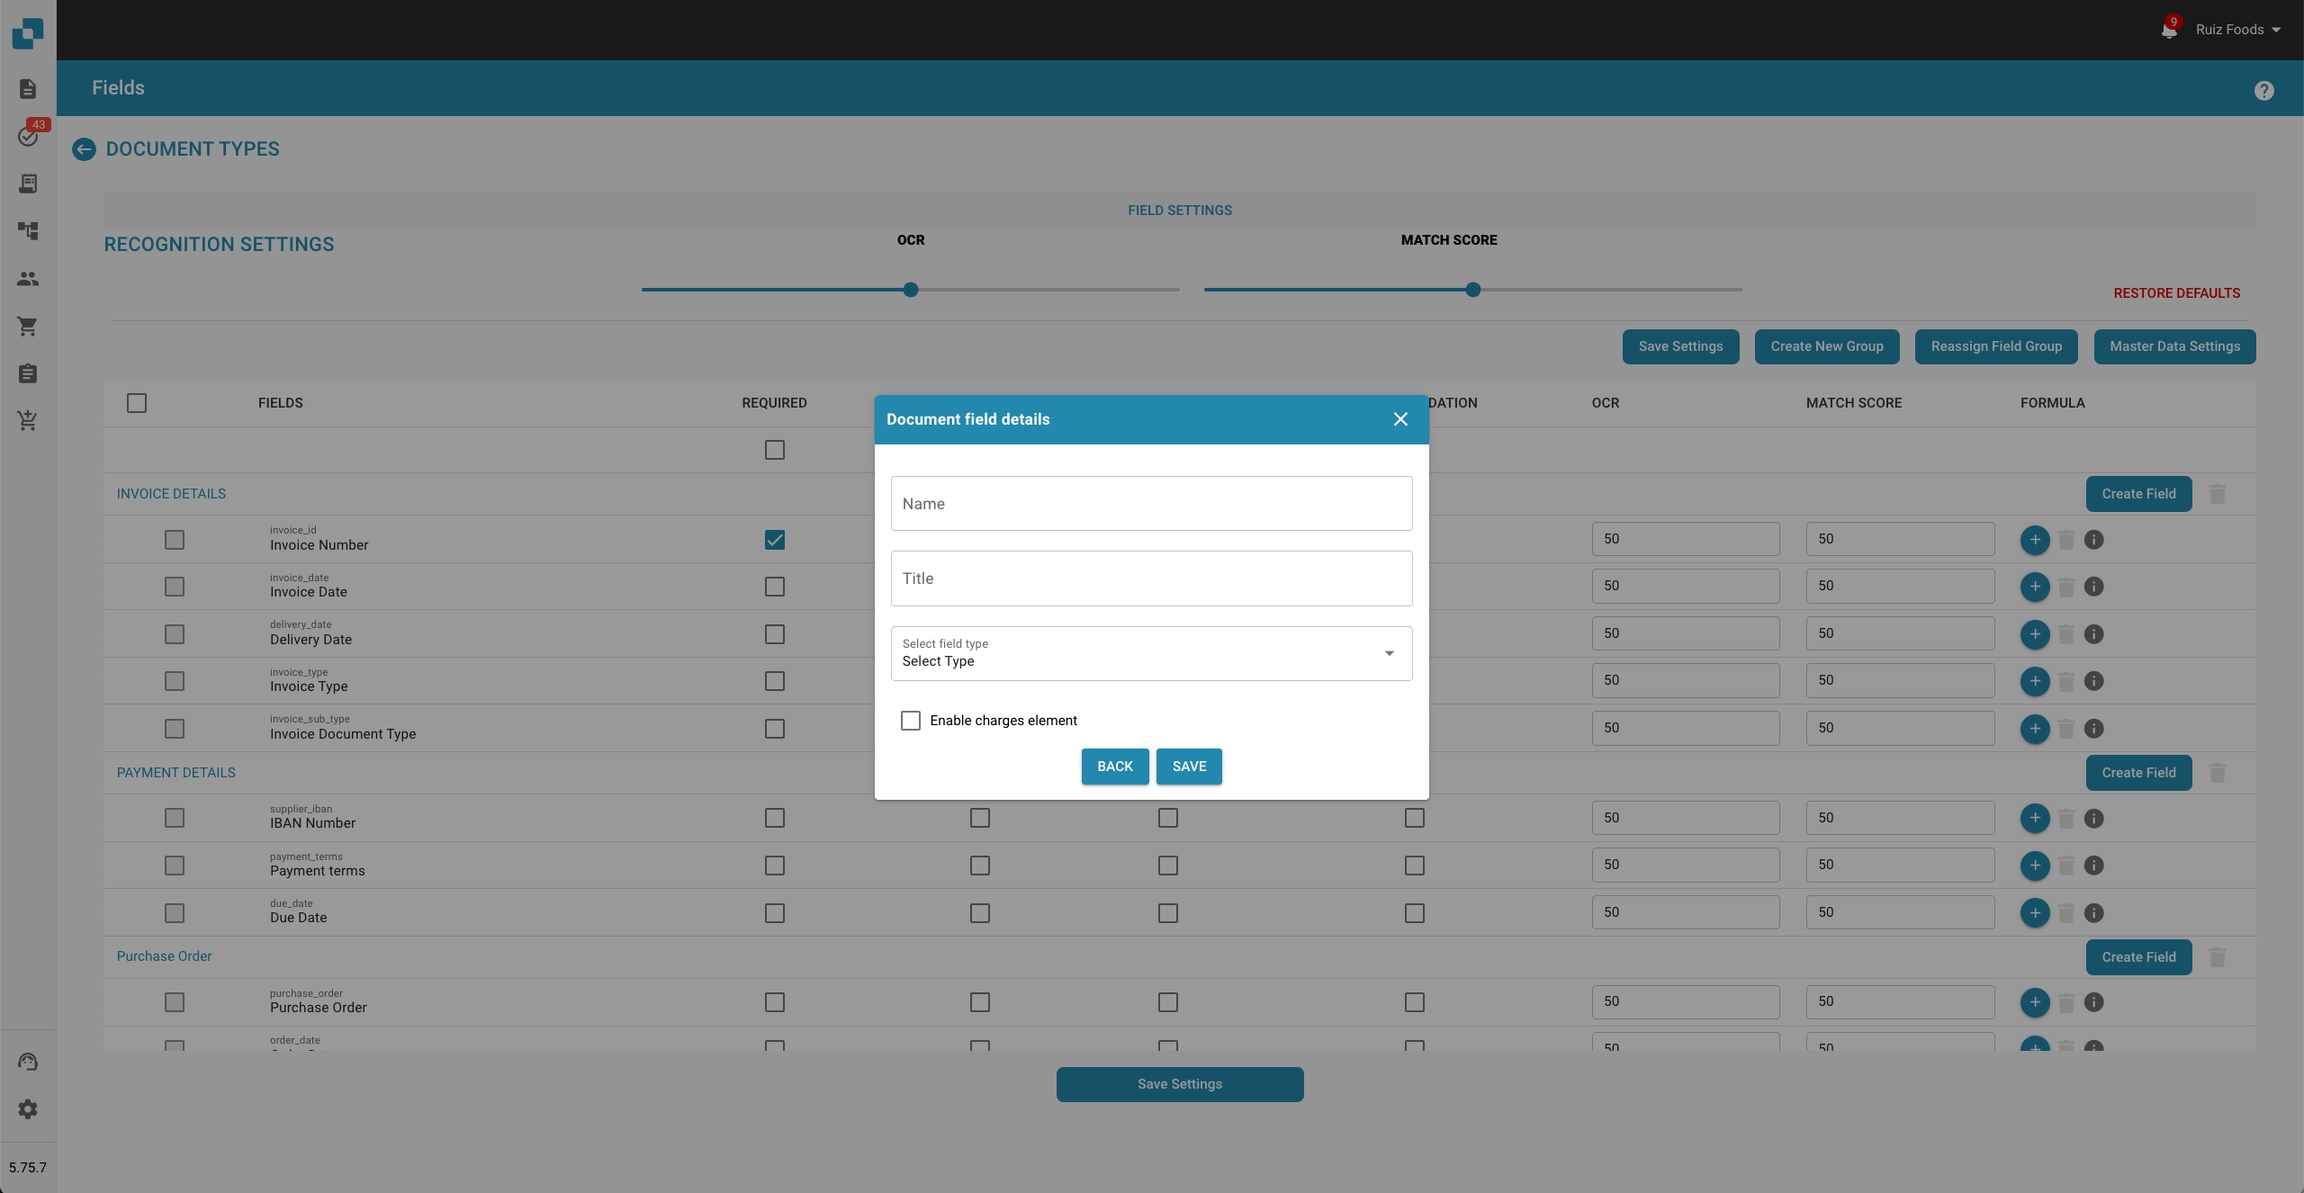
Step 2: Add a New Field
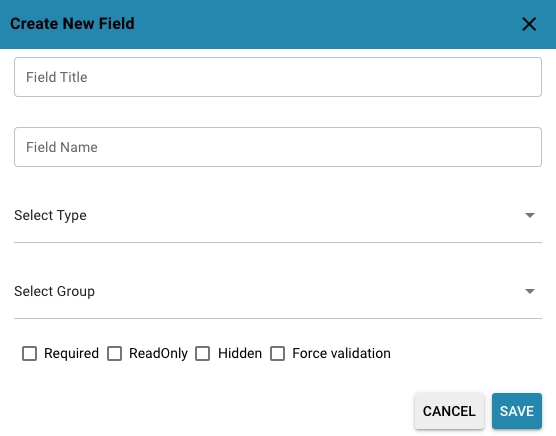
1. Open the Add Field Dialog:
• Click on the “Create Field” button located in the respective section (e.g., Invoice Details, Payment Details, Purchase Order).
2. Enter Field Details:
• A dialog box titled “Document field details” will appear.
• Fill in the required details:
• Name: Enter the name of the new field.
• Title: Enter a descriptive title for the field.
• Select field type: Choose the appropriate field type from the dropdown menu.
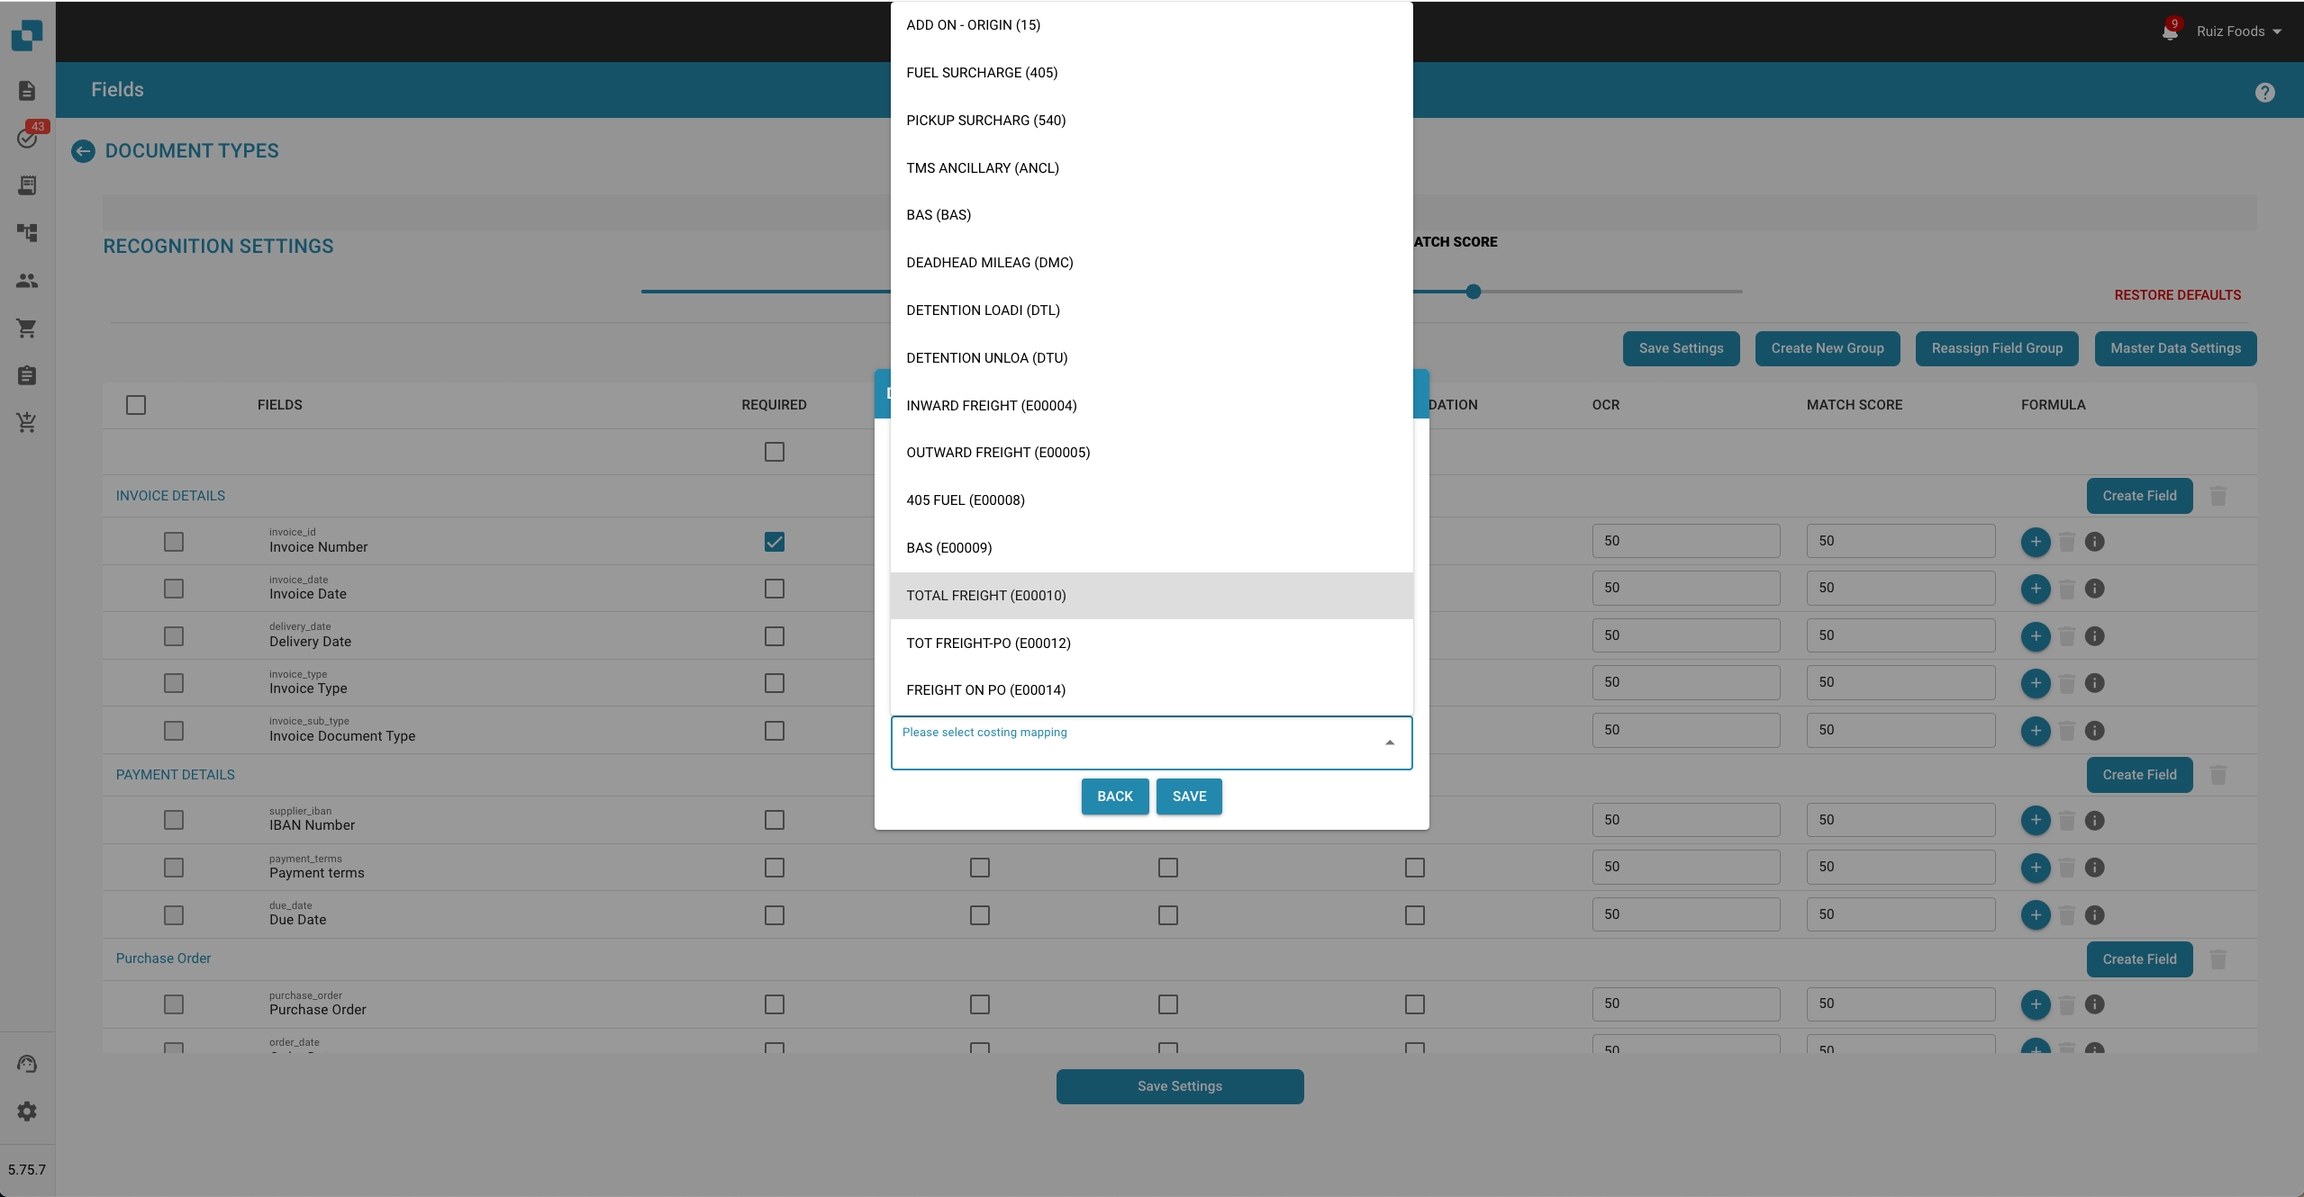
3. Enable Charges Element:
• If this field is associated with a charge, check the “Enable charges element” box.
4. Select Costing Mapping:
• Upon enabling charges, a dropdown menu will appear.
• Select the appropriate charge type from the list (e.g., ADD ON - ORIGIN, FUEL SURCHARGE, TOTAL FREIGHT).
Step 3: Save the New Field
1. Save Settings:
• Click the “SAVE” button to add the new field with the specified charge mapping.
• If you need to make changes, click the “BACK” button to return to the previous screen.
2. Finalize Field Creation:
• After saving, the new field will appear in the list under the specified document type.
• Ensure that the OCR and Match Score settings are configured as needed for accurate recognition.
3. Complete the Setup:
• Once all desired fields are added and configured, click the “Save Settings” button at the bottom of the Field Settings page to apply your changes.
Additional Notes
• Required Fields:
• If a field is mandatory, check the “REQUIRED” box next to the field name.
• Editing Existing Fields:
• To edit an existing field, click on the field name, update the details, and save the changes.
• Reassign Field Group:
• Use the “Reassign Field Group” option to change the grouping of fields if necessary.
• Master Data Settings:
• For advanced configuration, access the “Master Data Settings” to manage overall field and document type settings.
Modeltraining

Overzicht
Modeltraining stelt beheerders in staat om het trainen van machine learning-modellen die specifiek zijn voor elk documenttype te overzien en te beheren. Door een gestructureerde interface te bieden voor het importeren van voorbeeldgegevens, het trainen van modellen en het testen van hun prestaties, zorgt Docbits ervoor dat de gegevensextractiecapaciteiten in de loop van de tijd continu verbeteren.
Belangrijkste Kenmerken en Opties
Metrics Overzicht:
Voorbeeld: Aantal voorbeelddocumenten dat is gebruikt voor training.
Geëxporteerd: Aantal documenten dat succesvol is geëxporteerd na verwerking.
Bedrijf Σ: Totaal aantal bedrijfsspecifieke documenten dat is verwerkt.
Totaal Σ: Totaal aantal documenten dat is verwerkt over alle categorieën.
Trainings- en Testopties:
Importeren: Stelt beheerders in staat om nieuwe trainingsdatasets te importeren, die doorgaans gestructureerde voorbeelden zijn van documenten die door het systeem herkend moeten worden.
Model Trainen: Start het trainingsproces met behulp van de geïmporteerde gegevens om de herkennings- en extractiecapaciteiten van het systeem te verbeteren.
Testclassificatie: Maakt het mogelijk om het model te testen om de prestaties bij het classificeren en extraheren van gegevens uit nieuwe of ongeziene documenten te evalueren.
Actieknoppen:
Veld Aanmaken: Voeg nieuwe gegevensvelden toe die het model moet herkennen en extraheren.
Acties: Deze dropdown kan opties bevatten zoals details bekijken, configuraties bewerken of trainingsgegevens verwijderen.
Purpose and Use: Model Training
Regular model training is critical to ensure that a document processing system continues to work effectively and accurately as document formats and content change.
Here are some key reasons for regular model training:
Adaptation to new formats:
Documents are often created in different formats, be it PDF, Word, Excel, or others.
New versions of these formats may have additional features or changes in formatting that the processing system may not recognize unless it is updated accordingly.
By regularly training the model, the system can adapt to these new formats to ensure smooth processing.
Adaptation to changing content:
The content of documents can change over time, be it due to updates to business processes, changes in policies, or new industry standards.
Regular training allows the processing system to adapt to these changes and continue to deliver accurate results.
Optimizing accuracy:
By training the model with new data, algorithms and models can be continuously improved to increase the accuracy of document processing.
This is especially important in areas where precision and reliability are critical, such as processing financial documents or medical records.
Handling exceptions:
Regular model training allows the system to better identify and handle exceptions and boundary conditions.
This can help reduce errors and improve overall system performance.
Ensuring compliance:
In industries with strict compliance requirements, it is important that the document processing system is always up to date to meet legal requirements.
Regular training and updating of the model can help ensure the system complies with current standards.
Overall, regular model training is an essential component to the effectiveness and reliability of a document processing system. It allows the system to continuously adapt to changing requirements and deliver accurate results, which in turn improves efficiency and productivity.
Import Data: Model Training
Provide detailed instructions on how to import sample documents for training, including the format and document types to use.
To import sample documents for training, follow these steps:
Prepare the sample documents: Make sure the sample documents are in a supported format, such as PDF, Word, Excel, etc. These documents should cover a variety of types and formats that may be encountered in production operations of the document processing system.
Navigate to the import function: Log in to the administration area of the document processing system and navigate to the area where you can import new documents.
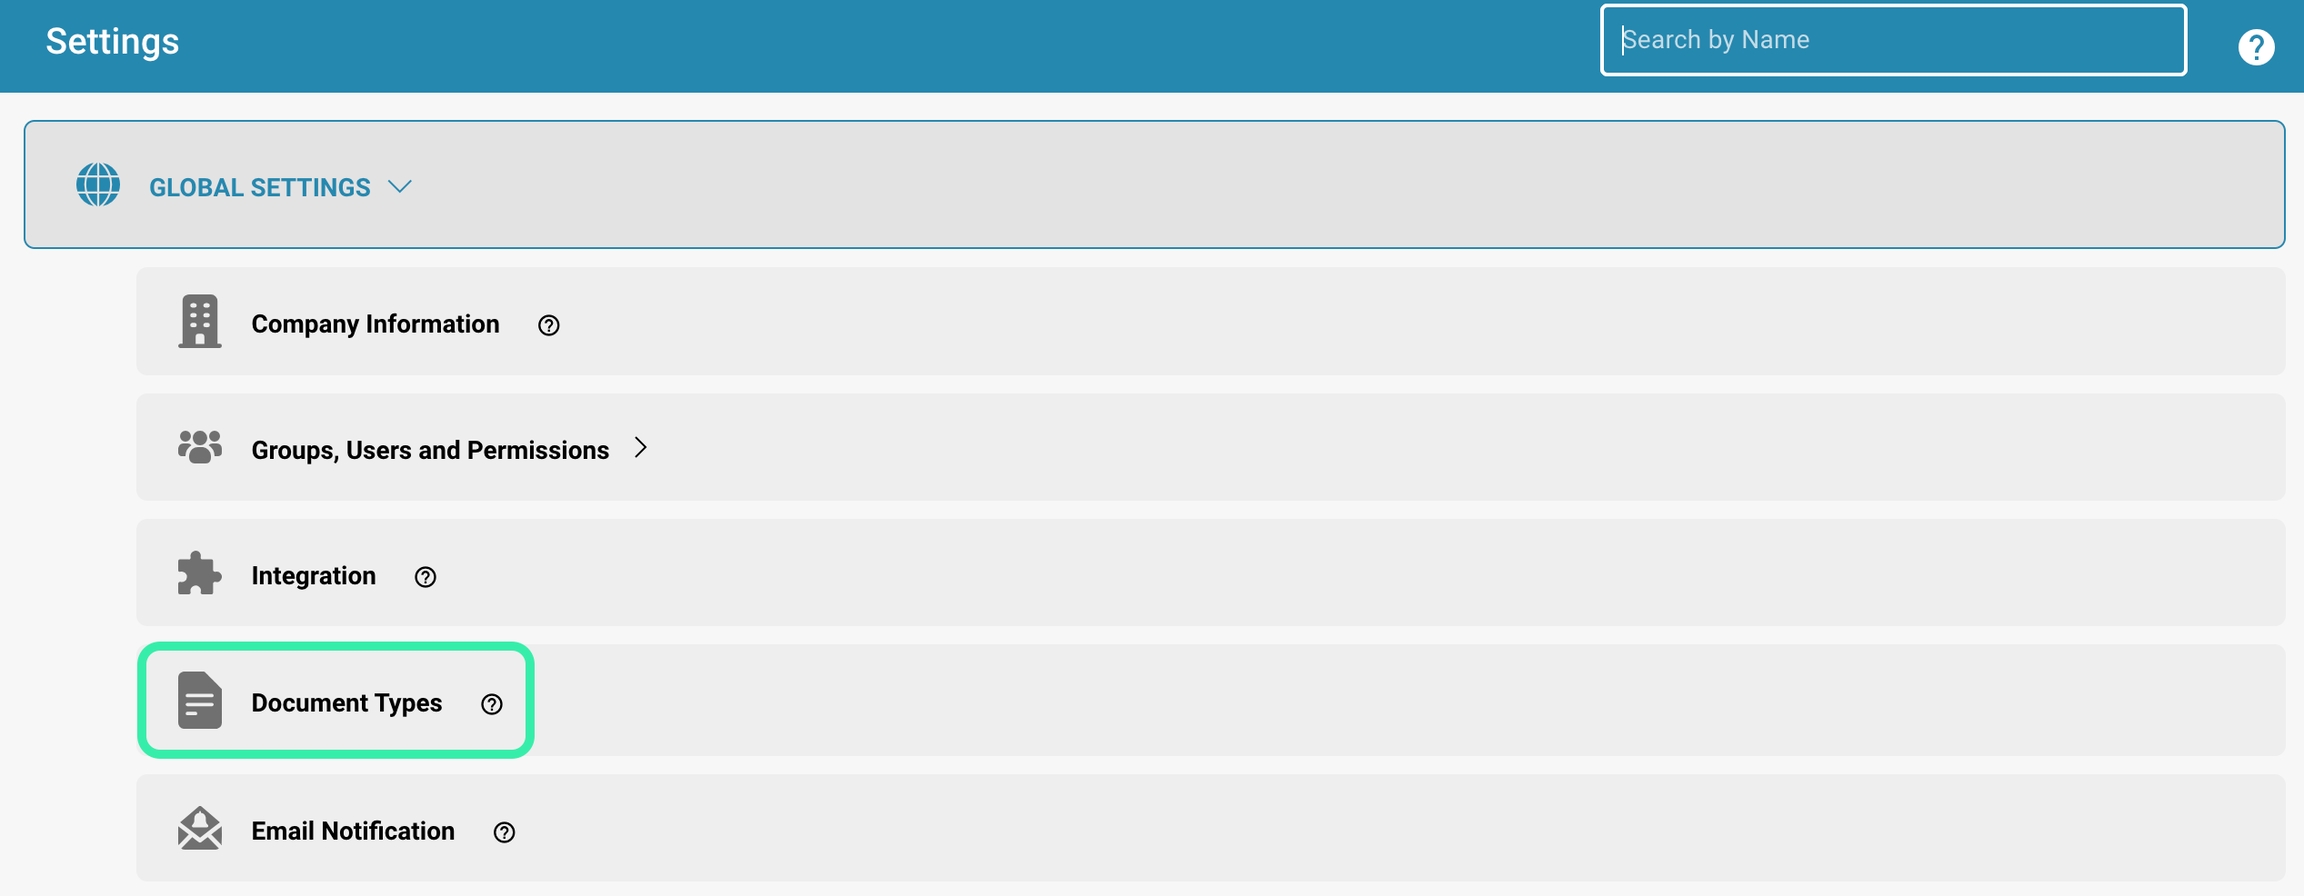

Select the option to import documents: Click the button or link to import documents. There may be an option such as "Import".
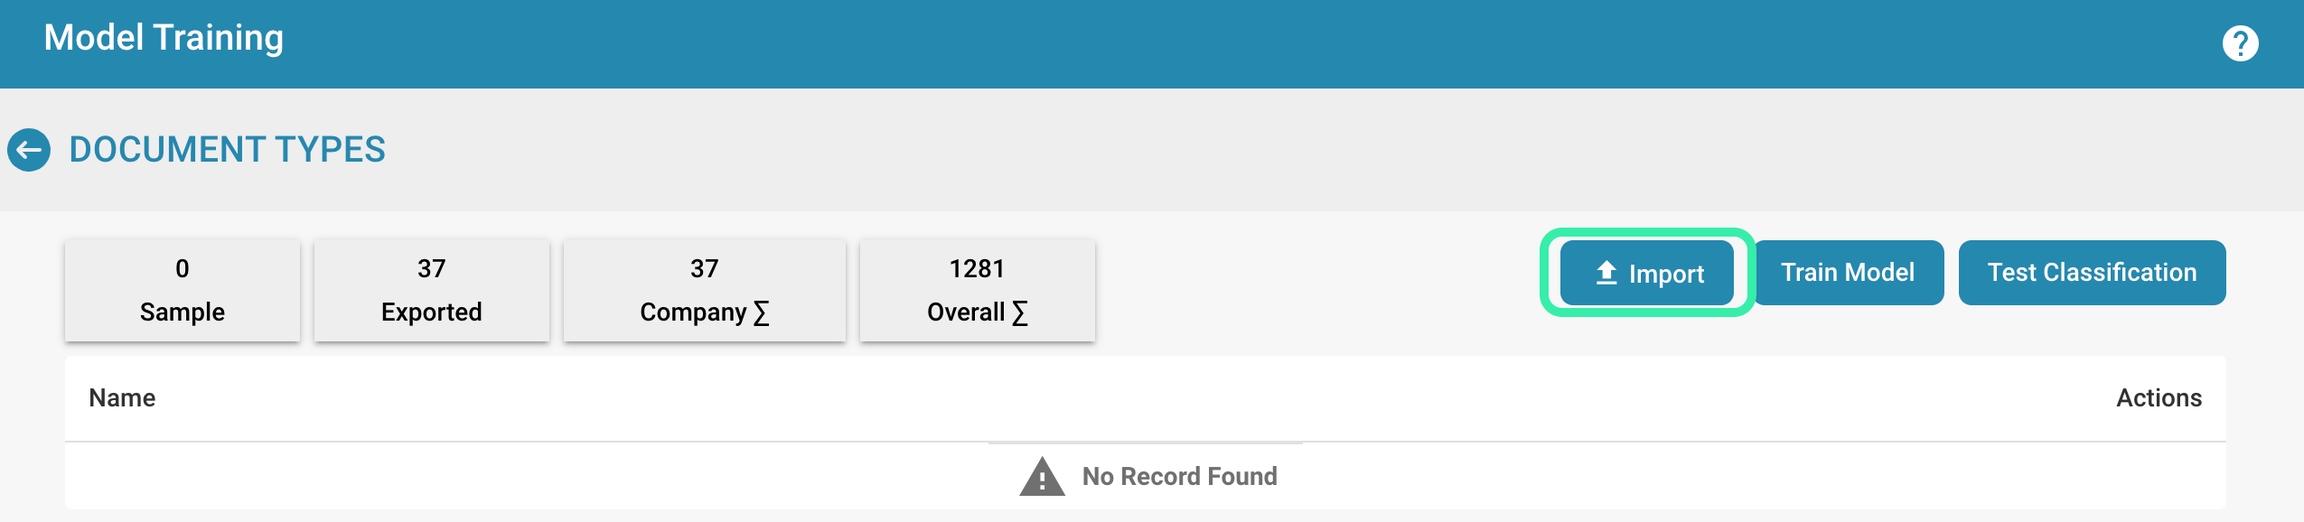
Select amount & date format:
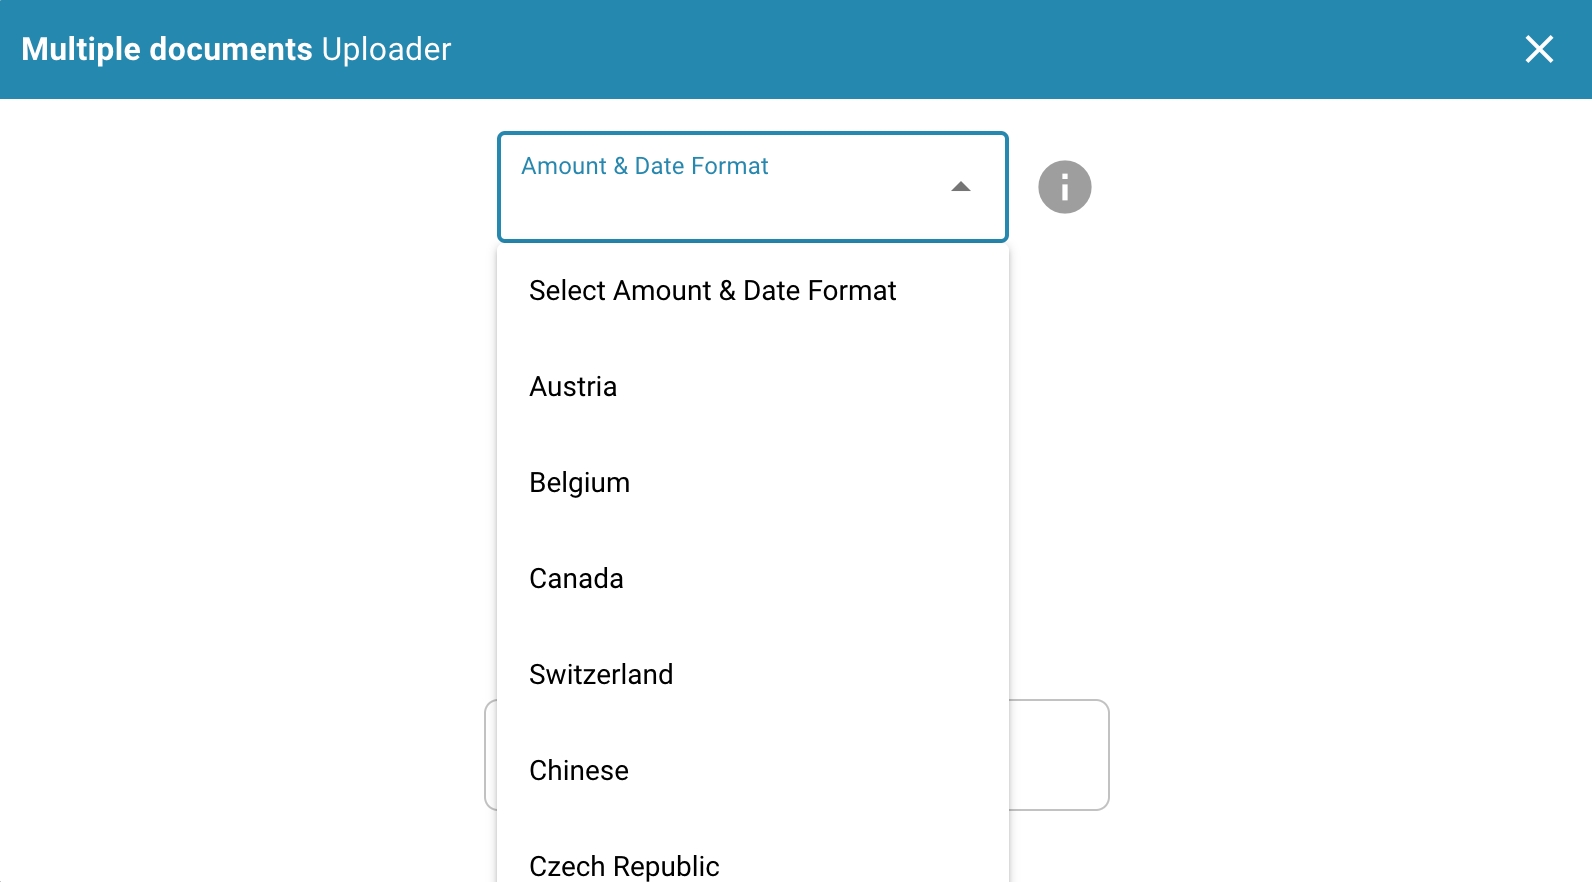
Amount Format:
The amount format may vary by region, but in general there are some common conventions:
Currency symbol: The currency symbol is usually provided before the amount, e.g. "$" for US dollars, "€" for euros, "£" for British pounds, etc.
Thousands separator: In some countries, long numbers are separated by a thousand separator for better readability. In the US, a comma is commonly used (e.g. 1,000), while in many European countries a period is used (e.g. 1,000).
Decimal separator: The decimal separator is used to separate the integer part from the decimal places. Most English-speaking countries use a period (e.g. 10.99), while many European countries use a comma (e.g. 10.99).
Date Format:
The date format also varies by region, with different countries having different conventions. Here are the most common formats:
Day-Month-Year (DD-MM-YY or DD.MM.YY): In many European countries, the date is specified in day-month-year format. For example, "21.05.24" represents May 21, 2024.
Month-Day-Year (MM-DD-YY or MM/DD/YY): In the United States, the month-day-year format is often used. For example, "05/21/24" represents May 21, 2024.
Year-Month-Day (YY-MM-DD or YY/MM/DD): In some other countries, the year-month-day format is preferred. For example, "24/05/21" represents May 21, 2024.
It is important to note the specific format to avoid misunderstandings, especially in international communications or financial transactions.
Select the sample documents: Select the sample documents you want to import. This can be done by uploading the files from your local computer or by selecting documents from an already connected location.
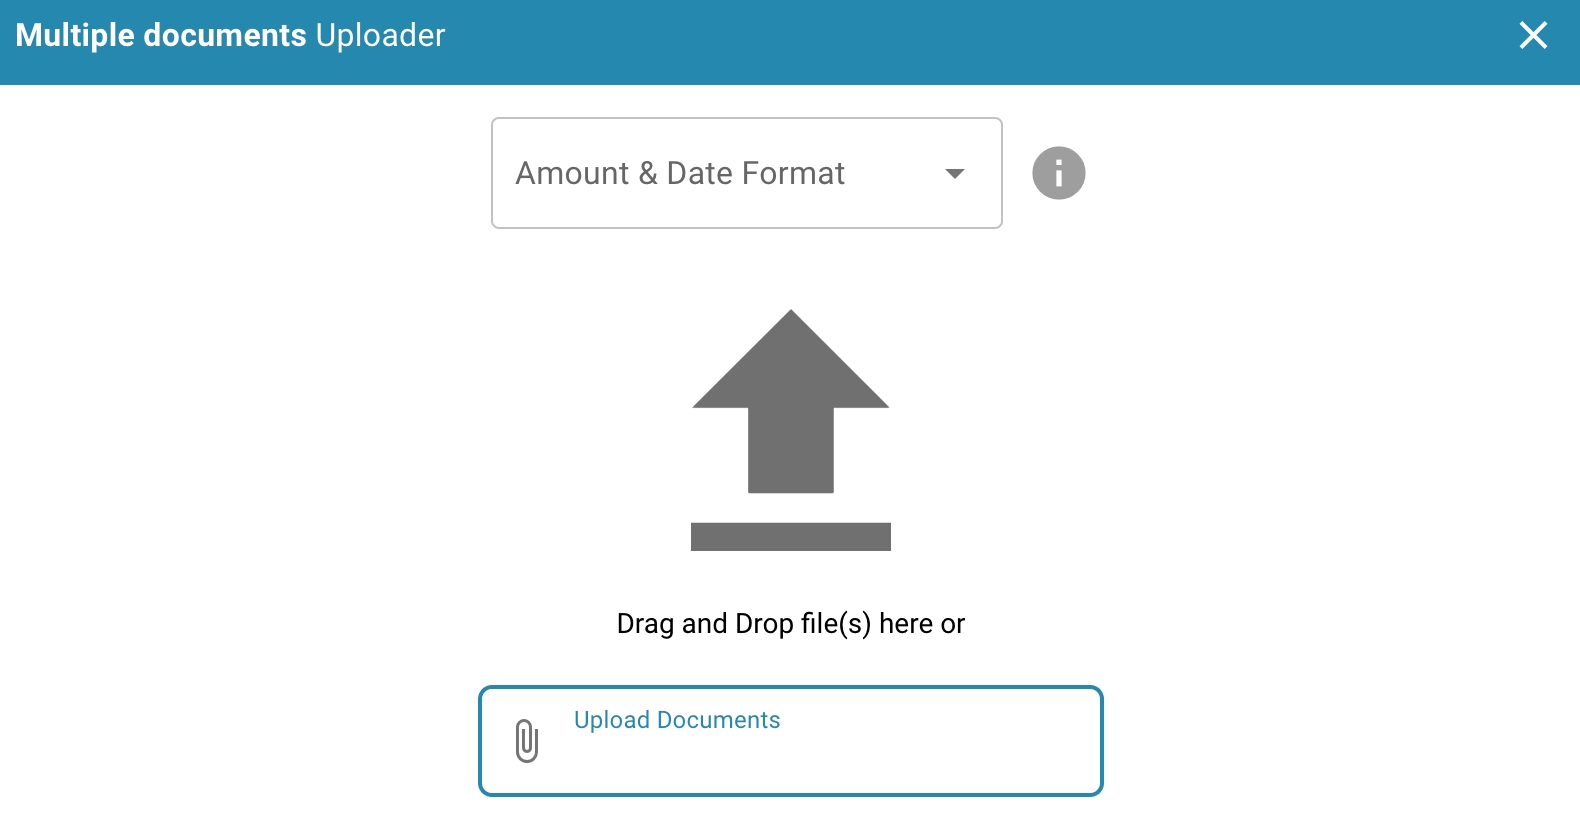
Configure the document types and subtypes (if required): If your system supports different document types or subtypes, assign the appropriate type to each imported document. This will help the system to categorize and process the documents correctly.
Start the import process: Confirm the selection of documents and start the import process. Depending on the size and number of documents, this process may take some time.
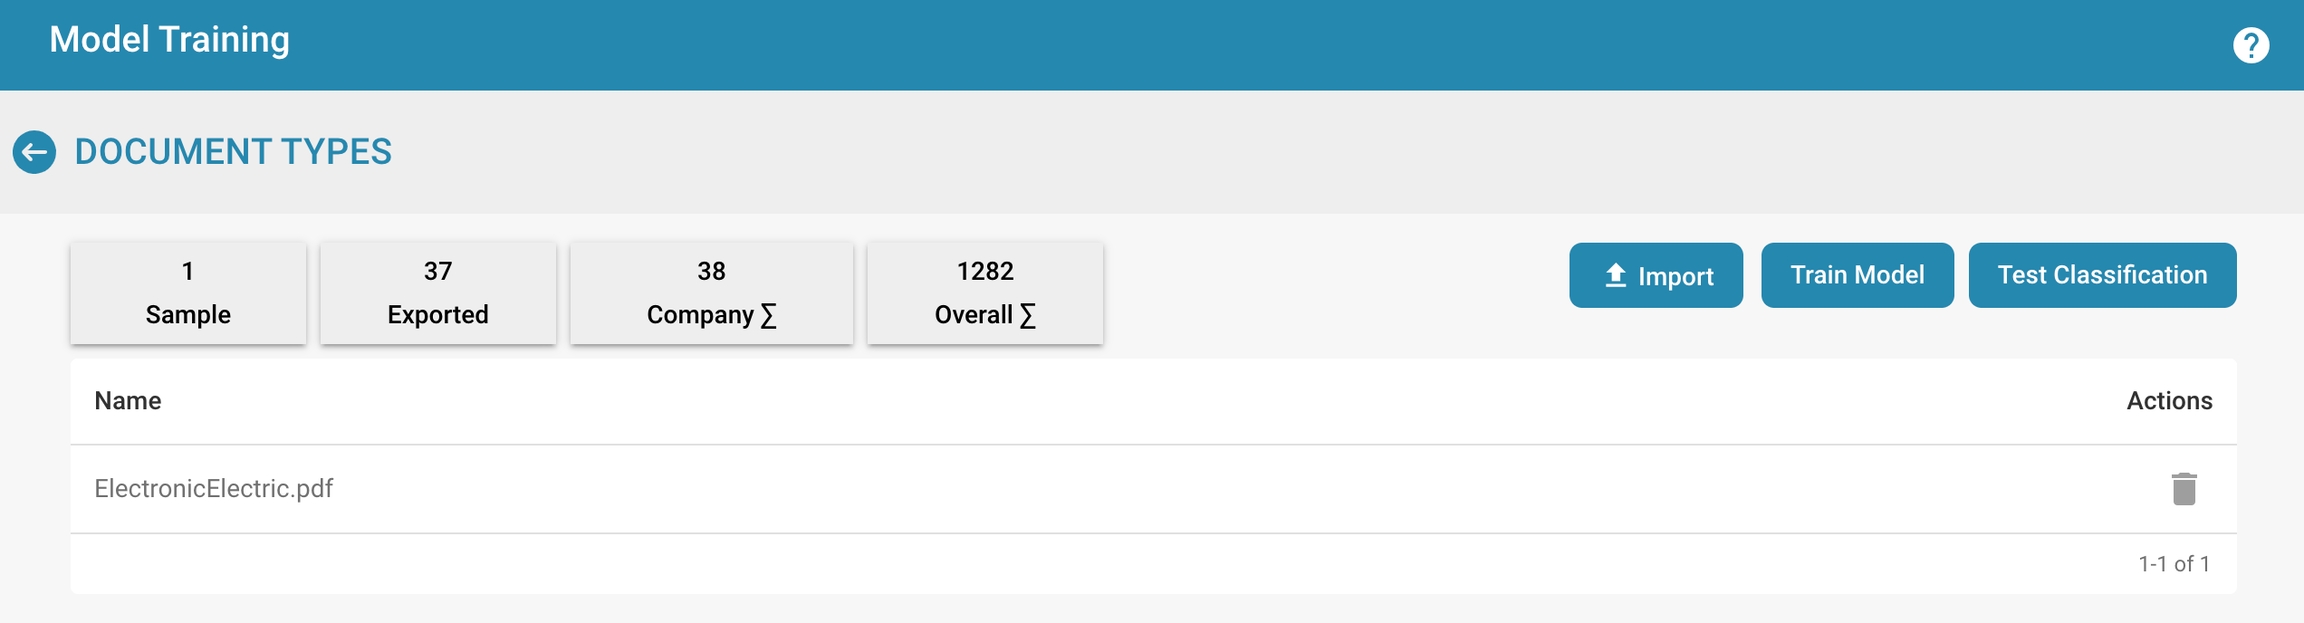
Check the import status: Check the status of the import process to make sure that all documents were imported successfully. Make sure that no errors occurred and that the documents were processed correctly.
Train the model: After the documents are imported, use them to train the document processing system model. Perform training according to the system's instructions to make sure it can process the sample data effectively.


By regularly adding sample documents for training, you can ensure that your document processing system is always up to date and provides accurate and efficient processing.
Manage training data
Manage existing training data, including adding, editing, or removing records.
To effectively manage training data, you can take the following steps:
Adding new records:
Collect new documents to serve as training data for your model.
Make sure these documents are a representative sample of the different types of data the model is designed to process.
Upload the new records to your training data repository.
Editing existing records:
Regularly review your existing training data and update it as needed. This may include editing document metadata, adding additional labels, or removing erroneous or non-representative records.
Removing records:
Identify outdated, inaccurate, or no longer relevant records and remove them from your training data set.
Make sure you have a clear process for deciding which records to remove and document that process.
Training data versioning:
Implement a version control system for your training data to track changes and keep a clear history of dataset changes. This allows you to restore older versions of the training data when needed and track changes.
Training data security:
Ensure your training data is appropriately protected, especially if it contains sensitive or confidential information. Implement access controls to ensure only authorized users can access the training data, and encrypt the data during transfer and storage.
Documentation and tracking:
Document all changes to your training data, including adding, editing, and removing datasets. This allows you to track the history of your training data and ensure you have current and relevant data for training your model.
By regularly managing and updating your training data, you can ensure that your model is trained with current and representative data and achieves optimal performance.
Testing the model
Steps to run classification tests to evaluate the accuracy and operational readiness of the model
To test the trained model and evaluate its accuracy and operational readiness, you can follow the steps below:
Preparing the test data:
Collect a representative sample of test data covering different types of documents and scenarios that the model will handle in the field. Ensure that the test data is of high quality and correctly labeled.
Running the classification tests:
Run the classification tests on the prepared test data.
Feed the test data into the model and let the model make predictions for classifying the documents.
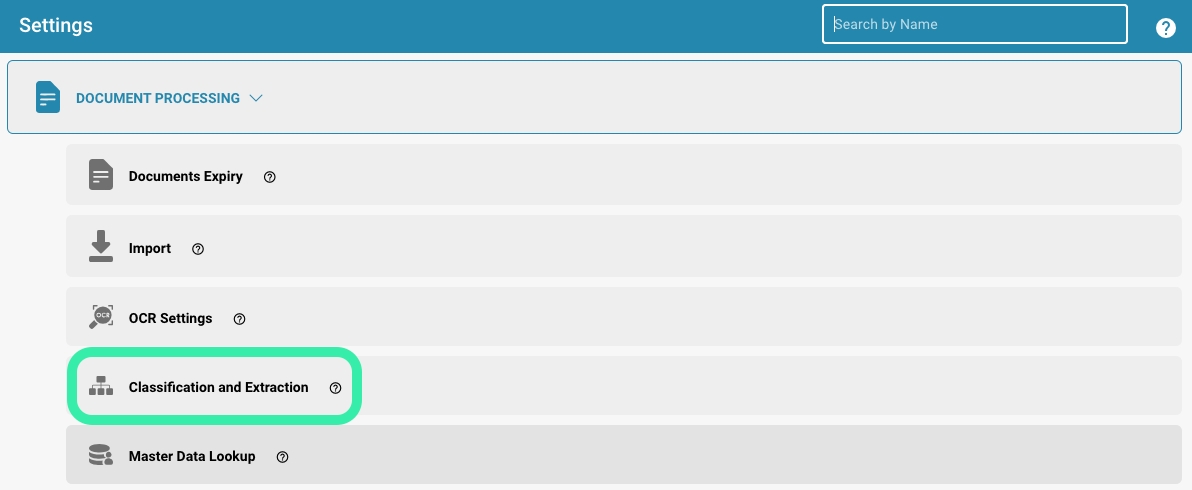
Add a new one or edit an existing classification rule.
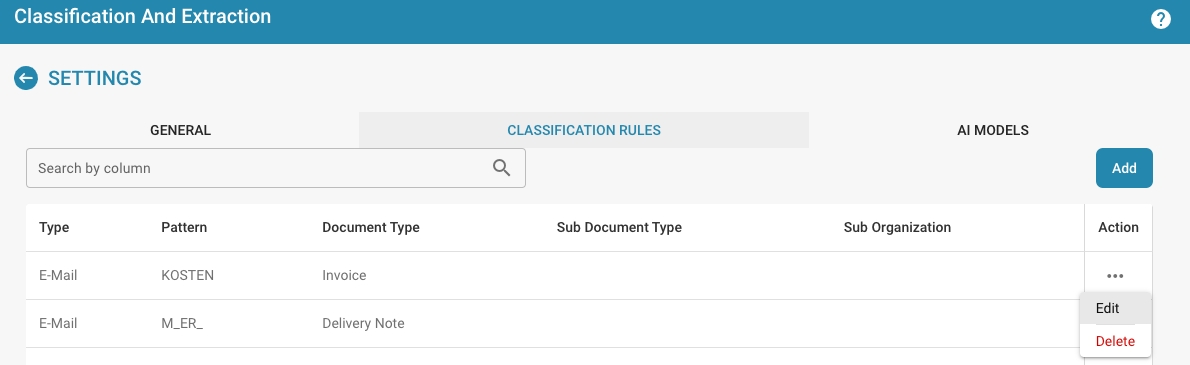
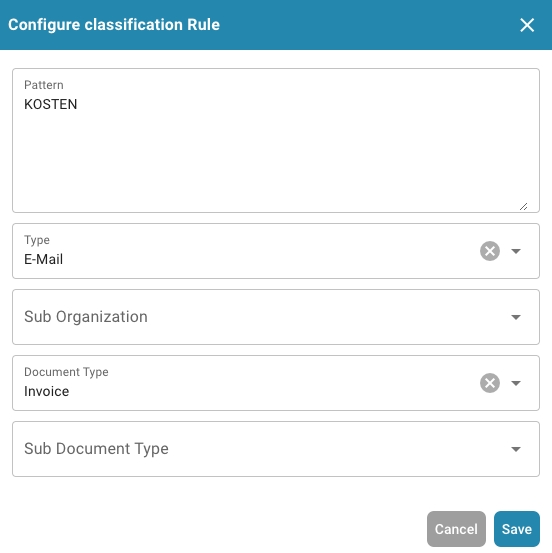
Evaluating the model accuracy:
Compare the model's predictions with the actual classifications of the test data. Calculate metrics such as accuracy, precision, recall, and F1 score to evaluate the model's performance. These metrics provide insight into how well the model classified the documents and how reliable it is.

Analyze errors:
Examine the errors the model made when classifying the test data and analyze their causes. Identify patterns or trends in the errors and, if necessary, make adjustments to the model to improve its performance.
Optimize the model:
Based on the results of the classification tests and error analysis, you can optimize the model by adding training data, adjusting training parameters, or changing the model architecture. Repeat the testing process to check if the optimizations improved the model's performance.
Document the results:
Document the results of the classification tests and any adjustments or optimizations made to the model. This will help you track the model's progress over time and ensure that it is constantly improving.
By regularly running classification tests and evaluating the performance of your model, you can ensure that it is suitable for use in production and delivers accurate results.
Best practices
Best practices for continuous model training, such as training frequency, selecting sample documents, and monitoring model performance metrics.
Here are some best practices for continuous model training:
Perform regular training:
Perform regular training cycles to ensure your model is up to date and adapts to changes in data and requirements.
The frequency of training can vary depending on the type of data and training progress, but it is important to train regularly to maintain model performance.
Use updated sample documents:
Use recent sample documents that are representative of the data your model will face.
This may include adding new documents, removing outdated documents, or editing metadata to ensure the training data is current and relevant.
Select diverse samples:
Make sure your training data covers a wide variety of scenarios and use cases to ensure the model is robust and versatile.
Consider different variations in layouts, languages, formats, and content to ensure the model works well in different situations.
Monitor model performance:
Regularly monitor the performance of the model using relevant metrics such as accuracy, precision, and recall.
Analyze the results of classification tests and validation checks to identify weak points and spot opportunities for improvement.
Incorporate continuous feedback:
Incorporate feedback from users and experts to continuously improve the model.
Collect feedback on misclassifications or inadequate results and use this information to adjust and optimize the model.
Automate the training process:
Automate the training process to increase efficiency and minimize human error.
Use tools and scripts to automatically perform model training, evaluation, and updating when new data is available or changes are required.
By implementing these best practices for continuous model training, you can ensure that your model is constantly improving and achieving optimal performance to meet the needs of your use case.
Troubleshooting
Provide solutions to typical problems that can arise during model training, such as data format errors, training model convergence issues, or unexpected model performance degradation.
Here are solutions to some typical problems that can arise during model training:
Data format errors:
Make sure the training data is in the correct format and meets the model's requirements.
Check the data for missing values, incorrect encodings, or unexpected structures.
If necessary, convert the data to the correct format and perform preprocessing to ensure it is suitable for training.
Training model convergence issues:
If the model is struggling to converge or show consistent improvements, check the hyperparameters and training configurations.
Experiment with different learning rates, batch sizes, or optimization algorithms to facilitate convergence.
If necessary, reduce the model complexity or increase the amount of training data to improve model performance.
Unexpected model performance degradation:
If the model shows unexpectedly poor performance after training, check the training data for possible errors or inaccuracies.
Analyze the error patterns and check if certain classes or features are classified poorly.
Run further tests with new training data to ensure that the model is consistent and reliable.
Overfitting or underfitting:
Monitor model performance for overfitting or underfitting, which can lead to poor generalization ability.
Experiment with regularization techniques such as L2 regularization or dropout to reduce overfitting.
Increase the amount of training data or data variation to avoid underfitting and improve model performance.
Lack of representativeness of training data:
Make sure your training data covers a sufficient variety of scenarios and use cases to prepare the model for different situations.
If necessary, supplement the training data with additional examples or synthetic data to improve coverage and increase model performance.
By identifying and fixing these issues specifically, you can improve the performance of your model and ensure that it works effectively and reliably to meet the needs of your use case.
Regex
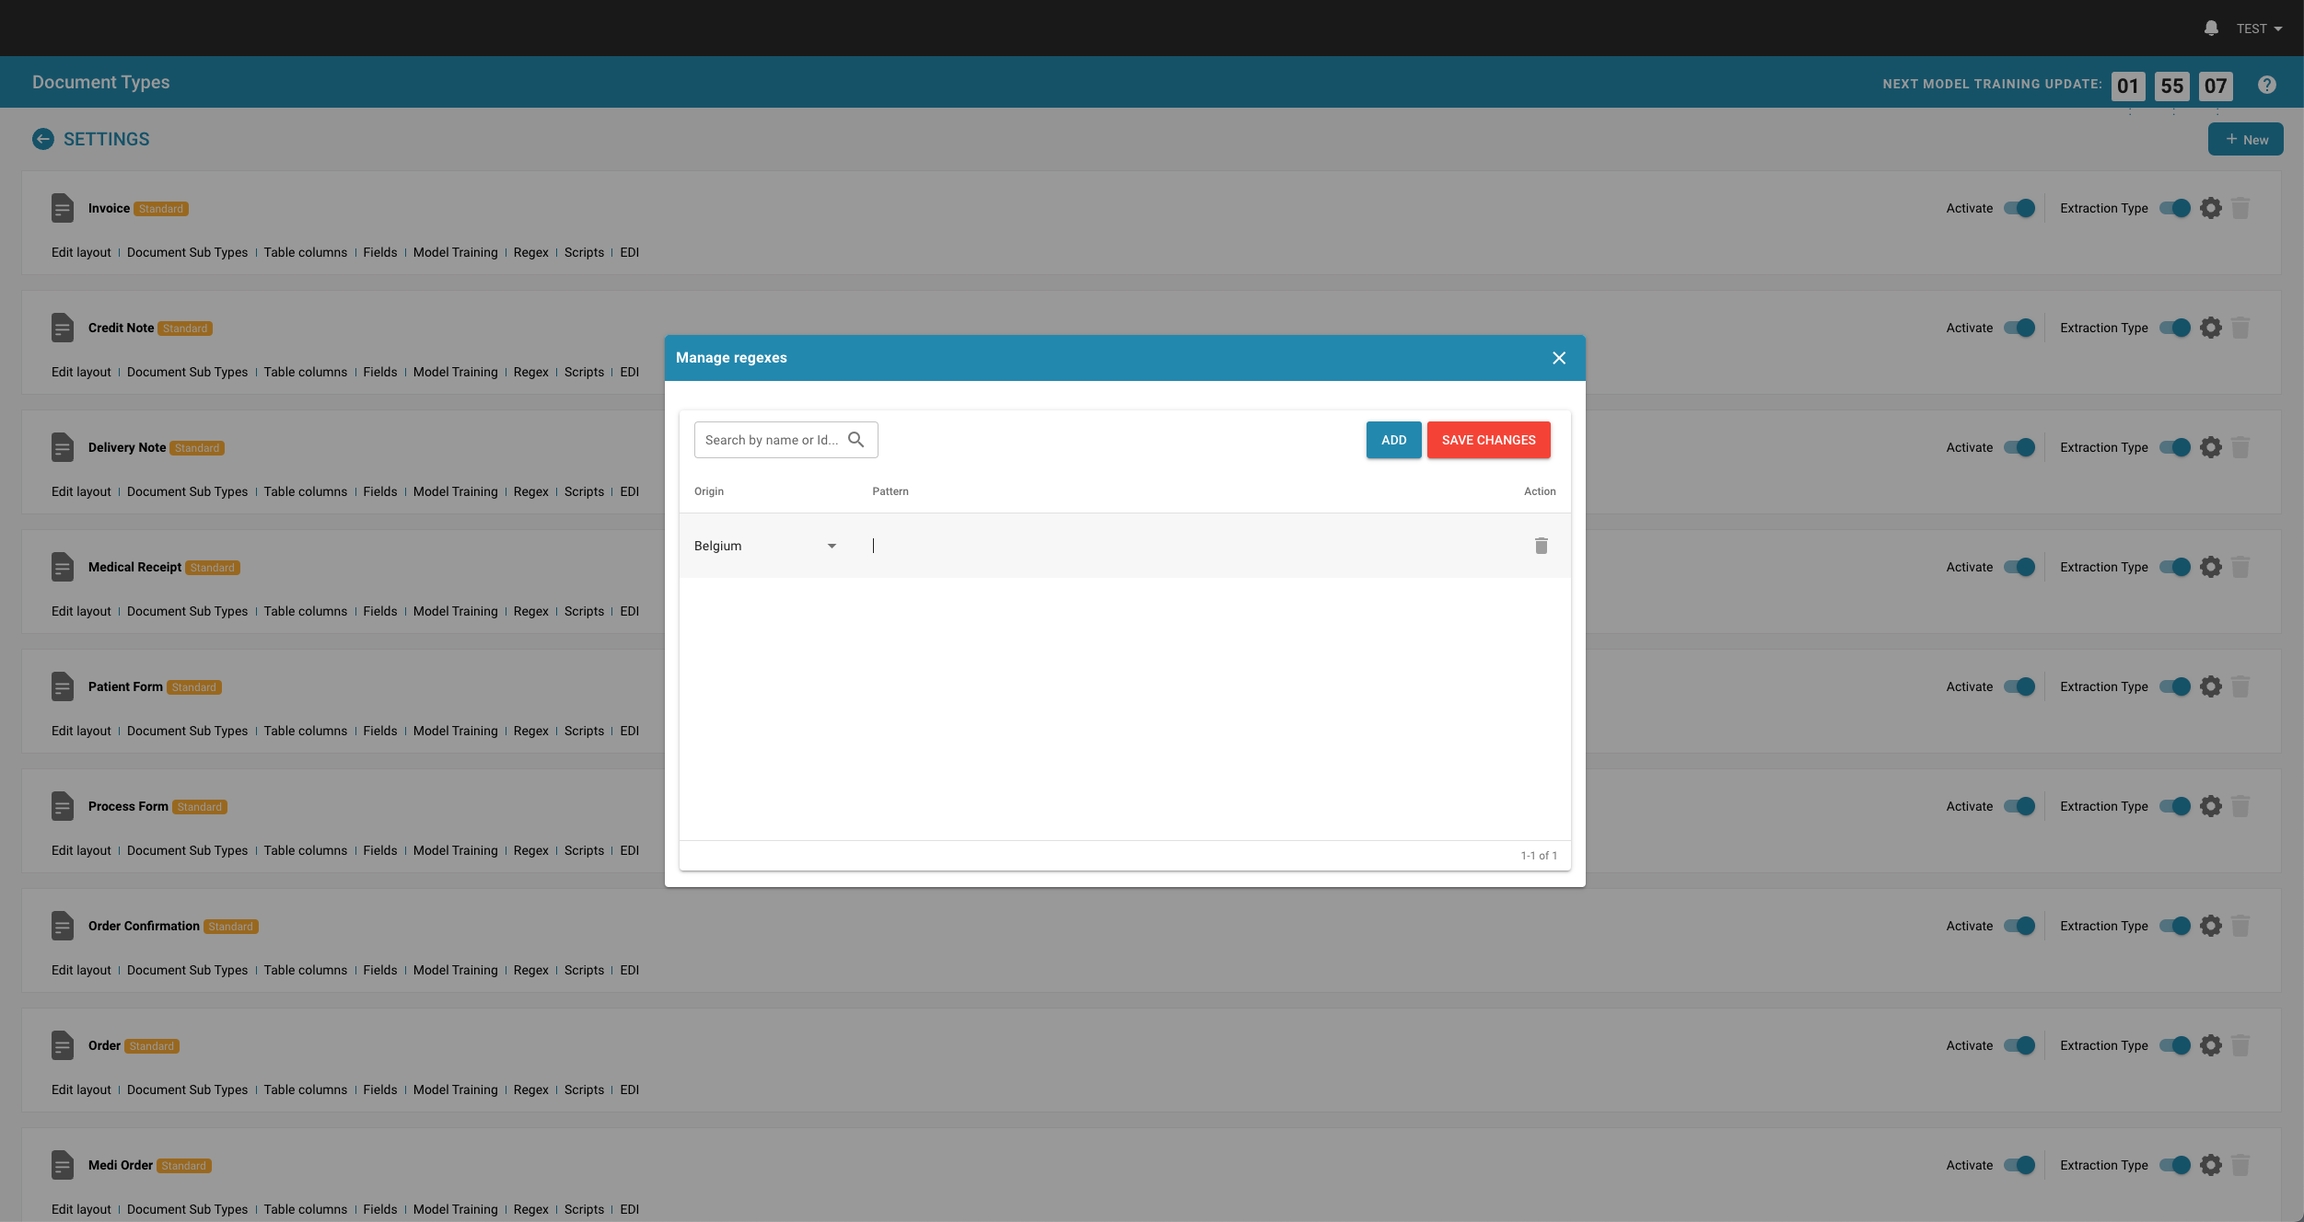
In Docbits, Regex settings allow administrators to define custom patterns that the system uses to find and extract data from documents. This feature is especially useful in situations where data needs to be extracted from unstructured text or when the data follows a predictable format that can be captured using regex patterns.
Key Features and Options
Managing Regexes:
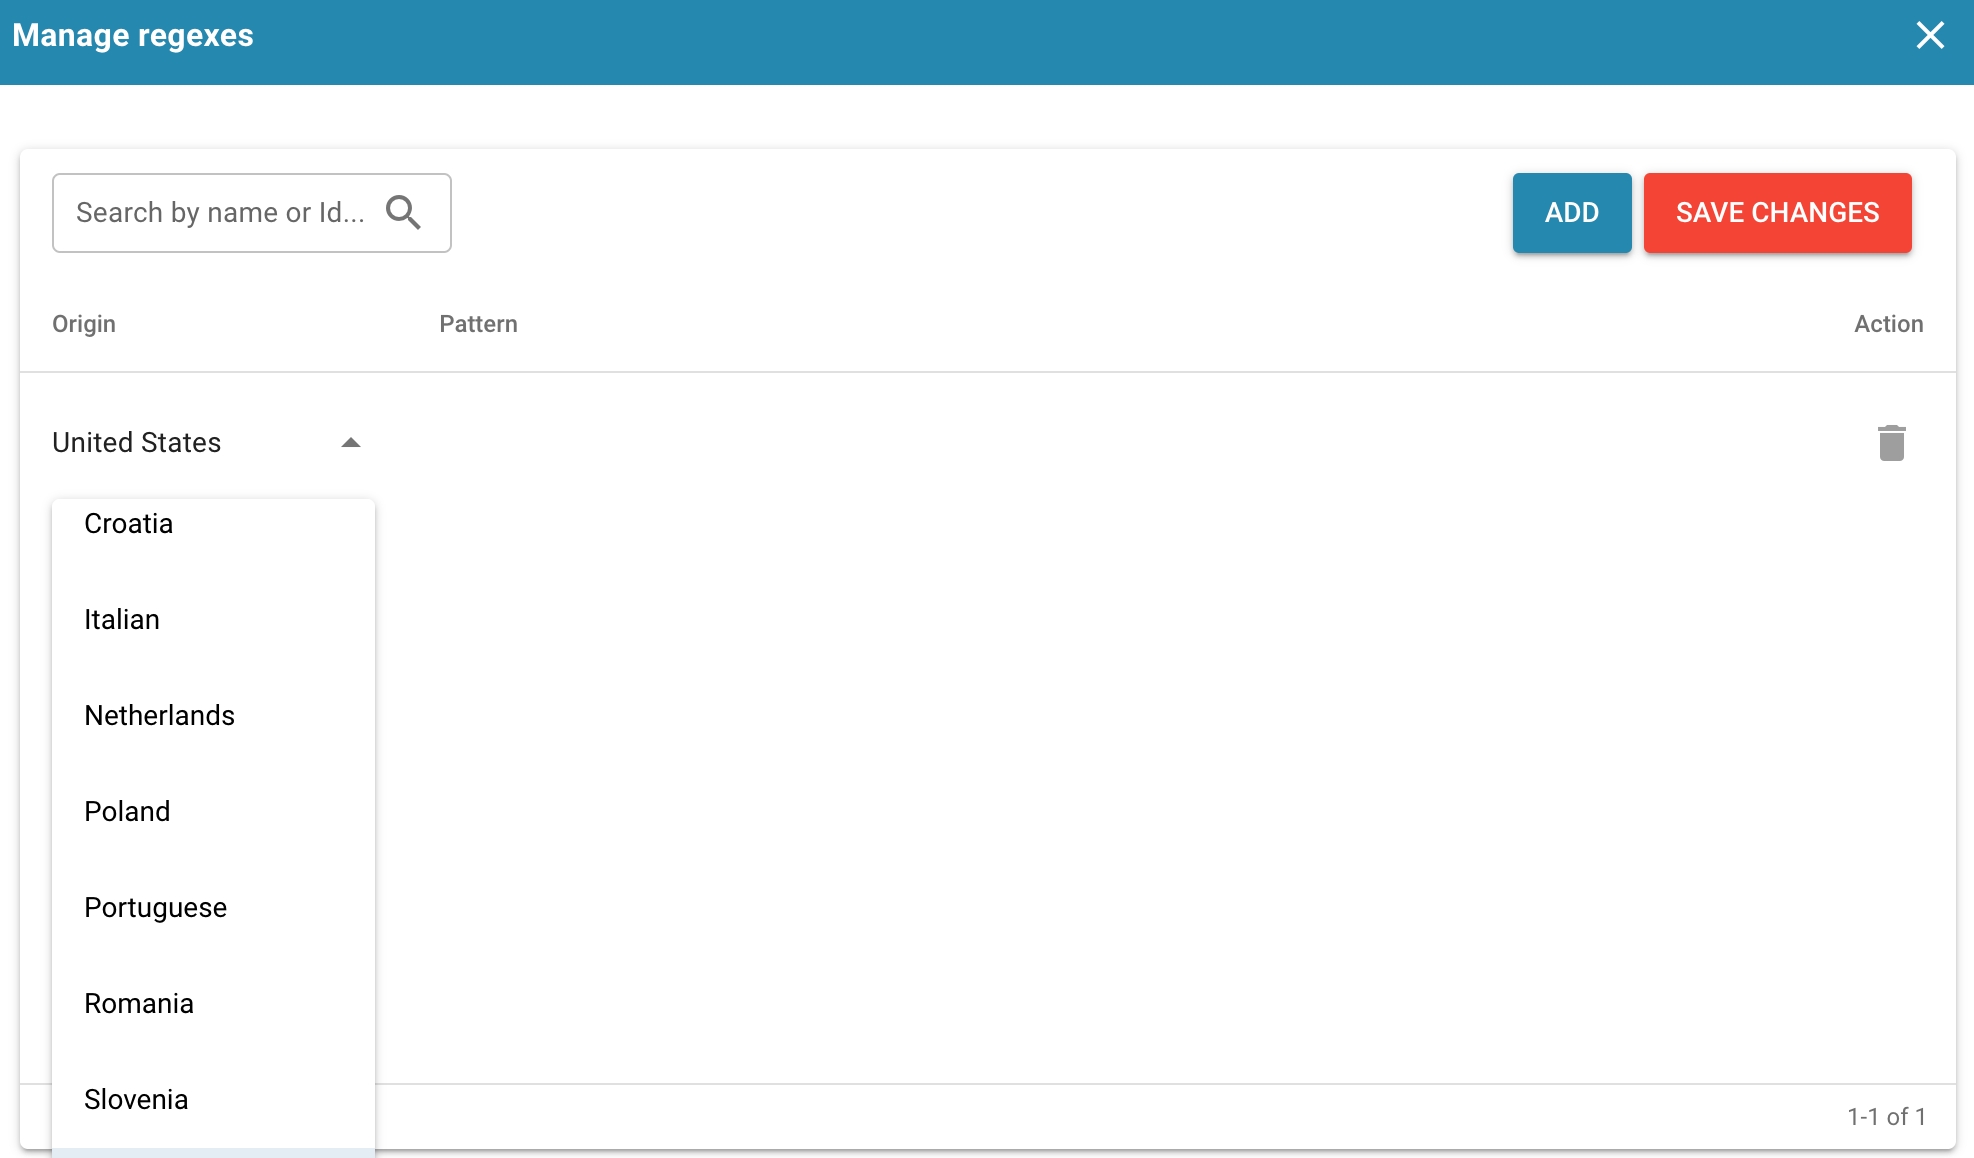
Managing Regexes:
Add: Allows you to create a new regex pattern for a specific document type.
Save Changes: Saves modifications to existing regex configurations.
Pattern: Here, you can define the regex pattern that matches the specific data format required.
Origin: Is the Document Origin - For example you can define a different Regex in Germany
Purpose and use
Regex, short for "Regular Expressions", is an extremely powerful method for pattern recognition in texts. It allows you to search for specific strings or patterns within texts, offering a high level of flexibility and precision.
In terms of data extraction from structured text formats such as documents, Regex plays a crucial role for several reasons:
Precise pattern recognition:
Regex allows you to define precise patterns for which text should be searched.
This is particularly useful when the data to be extracted follows a specific format or structure.
Flexible adaptation:
Since Regex offers a wide range of operators and constructs, complex patterns can be defined to extract data in different formats and variants.
This allows for flexible adaptation to different document structures.
Efficient processing:
Regex enables efficient processing of large amounts of text, since pattern searches are usually quick and even large text documents can be searched in an acceptable time.
Automation:
Regex can be used in scripts and programs to automate the extraction process.
This is especially useful when large volumes of documents need to be processed as extraction manually would be time-consuming and error-prone.
Validation and Cleansing:
Apart from extracting data, Regex also allows validation and cleaning of texts.
By defining patterns, unwanted strings can be identified and removed, resulting in cleaner and more consistent data.
Overall, using Regex provides an effective way to analyze structured text formats and extract data accurately and efficiently, which in turn is of great use for various applications such as data analysis, text processing, information extraction, and machine learning.
Creating a Regex Pattern
To create a new Regex pattern that correctly matches the desired data, follow these steps:
Define the goal:
First, clarify what type of data you want to extract and in what context it occurs.
Understand the structure and format of the data you want to capture.
Identify the pattern:
Analyze sample data to identify patterns or structures that are characteristic of the data you want to extract, keeping in mind possible variations and edge cases.
Use Regex Operators:
Choose the appropriate Regex operators and constructs to describe the identified patterns.
These include metacharacters such as
´.´ (any character), ´*´ (any number), ´+´ (at least one occurrence), ´? (zero or one occurrence) and character classes such as ´\d´ (digital character), ´\w´ (alphanumeric character) and ´\ (space).
Test the pattern:
Use test data to make sure your regex pattern correctly captures the desired data while taking into account possible edge cases.
Use online regex testers or special software tools to do this.
Optimize the pattern:
Check your regex pattern and optimize it if necessary to make it more precise and efficient.
For example, avoid patterns that are too general and could return too many unwanted matches.
Document the pattern:
Document your regex pattern, including its purposes, how it works and possible limitations.
This will make it easier for other developers to use and understand the pattern.
Implement the pattern:
Integrate your regex pattern into your application or script to extract and further process the desired data.
Some additional tips for creating an effective regex pattern:
Use groupings '( )' to define subpatterns and control their repetition.
Consider special cases and constraints in your pattern.
Be specific but not too restrictive to capture variations of the expected data.
Be case sensitive when relevant and use the i modifier for case independence when appropriate.
Experiment with your pattern and check the results regularly to make sure it is working correctly.
Editing and Saving Regex Patterns
Guide to modifying existing patterns and the importance of testing those changes to ensure they work as expected without breaking existing functionality.
To edit existing regex patterns and ensure the changes work as expected without breaking existing functionality, you can follow the guide below:
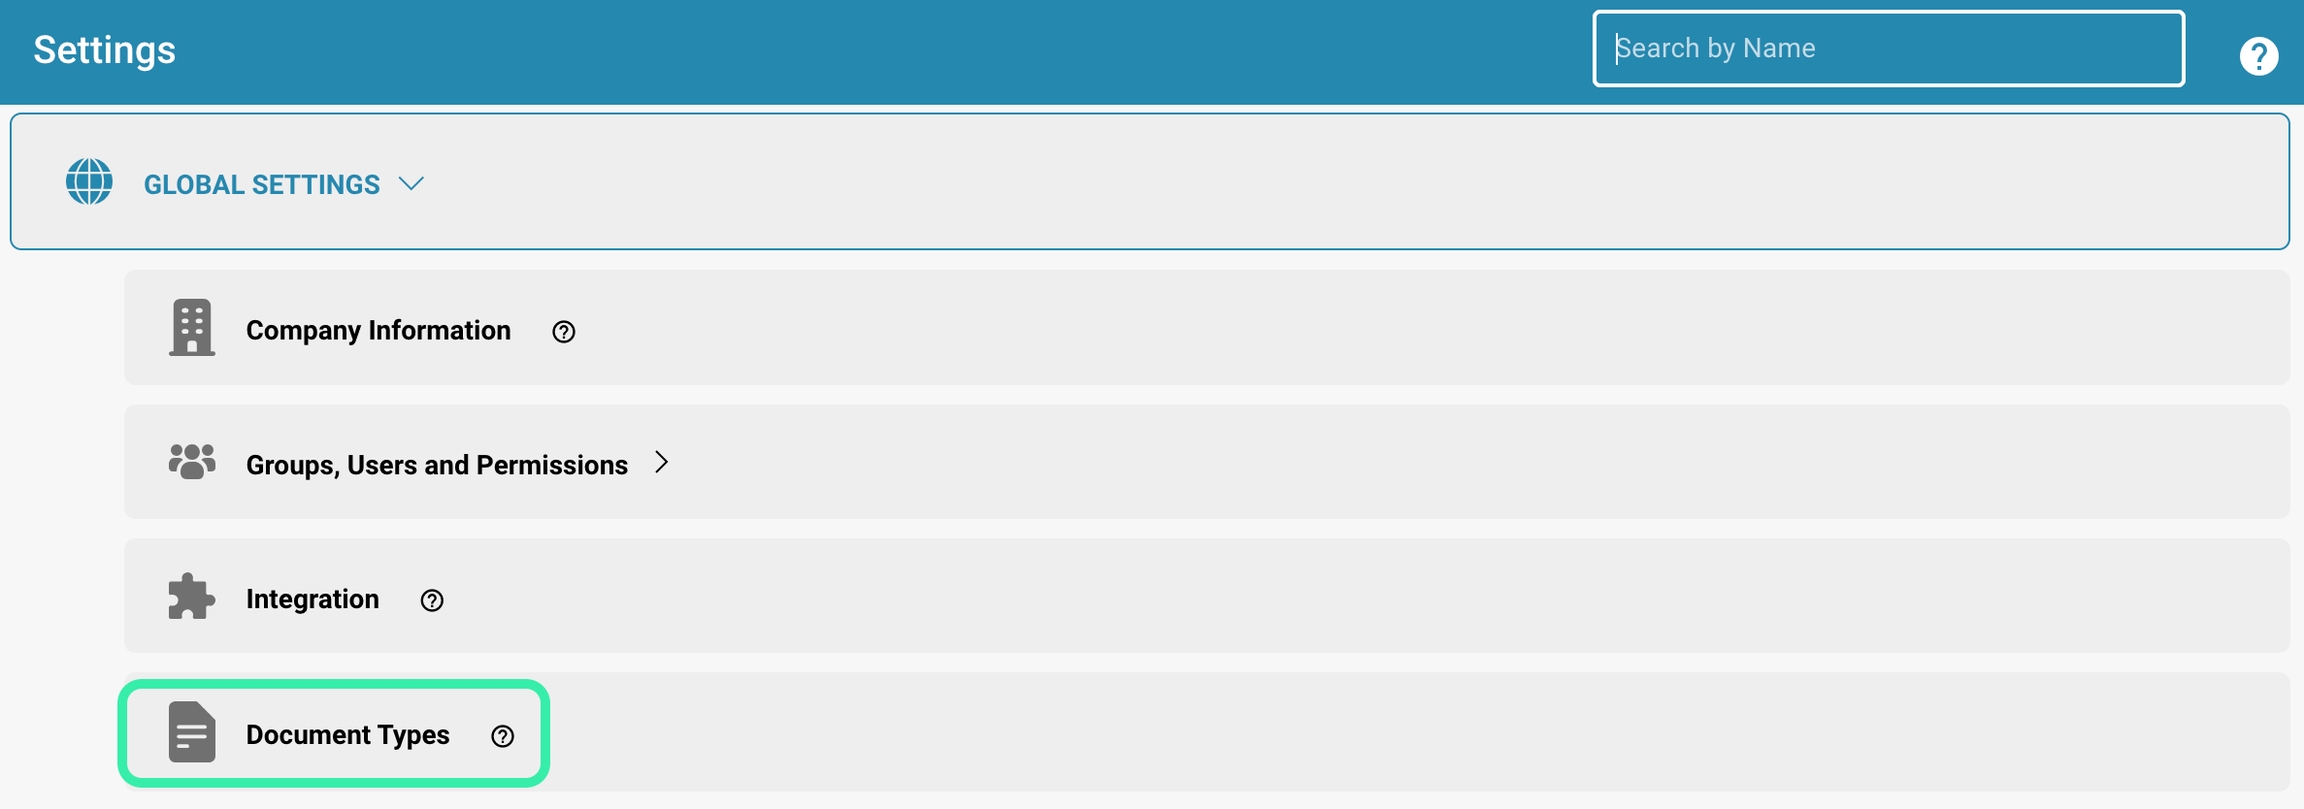
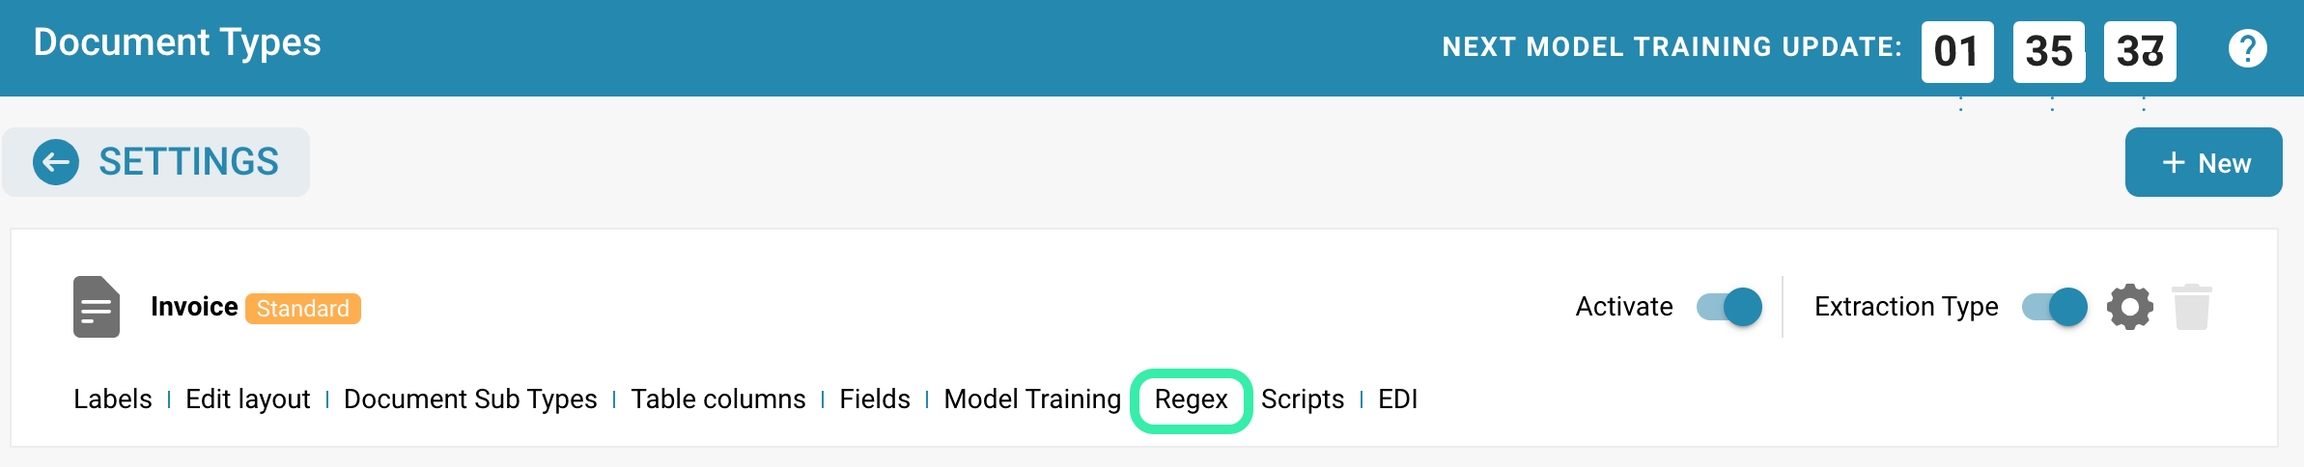
Analyze the existing pattern:
Examine the existing regex pattern to understand what data it captures and how it works.
Identify the parts of the pattern that need to be changed and the impact of those changes on the data captured.
For example: The invoice amount is to be read out:
(?<=Rechnungsbetrag:)[\s]*((((\d+)[,.]{1,10})+\d{0,2})|(\d+(?!,)))
Rechnungsbetrag: 100.00
Read the amount with 1000s dot but NOT pass the dot
[\d.][,\d]
Allowed characters: 0123456789,
The value "P32180" is to be read out. Anchor word here is "Invoice Date".
(?<=InvoiceDate )[\s]*P\d{5}
Customer number Invoice number Invoice date P32180 613976 05/13/2019
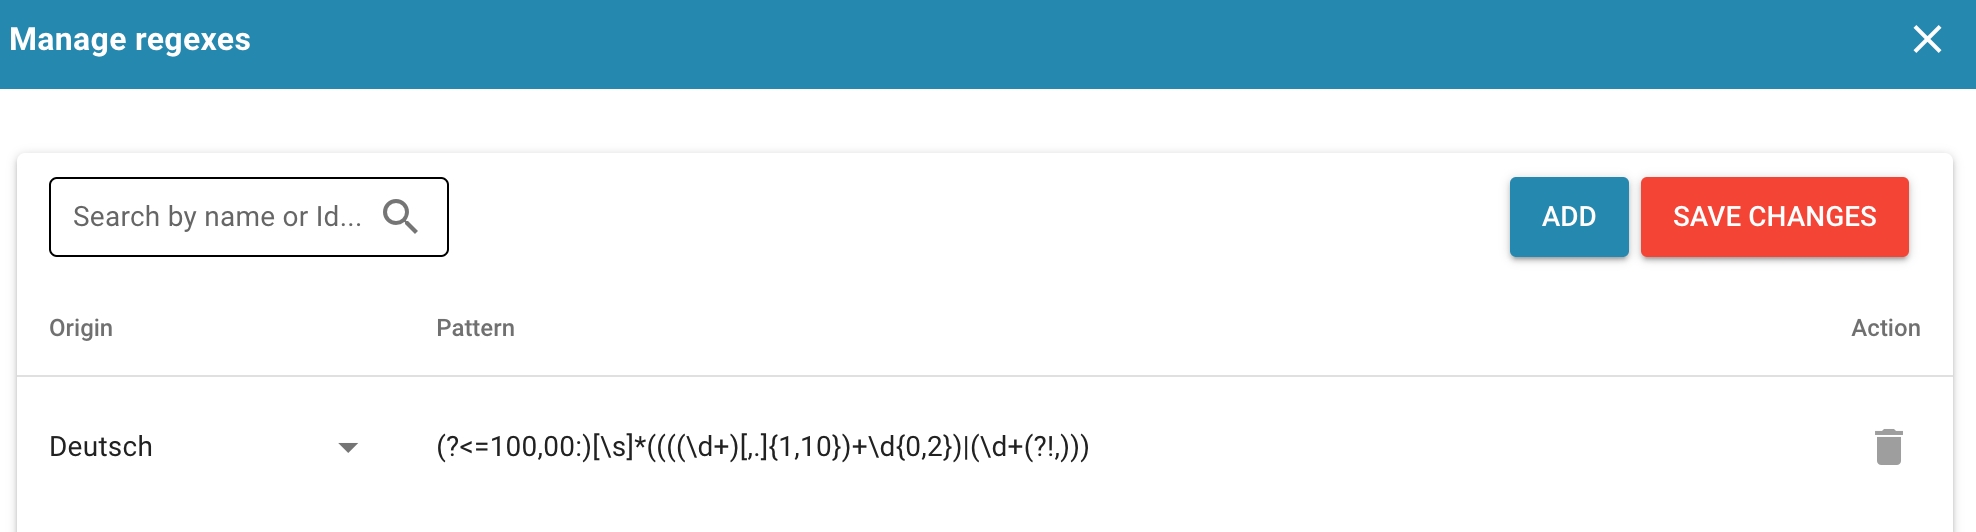
Document the changes:
Take notes about the changes you plan to make to the regex pattern.
Note what new patterns you plan to add and what parts of the existing pattern may need to be changed or removed.
Prepare test data:
Collect test data that is representative of the different types of data the regex pattern typically captures.
Make sure your test data covers both typical and edge cases to verify the robustness of your changes.
Make changes to the regex pattern:
Make the planned changes to the regex pattern.
This may include adding new patterns, removing or adjusting existing parts, or optimizing the pattern for better performance.
Test the changes:
Apply the updated regex pattern to your test data and carefully review the results.
Verify that the pattern still correctly captures the desired data and that there are no unexpected impacts on other parts of the data or system.
Debugging and adapting:
If test results are not as expected or unexpected issues occur, carefully review your changes and make further adjustments as needed.
This may include reverting certain changes or adding additional adjustments to fix the problem.
Document the changes:
Update the documentation of your regex pattern to reflect the changes made.
Describe the updated patterns and the reasons for the changes made to help other developers understand and use the pattern.
Saving the changes:
Once you are sure that the changes are successful and work as expected, save the updated regex pattern to your code base or configuration files to ensure they are available for future use.

By following these steps and carefully testing changes to regex patterns, you can ensure that your regex pattern continues to work correctly while meeting new requirements.
Best practices
Best practices for regex in document processing.
When using regex for document processing, there are some best practices to keep in mind to create and maintain effective and maintainable patterns:
Keep patterns simple and readable:
Complexity is often the enemy of maintainability.
It is advisable to keep regex patterns as simple and clear as possible.
Avoid overly complex expressions that are difficult to understand and use comments to explain how the pattern works.
Test patterns thoroughly before deployment:
Before deploying regex patterns in a production environment, thorough testing is essential.
Use test data that covers a wide range of possible scenarios and carefully review the results.
Also be aware of edge cases and unexpected variations in the data.
Document regex patterns for ongoing maintenance:
Good documentation is critical to ensuring the maintainability of regex patterns.
Describe how the pattern works, its purposes, and potential limitations.
Also, make notes about changes and updates to help other developers understand and maintain the patterns.
Promote modularity:
Break complex regex patterns into smaller, more easily understood parts.
This promotes reusability and makes maintenance easier.
Use named groups and user-defined functions to make your pattern more modular.
Performance optimization:
When processing large amounts of data, performance is an important factor.
Optimize your regex patterns to maximize processing speed.
For example, avoid excessive use of greedy quantifiers and inefficient constructs.
Regular review and update:
Review your regex patterns regularly for updates and improvements.
New requirements and changing data formats may require changes to the patterns.
Also update the documentation accordingly.
By following these best practices, you can ensure that your regex patterns are robust, efficient and maintainable, which in turn improves the reliability and scalability of your document processing solution.
Troubleshooting
When troubleshooting common regex problems, there are a few best practices to identify and fix the cause of the problem:
Use online regex testers:
Online regex testers are useful tools to check your regex patterns with test data and visualize the behavior of the pattern. They allow you to step through the matching process and identify potential problems.
Check the data context:
Make sure you understand the context of the data your regex pattern is working with. Sometimes unexpected characters or structures in the text can cause the pattern to not work as expected.
Check greedy quantifiers:
Greedy quantifiers like * and + can cause the pattern to capture too many characters and thus produce unexpected matches. Use greedy quantifiers with caution and check that the matching process is working as expected.
Debugging with grouping:
Use groupings ( ) to isolate subsections of your regex pattern and check their match separately. This allows you to understand which parts of the pattern might be causing problems.
Watch for special characters:
Some characters in regex have special meanings and need to be escaped if they are to be treated as normal characters. Make sure you use the correct escape characters to avoid unexpected results.
Test with different datasets:
Use a variety of test data to make sure your regex pattern works correctly in different scenarios. This includes typical datasets as well as edge cases and unexpected variations.
Consult the documentation:
Check the documentation of your regex implementation to make sure you understand the specific properties and peculiarities of the regex syntax used. Sometimes nuances in the syntax can lead to unexpected behavior.
Seek community support:
If you continue to have problems with your regex pattern, you can seek support in developer forums or Q&A platforms. Other developers may be able to offer helpful insights or solutions.
By following these tips and working systematically, you can identify and fix most common regex pattern issues to ensure reliable data extraction.
Script

Overzicht
Scripts in Docbits zijn doorgaans geschreven in een scripttaal die door het systeem Python wordt ondersteund. Ze worden geactiveerd tijdens de documentverwerkingsworkflow om complexe bedrijfslogica toe te passen of om de integriteit en nauwkeurigheid van gegevens te waarborgen voordat de gegevens verder worden verwerkt of opgeslagen.
Belangrijkste Kenmerken en Opties
Scriptbeheer:
Naam: Elk script krijgt een unieke naam ter identificatie.
Documenttype: Koppelt het script aan een specifiek documenttype, wat bepaalt op welke documenten het script zal worden toegepast.
Trigger Op: Definieert wanneer het script wordt geactiveerd (bijv. bij documentupload, vóór gegevensexport, na gegevensvalidatie).
Actieve/Inactieve Status: Hiermee kunnen beheerders scripts activeren of deactiveren zonder ze te verwijderen, wat flexibiliteit biedt bij testen en implementatie.
Scripteditor:
Biedt een interface waar scripts kunnen worden geschreven en bewerkt. De editor ondersteunt doorgaans syntaxisaccentuering, foutaccentuering en andere functies om te helpen bij de ontwikkeling van scripts.
Voorbeeldscript: Scripts kunnen bewerkingen bevatten zoals het doorlopen van factuurregels om totalen te valideren of om invoer te verwijderen die niet aan bepaalde criteria voldoet.

Script Activation and Management
Here is a guide on how to enable, disable and manage existing scripts in DocBits to suit your current processing needs:
Logging into DocBits:
Open your web browser and log into DocBits with your credentials.
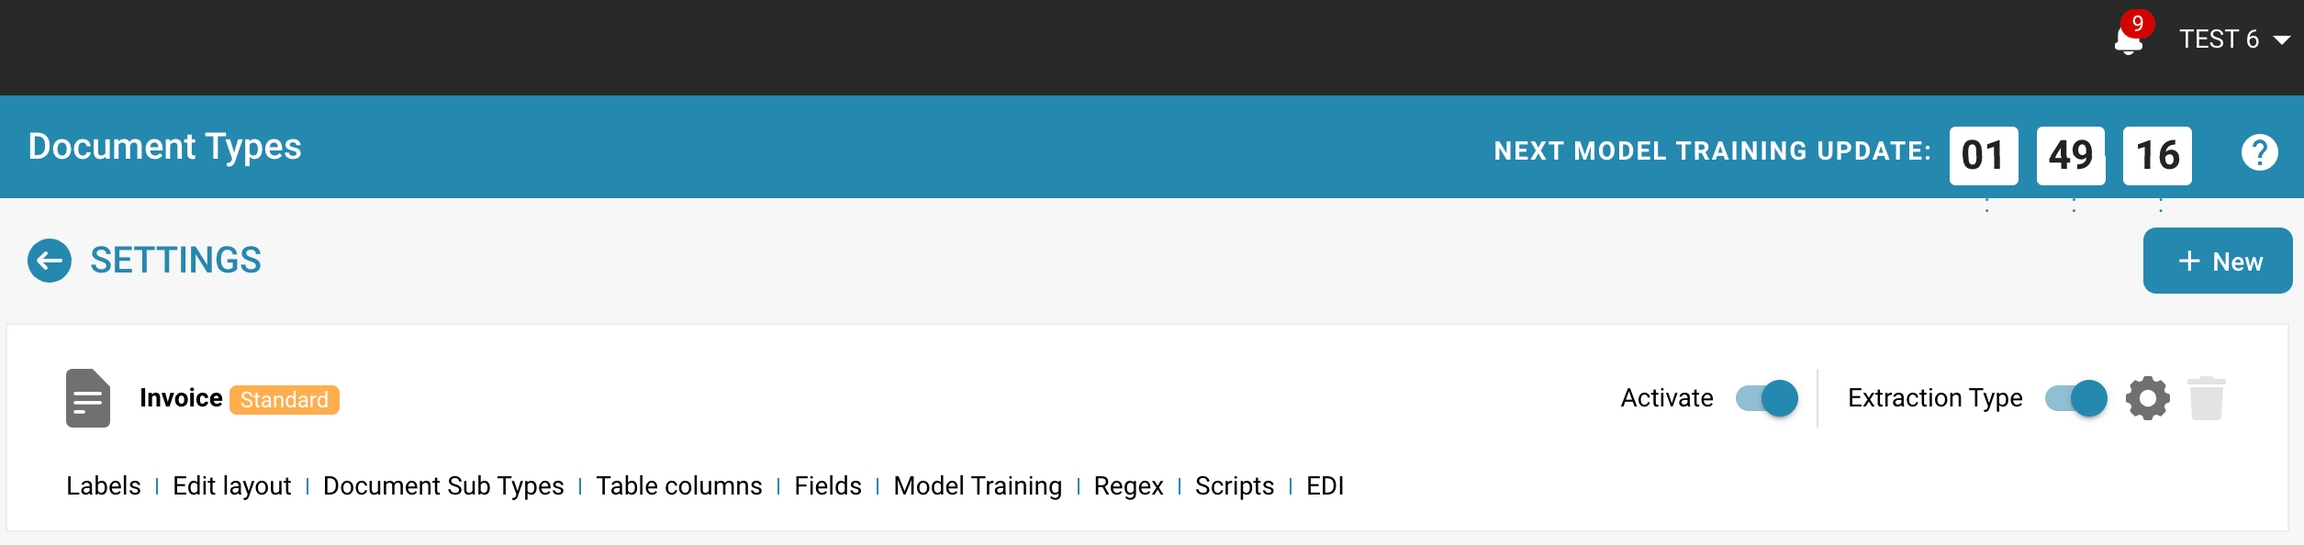
Navigate to Script Management:
Look for the option to manage scripts in the DocBits interface.
This may vary depending on your setup and configuration of DocBits.

Viewing existing scripts:
Once you are in the script management interface, you will see a list of all existing scripts.
Here you can scroll through the list to find the desired script you want to enable, disable or edit.
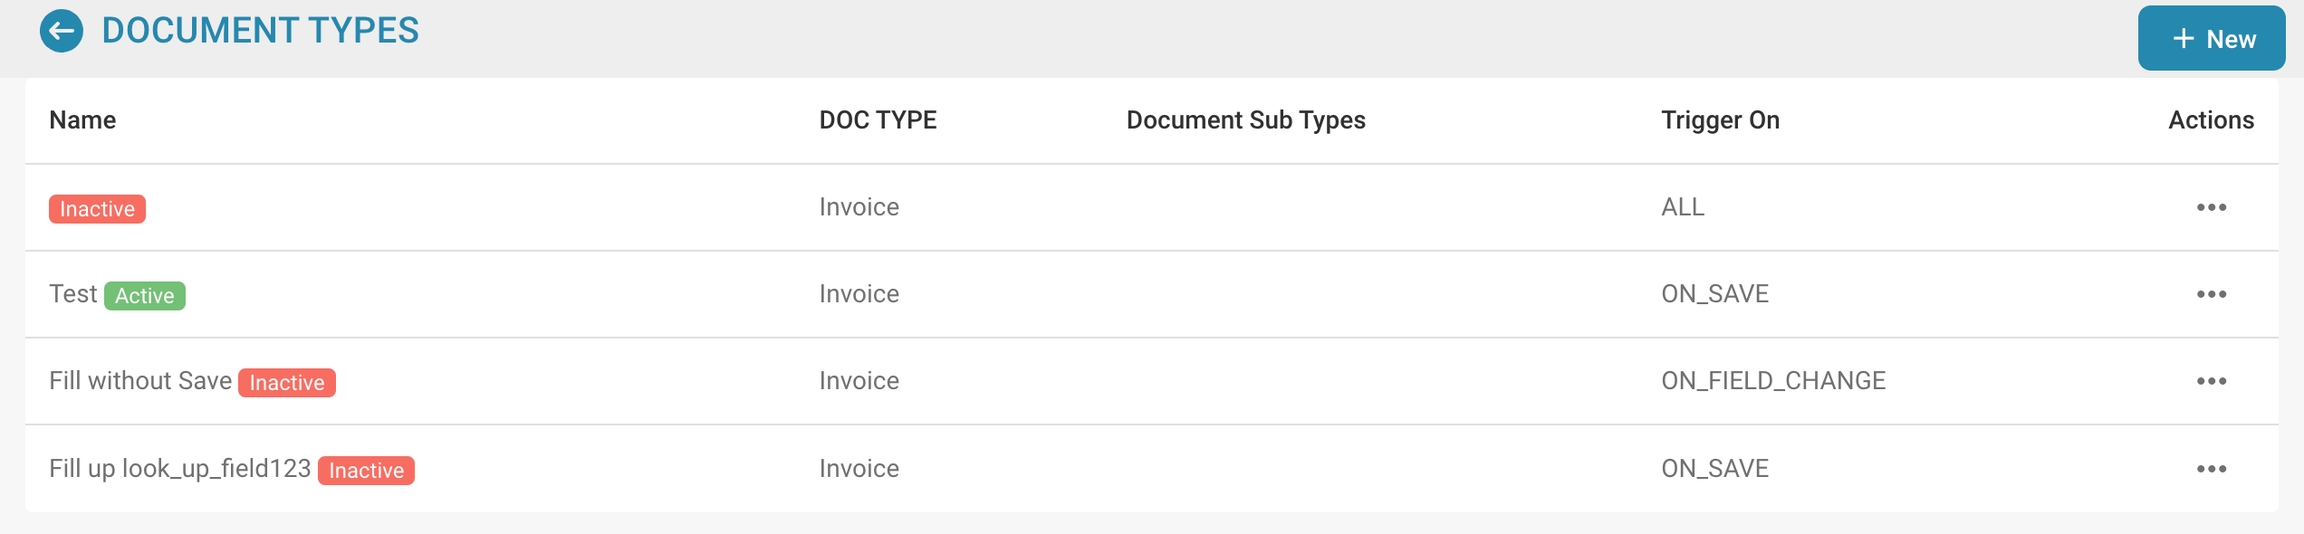
Enabling or disabling a script:
To enable or disable a script, find the relevant script in the list and enable or disable the script.
Make sure to save changes after making your selections.

Editing a script:
If you need to edit an existing script, look for the button in the script management interface that allows editing the script.
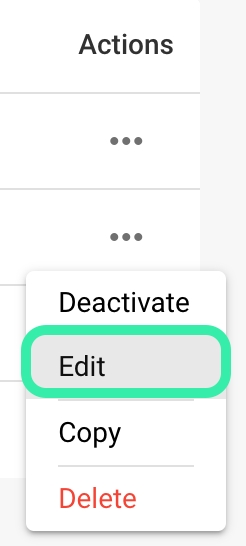
Click it to open the editor where you can modify the script's code.
After making your changes, save the script again.
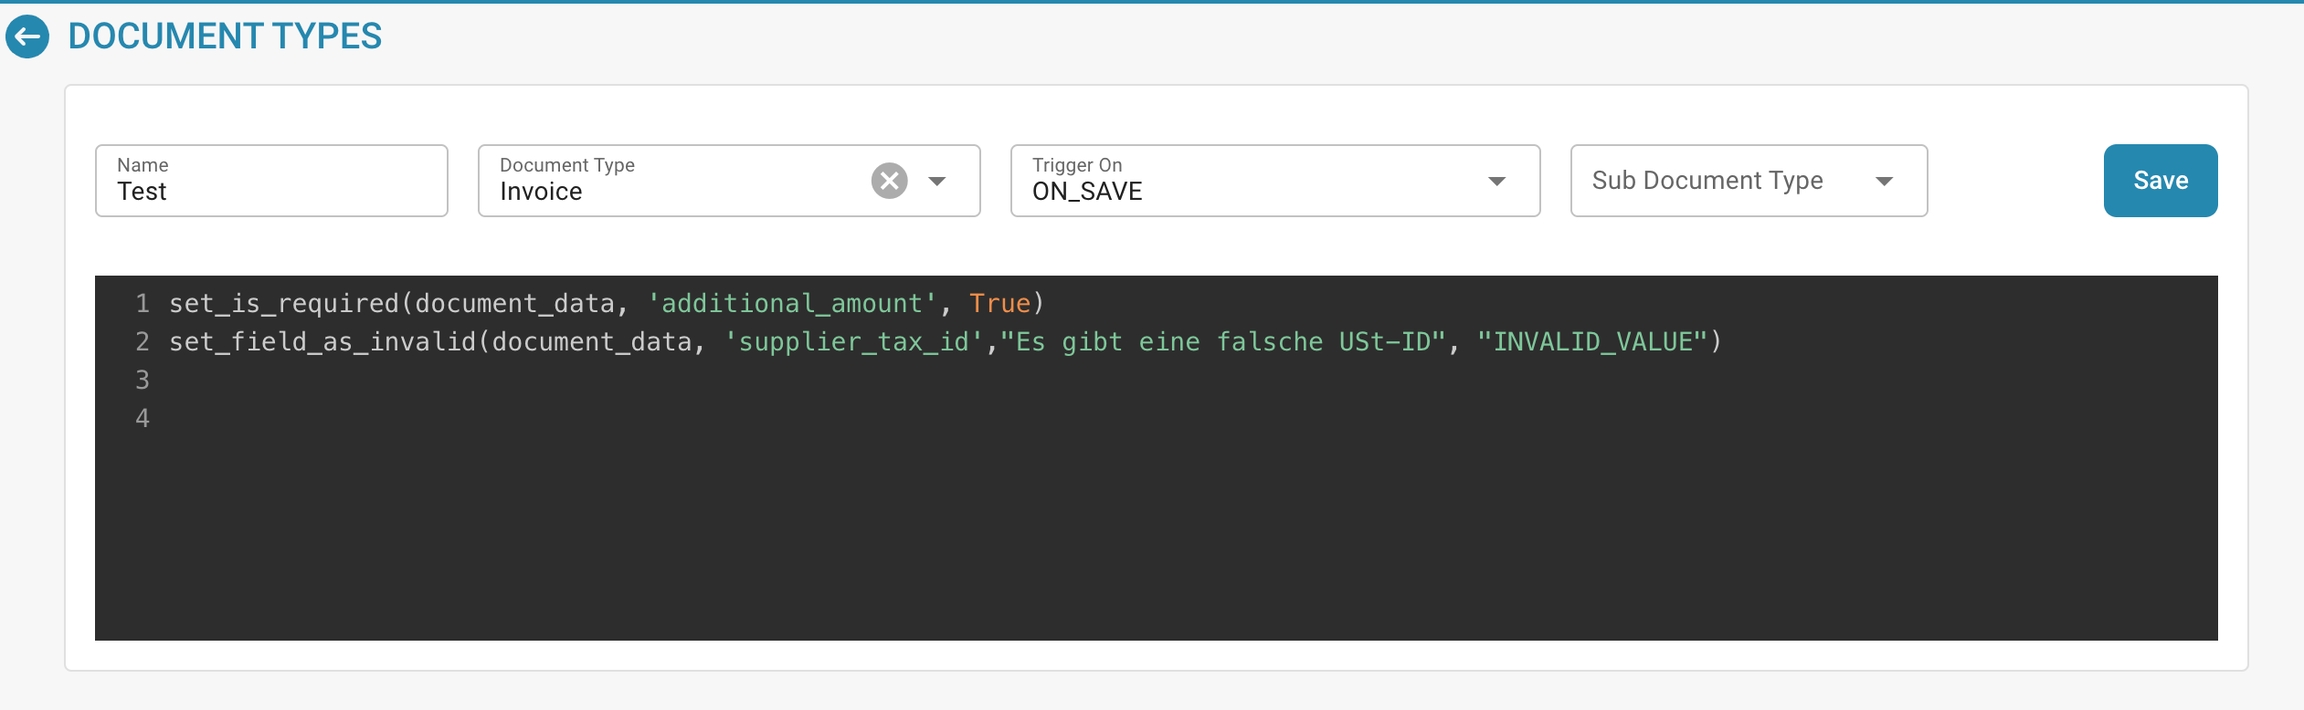
Review and test:
Before making changes to a script, carefully review the existing code and consider what impact your changes might have.
Test the script in a test environment to make sure it works as expected.

Documentation:
Don't forget to document your changes.
Write down what changes you made and why so that other users on the team can understand how the script works and what impact your changes might have.
Publishing changes:
When you are satisfied with your changes, republish the script to the DocBits production environment for the updated version to take effect.
These steps allow you to enable, disable and manage existing scripts in DocBits to adapt them to current processing needs and ensure that your documentation processes run efficiently and correctly.
Testing Scripts
Testing scripts thoroughly in a controlled environment is critical before deploying them to a live document processing workflow. Here are a few reasons why it's important.
Error Prevention:
Scripts can contain errors, whether due to syntax errors, logic errors, or unforeseen edge cases.
Testing in a controlled environment allows these errors to be identified and fixed before the script is deployed in a live workflow.
This helps avoid potential issues and downtime.
Data Security:
In a live workflow, using faulty scripts can result in data loss or data corruption, which can lead to serious security issues.
Testing in a controlled environment allows potential security vulnerabilities to be identified and fixed before sensitive data is affected.
Ensuring Functionality:
Scripts are designed to automate specific tasks or improve processes.
Thorough testing helps you ensure that the script performs the desired functions properly and produces the intended results.
This helps improve the efficiency and quality of document processing.
Adaptation to different environments:
A controlled test environment allows you to test the script under different conditions and ensure that it works stably in different environments.
This is especially important when the script is deployed in different system configurations or with different data sets.
Usability:
Testing in a controlled environment also allows you to check the usability of the script and ensure that it is easy to use and understand.
Feedback from the testing process allows you to tweak the script if necessary to improve the user experience.
Overall, thoroughly testing scripts in a controlled environment helps ensure the reliability, security, and effectiveness of document processing. It is an indispensable step to identify potential issues and ensure that the script works optimally before deploying it in a live workflow.
Purpose and Use
Using scripts to automate processes is critical for businesses of all sizes and in almost every industry. Not only do these scripts enable significant increases in efficiency, but they also ensure the accuracy and consistency of data, which in turn leads to informed decisions and improved operational efficiency.
Here are some key aspects of how scripts can be used to automate processes and ensure data accuracy:
Data cleansing:
Businesses often collect large amounts of data from various sources.
This data is often incomplete, inconsistent, or contains errors.
By using scripts, automated processes can be implemented to clean data, fill in missing values, remove duplicates, and correct errors.
This greatly improves the quality of the data and makes it easier to analyze and use.
Applying business rules:
Businesses often have specific business rules that need to be applied to the data being processed.
Scripts can be used to implement these rules and ensure that all data is processed according to company standards.
This can include everything from validating input data to applying compliance regulations.
Integrating data with other systems:
Often, data from different sources needs to be integrated into different systems to ensure a seamless flow of information within the organization.
Scripts can be used to automate this integration by extracting data from a source, transforming it, and loading it into the target system.
For example, this could include integrating sales data into a CRM system or transferring customer feedback into an analytics tool.
Automating repetitive tasks:
Many tasks in a business are routine and repetitive.
By using scripts, these tasks can be automated, saving time and resources. Examples include automatically generating reports, updating databases, or performing regular maintenance.
Overall, scripts play a crucial role in automating processes and ensuring data accuracy. By automating repeatable tasks and applying business rules consistently, they help increase efficiency, reduce errors, and enable informed decisions based on reliable data.
Creating and Editing Scripts
To create a new script in DocBits, follow these detailed instructions:
Choose the scripting language:
First, you need to choose the scripting language you want to use. DocBits typically supports common scripting languages such as Python, JavaScript, or SQL. The choice of language depends on the needs of your project and your own competency.
Open the script development environment:
Log in to DocBits and navigate to the script development environment. This is in the administration area.

Create a new script:
Click the "+ New" button to open a new script editor.

Write the code:
Use the editor to write the code for your script. Start with the basic syntax of your chosen scripting language.
For example, if you are using Python, your script might look like this:
1. Example script in Python
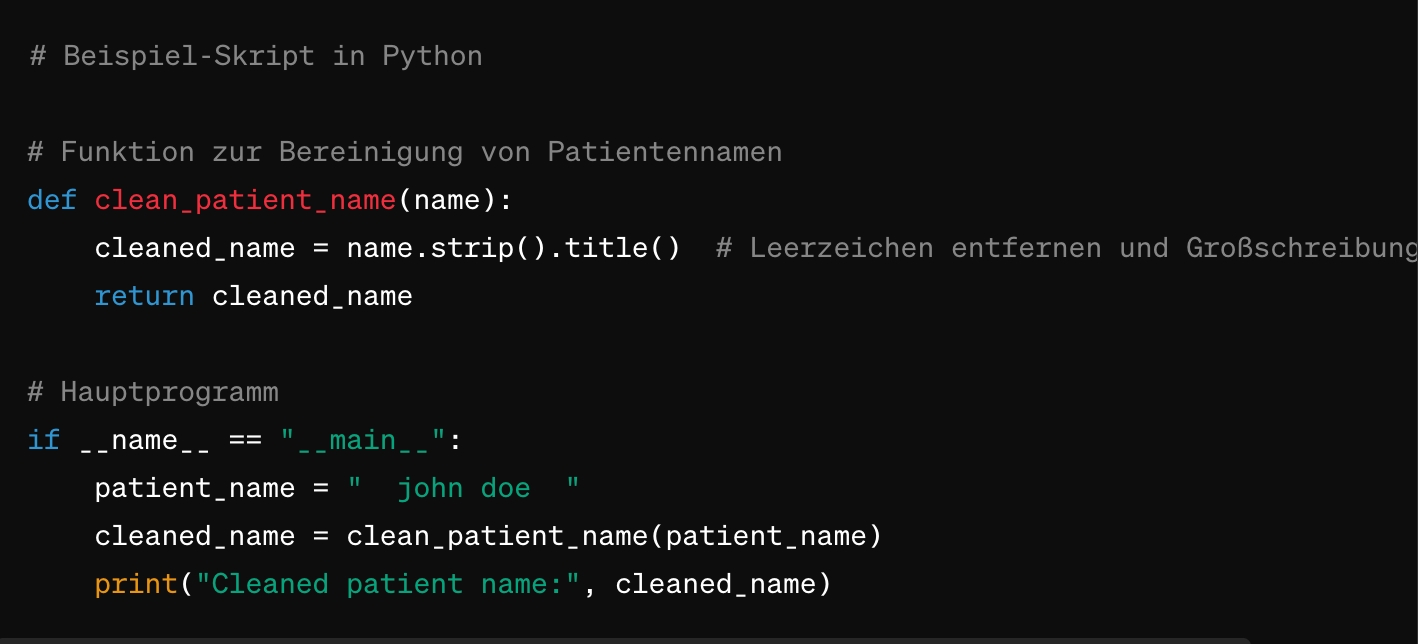
Function to clean patient names
def clean_patient_name(name): cleaned_name = name.strip().title() # Remove spaces and apply capitalization
return cleaned_name
Main program
if name == "main": patient_name = " john doe " cleaned_name = clean_patient_name(patient_name) print("Cleaned patient name:", cleaned_name)
2. Example script
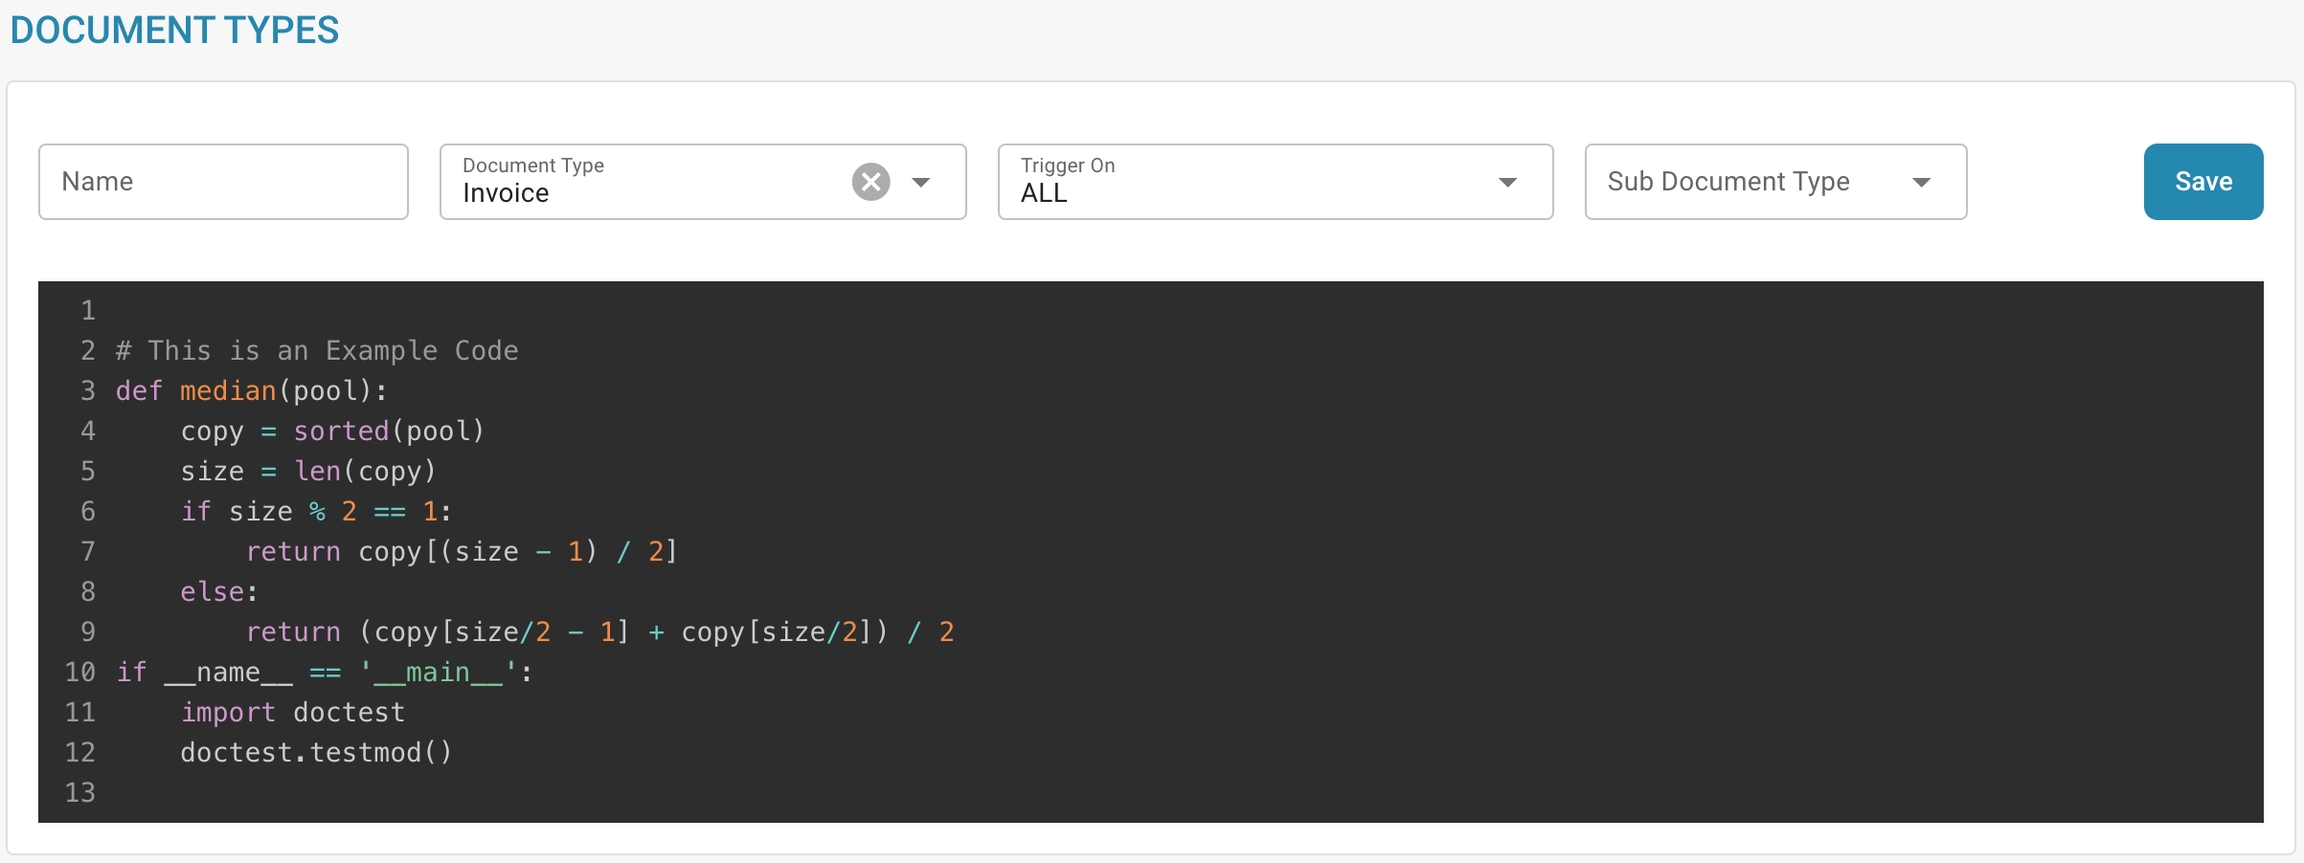
Test the script:
Check the code for errors and test it in a test environment. Make sure the script produces the expected results and works correctly.
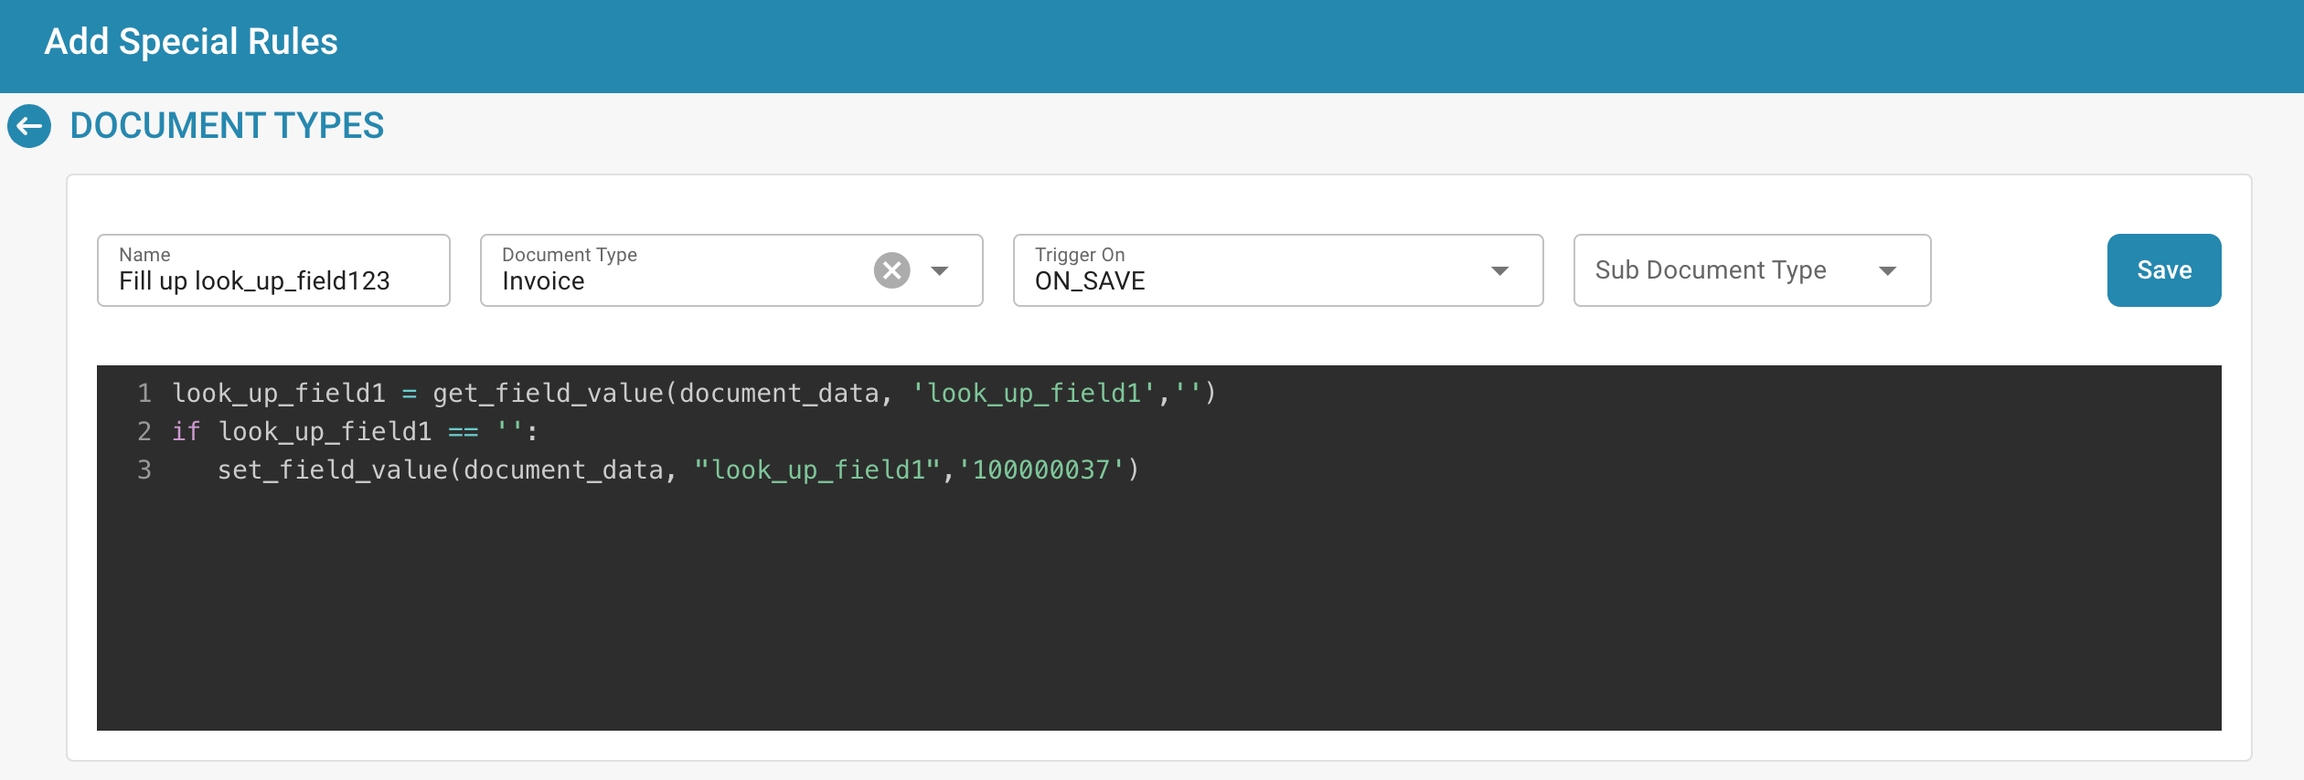
Save the script:
Save the script in DocBits and give it a meaningful name that describes the purpose of the script.

Mapping the script to document types:
An important step is mapping the script to the appropriate document types. This determines when and how the script is applied. This can usually be done through a configuration interface in DocBits, where you can assign the script to a specific document type and specify under which conditions it should be applied.

Review and publish:
After you have created, tested and mapped the script, check it again for errors and inconsistencies. If everything is OK, you can publish the script to the DocBits production environment.


Through these steps, you can successfully create, test and implement a new script in DocBits to automate processes and improve the efficiency of medical documentation.
Best Practices
Here are some best practices for script development in DocBits, such as keeping scripts modular, handling errors properly, and documenting the purpose and function of each script.
Modular Development:
Keep your scripts modular and well-structured.
Break complex tasks into smaller, more manageable modules.
Not only does this make your scripts easier to maintain and update, but it also allows you to reuse code and improve readability.
Error Handling:
Implement robust error handling in your scripts.
Make sure your code detects error cases and responds appropriately, whether by catching and logging errors, issuing helpful error messages, or taking action to recover.
Documentation:
Document the purpose, functions, and usage of each script in detail.
Describe what tasks the script performs, what inputs it expects, what outputs it generates, and how it integrates with the document processing workflow.
Clear documentation makes it easier for other developers to understand and maintain your scripts.
Commenting:
Comment your code thoroughly to explain its functionality and logic.
Use meaningful comments to explain important steps or complex parts of the code.
This not only makes the code easier for others to understand, but also for yourself when making future changes or updates.
Versioning:
Implement an effective version control system for your scripts.
This allows you to track changes, manage different versions, and revert to previous versions when needed.
This is especially useful when multiple developers are working on the same scripts or when you want to test different iterations.
Security:
Make sure your scripts are secure and free of potential security vulnerabilities.
For example, avoid unsafe practices such as directly executing user input or storing sensitive information in plain text.
Instead, implement security best practices and regularly audit your code for security vulnerabilities.
By following these best practices for script development in DocBits, you can create efficient, reliable, and well-documented scripts that improve the functionality and security of your document processing workflow.
Troubleshooting
Here is some advice on troubleshooting common scripting problems in DocBits: e.g. tips for debugging, dealing with unexpected script behavior, and performance optimization.
Debugging tips:
Use debugging tools:
Use debuggers or logging frameworks to trace the flow of your script and identify potential sources of errors.
Step-by-step execution:
Run your script step-by-step and check after each step that the expected behavior occurs.
This can help you pinpoint the exact time and cause of an error.
Print intermediate results:
Include targeted output from variables or intermediate results in your script to check the state of the code and understand what is happening.
Dealing with unexpected script behavior:
Isolate the problem:
Try to isolate the problem to a specific place in the code or a specific input data to find the source of the unexpected behavior.
Check external dependencies:
Make sure that external resources or libraries are installed and configured correctly and that your script can access them properly.
Check changes:
If the unexpected behavior occurs after a code change, review your recent changes and consider whether they might have caused the problem.
Performance tuning:
Identify bottlenecks:
Analyze your script to identify bottlenecks or inefficient areas that might affect performance.
Optimize critical sections:
Review critical sections of your code and look for ways to optimize them, such as using more efficient algorithms or data structures.
Consider scaling:
Think about the scaling of your scripts and how they behave as the load increases.
Test your script under different load conditions to make sure it works efficiently even under heavy use.
Documentation and knowledge sharing:
Document your troubleshooting steps:
Keep track of the steps you took to diagnose and resolve issues.
This can help you identify and resolve similar issues more quickly in the future.
Seek resources and expertise:
Use online resources, forums, or the documentation of the scripting language you are using to get help with troubleshooting.
Sharing experiences with other developers can also be helpful.
Applying these tips will help you more effectively diagnose and resolve common scripting issues in DocBits and optimize the performance of your scripts.
e-docs
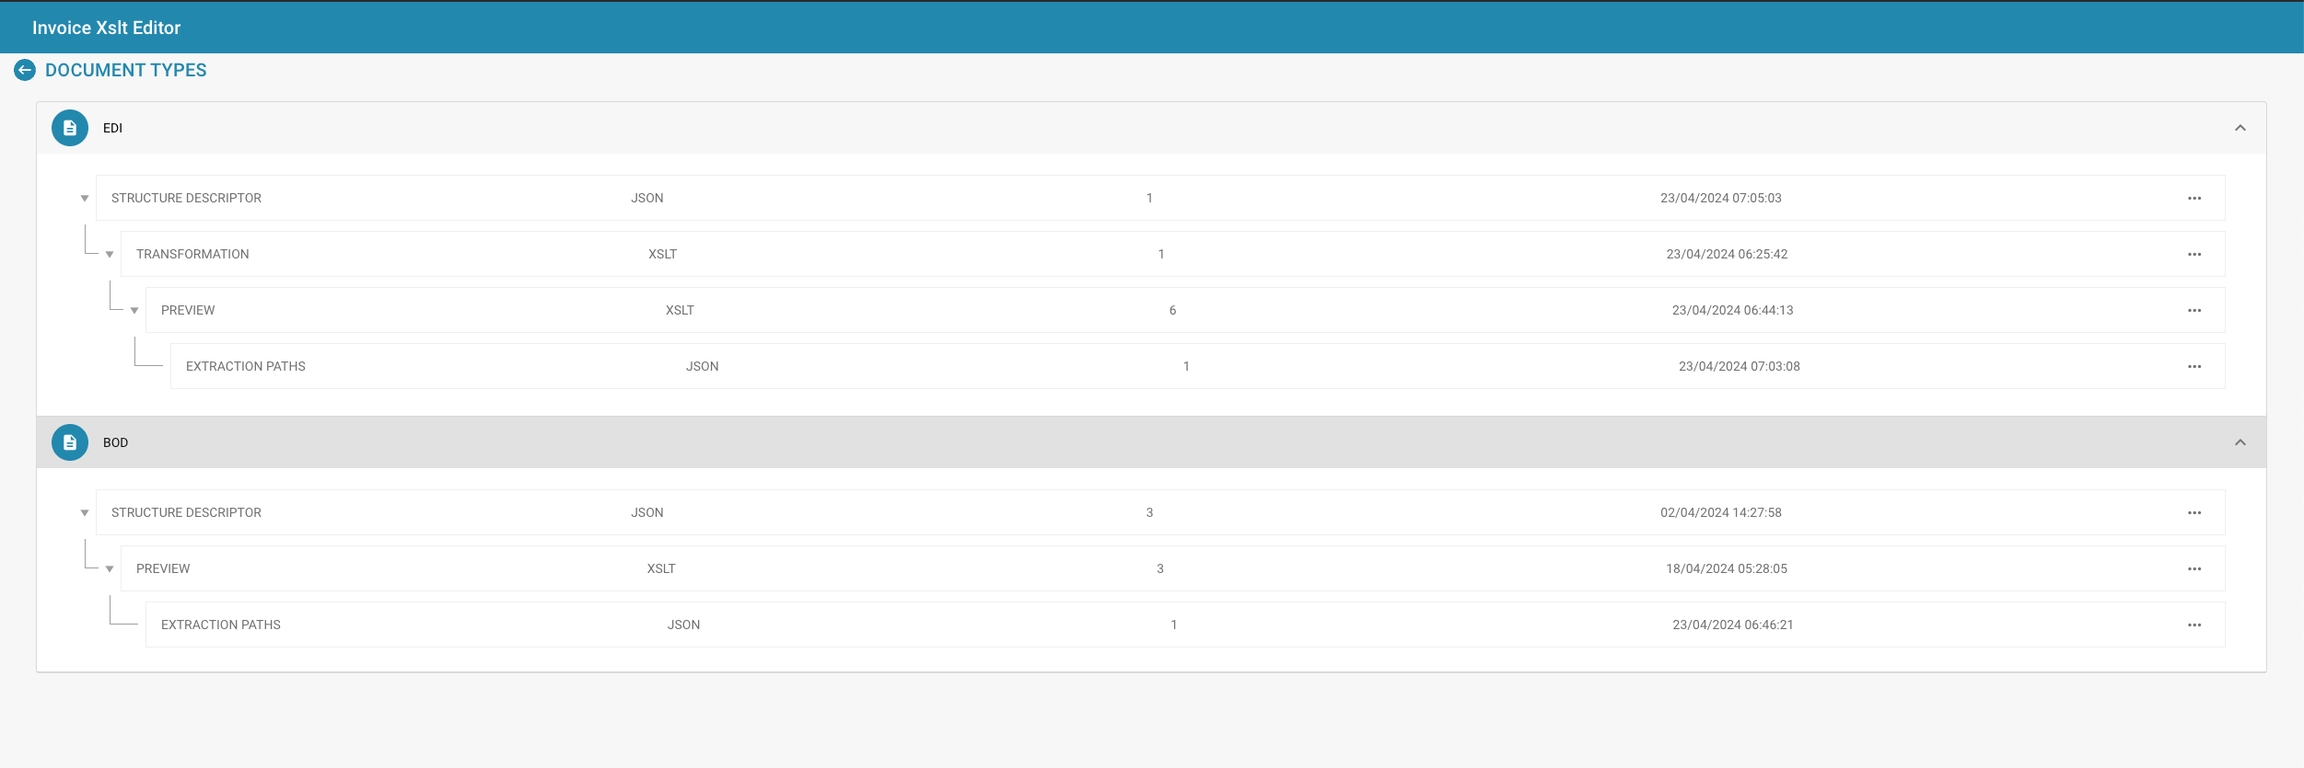
Overzicht
In Docbits bieden de EDI-instellingen tools voor het definiëren en beheren van de structuur en het formaat van EDI-berichten die overeenkomen met verschillende documenttypes, zoals facturen of inkooporders. De instellingen maken het mogelijk om EDI-berichten aan te passen aan de normen en vereisten die specifiek zijn voor verschillende handelspartners en industrieën.
Belangrijkste Kenmerken en Opties
EDI Configuratie-elementen:
Structuur Descriptor: Definieert de basisstructuur van het EDI-document, inclusief segmentvolgorde, verplichte velden en kwalificaties die nodig zijn voor de geldigheid van het EDI-document.
Transformatie: Specificeert de transformaties die worden toegepast om de documentgegevens om te zetten in een EDI-geformatteerd bericht. Dit houdt doorgaans in dat er mappings worden gespecificeerd van documentvelden naar EDI-segmenten en -elementen.
Voorbeeld: Hiermee kunnen beheerders zien hoe het EDI-bericht eruit zal zien na transformatie, wat helpt om de nauwkeurigheid vóór verzending te waarborgen.
Extractiepaden: Toont de paden die worden gebruikt om waarden uit het document te extraheren, die vervolgens worden gebruikt om het EDI-bericht in te vullen.
XSLT-editor:
Gebruikt voor het bewerken en valideren van de XSLT (eXtensible Stylesheet Language Transformations) die wordt gebruikt in het transformatieproces. XSLT is een krachtige taal die is ontworpen voor het transformeren van XML-documenten naar andere XML-documenten of andere formaten zoals HTML, tekst of zelfs andere XML-structuren.

Purpose and Use
EDI settings, short for Electronic Data Interchange, play a crucial role in electronic communication between business systems. EDI enables the automated exchange of business documents and data between different companies without the need for manual intervention. The importance of EDI lies primarily in improving the efficiency, accuracy and speed of data transfer, which leads to optimization of business processes.
In supply chain management, EDI settings enable seamless communication between suppliers, manufacturers, distributors and retailers. Purchase orders, shipping advices, invoices and other important documents can be automatically exchanged between the parties involved, resulting in improved inventory management, reduced delivery times and an overall more efficient supply chain.
In purchasing, EDI settings enable the automated exchange of purchase orders and order confirmations between companies and their suppliers. This shortens processing times, minimizes errors and makes it easier to track orders.
In finance, EDI settings enable the electronic exchange of invoices, payment advices and other financial documents between companies and their business partners. This speeds up the payment process, reduces the need for manual intervention and promotes accuracy in financial transactions.
Overall, EDI settings contribute significantly to improving efficiency, accuracy and transparency in various areas of business operations and are therefore an integral part of modern business practices.
Setting Up EDI Templates
Here are step-by-step instructions for setting up EDI templates:

Define the structure descriptor:
Identify the type of EDI message you are working with, e.g. ANSI X12, EDIFACT, or a custom format.
Determine the segments, elements, and subelements within the EDI structure.
Create a structure descriptor that accurately reflects the hierarchy and organization of the EDI message. This can be done using a special syntax such as XML or JSON.

Set up transformations:
Use an appropriate tool or software that supports EDI transformations, such as an EDI translator.
Define the rules for converting the EDI message to your system's internal format and vice versa.
Configure the transformations to interpret and process segments, elements, and subelements according to your system's requirements. Test the transformations thoroughly to ensure that the data is correctly interpreted and formatted.

Configure extraction paths for optimal data extraction and formatting:
Identify the data fields to be extracted and transferred to your internal system.
Define extraction paths or rules to extract the relevant data fields from the EDI messages.
Consider the different variations and formats that may occur in the incoming EDI messages and ensure that the extraction paths are flexible enough to accommodate them.
Validate the extraction results to ensure that the correct data fields are extracted and correctly formatted.

By carefully defining the structure descriptor, setting up transformations and configuring extraction paths, you can ensure that data extraction and formatting are performed optimally in your EDI templates. This will help improve the efficiency and accuracy of your electronic business communications.
Using the XSLT Editor
Guide to using the XSLT Editor to create or modify transformations. Includes tips for testing and validating XSLT scripts to ensure they correctly transform document data into the required EDI format.
Here's a guide to using the XSLT Editor to create or modify transformations, as well as tips for testing and validating XSLT scripts:
Opening the XSLT Editor:
Launch the XSLT editor of your choice. Popular options include Oxygen XML Editor, Altova XMLSpy, or simply a text editor with syntax highlighting for XSLT.
Creating or modifying transformations:
Define the rules for transforming the input data (e.g. XML) into the desired EDI format. Use XSLT templates to select the elements and attributes of the input XML and format them accordingly.
Use XSLT functions and statements such as xsl:template, xsl:apply-templates, xsl:for-each´, xsl:value-of, etc. to perform the transformations.
Check your transformations carefully to ensure that all required data is extracted and formatted correctly.
Testing and validating XSLT scripts:
Use sample data to test your XSLT transformations. Ideally, this sample data should cover various scenarios and edge cases that may occur in the actual input data.
Run your XSLT scripts with the sample data and carefully check the output result. Make sure that the generated EDI output meets the expected specifications.
Validate your XSLT scripts against the XSLT specification to ensure they are syntactically correct and do not contain errors that could cause unexpected behavior.
Use tools such as XSLT debuggers to perform step-by-step testing when necessary and identify potential problems in your transformations.
By carefully creating, testing, and validating your XSLT scripts, you can ensure that they correctly transform the input data into the required EDI format. This is critical for successful electronic data interaction between different business systems.
Previewing EDI Messages
How to use the preview feature to check the appearance and content of EDI messages before sending them to ensure they meet the partner's requirements.
The preview feature is an extremely useful tool to check the appearance and content of EDI messages before they are actually sent.
Here are some steps on how to use the preview feature to ensure that EDI messages meet the partner's requirements:
Previewing the EDI format:
Open the preview feature in your EDI system to get a preview of the generated EDI format. This allows you to check the layout and structure of the message to ensure that it meets the standards and specifications that your business partner expects.
Validating the data content:
Check the data content in the preview to ensure that all required fields are present and contain correct values. Make sure that data fields are placed in the correct segments and use the correct codes or labels.
Identifying formatting errors:
Ensure that the formatting of the EDI message follows standards, such as proper segment separators, field separators, and decimal separators. Also check the indentation and arrangement of segments to ensure the message is clear and easy to read.
Considering partner requirements:
Consider your business partner's specific requirements regarding the EDI format. This may include using certain segments, elements, or codes that need to be previewed to ensure they are implemented correctly.
Conducting test transactions:
Use the preview feature to conduct test transactions with your business partner before sending real data. This allows you to identify and resolve potential problems early, before they impact business operations.
Careful use of the preview feature helps you ensure that your EDI messages meet your business partner's requirements and ensure a smooth exchange of business data.
Best Practices
Best practices for managing EDI configurations include regular updates to adapt to changing standards, thorough testing of EDI templates, and maintaining clear documentation of all transformations and structure descriptions.
Here are some best practices for managing EDI configurations:
Regular updates and adaptations to changing standards:
Stay up to date with changes in the EDI standards such as ANSI X12, EDIFACT, or industry-specific standards.
Schedule regular reviews of your EDI configurations to ensure they comply with current standards.
Adapt your EDI templates and transformations accordingly to reflect new requirements and changes in the standards.
Thorough testing of EDI templates:
Perform comprehensive testing of your EDI templates to ensure they deliver the expected results.
Use both automated and manual testing methods to verify the accuracy and reliability of your transformations. Test different scenarios and edge cases to ensure your templates are robust enough to handle different data formats.
Clear documentation of all transformations and structure descriptions:
Maintain detailed documentation of all EDI transformations, including the XSLT scripts or other transformation rules you use.
Also document the structure descriptions of your EDI messages, including the segment, element and data type definitions.
Keep the documentation up to date and accessible to all team members working with the EDI implementation.
Versioning of configurations:
Implement versioning of your EDI configurations to track changes and revert to previous versions if necessary.
Use an appropriate version control system to track changes and ensure that all team members have access to the most current version.
Training and education of employees:
Ensure that your employees have the necessary knowledge and skills to effectively handle the EDI configurations.
Provide training and education to ensure your team is aware of the latest developments in EDI standards and practices.
By implementing these best practices, you can improve the efficiency, accuracy and reliability of your EDI configurations and ensure they meet the ever-changing needs of your business and your business partners.
Troubleshooting
Here is some advice on troubleshooting common problems:
Data formatting errors:
Carefully review the EDI structure and format of your messages to ensure they comply with standards and specifications.
Validate data fields for correct syntax and formatting according to agreed standards such as ANSI X12 or EDIFACT.
Make sure the transformations and templates used are correctly configured to properly format and interpret the data.
Partner compatibility issues:
Review your business partner's configurations and specifications to ensure they match your own.
Communicate with your partner to identify any discrepancies or incompatibilities and work together to find solutions.
Implement adjustments in your EDI configurations if necessary to improve compatibility with your partner.
Handling transmission errors:
Monitor your EDI transmissions regularly to identify potential errors or failures early.
Implement mechanisms for error detection and remediation, such as automated notifications of transmission errors or setting up retry mechanisms for failed transmissions.
Perform regular tests of your transmission processes to ensure they work reliably and without errors.
Documentation and logging of errors:
Keep detailed logging of all errors and problems in EDI transactions, including causes and actions taken.
Document solutions to recurring problems to resolve and prevent future errors more quickly.
Involve subject matter experts:
When necessary, bring in subject matter experts or EDI consultants to solve complex problems or address specific challenges.
Use resources such as forums, training, or support from EDI providers for additional assistance with troubleshooting.
By systematically applying these tips, you can effectively troubleshoot EDI transactions and ensure the reliability of your electronic business communications.
XRechnung
Overview
In the XRechnung administration panel, you will encounter the following key components:
1. Transformation
Purpose
The Transformation process is essential for converting raw data, usually in XML format, into a structured format that meets specific requirements, like generating an invoice. In XRechnung, this is primarily achieved using XSLT (Extensible Stylesheet Language Transformations). XSLT is a language designed for transforming XML documents into other types of documents, like another XML, HTML, or plain text.
How It Works
• XSLT Template: The XSLT file defines how the XML data is processed and what the final output should look like. It applies rules and templates to extract, manipulate, and output the data from the XML document.
• Elements and Attributes: The XSLT file contains specific elements and attributes that control the transformation process. For instance, <xsl:value-of> is used to extract the value of a specific node from the XML document.
Admin Capabilities
• Modifying the XSLT:
• Edit Existing Templates: An admin can modify the existing XSLT templates to change how the input XML data is transformed. For example, if there’s a need to extract additional information from the XML document, an admin could add new rules in the XSLT file.
• Create New Versions: If changes are required, an admin can create a new version of the XSLT template. This ensures that previous versions remain intact for historical reference or rollback if needed.
Example:
Suppose the XSLT template extracts the invoice ID using:
If a new field, such as a customer reference number, needs to be extracted, an admin might add:
2. Preview
Purpose
The Preview function allows admins to view the output generated by the XSLT transformation before finalizing it. This step is crucial for ensuring that the transformation rules work correctly and that the output meets the required standards.
How It Works
• Real-Time Validation: The preview feature provides a real-time rendering of how the transformed data will look when applied to an actual document (like an invoice). This helps in catching errors or formatting issues early.
• Adjustments: If the preview shows discrepancies or errors, adjustments can be made directly in the transformation (XSLT) file.
Admin Capabilities
• Customizing the Preview:
• Modify Preview Settings: An admin can adjust which parts of the transformation are previewed. For instance, they might focus on specific sections of the document or test new rules added to the XSLT template.
• Save and Iterate: After making adjustments, the preview can be refreshed to see the changes. This iterative process allows fine-tuning until the desired output is achieved.
Example:
If an admin notices that the date format in the preview is incorrect (e.g., showing YYYY-MM-DD instead of DD-MM-YYYY), they can modify the XSLT to format the date correctly and immediately see the result in the preview.
3. Extraction Paths
Purpose
Extraction Paths define the specific paths within an XML or JSON structure from which data should be extracted. This process is essential for isolating key pieces of information within the document that will be used in the transformation or for other processing tasks.
How It Works
• XPath and JSONPath: Extraction paths use languages like XPath (for XML) or JSONPath (for JSON) to specify the location of the data within the document. These paths are crucial in telling the system exactly where to find and how to extract the required information.
Admin Capabilities
• Defining and Modifying Paths:
• Modify Existing Paths: An admin can modify the extraction paths if the data structure changes or if additional data needs to be extracted. This might involve changing the XPath or JSONPath expressions.
• Add New Paths: For new fields or data points, an admin can define new extraction paths. This would involve specifying the correct path in the XML or JSON document.
Example:
In an XML invoice document, if the path to the invoice ID is defined as:
And a new field, such as a shipping address, needs to be added, an admin might add:
Standard Preview

Mapping XRechnung in DocBits
In DocBits, XRechnung invoices are mapped to specific fields using a predefined configuration that ensures the data can be seamlessly exported to various formats, including integration with other systems like Infor. The export configuration leverages templates and rules to ensure that each element of the XRechnung is captured and mapped appropriately.
Key Components
1. Document Types: XRechnung documents are mapped to specific Document Types in DocBits. Each document type (e.g., invoice, credit note, debit note) has its own structure and fields.
2. Field Mapping: Fields in the XRechnung are mapped to corresponding fields in DocBits using a export configuration file. This file defines how each XRechnung field is handled and where it should be exported.
3. Rules for Export: Certain rules are defined to handle specific cases where values may differ, including tolerance checks, approval requirements, or line-level charges. These rules ensure that XRechnung data is processed and exported correctly, based on specific business logic
CII-XRechnung Mapping:
supplier_id
<ram:SellerTradeParty><ram:ID>
Supplier's identification number.
supplier_name
<ram:SellerTradeParty><ram:Name>
Supplier's name.
supplier_address
<ram:SellerTradeParty><ram:PostalTradeAddress><ram:LineOne>
Supplier's address line one.
supplier_tax_id
<ram:SellerTradeParty><ram:SpecifiedTaxRegistration><ram:ID>
Supplier's tax identification number.
company_id
<ram:InvoiceeTradeParty><ram:ID>
Company's identification number.
company_name
<ram:InvoiceeTradeParty><ram:Name>
Company's name.
company_street
<ram:InvoiceeTradeParty><ram:PostalTradeAddress><ram:LineOne>
Company's address line one.
company_plz
<ram:InvoiceeTradeParty><ram:PostalTradeAddress><ram:PostcodeCode>
Company's postal code.
company_vat
<ram:InvoiceeTradeParty><ram:SpecifiedTaxRegistration><ram:ID>
Company's VAT number.
invoice_id
<rsm:ExchangedDocument><ram:ID>
Invoice identification number.
invoice_date
<ram:IssueDateTime><ram:DateTimeString>
Date when the invoice was issued.
delivery_date
<ram:ApplicableHeaderTradeDelivery><ram:ActualDeliverySupplyChainEvent><ram:OccurrenceDateTime><ram:DateTimeString>
Date of actual delivery.
supplier_iban
<ram:PayeePartyCreditorFinancialAccount><ram:IBANID>
Supplier's IBAN number.
payment_terms
<ram:SpecifiedTradePaymentTerms><ram:Description>
Payment terms description.
purchase_order
<ram:BuyerOrderReferencedDocument><ram:IssuerAssignedID>
Reference to the purchase order.
currency
<ram:InvoiceCurrencyCode>
Currency used in the invoice.
net_amount
<ram:ApplicableTradeTax><ram:BasisAmount>
Net amount before tax.
tax_amount
<ram:ApplicableTradeTax><ram:CalculatedAmount>
Amount of tax.
tax_rate
<ram:ApplicableTradeTax><ram:RateApplicablePercent>
VAT rate applied.
net_amount_2
<ram:ApplicableTradeTax><ram:BasisAmount>
Net amount before tax.
tax_amount_2
<ram:ApplicableTradeTax><ram:CalculatedAmount>
Amount of tax.
tax_rate_2
<ram:ApplicableTradeTax><ram:RateApplicablePercent>
VAT rate applied.
total_net_amount
<ram:SpecifiedTradeSettlementHeaderMonetarySummation><ram:TaxBasisTotalAmount>
Total net amount before tax.
total_tax_amount
<ram:SpecifiedTradeSettlementHeaderMonetarySummation><ram:TaxTotalAmount>
Total tax amount.
total_amount
<ram:SpecifiedTradeSettlementHeaderMonetarySummation><ram:GrandTotalAmount>
Total invoice amount.
POSITION
<ram:AssociatedDocumentLineDocument><ram:LineID>
Line position number in the invoice.
PURCHASE_ORDER
<ram:BuyerOrderReferencedDocument><ram:IssuerAssignedID>
Purchase order reference.
ITEM_NUMBER
<ram:SpecifiedTradeProduct><ram:SellerAssignedID>
Item number assigned by the seller.
SUPPLIER_ITEM_NUMBER
<ram:SpecifiedTradeProduct><ram:GlobalID>
Global item number assigned by the supplier.
DESCRIPTION
<ram:SpecifiedTradeProduct><ram:Name>
Description of the item.
QUANTITY
<ram:SpecifiedLineTradeDelivery><ram:BilledQuantity>
Quantity of items billed.
UNIT
<ram:BilledQuantity>unitCode
Unit of measure for the quantity.
UNIT_PRICE
<ram:SpecifiedLineTradeAgreement><ram:NetPriceProductTradePrice><ram:ChargeAmount>
Unit price of the item.
VAT
<ram:SpecifiedLineTradeSettlement><ram:ApplicableTradeTax><ram:RateApplicablePercent>
VAT rate applied to the line item.
TOTAL_AMOUNT
<ram:SpecifiedLineTradeSettlement><ram:SpecifiedTradeSettlementLineMonetarySummation><ram:LineTotalAmount>
Total amount for the line item.
order_date
not mapped yet
Date of the order.
invoice_sub_type
not mapped yet
Sub-type of the invoice.
invoice_type
not mapped yet
Type of the invoice.
due_date
not mapped yet
Due date for payment.
negative_amount
not mapped yet
Amount with a negative value.
charges
not mapped yet
Additional charges.
accounting_date
not mapped yet
Date for accounting purposes.
supplier_country_code
not mapped yet
Country code of the supplier.
tax_country_1
not mapped yet
Country code for tax purposes.
correlation_id
not mapped yet
Identifier for correlation.
sqr_field_esr_reference
not mapped yet
Reference for SQR field ESR.
additional_amount
not mapped yet
Additional amount in the invoice.
authorised_user
not mapped yet
User authorized for the transaction.
payment_method
not mapped yet
Method of payment used.
bank_id
not mapped yet
Identification of the bank.
geo_code
not mapped yet
Geographical code.
discount_term
not mapped yet
Terms for any discount applied.
total_net_amount_us
not mapped yet
Total net amount in USD.
purchase_order_supplier_id
not mapped yet
Supplier's ID in the purchase order.
purchase_order_supplier_name
not mapped yet
Supplier's name in the purchase order.
purchase_order_warehouse_id
not mapped yet
Warehouse ID for the purchase order.
purchase_order_location_id
not mapped yet
Location ID for the purchase order.
ship_to_party_id
not mapped yet
ID of the party receiving the shipment.
ship_to_party_name
not mapped yet
Name of the party receiving the shipment.
buyer_id
<ram:BuyerTradeParty><ram:ID>
Buyer's identification number.
buyer_name
<ram:BuyerTradeParty><ram:Name>
Buyer's name.
tax_code
not mapped yet
Code for tax purposes.
tax_code_2
not mapped yet
Secondary tax code.
net_amount_3
not mapped yet
Net amount with a third tax rate.
tax_amount_3
not mapped yet
Tax amount with a third tax rate.
tax_rate_3
not mapped yet
Third tax rate applied.
tax_code_3
not mapped yet
Tertiary tax code.
additional_amount_2
not mapped yet
Additional amount 2.
additional_amount_3
not mapped yet
Additional amount 3.
negative_amount_2
not mapped yet
Second negative amount.
negative_amount_3
not mapped yet
Third negative amount.
shipping_charges
not mapped yet
Charges for shipping.
sales_tax
not mapped yet
Sales tax amount.
sub_tax
not mapped yet
Sub-tax amount.
wi_tax
not mapped yet
Withholding tax amount.
county_tax
not mapped yet
County tax amount.
city_tax
not mapped yet
City tax amount.
custom_field_1
not mapped yet
Custom field 1.
custom_field_2
not mapped yet
Custom field 2.
custom_field_3
not mapped yet
Custom field 3.
custom_field_4
not mapped yet
Custom field 4.
custom_field_5
not mapped yet
Custom field 5.
custom_field_6
not mapped yet
Custom field 6.
custom_field_7
not mapped yet
Custom field 7.
custom_field_8
not mapped yet
Custom field 8.
custom_field_9
not mapped yet
Custom field 9.
custom_field_10
not mapped yet
Custom field 10.
firma
not mapped yet
Company name.
name
not mapped yet
Name of the company or individual.
strasse
not mapped yet
Street address.
postleitzahl
not mapped yet
Postal code.
id_nummer
not mapped yet
Identification number.
UBL-XRechnung Mapping
supplier_id
not mapped yet
Supplier's identification number.
supplier_name
not mapped yet
Supplier's name.
supplier_address
not mapped yet
Supplier's address line one.
supplier_tax_id
not mapped yet
Supplier's tax identification number.
company_id
not mapped yet
Company's identification number.
company_name
not mapped yet
Company's name.
company_street
not mapped yet
Company's address line one.
company_plz
not mapped yet
Company's postal code.
company_vat
not mapped yet
Company's VAT number.
invoice_id
not mapped yet
Invoice identification number.
invoice_date
not mapped yet
Date when the invoice was issued.
delivery_date
not mapped yet
Date of actual delivery.
supplier_iban
not mapped yet
Supplier's IBAN number.
payment_terms
not mapped yet
Payment terms description.
purchase_order
not mapped yet
Reference to the purchase order.
currency
not mapped yet
Currency used in the invoice.
net_amount
not mapped yet
Net amount before tax.
tax_amount
not mapped yet
Amount of tax.
tax_rate
not mapped yet
VAT rate applied.
net_amount_2
not mapped yet
Net amount before tax.
tax_amount_2
not mapped yet
Amount of tax.
tax_rate_2
not mapped yet
VAT rate applied.
total_net_amount
not mapped yet
Total net amount before tax.
total_tax_amount
not mapped yet
Total tax amount.
total_amount
not mapped yet
Total invoice amount.
POSITION
not mapped yet
Line position number in the invoice.
PURCHASE_ORDER
not mapped yet
Purchase order reference.
ITEM_NUMBER
not mapped yet
Item number assigned by the seller.
SUPPLIER_ITEM_NUMBER
not mapped yet
Global item number assigned by the supplier.
DESCRIPTION
not mapped yet
Description of the item.
QUANTITY
not mapped yet
Quantity of items billed.
UNIT
not mapped yet
Unit of measure for the quantity.
UNIT_PRICE
not mapped yet
Unit price of the item.
VAT
not mapped yet
VAT rate applied to the line item.
TOTAL_AMOUNT
not mapped yet
Total amount for the line item.
order_date
not mapped yet
Date of the order.
invoice_sub_type
not mapped yet
Sub-type of the invoice.
invoice_type
not mapped yet
Type of the invoice.
due_date
not mapped yet
Due date for payment.
negative_amount
not mapped yet
Amount with a negative value.
charges
not mapped yet
Additional charges.
accounting_date
not mapped yet
Date for accounting purposes.
supplier_country_code
not mapped yet
Country code of the supplier.
tax_country_1
not mapped yet
Country code for tax purposes.
correlation_id
not mapped yet
Identifier for correlation.
sqr_field_esr_reference
not mapped yet
Reference for SQR field ESR.
additional_amount
not mapped yet
Additional amount in the invoice.
authorised_user
not mapped yet
User authorized for the transaction.
payment_method
not mapped yet
Method of payment used.
bank_id
not mapped yet
Identification of the bank.
geo_code
not mapped yet
Geographical code.
discount_term
not mapped yet
Terms for any discount applied.
total_net_amount_us
not mapped yet
Total net amount in USD.
purchase_order_supplier_id
not mapped yet
Supplier's ID in the purchase order.
purchase_order_supplier_name
not mapped yet
Supplier's name in the purchase order.
purchase_order_warehouse_id
not mapped yet
Warehouse ID for the purchase order.
purchase_order_location_id
not mapped yet
Location ID for the purchase order.
ship_to_party_id
not mapped yet
ID of the party receiving the shipment.
ship_to_party_name
not mapped yet
Name of the party receiving the shipment.
buyer_id
not mapped yet
Buyer's identification number.
buyer_name
not mapped yet
Buyer's name.
tax_code
not mapped yet
Code for tax purposes.
tax_code_2
not mapped yet
Secondary tax code.
net_amount_3
not mapped yet
Net amount with a third tax rate.
tax_amount_3
not mapped yet
Tax amount with a third tax rate.
tax_rate_3
not mapped yet
Third tax rate applied.
tax_code_3
not mapped yet
Tertiary tax code.
additional_amount_2
not mapped yet
Additional amount 2.
additional_amount_3
not mapped yet
Additional amount 3.
negative_amount_2
not mapped yet
Second negative amount.
negative_amount_3
not mapped yet
Third negative amount.
shipping_charges
not mapped yet
Charges for shipping.
sales_tax
not mapped yet
Sales tax amount.
sub_tax
not mapped yet
Sub-tax amount.
wi_tax
not mapped yet
Withholding tax amount.
county_tax
not mapped yet
County tax amount.
city_tax
not mapped yet
City tax amount.
custom_field_1
not mapped yet
Custom field 1.
custom_field_2
not mapped yet
Custom field 2.
custom_field_3
not mapped yet
Custom field 3.
custom_field_4
not mapped yet
Custom field 4.
custom_field_5
not mapped yet
Custom field 5.
custom_field_6
not mapped yet
Custom field 6.
custom_field_7
not mapped yet
Custom field 7.
custom_field_8
not mapped yet
Custom field 8.
custom_field_9
not mapped yet
Custom field 9.
custom_field_10
not mapped yet
Custom field 10.
firma
not mapped yet
Company name.
name
not mapped yet
Name of the company or individual.
strasse
not mapped yet
Street address.
postleitzahl
not mapped yet
Postal code.
id_nummer
not mapped yet
Identification number.
TOML Export
How XRechnung is Mapped in DocBits
1. Header Configuration (export_configuration.header)
The header section in the XRechnung is mapped to fields in DocBits as follows:
[export_configuration.header] name = "header"
[export_configuration.header.fields] DIVI = "RFP" IBTP = "20" IMCD = "0" CRTP = "1" CONO = "001" SUNO = "[supplier_id]" IVDT = "[invoice_date]" SINO = "[invoice_id]" SPYN = "[supplier_id]" CUCD = "[currency]" CUAM = "[total_amount]" FTCO = "[supplier_country_code]" PUNO = "[purchase_order]" CORI = "[correlation_id]" PAIN = "[sqr_field_esr_reference]" TCHG = "[additional_amount]" CDC1 = "[negative_amount]" APCD = "[buyer_id]" TEPY = "[payment_terms]" PYME = "[payment_method]" BKID = "[bank_id]" GEOC = "1" TECD = "[discount_term]" TXAP = "[tax_applicable]" TXIN = "[tax_included]"
• SUNO: Supplier ID, mapped to [supplier_id] from XRechnung.
• IVDT: Invoice Date, mapped to [invoice_date].
• SINO: Invoice Number, mapped to [invoice_id].
• Other fields such as total amount, currency, and payment terms are similarly mapped from the XRechnung to DocBits fields.
2. Tax Lines (export_configuration.tax_lines)
Tax-related information is mapped using the following configuration:
[export_configuration.tax_lines] name = "tax_lines"
[export_configuration.tax_lines.fields] RDTP = "3" DIVI = "RFP" CONO = "001" TAXT = "2" GEOC = "[[geo_code]]" TTXA = "[[amount]]" TAXC = "[[tax_code]]"
• GEOC: Geo Code, mapped to the corresponding [geo_code] from XRechnung.
• TAXC: Tax Code, mapped to [tax_code].
3. Order Header Charges (export_configuration.order_header_charges)
This section handles any additional charges that need to be added at the header level of the XRechnung.
[export_configuration.order_header_charges] name = "order_header_charges"
[export_configuration.order_header_charges.fields] RDTP = "2" DIVI = "RFP" CONO = "001" NLAM = "[[amount]]" CEID = "[[costing_element]]" CDSE = "[[charge_sequence]]"
• NLAM: Amount for the order charge.
• CEID: Costing Element, which can be mapped from specific XRechnung elements.
4. Receipt Lines (export_configuration.receipt_lines)
Receipt lines, which represent line items in the XRechnung, are handled as follows:
[export_configuration.receipt_lines] name = "receipt_lines"
[export_configuration.receipt_lines.fields] RDTP = "1" DIVI = "RFP" RELP = "1" CONO = "001" IVQA = "[[quantity]]" PUUN = "[[unit]]" PUNO = "[[purchase_order]]" PNLI = "[[line_number]]" ITNO = "[[item_number]]" POPN = "[[item_number]]" SUDO = "[[packing_slip]]" GRPR = "[[gross_unit_price]]" PPUN = "[[unit_code_price]]" TCHG = "[[charges]]" CDC1 = "[[discount]]" REPN = "[[receipt_number]]" PNLS = "[[sub_line_number]]"
• IVQA: Quantity, mapped from the [quantity] in the XRechnung line items.
• ITNO: Item Number, mapped to [item_number].
5. Cost Lines (export_configuration.cost_lines)
Cost lines, which handle additional costs in the XRechnung, are mapped using the following:
[export_configuration.cost_lines] name = "cost_lines"
[export_configuration.cost_lines.fields] RDTP = "8" DIVI = "RFP" CONO = "001" NLAM = "[[amount]]" VTXT = "[[voucher_text]]" AO01 = "[[accounting_object_1]]" AO02 = "[[accounting_object_2]]" AO03 = "[[accounting_object_3]]" AO04 = "[[accounting_object_4]]" AO05 = "[[accounting_object_5]]" AO06 = "[[accounting_object_6]]" AO07 = "[[accounting_object_7]]" AIT1 = "[[ledger_account]]" AIT2 = "[[dimension_2]]" AIT3 = "[[dimension_3]]" AIT4 = "[[dimension_4]]" AIT5 = "[[dimension_5]]" AIT6 = "[[dimension_6]]" AIT7 = "[[dimension_7]]"
EDI 810 (Invoice) Mapping
supplier_id
not mapped yet
Unique identifier for the supplier.
supplier_name
N102
Name of the supplier.
supplier_address
N301
Address of the supplier.
supplier_tax_id
not mapped yet
Tax identification number of the supplier.
invoice_id
BIG02
Unique identifier for the invoice.
invoice_date
BIG03
Date when the invoice was issued.
delivery_date
not mapped yet
Date when the goods or services were delivered.
supplier_iban
not mapped yet
International Bank Account Number of the supplier.
payment_terms
not mapped yet
Terms for payment specified in the invoice.
purchase_order
not mapped yet
Purchase order number associated with the invoice.
currency
CUR02
Currency in which the invoice is issued.
net_amount
not mapped yet
Total amount before taxes.
tax_amount
TXI02
Amount of tax applied.
tax_rate
not mapped yet
Rate at which tax is applied.
net_amount_2
not mapped yet
Additional net amount for another tax rate, if applicable.
tax_amount_2
not mapped yet
Additional tax amount for another tax rate, if applicable.
tax_rate_2
not mapped yet
Additional tax rate, if applicable.
total_net_amount
not mapped yet
Total net amount of the invoice.
total_tax_amount
not mapped yet
Total tax amount of the invoice.
total_amount
TDS01
Total amount including taxes.
POSITION
REF02
Position of the line item in the invoice.
PURCHASE_ORDER
REF02
Purchase order number referenced in the invoice.
ITEM_NUMBER
REF02
Number identifying the line item.
SUPPLIER_ITEM_NUMBER
not mapped yet
Item number assigned by the supplier.
DESCRIPTION
not mapped yet
Description of the line item.
QUANTITY
IT102
Quantity of items.
UNIT
IT103
Unit of measure for the item.
UNIT_PRICE
IT104
Price per unit of the item.
VAT
not mapped yet
Value-added tax applied to the item.
TOTAL_AMOUNT
IT102 * IT104
Total amount for the line item including taxes.
order_date
not mapped yet
Date when the order was placed.
invoice_sub_type
not mapped yet
Sub-type of the invoice, if applicable.
invoice_type
not mapped yet
Type of the invoice (e.g., standard, credit, debit).
due_date
not mapped yet
Date by which payment is due.
negative_amount
SAC02
Amount representing a credit or reduction.
additional_amount
not mapped yet
Additional amount not covered by other fields.
total_net_amount_us
not mapped yet
Total net amount in USD.
purchase_order_supplier_id
not mapped yet
Supplier's ID related to the purchase order.
purchase_order_supplier_name
not mapped yet
Name of the supplier related to the purchase order.
purchase_order_warehouse_id
not mapped yet
Warehouse ID associated with the purchase order.
purchase_order_location_id
not mapped yet
Location ID related to the purchase order.
ship_to_party_id
not mapped yet
Identifier for the party to whom goods are shipped.
ship_to_party_name
not mapped yet
Name of the party to whom goods are shipped.
buyer_id
not mapped yet
Identifier for the buyer.
buyer_name
not mapped yet
Name of the buyer.
tax_code
not mapped yet
Code representing the tax applied.
tax_code_2
not mapped yet
Additional tax code, if applicable.
net_amount_3
not mapped yet
Another net amount, if applicable.
tax_amount_3
not mapped yet
Additional tax amount, if applicable.
tax_rate_3
not mapped yet
Additional tax rate, if applicable.
tax_code_3
not mapped yet
Additional tax code, if applicable.
additional_amount_2
not mapped yet
Additional amount not covered by other fields.
additional_amount_3
not mapped yet
Another additional amount, if applicable.
negative_amount_2
not mapped yet
Additional negative amount, if applicable.
negative_amount_3
not mapped yet
Another negative amount, if applicable.
shipping_charges
not mapped yet
Charges for shipping included in the invoice.
sales_tax
not mapped yet
Tax applied on sales.
sub_tax
not mapped yet
Sub-tax applied, if applicable.
wi_tax
not mapped yet
Withholding tax applied, if applicable.
county_tax
not mapped yet
Tax applied at the county level.
city_tax
not mapped yet
Tax applied at the city level.
custom_field_1
not mapped yet
Custom field for additional data.
custom_field_2
not mapped yet
Additional custom field.
custom_field_3
not mapped yet
Additional custom field.
custom_field_4
not mapped yet
Additional custom field.
custom_field_5
not mapped yet
Additional custom field.
custom_field_6
not mapped yet
Additional custom field.
custom_field_7
not mapped yet
Additional custom field.
custom_field_8
not mapped yet
Additional custom field.
custom_field_9
not mapped yet
Additional custom field.
custom_field_10
not mapped yet
Additional custom field.
firma
not mapped yet
Company or firm name.
name
not mapped yet
General name field.
strasse
not mapped yet
Street address of the supplier.
postleitzahl
not mapped yet
Postal code of the supplier's address.
id_nummer
not mapped yet
Identification number for the entity.
EDI 850 (Purchase Order) Mapping
supplier_id
N104
Unique identifier for the supplier.
supplier_name
N102
Name of the supplier.
supplier_address
N101
Address of the supplier.
supplier_tax_id
not mapped yet
Tax identification number of the supplier.
delivery_date
DTM02
Date the goods or services were delivered.
supplier_iban
not mapped yet
IBAN number of the supplier.
payment_terms
ITD12
Terms of payment specified for the invoice.
purchase_order
not mapped yet
Purchase order number associated with the invoice.
currency
CUR02
Currency used in the invoice.
net_amount
not mapped yet
Net amount before taxes.
tax_amount
not mapped yet
Total tax amount applied.
tax_rate
not mapped yet
Tax rate applied to the net amount.
net_amount_2
not mapped yet
Secondary net amount (if applicable).
tax_amount_2
not mapped yet
Secondary tax amount (if applicable).
tax_rate_2
not mapped yet
Secondary tax rate (if applicable).
total_net_amount
not mapped yet
Total net amount of the invoice.
total_tax_amount
not mapped yet
Total tax amount of the invoice.
total_amount
not mapped yet
Total amount of the invoice, including taxes.
POSITION
PO101
Position within the invoice (related to line items).
PURCHASE_ORDER
not mapped yet
Purchase order number.
ITEM_NUMBER
PO1
Item number associated with the invoice line item.
SUPPLIER_ITEM_NUMBER
REF02
Supplier's item number.
DESCRIPTION
PID05
Description of the item or service.
QUANTITY
PO102
Quantity of items or services.
UNIT
PO103
Unit of measure for the items or services.
UNIT_PRICE
PO104
Price per unit of the item or service.
VAT
not mapped yet
VAT amount for the item or service.
TOTAL_AMOUNT
PO102 * PO104
Total amount for the line item, including VAT.
AGREEMENT_NUMBER
REF02
Agreement number related to the invoice (if applicable).
TAX
(PO105)/100
General tax amount applied to the invoice.
order_date
BEG05
Date when the order was placed.
negative_amount
not mapped yet
Amount that is negative, possibly due to returns or adjustments.
charges
not mapped yet
Additional charges applied to the invoice.
order_number
BEG03
Number assigned to the order.
created_by
BEG02
Identifier or name of the person who created the invoice.
delivery_terms
BEG07
Terms related to the delivery of goods or services.
delivery_method
BEG05
Method of delivery used for the goods or services.
allowance
sum(SAC05)/100
Allowance amount provided, if any.
tax
sum(SAC05)/100
Tax amount applied to the invoice (similar to TAX above).
delivery_name
not mapped yet
Name of the recipient or entity receiving the delivery.
delivery_address_line_1
not mapped yet
First line of the delivery address.
delivery_address_line_2
not mapped yet
Second line of the delivery address (if applicable).
pickup_address
not mapped yet
Address where the goods can be picked up (if applicable).
EDI 855 (Purchase Order Acknowledgement) Mapping
supplier_id
N104
Unique identifier for the supplier.
supplier_name
N102
Name of the supplier.
supplier_address
N301
Address of the supplier.
supplier_tax_id
not mapped yet
Tax identification number of the supplier.
invoice_id
not mapped yet
Unique identifier for the invoice.
invoice_date
not mapped yet
Date the invoice was issued.
delivery_date
not mapped yet
Date the goods or services were delivered.
supplier_iban
not mapped yet
IBAN number of the supplier.
payment_terms
not mapped yet
Terms of payment specified for the invoice.
purchase_order
BAK03
Purchase order number associated with the invoice.
currency
CUR02
Currency used in the invoice.
net_amount
not mapped yet
Net amount before taxes.
tax_amount
not mapped yet
Total tax amount applied.
tax_rate
not mapped yet
Tax rate applied to the net amount.
net_amount_2
not mapped yet
Secondary net amount (if applicable).
tax_amount_2
not mapped yet
Secondary tax amount (if applicable).
tax_rate_2
not mapped yet
Secondary tax rate (if applicable).
total_net_amount
not mapped yet
Total net amount of the invoice.
total_tax_amount
not mapped yet
Total tax amount of the invoice.
total_amount
not mapped yet
Total amount of the invoice, including taxes.
order_date
not mapped yet
Date when the order was placed.
document_date
BAK04
Date of the document creation or issue.
POSITION
PO101
Position within the invoice (related to line items).
PURCHASE_ORDER
not mapped yet
Purchase order number.
ITEM_NUMBER
PO107
Item number associated with the invoice line item.
SUPPLIER_ITEM_NUMBER
not mapped yet
Supplier's item number.
DESCRIPTION
PO105
Description of the item or service.
QUANTITY
ACK02, PO102
Quantity of items or services.
UNIT
PO103
Unit of measure for the items or services.
UNIT_PRICE
ACK02, PO104
Price per unit of the item or service.
VAT
not mapped yet
VAT amount for the item or service.
TOTAL_AMOUNT
(ACK02 * ACK02), (PO102 * PO104)
Total amount for the line item, including VAT.
PROMISED_DELIVERY_DATE
DTM02
Promised delivery date for the goods or services.
net_amount_3
not mapped yet
Tertiary net amount (if applicable).
tax_amount_3
not mapped yet
Tertiary tax amount (if applicable).
tax_rate_3
not mapped yet
Tertiary tax rate (if applicable).
custom_field_1
not mapped yet
Custom field for additional information (1).
custom_field_2
not mapped yet
Custom field for additional information (2).
custom_field_3
not mapped yet
Custom field for additional information (3).
custom_field_4
not mapped yet
Custom field for additional information (4).
custom_field_5
not mapped yet
Custom field for additional information (5).
custom_field_6
not mapped yet
Custom field for additional information (6).
custom_field_7
not mapped yet
Custom field for additional information (7).
custom_field_8
not mapped yet
Custom field for additional information (8).
custom_field_9
not mapped yet
Custom field for additional information (9).
custom_field_10
not mapped yet
Custom field for additional information (10).
EDI 856 (Advance Shipment Notice) Mapping
supplier_id
not mapped yet
Unique identifier for the supplier.
supplier_name
N102
Name of the supplier.
supplier_address
N301
Address of the supplier.
supplier_tax_id
not mapped yet
Tax identification number of the supplier.
purchase_order
PRF01
Purchase order number associated with the invoice.
bill_of_landing
REF02
Bill of lading document number.
trailer_number
TD303
Number of the trailer transporting the goods.
asn_date
BSN03
Date of the Advance Shipment Notice (ASN).
vendor_delivery_number
BSN02
Delivery number assigned by the vendor.
carrier_name
TD505
Name of the carrier responsible for the shipment.
POSITION
not mapped yet
Position within the invoice (related to line items).
PURCHASE_ORDER
PRF01
Purchase order number.
ITEM_NUMBER
LIN03
Item number associated with the invoice line item.
SUPPLIER_ITEM_NUMBER
LIN05
Supplier's item number.
DESCRIPTION
not mapped yet
Description of the item or service.
QUANTITY
SN102
Quantity of items or services.
UNIT
SN103
Unit of measure for the items or services.
UNIT_PRICE
not mapped yet
Price per unit of the item or service.
VAT
not mapped yet
VAT amount for the item or service.
TOTAL_AMOUNT
not mapped yet
Total amount for the line item, including VAT.
LOT_NUMBER
LIN07
Lot number associated with the item.
SSCC
MAN02
Serial Shipping Container Code for the item.
PALLATE
REF02
Pallet information for the shipment.
MANUFACTURING
DTM02
Manufacturing date of the item.
TEMP
LIN09
Temperature conditions (if applicable).
NET_WEIGHT
PO406
Net weight of the item.
PACKAGE_NUMBER
MAN05
Package number associated with the item.
Peppol BIS Billing 3.0
Overview
This section describes the implementation plan for importing and mapping data from XML files using the Peppol BIS Billing 3.0 schema. Peppol BIS Billing 3.0 was developed to standardize e-billing processes and ensure compliance with European standards.
Objectives
Ensure full compliance with Peppol BIS Billing 3.0 specifications.
Seamless integration of e-invoice data into our accounts payable system using DocBits.
Improve data quality and processing efficiency.
Scope
The scope of this project is to map key elements of the Peppol BIS Billing 3.0 schema to our internal data structures. In particular, the mapping will cover the following areas:
Vendor and Buyer details
Invoice details
Invoice lines
Payment instructions
Tax and legal information
Key elements and mapping
Vendor information:
cac:AccountingSupplierParty
cbc:EndpointID: Electronic address of the vendor
cbc:Name: Trade name of the vendor
cbc:CompanyID: Legal registration number of the vendor
cbc:StreetName, cbc:CityName, cbc:PostalZone: Address details of the vendor
Buyer information:
cac:AccountingCustomerParty
cbc:EndpointID: Electronic address of the buyer
cbc:Name: Trade name of the buyer
cbc:CompanyID: Legal registration number of the buyer
cbc:StreetName, cbc:CityName, cbc:PostalZone: Address details of the buyer
Invoice details:
cbc:ID: Invoice number
cbc:IssueDate: Issue date of the invoice
cbc:DueDate: Invoice due date
cbc:InvoiceTypeCode: Invoice type
Invoice lines:
cac:InvoiceLine
cbc:ID: Invoice line number
cbc:InvoicedQuantity: Invoiced quantity
cbc:LineExtensionAmount: Line extension amount
cbc:Description: Description of the billing position
cac:Item
cbc:Name: Item name
cbc:SellerItemIdentification/cbc:ID: Item number of the vendor
cac:Price
cbc:PriceAmount: Price per unit
cbc:BaseQuantity: Base quantity for the price
Payment instructions:
cac:PaymentMeans
cbc:PaymentMeansCode: Code to identify the payment method
cbc:PaymentID: Payment identifier
Tax information:
cac:TaxTotal
cbc:TaxAmount: Total tax amount
cac:TaxSubtotal: Details for each interim tax amount
PDF preview for e-invoice
A PDF document is generated according to a standard layout with the imported fields in order to provide the user with a preview for reference purposes. Further customization of the PDF preview layout is possible but requires additional effort.
eSLOG 1.6 en 2.0
Ondersteunde eSLOG Factuurversies
Momenteel worden eSLOG Factuurversies 1.6 en 2.0 ondersteund.
Voor officiële eSLOG-documentatie kunt u deze link raadplegen.
Beide eSLOG-versies zijn standaard ingeschakeld.
Stappen om eSLOG-configuratie te Wijzigen
Configureer eSLOG:
Navigeer naar Instellingen → Globale Instellingen → Documenttypen → Factuur.
Klik op E-Doc.

Een lijst van alle beschikbare e-docs verschijnt.
Zoek de eSLOG-versie die u wilt wijzigen.

Transformatie en XML-padconfiguratie:
In de transformatiesettings kunt u het pad definiëren om specifieke informatie binnen het XML-bestand te lokaliseren en deze op te slaan in een nieuwe structuur, waardoor het gemakkelijker wordt om toegang te krijgen tot de gegevens. Opmerking: Als u deze functionaliteit gebruikt, moet u de nieuw aangemaakte XML-paden gebruiken, niet de oorspronkelijke XML-paden, in de Voorbeeld en Extractiepad.
Stappen om Transformatie Bestand te Wijzigen:
Open de Transformatie.
Maak een nieuw concept door op het potloodicoon te klikken.
Selecteer het nieuw aangemaakte concept.
Maak een nieuw veld aan of wijzig een bestaand veld.
Stel het gewenste pad in voor gegevensextractie.
Klik op Opslaan.
Voorbeeld PDF-configuratie
De Voorbeeld PDF-configuratie wordt gebruikt om een gebruikersleesbare versie van het document te genereren. U kunt het aanpassen met HTML om aan uw behoeften te voldoen.
Stappen om Voorbeeld Bestand te Wijzigen:
Open de Voorbeeld.
Maak een nieuw concept door op het potloodicoon te klikken.
Selecteer het nieuw aangemaakte concept.
Maak een nieuw veld aan of wijzig een bestaand veld.
Stel het gewenste pad in voor gegevensextractie.
Klik op Opslaan.
Extractiepadenconfiguratie
De Extractiepadenconfiguratie wordt gebruikt om gegevens te extraheren en velden in het validatiescherm in te vullen, zoals de factuurtabel of velden die zijn geconfigureerd in de factuurlay-out.
Stappen om Extractiepaden te Wijzigen:
Open de Extractiepaden.
Maak een nieuw concept door op het potloodicoon te klikken.
Selecteer het nieuw aangemaakte concept.
Maak een nieuw veld aan of wijzig een bestaand veld.
De linkerkant vertegenwoordigt de DocBits veld-ID, die te vinden is in de Instellingen → Globale Instellingen → Documenttypen → Factuur → Velden.


De rechterkant vertegenwoordigt het pad naar het veld dat is aangemaakt in de Transformatie.
Klik op Opslaan.
Meer Instellingen

Overzicht
Het gebied Meer Instellingen stelt beheerders in staat om verschillende aspecten van documentverwerking te configureren die niet in de basisinstellingen zijn opgenomen. Dit omvat opties voor tabelextractie, documentbeoordeling, PDF-generatie, goedkeuringsprocessen en instellingen die specifiek zijn voor bepaalde operaties zoals inkooporders of boekhouding.
Belangrijkste Kenmerken en Opties
Tabelextractie:
Sla tabelvalidatie over: Maakt het mogelijk om het validatieproces voor tabelgegevens over te slaan, wat nuttig kan zijn in scenario's waar gegevensvalidatie flexibel moet zijn.
In Beoordeling:
Ontwerp in Beoordelingsformulier: Configureert de lay-out en velden die verschijnen in de beoordelingsformulieren die tijdens het documentbeoordelingsproces worden gebruikt.
PDF-generatie:
Ontwerp Sjabloon: Specificeert het sjabloon dat wordt gebruikt voor het genereren van PDF-versies van de documenten, wat cruciaal kan zijn voor archivering of externe communicatie.
Goedkeuring:
Goedkeuren vóór export: Zorgt ervoor dat documenten goedgekeurd moeten worden voordat ze uit het systeem kunnen worden geëxporteerd.
Tweede Goedkeuring: Voegt een extra laag van goedkeuring toe voor verdere validatie, waardoor de controle over documentverwerking wordt verbeterd.
Inkooporder / Auto Boekhouding:
PO-tabel in lay-outbouwer: Maakt het mogelijk om inkoopordertabellen op te nemen in de lay-outbouwer voor aangepaste documentlay-outs.
Inkooporder: Schakelt de verwerking van inkooporderdocumenten binnen het systeem in of uit.
PO Tolerantie-instelling: Stelt tolerantieniveaus in voor inkooporderhoeveelheden, wat helpt bij het accommoderen van kleine afwijkingen zonder ze als fouten te markeren.
Document Alternatieve Export:
PO-statussen uitschakelen: Maakt het mogelijk om bepaalde statussen voor inkooporders tijdens het exportproces uit te schakelen, wat flexibiliteit biedt in de manier waarop bestellingen worden behandeld.
Leverancier Artikelnummer Kaart:
Een hulpprogramma-instelling die leverancier artikelnummer koppelt aan interne artikelnummer, wat zorgt voor nauwkeurigheid in voorraad- en inkooporderbeheer.
Purpose and use
Here are detailed explanations of the meaning and use of the listed settings in document processing to facilitate individual and controlled workflows:
Skip Table Validation:

Purpose:
This setting allows you to skip validation of tables.
Use:
This is useful when using tables whose structure changes frequently or when validation causes unnecessary delays. Skipping validation can speed up processing, but this should only be used if data quality is otherwise assured.
Duplicate Document Detection

Purpose:
This setting enables the automatic detection of duplicate documents based on selected fields.
Use:
This tool is designed to prevent the same documents being processed twice, ensuring efficiency in the processing workflow.
Design in Review Form:

Purpose:
This setting allows you to design documents directly in review mode.
Use:
Useful for taking visual feedback and annotations into account during review and making design changes in real time. This improves the efficiency of the review process and allows designers and reviewers to work more closely together.
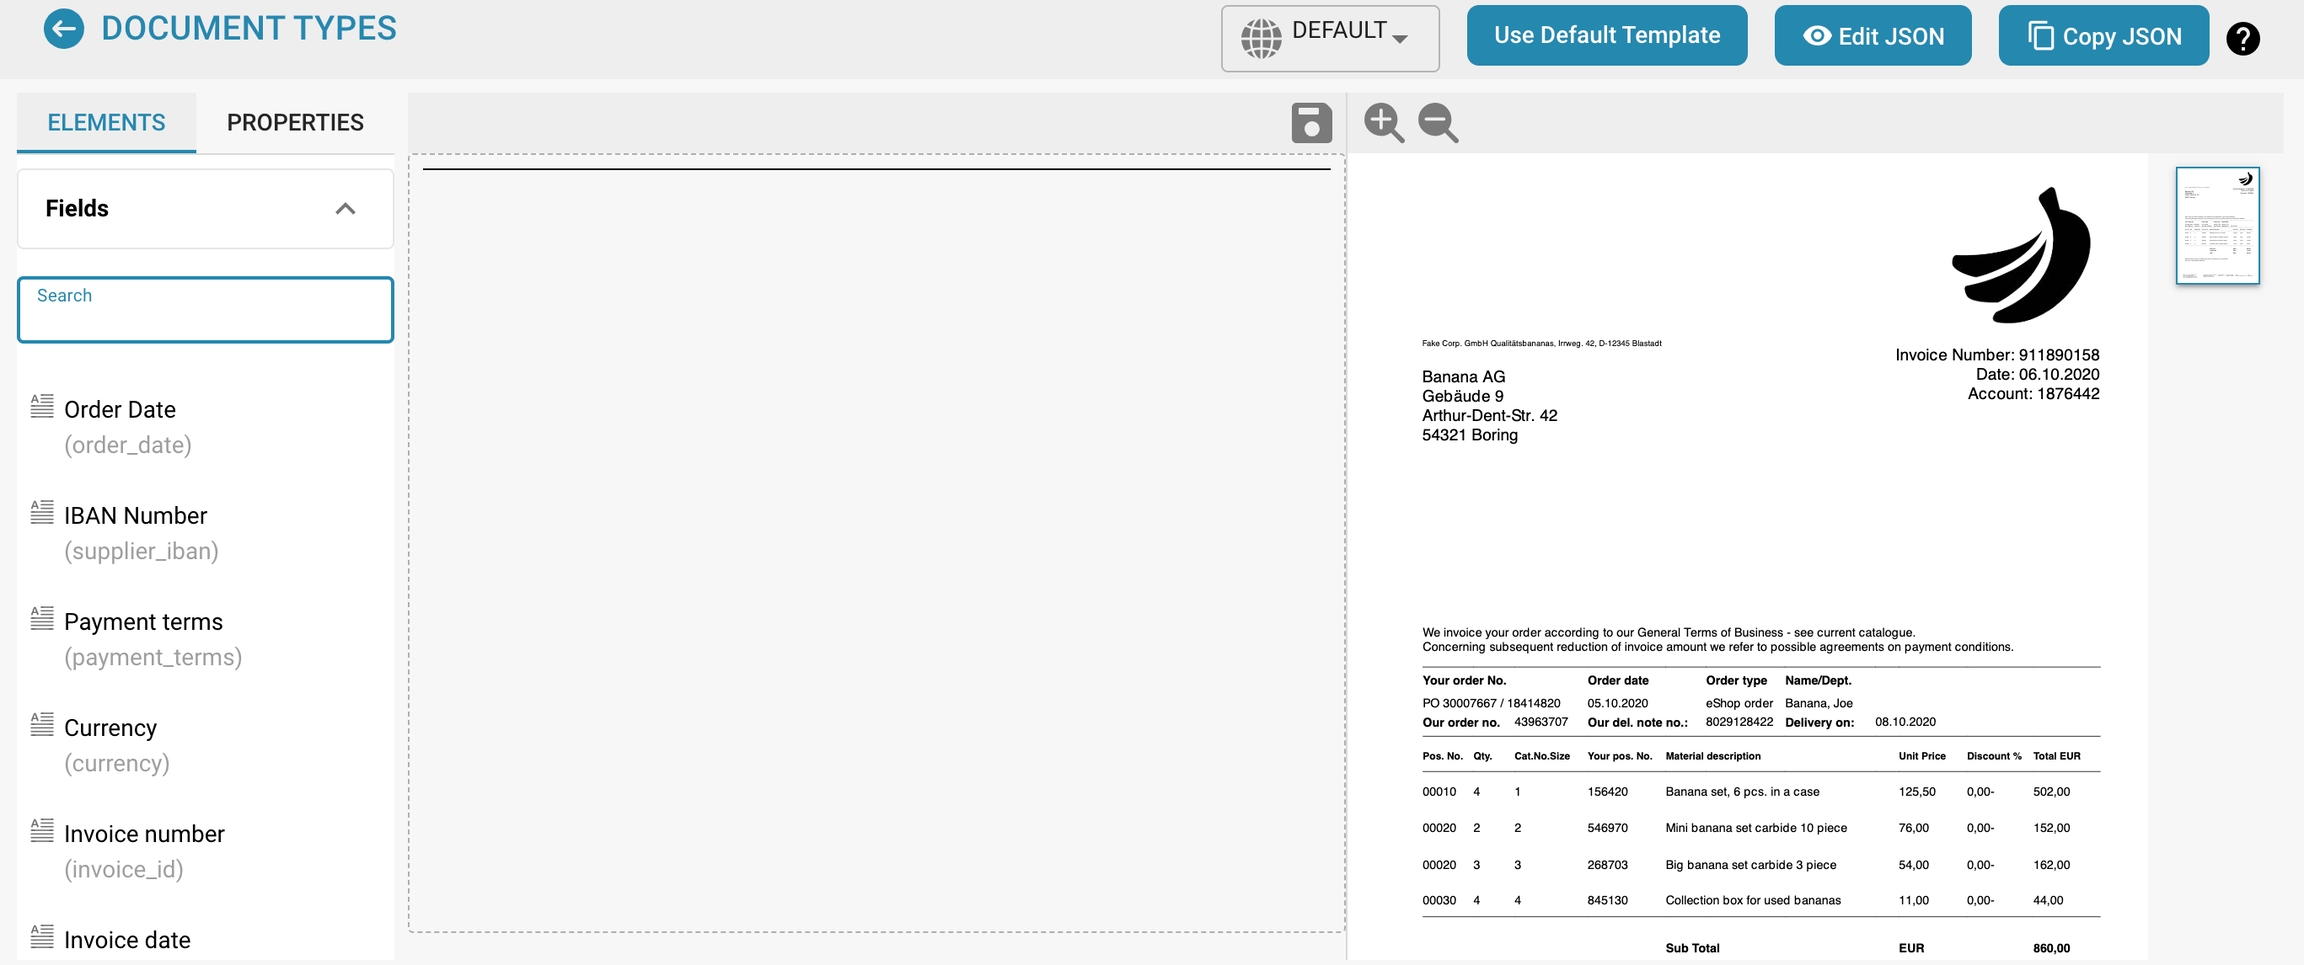
Design Reject Form:
Purpose:
This setting allows you to design the view of rejected documents directly.
Use:
Useful for taking visual feedback and annotations into account while making design changes in real time. This improves the efficiency of the review process and allows designers and reviewers to work more closely together.
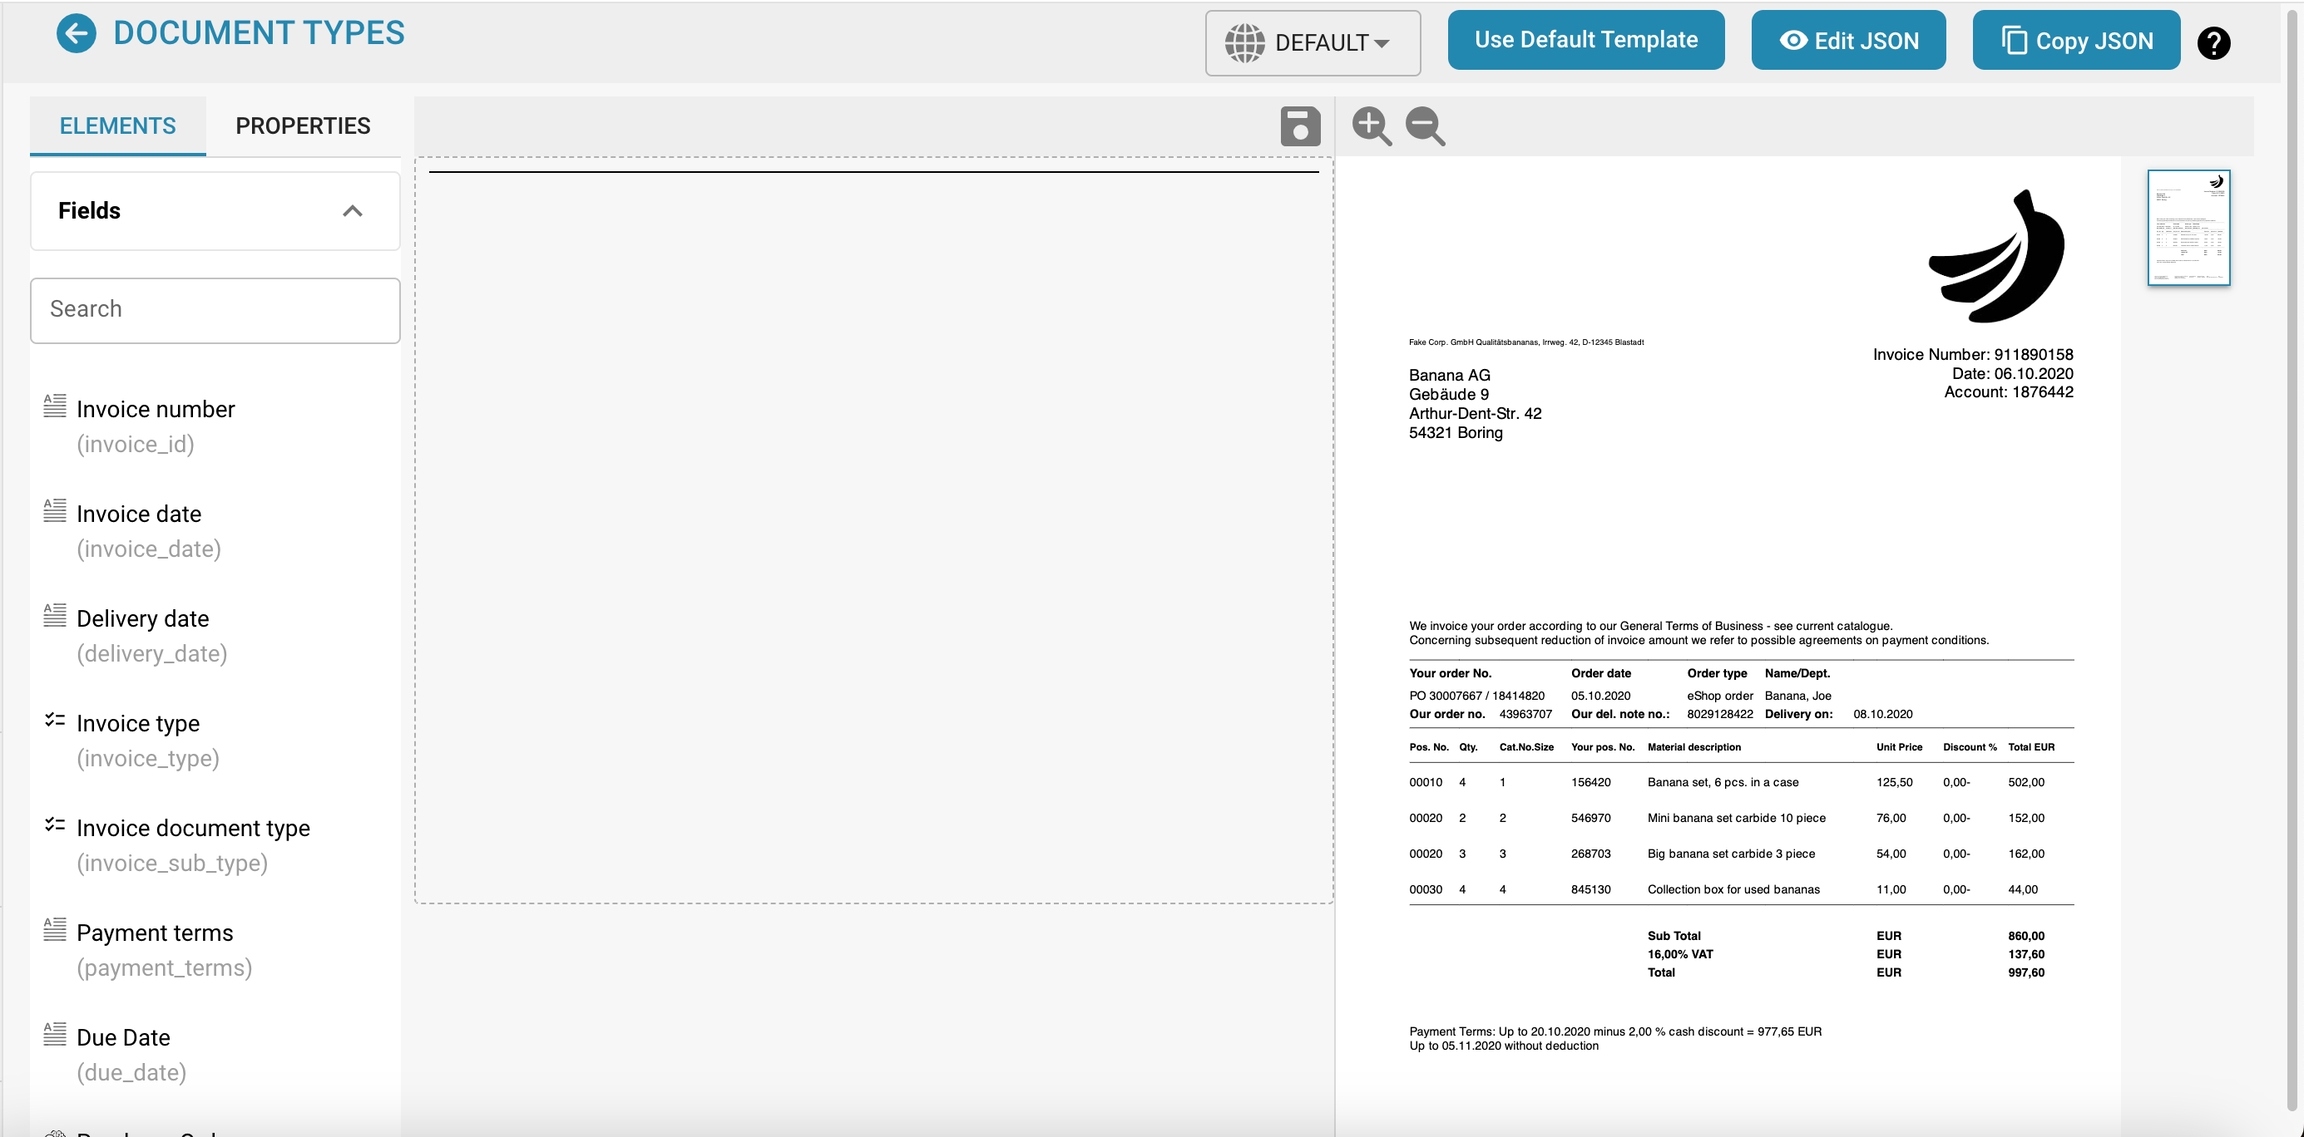
Design Template:

Purpose:
Templates for standardizing document layouts and formatting.
Use:
Makes it easier to create consistent and professional documents. Companies can create their own design templates that follow brand guidelines and formatting standards, increasing efficiency and improving the appearance of the documents.
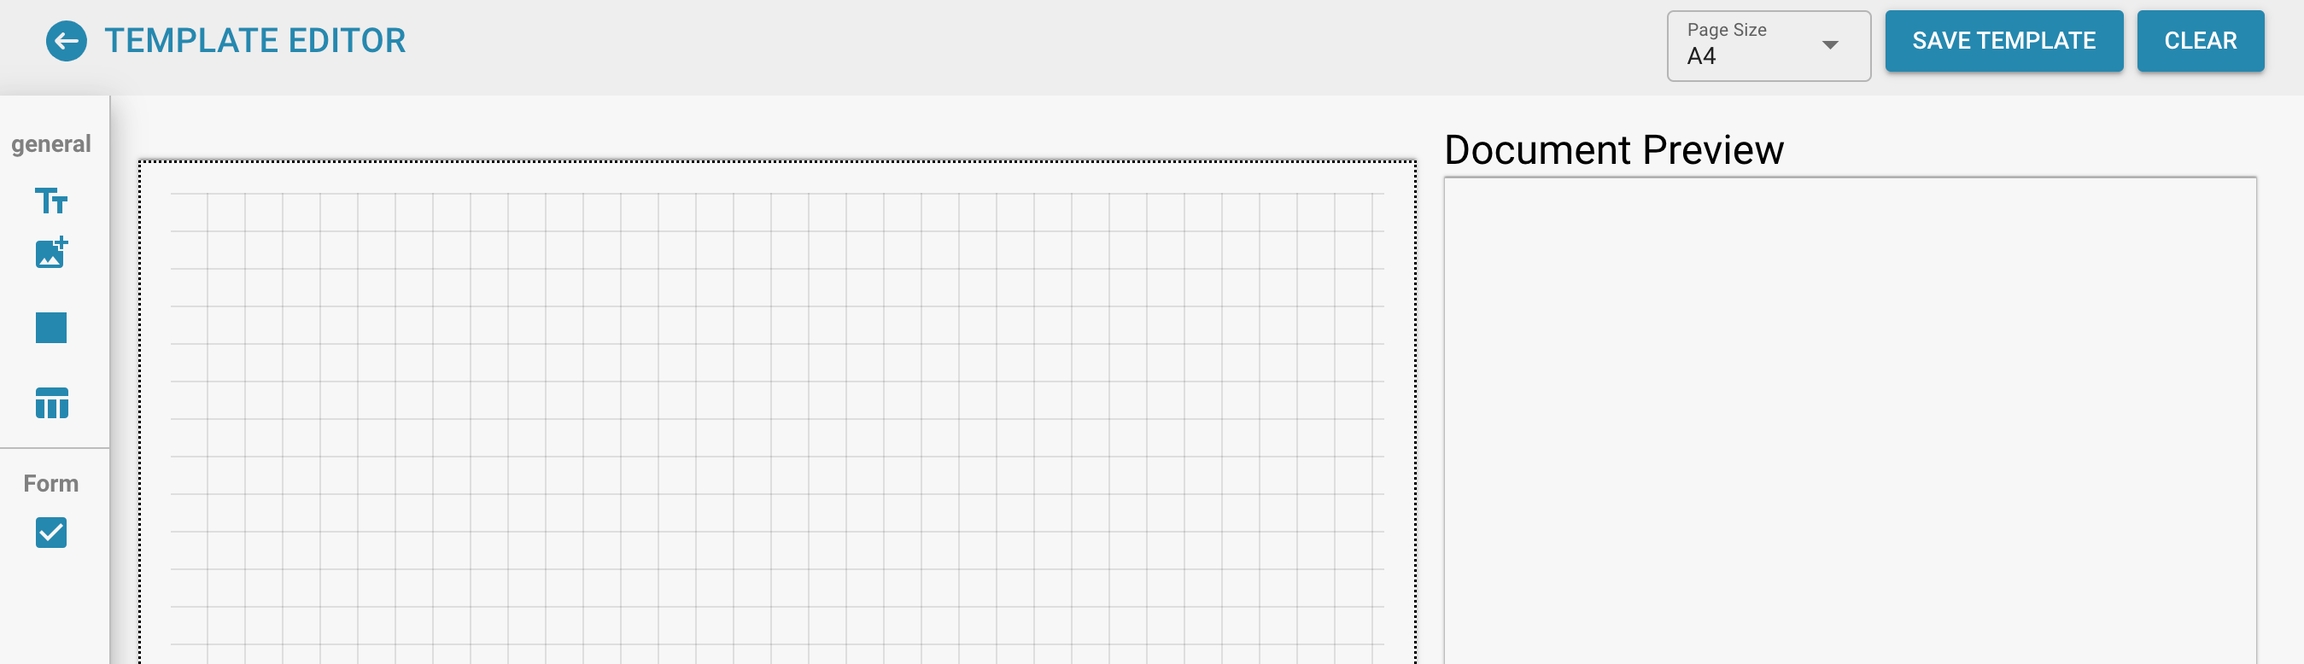
Export to IDM (Information Document Management):

Purpose:
This setting enables documents to be exported to an Information Document Management System (IDM).
Use:
This function is used to export documents directly from the creation or review system to an IDM system to store, manage and facilitate access to them centrally. This improves the organization and traceability of documents, ensures that they are kept securely and makes it easier to comply with compliance regulations.
Approval:

Purpose:
Document approval workflow.
Use:
Defines approval steps and responsibilities. This setting is critical for compliance with company policies and regulatory requirements. It ensures that all relevant parties have reviewed and approved the document before it is finalized. Once the document is finalized, it can be stamped with an approval stamp.
Design Approval Form:
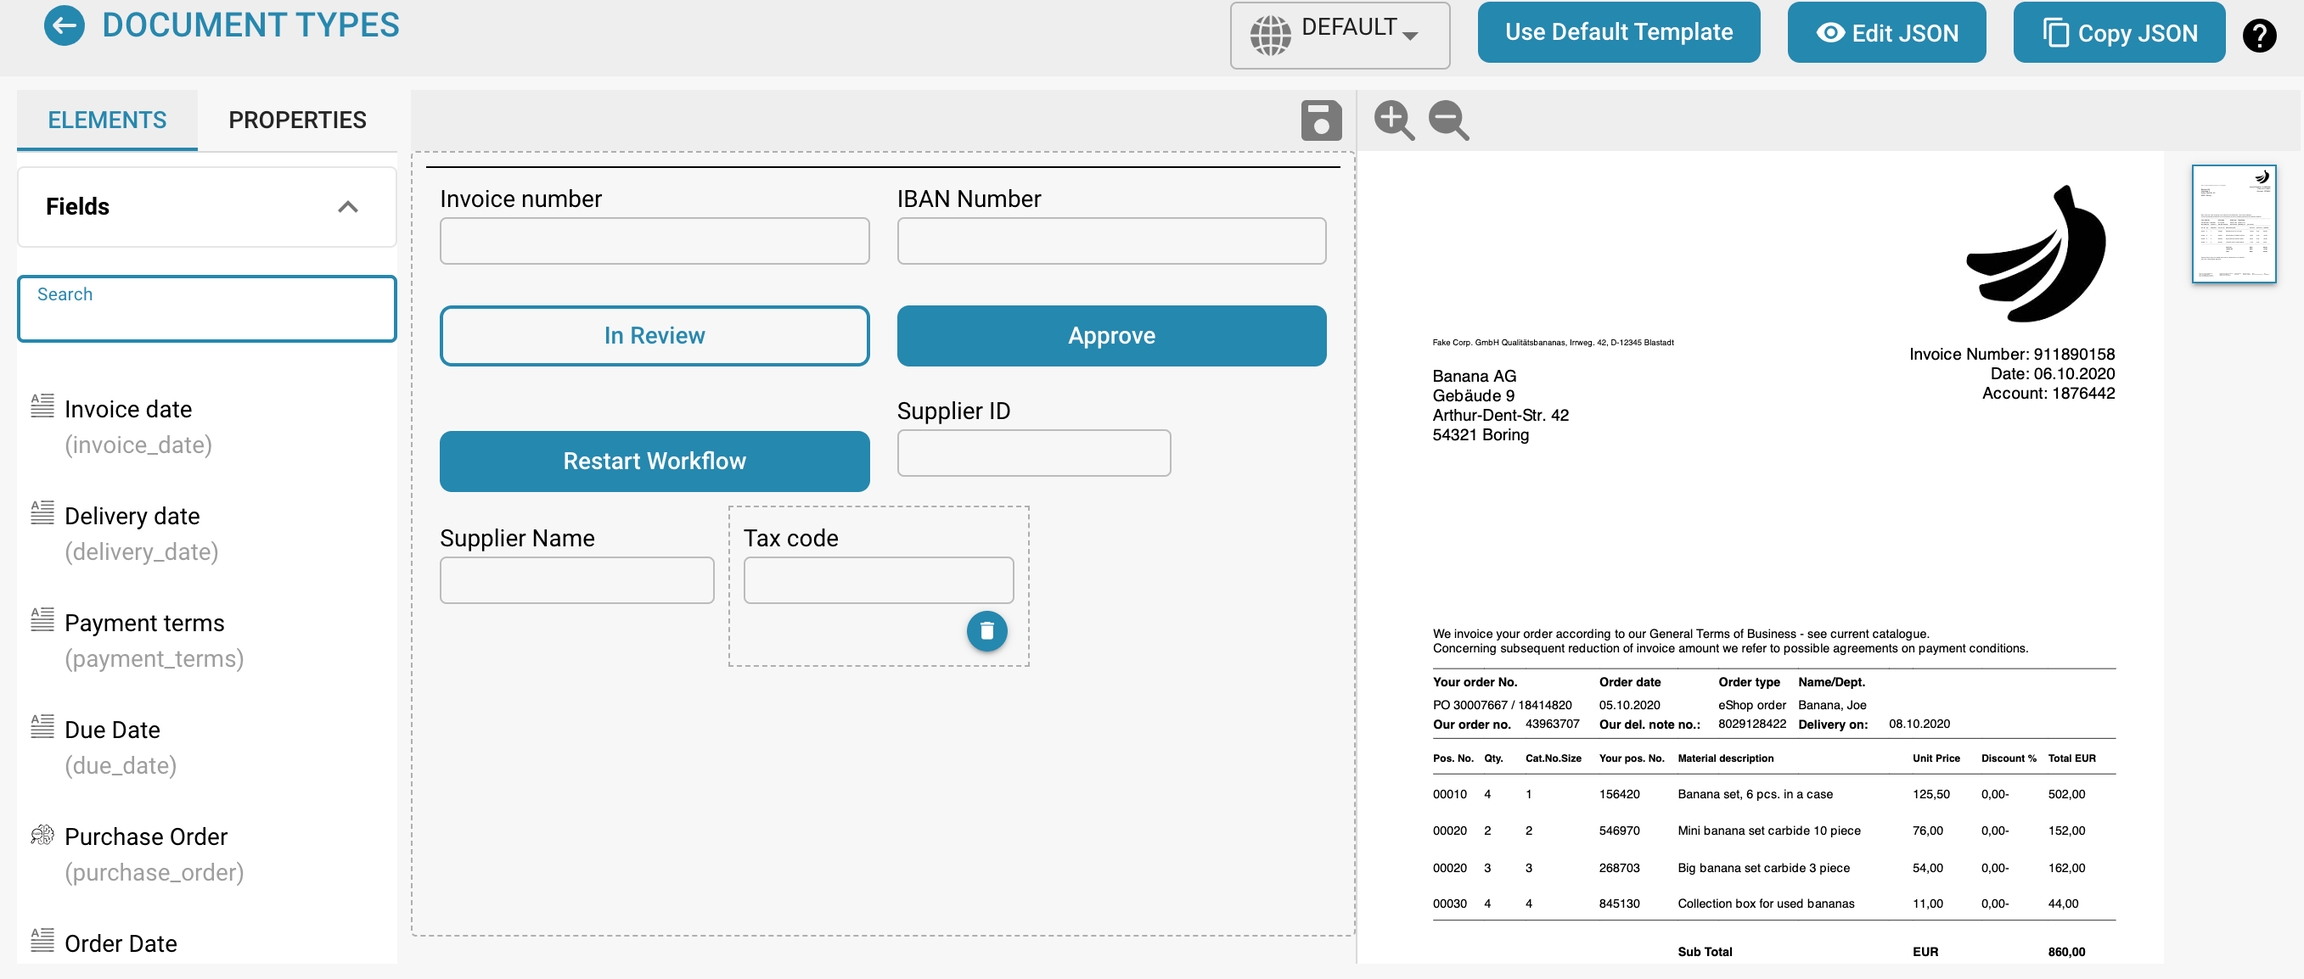
Design Approval Form v2:
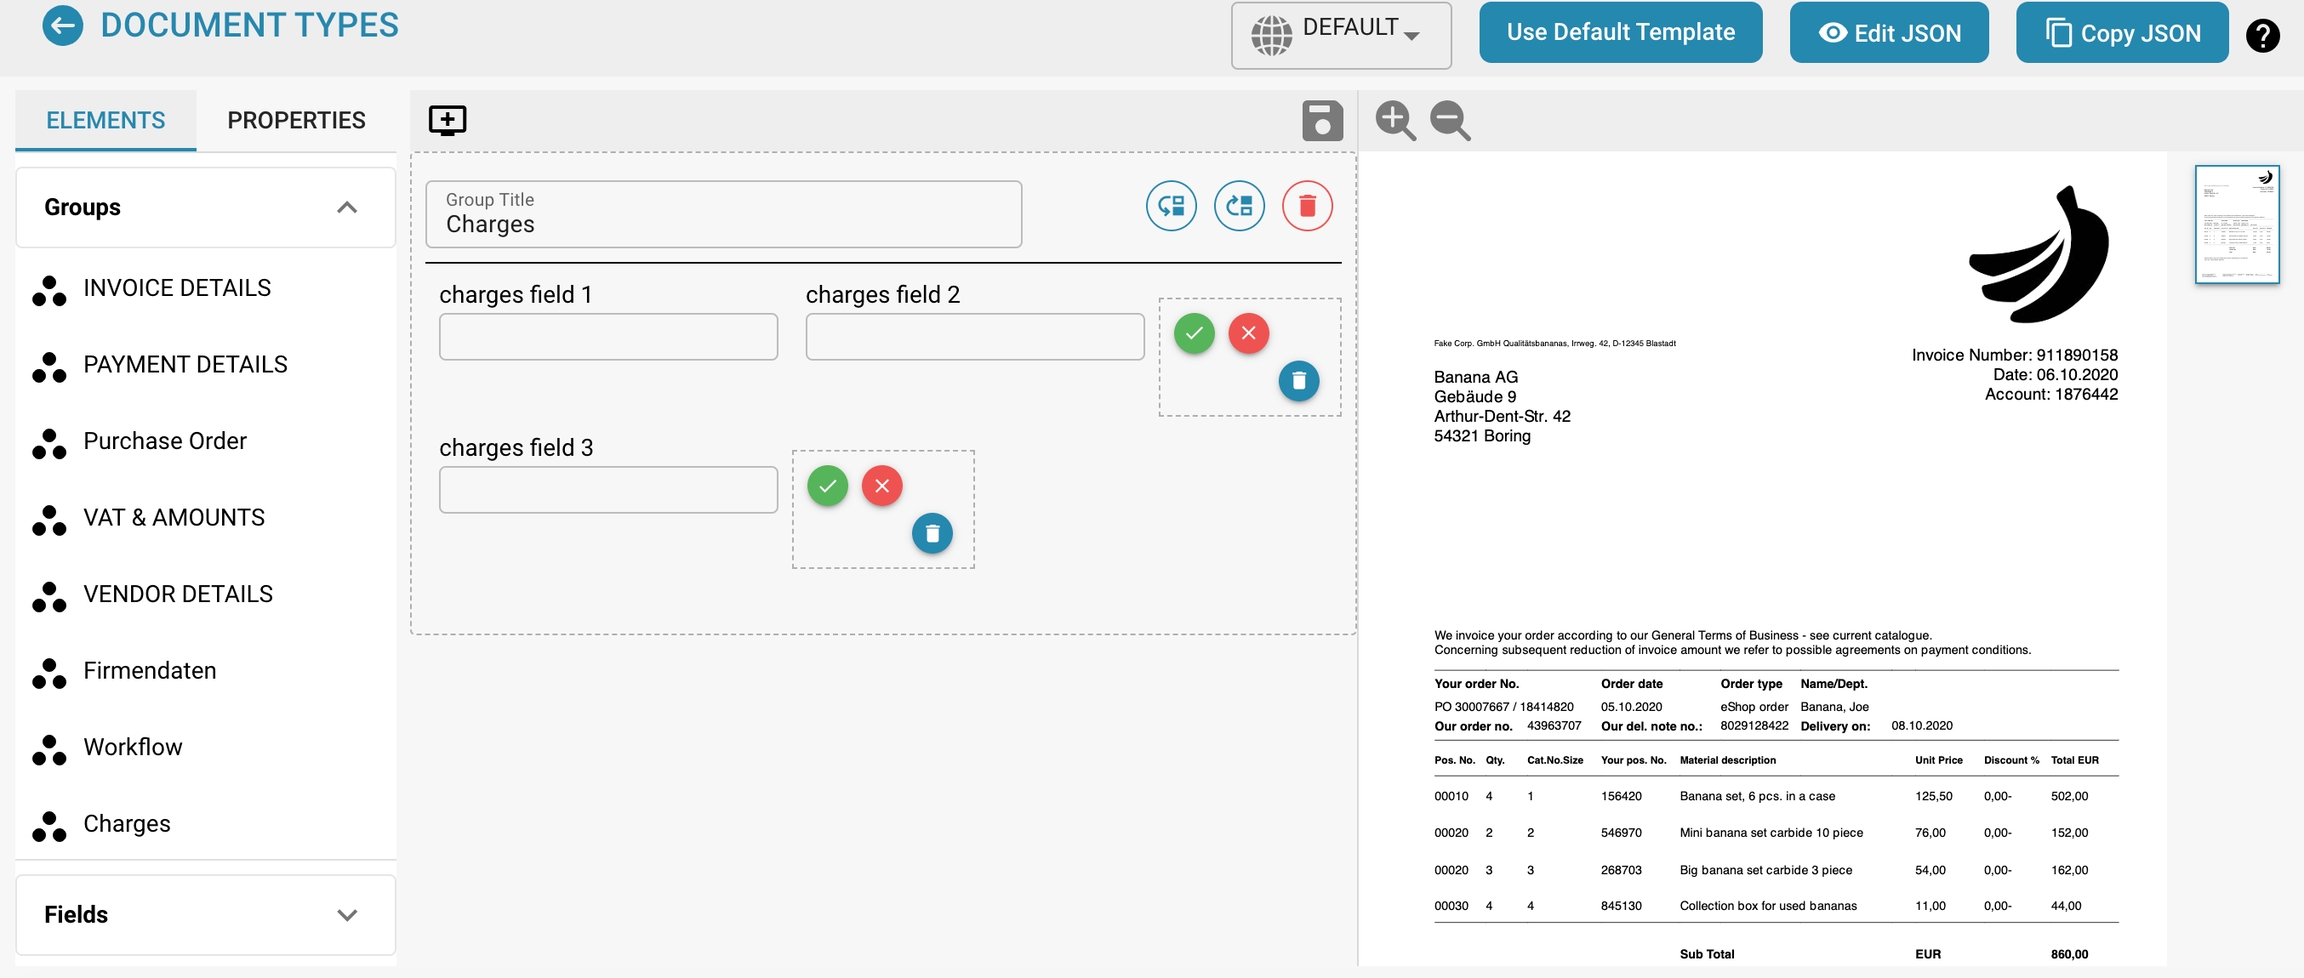
Design Second Approval form:
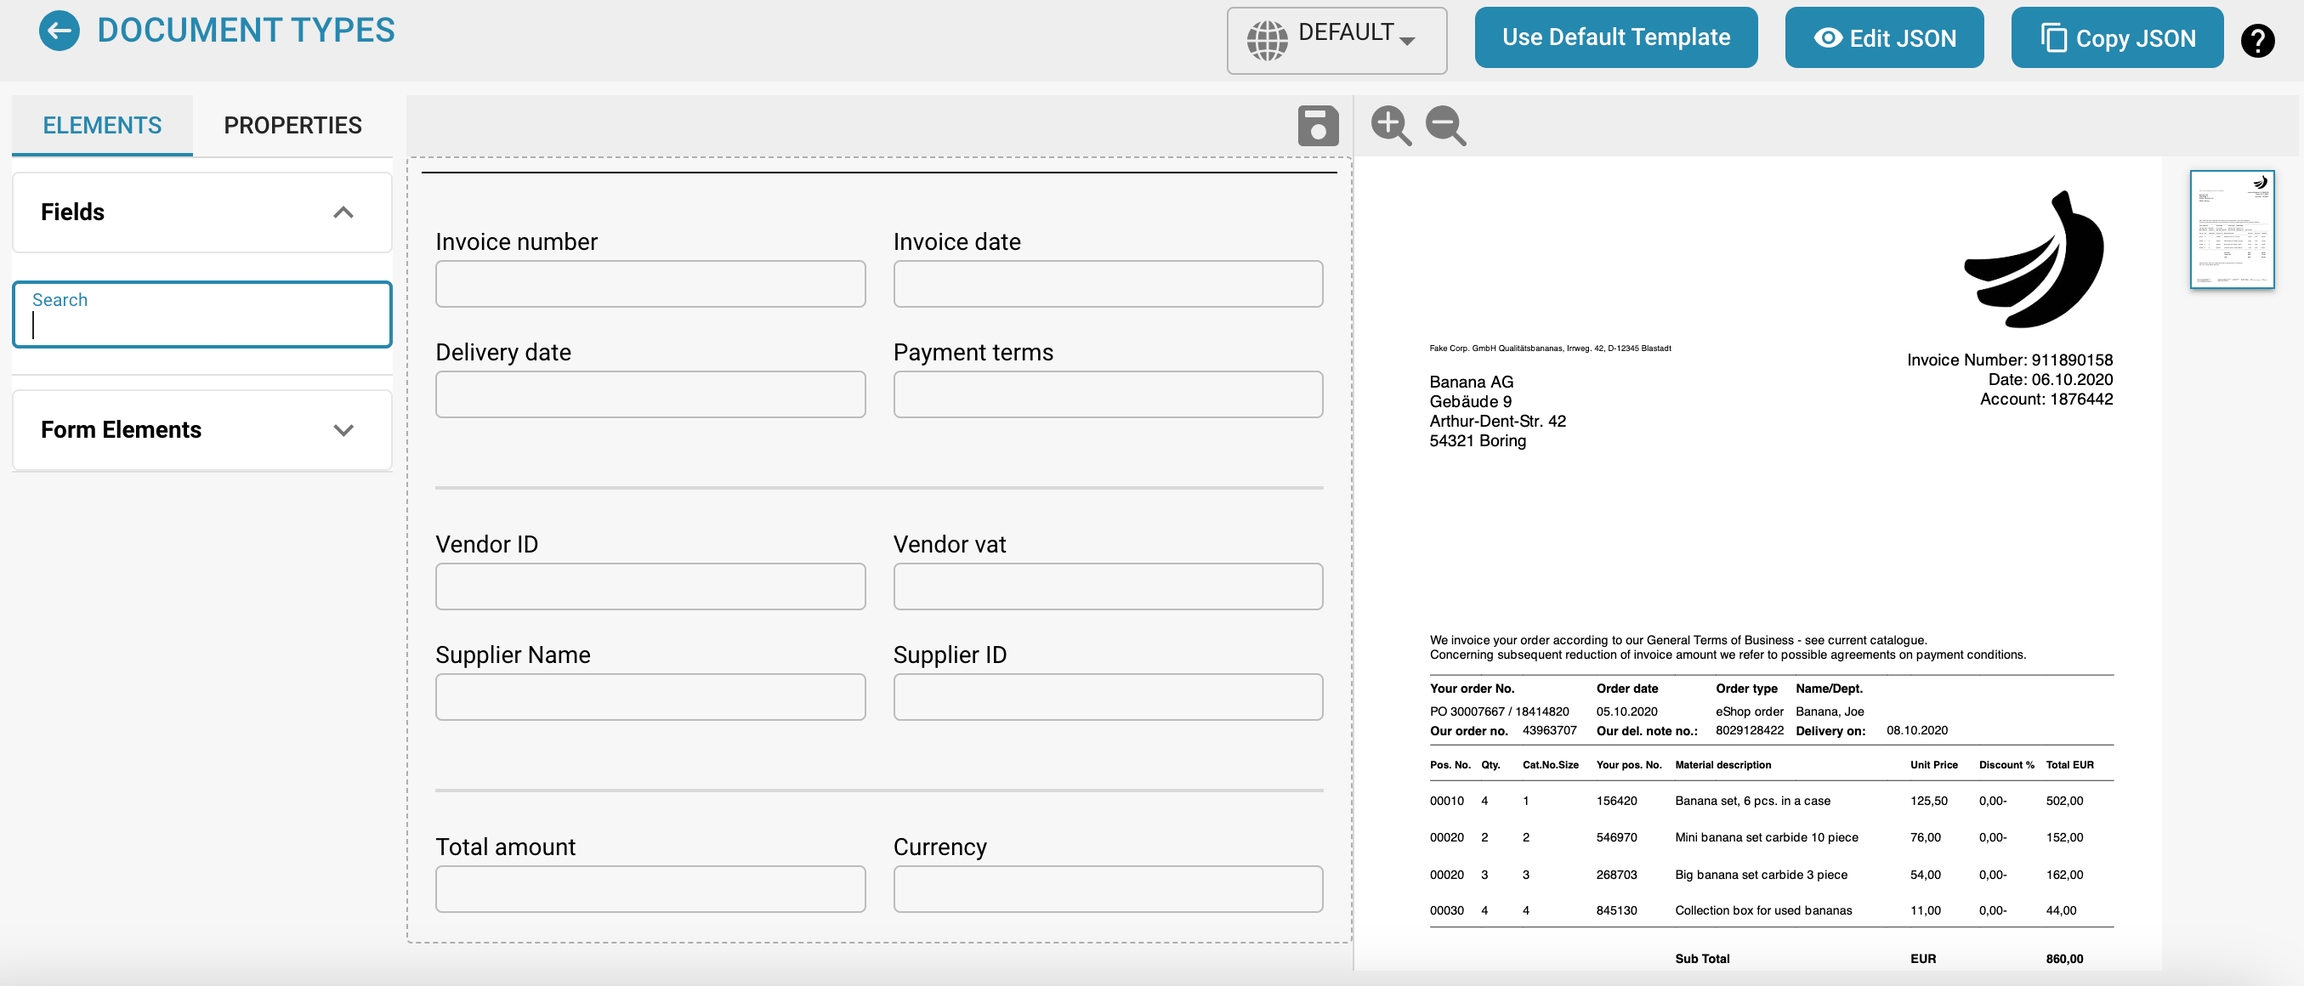
Purchase Order / Auto Accounting:
Purpose:
Automates the processing and posting of purchase orders.
Usage:
Facilitates the automatic creation and processing of purchase orders and their posting in financial systems. This saves time, reduces errors and improves efficiency in the purchasing and accounting process.
PO Table in Layout Builder:

Purpose:
Enables the integration of purchase order tables into the layout of documents.
Usage:
Designs purchase order tables directly in the Layout Builder and adapts them to specific requirements. This ensures a seamless and consistent design of documents containing purchase order information.
Export not matched PO lines:

Purpose:
Exports purchase order lines that do not match the existing purchase orders.
Usage:
Identifies and exports lines that may contain errors or require special review. This helps to detect and correct discrepancies before the orders are completed.
PO Tolerance Settings:

Purpose:
Defines tolerance limits for deviations in purchase orders.
Usage:
Determines how much deviation from the order is acceptable without requiring additional approval.
This include price or quantity deviations. This setting helps streamline the approval process and avoid unnecessary delays.

Additional PO Tolerance Settings:

Purpose:
These settings provide advanced configuration options for purchase orders (POs) to meet specific business requirements.
Usage:
You can set additional parameters and conditions for purchase orders, such as delivery terms, specific payment terms. This facilitates precise control and customization of the purchase order processes, thereby improving efficiency and accuracy in purchasing.

Document Alternative Export:

Purpose:
This setting allows documents to be exported in different formats or via alternative methods.
Usage:
You can specify in which formats (e.g. PDF, DOCX, XML) or via which channels (e.g. email, cloud storage) documents should be exported. This increases flexibility and allows documents to be exported according to the requirements of different recipients or systems.

PO Disable Statuses:

Purpose:
This setting allows certain statuses of purchase orders to be disabled or locked in order to control the workflow.
Usage:
Companies can specify which statuses should be disabled in certain situations to prevent orders from being edited or modified incorrectly. This is useful to ensure the integrity and consistency of the purchase order process.
For example, an order that has already been approved and released for delivery could no longer be processed or cancelled.
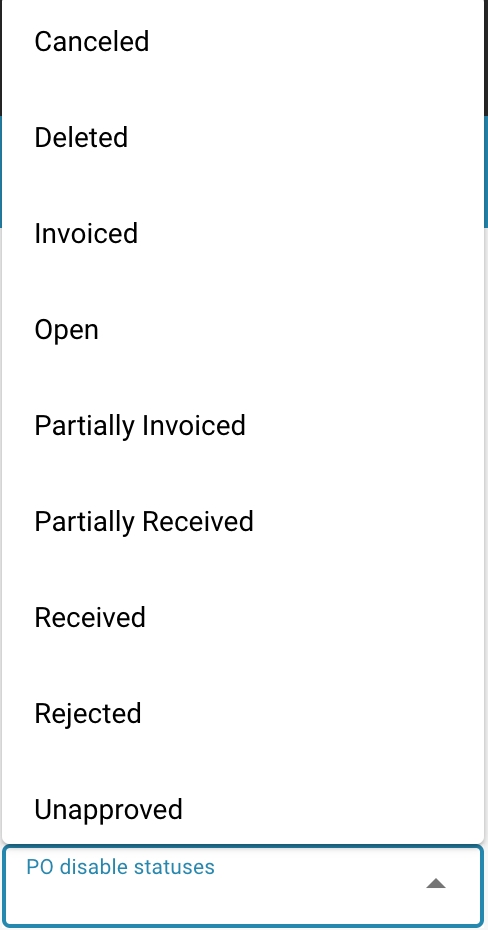
Importance for controlled workflows
Additional PO Settings:
Individual customization:
Allows the adjustment of the order settings to specific business requirements, which increases efficiency and accuracy in purchasing.
Controlled processes:
Supports the implementation of detailed purchasing rules and procedures.
Additional PO Tolerance Settings:
Efficient approval processes:
Minimizes unnecessary approval steps by setting clear tolerance limits.
Risk management:
Helps to identify significant deviations at an early stage and take appropriate action.
Document Alternative Export:
Flexibility:
Allows the export of documents in different formats that meet the requirements of different systems and recipients.
Efficiency:
Automates the export process, reducing manual work and errors.
PO Disable Statuses:
Process control:
Prevents unwanted changes or edits to orders that are already in an advanced status.
Security:
Protects the integrity of the ordering process and ensures that only authorized changes are made.
Best practices
Here are some proven recommendations for using settings effectively to optimize document processing, improve data accuracy, and ensure compliance.
Standardize templates and language settings:
Create clear guidelines for using formatting templates and language settings to ensure all documents are consistent.
Regularly train employees on the correct use of templates and language settings.
Enable autocorrect and spell check:
Encourage employees to spell check before finalizing a document to identify and correct typos and grammatical errors.
Use versioning and change tracking:
Use versioning and change tracking to track edit history and ensure traceability of changes.
Carefully document changes and comments to support the review process and facilitate collaboration.
Careful document security configuration:
Set clear access restrictions to ensure that confidential documents can only be viewed and edited by authorized people.
Regularly update passwords and access rights to ensure security and meet compliance requirements.
Regular training and updates:
Regularly train employees on how to use DocBits and its features effectively.
Stay up to date with updates and new features and implement them as needed to improve efficiency and security.
Documented workflows and policies:
Create clear document processing policies and workflows that cover the use of the various settings and features.
Document compliance requirements and ensure that all employees understand and adhere to them.
By implementing these best practices, you can increase efficiency in DocBits, improve data accuracy, and ensure that it meets relevant compliance requirements.
Troubleshooting
Even with careful configuration, document processing can occasionally encounter problems. Here are some troubleshooting tips for common problems that may arise from the configurations:
Additional order settings:
Check that all additional parameters are correctly configured and meet business requirements.
Make sure that the configuration matches system requirements and user needs.
Export to IDM:
Make sure that the connection to the IDM system is correctly configured and that all necessary permissions are in place.
Check that the document format is compatible with the requirements of the IDM system.
Additional tolerance settings:
Make sure that the tolerance limits are realistic and feasible.
Check regularly that the tolerance limits meet current business requirements.
Alternative document export:
Test the export in different formats to make sure that all required information is exported correctly.
Make sure that the export formats are compatible with the requirements of the recipients or target systems.
Order deactivation status:
Review the status deactivation configuration to ensure it is not unnecessarily blocking the workflow.
Make sure all users are aware of the status changes and know how to respond.
By applying these settings and best practices, organizations can streamline their document processing processes, improve data accuracy, and ensure regulatory compliance.
Behandeling van dubbele documenten
Inschakelen van dubbele documentbehandeling
Om dubbele documentbehandeling in te schakelen, volg je deze stappen:
Navigeer naar Instellingen → Algemene Instellingen → Documenttypen.

Selecteer het gewenste Documenttype en klik op Meer Instellingen.

Ga naar de sectie Duplicaatdetectie.

Je hebt twee opties voor het detecteren van dubbele documenten:
Detectie van dubbele documenten: Deze functie controleert op dubbele documenten die naar DocBits zijn geüpload op basis van de geselecteerde criteria. Als een document overeenkomt met de geselecteerde criteria in andere documenten, wordt het gemarkeerd als een duplicaat.
Duplicaatfactuur opsporen (Alleen beschikbaar voor het Factuur documenttype): Deze functie vereist het synchroniseren van Leveranciersfacturen van Infor naar DocBits. Het vergelijkt de factuurnummers in het DocBits-dashboard met die in Infor. Als hetzelfde factuurnummer meer dan eens voorkomt, wordt het gemarkeerd als een duplicaat.
OPMERKING: Het gebruik van de functie Duplicaatfactuur opsporen resulteert in een extra kredietkosten.
Zodra de instelling is geactiveerd, kun je de specifieke criteria voor duplicaatdetectie selecteren.

Weergeven van dubbele documenten op het dashboard
Na het inschakelen van Duplicaatdetectie, zal het dashboard een pictogram weergeven voor documenten die zijn geïdentificeerd als duplicaten op basis van de geselecteerde criteria. Door op dit pictogram te klikken, worden de dubbele records in een gesplitst scherm weergegeven voor gemakkelijke vergelijking.


Bij het bekijken van een document verschijnt er een waarschuwingsbalk om aan te geven dat het document een duplicaat is.

Goedkeuringsstempel
Overzicht:
Deze functie voegt automatisch een goedkeuringsstempel toe aan een document wanneer het wordt goedgekeurd in het goedkeuringsscherm. Als een document een goedkeuringsstempel bevat, wordt deze opgenomen bij het exporteren naar IDM.
Het inschakelen van de Goedkeuringsstempelfunctie
Volg deze stappen om de goedkeuringsstempelfunctie in te schakelen:
Ga naar Instellingen → Algemene Instellingen → Documenttypen.

Selecteer het Documenttype waarvoor je de stempelgoedkeuring wilt inschakelen en klik op Meer Instellingen.

Schakel onder de sectie Goedkeuring de optie Goedkeuringsstempel in.

Na Activatie:
Zodra de functie is geactiveerd, ontvangt elk document in de status "in afwachting van goedkeuring" automatisch een goedkeuringsstempel zodra het is goedgekeurd. De stempel bevat het "Approved" logo, de naam van de gebruiker die het document heeft goedgekeurd, en het tijdstip waarop het document is goedgekeurd.


PDF's downloaden met of zonder de Goedkeuringsstempel
Als een document een goedkeuringsstempel heeft, kun je ervoor kiezen om de PDF te downloaden met of zonder de goedkeuringsstempel.
Ga hiervoor naar het Dashboard.
Klik op de drie stippen in de Actie kolom.
Selecteer een van de twee beschikbare downloadopties:
Downloaden met Annotaties
Downloaden zonder Annotaties

Supplier Item Number Map - Admin Documentation
Overview
As an admin, you have the ability to view and manage the mappings between internal item numbers and supplier item numbers. This feature ensures that discrepancies between your system and your suppliers' systems are handled efficiently. You can review, edit, and delete incorrect mappings to maintain data accuracy.

Accessing the Supplier Item Number Map
Navigate to Settings:
Go to the Settings section in your admin dashboard.
Access Document Types:
Under Settings, select Document Types.
More Settings:
Click on More Settings to access additional configuration options.
Supplier Item Number Map:
In the More Settings section, you will find the Supplier Item Number Map table. This table lists all the current mappings between your internal item numbers and the corresponding supplier item numbers.
Managing Item Number Mappings
Viewing Mappings:
The table displays the following columns:
Supplier ID: The unique identifier for the supplier.
Item Number: Your internal item number for the product.
Supplier Item Number: The corresponding item number used by the supplier.
Action: Options to manage the mappings.
Deleting Incorrect Mappings:
If you identify an incorrect mapping, you can delete it by clicking the trash can icon (🗑) in the Action column.
A confirmation prompt will appear to ensure that you want to delete the mapping.
Editing Mappings:
(If applicable) You may also have the option to edit existing mappings to correct any discrepancies. This could involve clicking on the item or supplier number to make changes.
Example Workflow
Identify Discrepancies:
Regularly review the Supplier Item Number Map to identify any discrepancies or incorrect mappings.
Delete Incorrect Mappings:
For any incorrect mappings, click the trash can icon to delete them.
Re-enter Correct Mappings:
Ensure that correct mappings are entered either manually during the next transaction or by editing the existing entries if the system supports it.
Aankooporder tolerantie-instellingen / Extra aankooporder tolerantie
Instelling om Aankooporder Toleranties te configureren
Ga naar Instellingen → Algemene Instellingen → Documenttypen → Meer Instellingen → Aankooporder Sectie → PO Tolerantie Instelling
Hoe Het Werkt
Wanneer ingeschakeld, stelt deze instelling je in staat om toleranties voor Hoeveelheid en/of Eenheidsprijs te definiëren. Deze toleranties kunnen worden ingesteld als een percentage of als een vast bedrag. Dit betekent dat een factuur kan afwijken van de aankooporder (PO) binnen het opgegeven tolerantiebereik zonder als een mismatch te worden gemarkeerd, wat flexibiliteit biedt terwijl een naadloze verwerking wordt gegarandeerd.
OPMERKING: Toleranties werken in beide richtingen; dat wil zeggen, de factuurwaarde kan zowel hoger als lager zijn dan de PO-waarde binnen het toegestane bereik.
Instelling Configureren
Schakel de Instelling In:
Zet de PO Tolerantie Instelling aan met de schakelaar.
Configureer Toleranties:
Er verschijnen vier velden:
Eén veld voor het Hoeveelheid Tolerantie Bedrag.
Eén veld voor het Eenheidsprijs Tolerantie Bedrag.
Achter elk veld is er een dropdownmenu waar je het type tolerantie kunt selecteren:
Percentage: Geeft een percentage tolerantie aan.
Waarde: Geeft een vast bedrag aan waar het bedrag van kan afwijken.

Voorbeeldscenario:
Stel dat de Eenheidsprijs Tolerantie is ingesteld op 5%.
De aankooporder bevat twee regels:
Regel 1: Eenheidsprijs = $5.00
Regel 2: Eenheidsprijs = $2.00
Op de factuur:
Regel 1: De eenheidsprijs is aangepast naar $4.80 (binnen de 5% tolerantie).
Regel 2: De eenheidsprijs is aangepast naar $2.20 (buiten de 5% tolerantie).
Resultaat:
Regel 1 is niet gemarkeerd als een mismatch omdat $4.80 binnen 5% van $5.00 ligt.
Regel 2 is gemarkeerd als een mismatch omdat $2.20 de toegestane 5% afwijking van $2.00 overschrijdt. De gebruiker moet nu actie ondernemen om de mismatch op te lossen voordat de factuur verder kan worden verwerkt.

Instelling om Extra Aankooporder Tolerantie-instellingen te configureren
Ga naar Instellingen → Algemene Instellingen → Documenttypen → Meer Instellingen → Aankooporder Sectie → Extra PO Tolerantie Instelling
Hoe Het Werkt
Wanneer ingeschakeld, stelt deze instelling je in staat om toleranties voor Vracht, Kosten, en/of Belasting te definiëren. Deze toleranties kunnen worden ingesteld als een percentage of als een vast bedrag, waardoor facturen iets kunnen afwijken van de PO-waarden zonder als mismatches te worden gemarkeerd. Dit biedt extra flexibiliteit en zorgt ervoor dat kleine verschillen de workflow niet onderbreken.
OPMERKING: Net als de standaard tolerantie-instellingen, zijn deze toleranties van toepassing in beide richtingen—waardoor verhogingen of verlagingen binnen de ingestelde limieten zijn toegestaan.
Instelling Configureren
Schakel de Instelling In:
Zet de Extra PO Tolerantie Instelling aan met de schakelaar.
Configureer Toleranties:
Zes velden worden zichtbaar:
Eén veld voor de tolerantiebedragen voor Vracht, Kosten, en Belasting.
Elk veld heeft een bijbehorend dropdownmenu waar je het type tolerantie kunt kiezen:
Percentage: De tolerantie wordt gedefinieerd als een percentage.
Waarde: De tolerantie wordt gedefinieerd als een vast bedrag.

Aankooporder uitschakelen statussen
Instelling om PO statussen uit te schakelen
Ga naar Instellingen → Algemene Instellingen → Documenttypen → Meer Instellingen → Aankooporder Sectie → PO Uitschakelen Statussen
Hoe het werkt
De PO Uitschakelen Statussen instelling stelt gebruikers in staat om aankooporder (PO) statussen op te geven die voorkomen dat facturen aan die PO's worden gekoppeld. Als een aankooporder een status heeft die in deze instelling is vermeld, kan deze niet worden gebruikt voor factuurmatching in het PO-matching scherm. Dit stopt verdere verwerking van de PO totdat de status verandert naar een die niet is uitgeschakeld.
Dit stopt verdere verwerking van de factuur totdat de status van de PO verandert naar een die niet is uitgeschakeld. Door deze instelling te gebruiken, kunnen gebruikers ervoor zorgen dat aankooporders met specifieke statussen geen verdere factuurverwerking ondergaan, waardoor fouten worden verminderd en onnodige betalingen worden voorkomen.
Hoe een Uitgeschakelde Aankooporder te Identificeren
In het PO Matching scherm verschijnt een uitgeschakelde aankooporder doorstreept. Dit geeft visueel aan dat de PO momenteel niet kan worden gematcht vanwege zijn status.

Hoe het in te stellen
In de PO Uitschakelen Statussen instelling zie je een selectievak aan de linkerkant.
Door op dit vak te klikken, opent een dropdownlijst met beschikbare PO statussen.

Selecteer een of meer statussen door erop te klikken. Klik opnieuw om te deselecteren.
Klik op de Toepassen knop om je wijzigingen op te slaan.

Beschikbare Statussen
Geannuleerd
Verwijderd
Gefactureerd
Open
Gedeeltelijk Gefactureerd
Gedeeltelijk Ontvangen
Ontvangen
Niet-goedgekeurd
In Behandeling
Gesloten
PO-tabel in Layout Builder
Deze instelling regelt de toegankelijkheid van de Purchase Order (PO) tabel in de Layout Builder en het Validatiescherm.
Hoe de PO-tabel in te schakelen
Om deze functie in te schakelen:
Ga naar Instellingen → Algemene instellingen → Documenttypen → Meer instellingen → Aankoopordersectie → PO-tabel in Layout Builder.
Schakel de instelling in om de Purchase Order tabel zichtbaar te maken.

Functionaliteit:
Wanneer ingeschakeld:
De Purchase Order tabel verschijnt in de Tabelsectie in de Layout Builder.
Er wordt geen melding weergegeven dat de module is uitgeschakeld.

Wanneer uitgeschakeld:
Een hint geeft aan dat de module is uitgeschakeld.
De PO-tabel is niet zichtbaar in het Validatiescherm.

Hoe toegang te krijgen tot de Layout Builder
Navigeer naar Instellingen → Algemene instellingen → Documenttypen → Layout bewerken.

De PO-tabel terug toevoegen aan de Layout
Als de PO-tabel ontbreekt of is verwijderd, volg dan deze stappen:
Open de Layout Builder.
Onder Formulierelementen, selecteer Uitgehaalde tabellen.
Voeg de PO-tabel toe aan uw layout.

Zodra toegevoegd en ingeschakeld, zal de PO-tabel zichtbaar zijn in de Layout Builder en het Validatiescherm wanneer er een aankooporder beschikbaar is voor een factuur.

Automatische controle op PO-updates
Waar te Vinden
Ga naar Instellingen → Algemene Instellingen → Documenttypen → Meer Instellingen → Aankooporder Sectie → Automatische Controle op PO-updates Zet de knop om deze instelling in te schakelen.

Hoe Het Werkt
Wanneer ingeschakeld, biedt het systeem een visuele indicator in het Aankooporder Matching scherm telkens wanneer een aankooporder is bijgewerkt. Dit pictogram geeft aan dat de aankooporder moet worden vernieuwd om ervoor te zorgen dat gebruikers werken met de meest actuele informatie voordat ze beslissingen nemen.

Om de aankooporder te vernieuwen, klik je op het ververspictogram naast het aankoopordernummer (zie afbeelding hieronder).

Eenheidsprijs PO berekenen
Overzicht
Je kunt ervoor kiezen om de eenheidsprijs handmatig te berekenen door het nettobedrag door de hoeveelheid te delen, in plaats van deze automatisch uit het document te halen. Dit is vooral nuttig wanneer de eenheidsprijs in de bestelling (in Infor) verschilt van de prijs die uit het document is gehaald. Dergelijke discrepanties kunnen ontstaan als er een korting op de eenheidsprijs in de Infor-bestelling wordt toegepast, terwijl het document de korting alleen op het nettobedrag toepast.
Activatiestappen
Navigeer naar Instellingen -> Algemene Instellingen -> Documenttypen.
Selecteer het gewenste documenttype en klik op Meer Instellingen.
In de sectie Bestelling, schakel de optie Eenheidsprijs PO berekenen in.

Voorbeeld:

In dit geval wordt de eenheidsprijs (zonder de korting) uit het document gehaald, terwijl de bestelling in Infor de eenheidsprijs met de toegepaste korting opslaat. Dit resulteert in een mismatch in de eenheidsprijs.
Zodra de instelling is geactiveerd, wordt de eenheidsprijs als volgt herberekend: Eenheidsprijs = Nettobedrag ÷ Hoeveelheid Dit zorgt ervoor dat de eenheidsprijs consistent is en overeenkomt met de bedoelde waarde.
Export niet gematchte PO-regels
Waar te Vinden
Ga naar Instellingen → Algemene Instellingen → Documenttypen → Meer Instellingen → Aankooporder Sectie → Export Niet Gematchte PO-regels. Schakel de knop in om deze instelling in te schakelen.

Hoe Het Werkt
Wanneer uitgeschakeld, exporteert het systeem alleen aankooporderregels die zijn gematcht met een orderbevestigingsregel. Ongematchte aankooporderregels worden niet opgenomen in de export.
Wanneer ingeschakeld, exporteert het systeem alle aankooporderregels, zelfs als ze niet zijn gematcht met een orderbevestigingsregel.
Bijvoorbeeld, als een aankooporder drie regels heeft, maar de leverancier een orderbevestiging met slechts één regel stuurt, match je die regel met een aankooporderregel. De overige twee ongematchte aankooporderregels zullen zijn:
Uitsluitend van de export als de instelling is uitgeschakeld.
Inbegrepen in de export als de instelling is ingeschakeld.