Loading...
Loading...
Loading...
Loading...
Loading...
Loading...
Loading...
Loading...
Loading...
Loading...
Loading...
Loading...
Loading...
Loading...
Loading...
Loading...
Loading...
Loading...
Loading...
Loading...
Loading...
Loading...
Loading...
Loading...
Loading...
Loading...
Loading...
Loading...
Loading...
Loading...
Loading...
Loading...
Loading...
Loading...
Loading...
Loading...
Loading...
These tests are designed to ensure that our file import system works correctly. We specifically test the import of PDF and TIFF files into the system, ensuring that they are processed and stored successfully.
Setup:
Before each test, we log a setup message.
Cleanup: After each test, we clean up by deleting any documents created by the test user from the database to ensure no leftover data affects subsequent tests.
Import PDF File:
Test Import PDF (test_import_pdf):
Import a PDF file (FellowBananaInvoice.pdf) into the system.
Expected Outcome: The file should be imported successfully, returning a document ID.
Import TIFF File:
Test Import TIFF (test_import_tiff):
Import a TIFF file (TIFF_FILE.TIF) into the system.
Expected Outcome: The file should be imported successfully, returning a document ID.
Setup and Cleanup:
Logging: A setup and cleanup message is logged for each test.
Database Cleanup (clean_documents): Deletes any documents created by the test user from the database to maintain a clean state.
File Import Tests:
Import PDF File:
Load User: Load the test user.
File Path: Specify the path to the PDF file (tests/files/pdfs/FellowBananaInvoice.pdf).
Import File: Use the FileImporter class to import the PDF file.
Check Response: Ensure the response is a list containing a success message and a document ID.
Import TIFF File:
Load User: Load the test user.
File Path: Specify the path to the TIFF file (tests/files/pdfs/TIFF_FILE.TIF).
Import File: Use the FileImporter class to import the TIFF file.
Check Response: Ensure the response is a list containing a success message and a document ID.
Logger: Used to log debug messages during setup, cleanup, and test execution.
Database Helper: Executes queries without returning results for cleanup.
File Importer: Handles the import of files into the system.
Fixtures: set_up fixture to manage setup and cleanup for tests.
Tests:
test_import_pdf: Tests importing a PDF file.
test_import_tiff: Tests importing a TIFF file.
These tests ensure that our file import functionality works as expected for both PDF and TIFF files. By following this approach, we verify that files are imported correctly and that the system can handle different file types without issues.
These tests ensure that our email import system works correctly. The main goals are to:
Send emails with attachments.
Receive and move emails to specific folders.
Check if emails are read or unread.
Import emails into our system.
Clean up by deleting emails and imported documents afterward.
Setup:
Get Environment Settings: Load the email server details and credentials from environment variables.
Encrypt Email Password: Securely encrypt the email password.
Send and Manage Emails:
Send Emails: Use an SMTP function to send emails with specific subjects and attachments.
Move Emails: Use IMAP functions to move emails to the target folder.
List Folders: Check if the target folder exists.
Delete Emails: Clean up emails by deleting them from folders.
Check Email Status: Verify if emails are marked as unread or read.
Test Sequence
Initial Setup:
Check Connection: Verify connection to the email server and get the connection ID.
Login Test: Confirm that logging in with stored credentials works.
Folder Check: Ensure the target folder exists on the email server.
Email Operations:
Send Test Emails: Send three emails with unique subjects.
Retrieve Email IDs: Get the IDs of the sent emails from the inbox.
Move Emails: Move these emails from the inbox to the target folder.
Check Email Status: Ensure the emails in the target folder are marked as unread.
Email Importing:
Fetch Emails: Import emails from the target folder into our system.
Check Imported Emails: Ensure the imported emails are correctly fetched and logged.
Log Verification:
Check Import Logs: Verify that the subjects of the sent emails are recorded in the import logs.
Cleanup:
Delete Imported Documents: Remove the documents that were imported from the emails.
Delete Emails: Clean up by deleting the sent and moved emails from the folders.
Setup and Initialization:
Initialize Shared Data: Prepare shared data for tests.
Email Connection Tests:
Get Connection ID: Check if we can connect to the email server and get an ID for the connection.
Login Verification: Ensure that logging in to the email server works properly.
Folder Verification Tests:
Check Target Folder: Make sure the target folder exists on the email server.
Verify Folder Listing: Ensure the list of folders from the server matches our expectations.
Email Sending and ID Retrieval:
Send Emails: Send three test emails with specific subjects and attachments.
Get Email IDs: Retrieve the unique IDs of these sent emails from the inbox.
Email Moving and Status Checking:
Move Emails to Folder: Move the test emails from the inbox to the target folder.
Check Unread Status: Ensure the emails are marked as unread after moving.
Email Fetching and Response Validation:
Fetch Emails from Folder: Import the emails from the target folder into our system.
Validate Fetched Emails: Confirm that the fetched emails match the sent emails.
Import Log Verification:
Fetch Import Log: Retrieve the log of imported emails.
Check Email Subjects in Log: Ensure the subjects of the test emails are present in the import log.
Cleanup:
Delete Imported Documents: Remove the documents that were imported from the emails.
Delete Emails: Delete the test emails from the inbox and the target folder to keep everything clean.
\
These tests ensure that our system can handle email importing correctly. This includes sending emails, receiving and moving them to specific folders, checking if they are read or unread, importing them into the system, and performing cleanup afterward.
Setup:
Get Environment Settings: Load necessary details like email server information and credentials from environment variables.
Encrypt Email Password: Securely encrypt the email password for safe usage.
Email Sending and Management:
Send an Email: Use an SMTP function to send an email with a specific subject and attachment.
Move the Email: Use IMAP functions to move the email to a target folder.
List Folders: Ensure the target folder exists.
Delete the Email: Clean up by deleting the email from the folder.
Check Email Status: Verify if the email is marked as read or unread.
Test Sequence
Initial Setup:
Check Connection: Verify connection to the email server and get the connection ID.
Login Test: Confirm that logging in with stored credentials works.
Folder Check: Ensure the target folder exists on the email server.
Email Operations:
Send a Test Email: Send an email with a specific subject.
Retrieve Email ID: Get the ID of the sent email from the inbox.
Move the Email: Move the email from the inbox to the target folder.
Check Email Status: Ensure the email in the target folder is marked as unread.
Email Importing:
Fetch the Email: Import the email from the target folder into our system.
Check Imported Email: Ensure the imported email is correctly fetched and logged.
Log Verification:
Check Import Log: Verify that the subject of the sent email is recorded in the import log.
Cleanup:
Delete Imported Document: Remove the document that was imported from the email.
Delete the Email: Delete the sent and moved email from the folders to keep everything clean.
Setup and Initialization:
Initialize Shared Data: Prepare shared data for tests.
Email Connection Tests:
Get Connection ID: Check if we can connect to the email server and get an ID for the connection.
Login Verification: Ensure that logging in to the email server works properly.
Folder Verification Tests:
Check Target Folder: Make sure the target folder exists on the email server.
Verify Folder Listing: Ensure the list of folders from the server matches our expectations.
Email Sending and ID Retrieval:
Send an Email: Send a test email with a specific subject and attachment.
Get Email ID: Retrieve the unique ID of this sent email from the inbox.
Email Moving and Status Checking:
Move Email to Folder: Move the test email from the inbox to the target folder.
Check Unread Status: Ensure the email is marked as unread after moving.
Email Fetching and Response Validation:
Fetch Email from Folder: Import the email from the target folder into our system.
Validate Fetched Email: Confirm that the fetched email is present in the response.
Import Log Verification:
Fetch Import Log: Retrieve the log of imported emails.
Check Email Subject in Log: Ensure the subject of the test email is present in the import log.
Cleanup:
Delete Imported Document: Remove the document that was imported from the email.
Delete the Email: Delete the test email from the inbox and the target folder to keep everything clean.
\
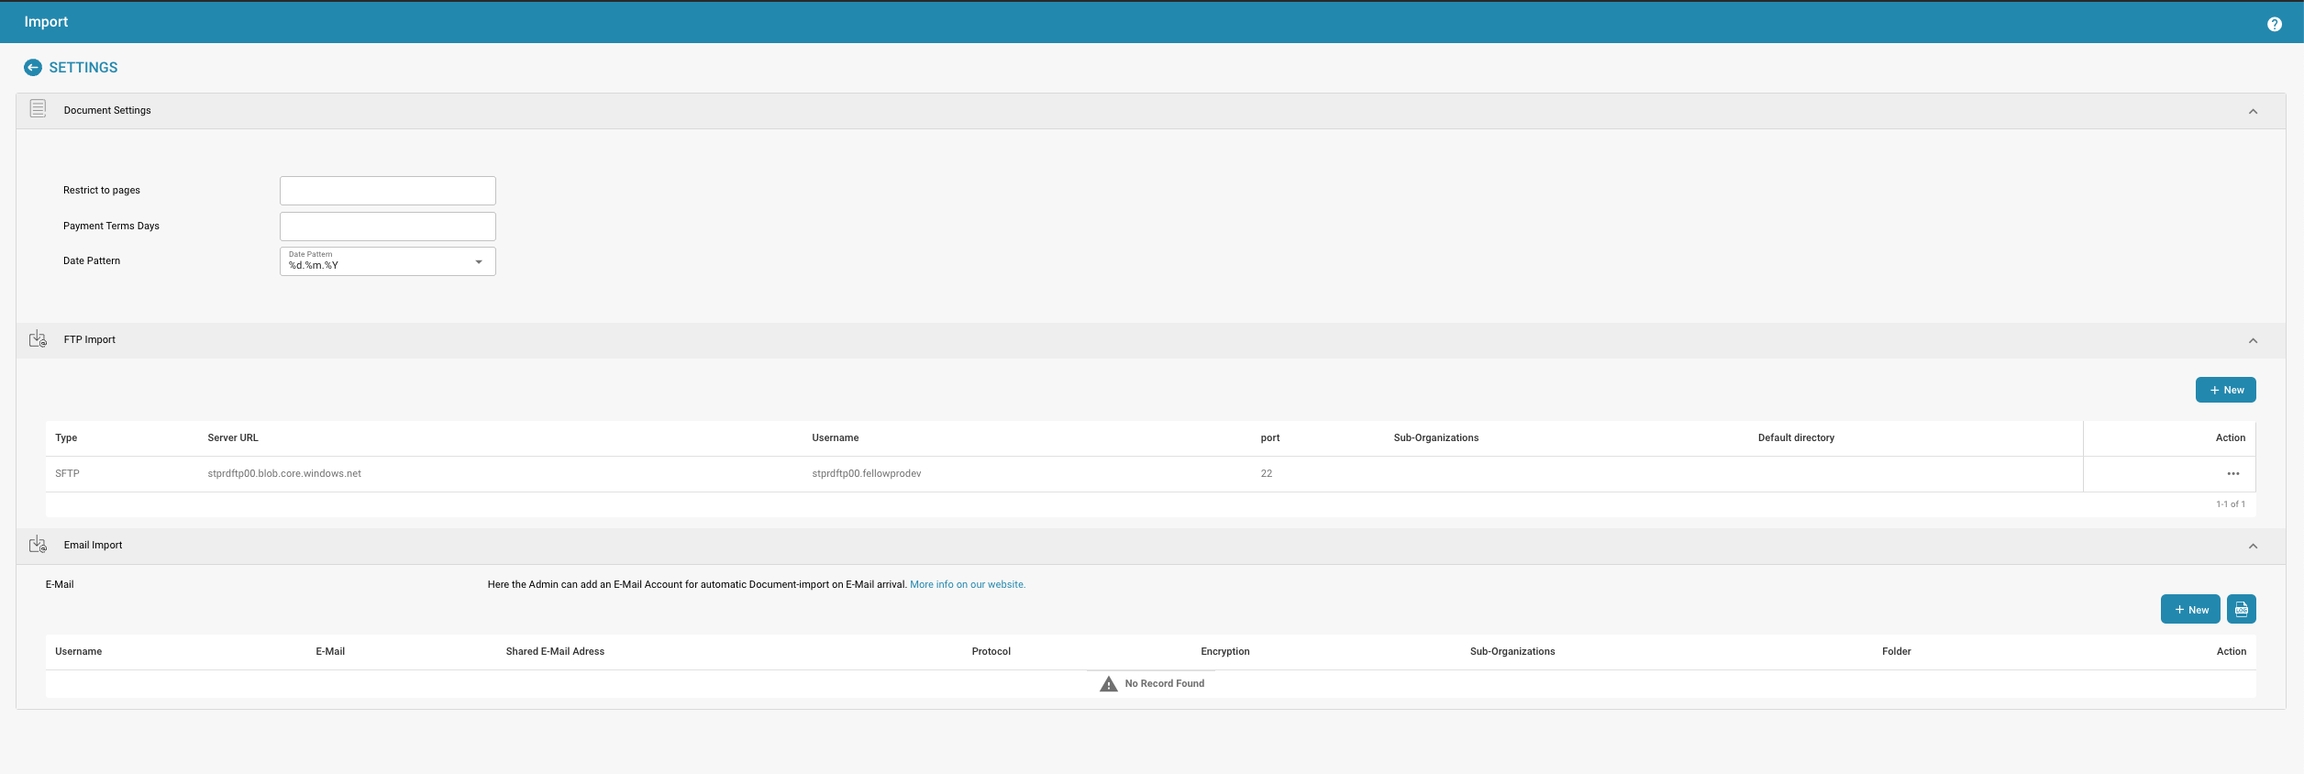
De "Importeren" instellingen in uw documentverwerkingssysteem stellen u in staat om te configureren hoe documenten uit verschillende bronnen in het systeem worden geïmporteerd, inclusief instellingen voor zowel FTP (File Transfer Protocol) als e-mail. Hier is een overzicht van deze instellingen:
Documentinstellingen:
Beperk tot pagina's: Hiermee kunt u de verwerking beperken tot een bepaald aantal pagina's van elk document.
Betalingsvoorwaarden Dagen: Definieert de standaard betalingsvoorwaarden (in dagen) die op documenten kunnen worden toegepast.
Datumpatroon: Stelt het patroon in voor hoe data herkend en geformatteerd moeten worden binnen geïmporteerde documenten.
FTP Import:
Type: Definieert het type FTP-protocol dat gebruikt moet worden (bijv. SFTP).
Server URL: Het serveradres waar documenten van worden opgehaald.
Gebruikersnaam en Poort: Inloggegevens en poortnummer voor toegang tot de FTP-server.
Standaardmap: Geeft de map op de FTP-server aan waar bestanden zullen worden geïmporteerd.
De extra optie om nieuwe gegevens toe te voegen omvat velden zoals:
Wachtwoord: Voor authenticatie.
Bestandsnaam overeenkomende patronen: Om aan te geven welke bestanden moeten worden geïmporteerd op basis van hun namen.
Sub-organisaties: Selecteer op welke sub-organisatie de importinstellingen van toepassing moeten zijn.
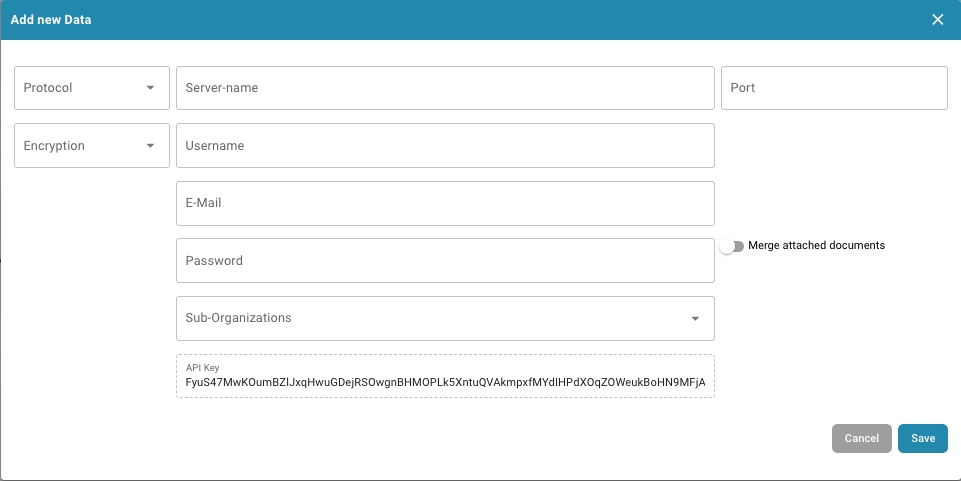
E-mail Import:
E-mailadres: Stel een e-mailaccount in waar documenten naartoe kunnen worden gestuurd voor import.
Gebruikersnaam en Wachtwoord: Inloggegevens voor toegang tot het e-mailaccount.
Protocol en Versleuteling: Geef het protocol (IMAP, POP3) en het type versleuteling op.
Samensmelten van bijgevoegde documenten: Optie om alle bijgevoegde documenten samen te voegen tot één document bij import.
Dit stelt ook in staat om sub-organisaties op te geven voor meer nauwkeurige controle over waar e-mails binnen uw organisatiestructuur naartoe worden gestuurd.
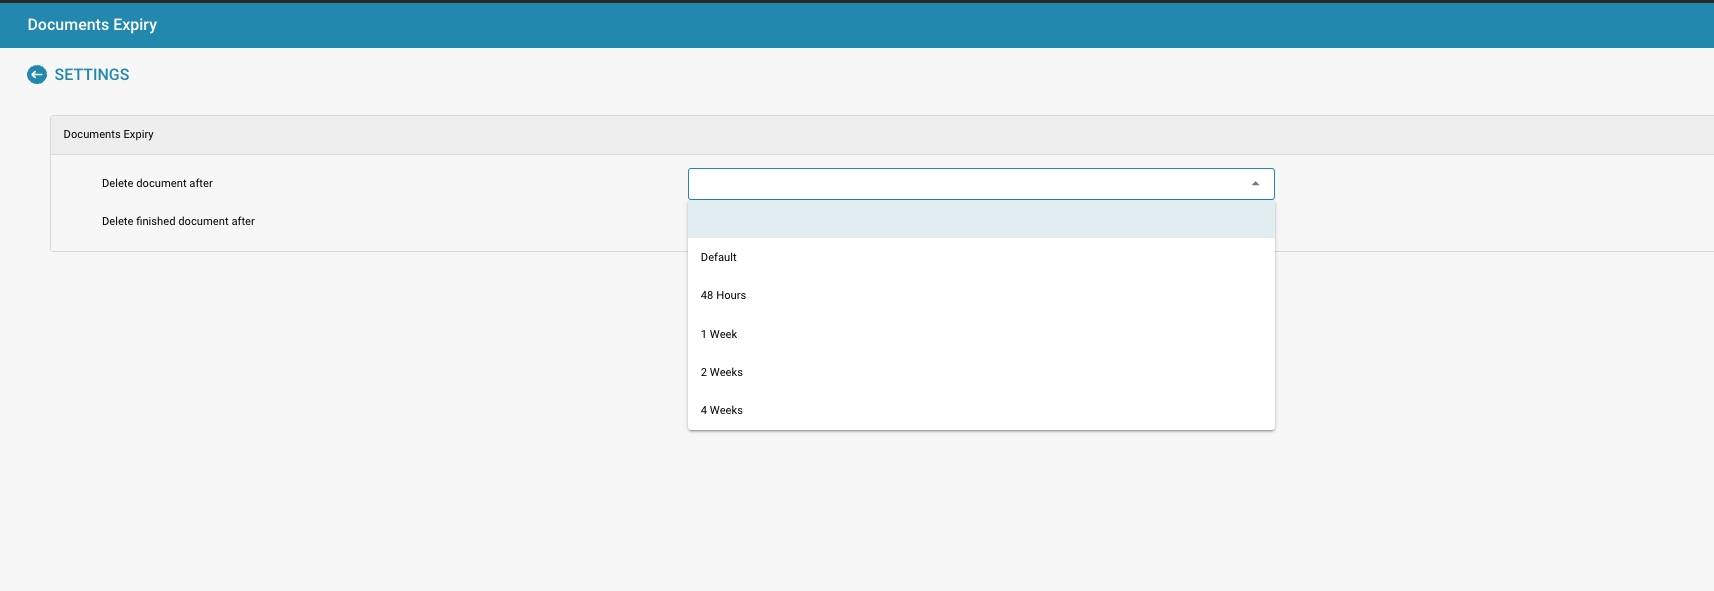
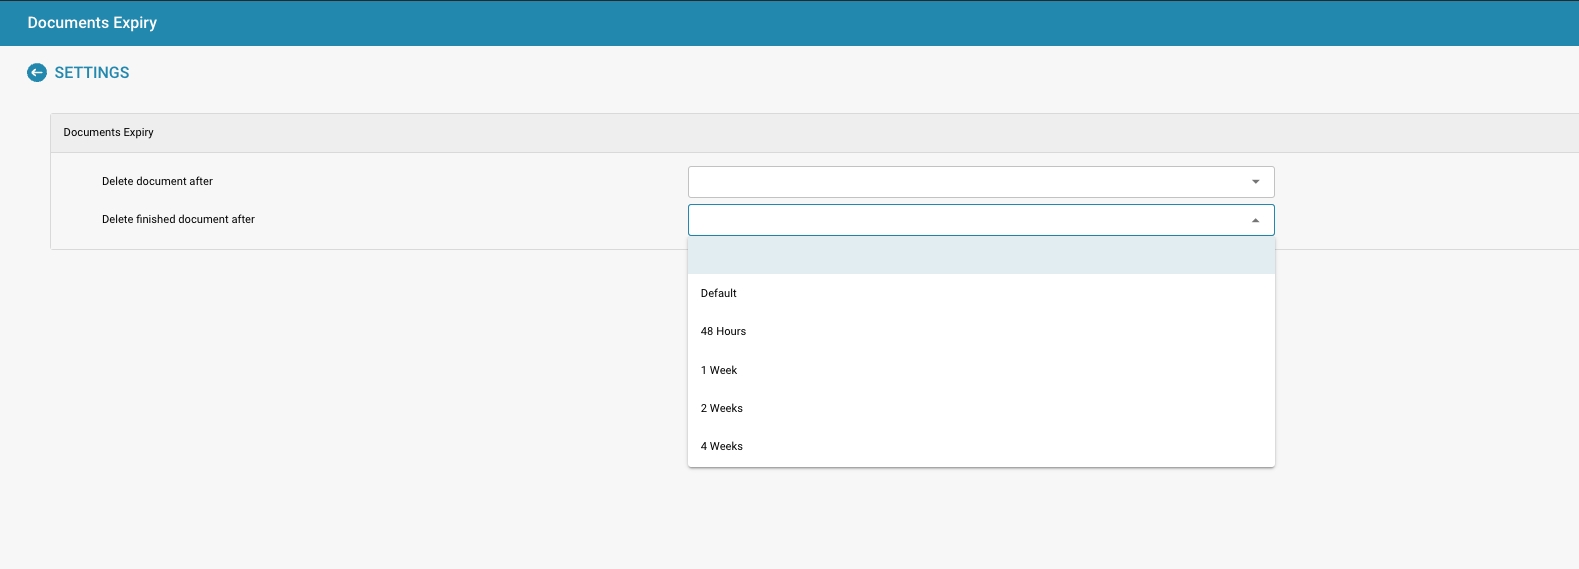
In the "Documents Expiry" setting under the "DOCUMENT PROCESSING" section, you can configure the automatic deletion schedules for your documents within the system. This feature is particularly useful for managing data retention policies and ensuring compliance with legal or organizational standards regarding document storage.
Here’s what each setting does:
Delete document after: This dropdown allows you to set the time frame after which a document that has been processed will be automatically deleted from the system. You can choose from predefined options like 48 Hours, 1 Week, 2 Weeks, or 4 Weeks. This helps in managing space and maintaining document lifecycle policies.
Delete finished document after: Similar to the previous setting, but specifically targets the finished or fully processed documents. It allows the same time frame options for deletion, ensuring that completed documents are not stored longer than necessary.
Both settings ensure that documents are not kept indefinitely on your system, helping to avoid unnecessary storage use and keeping the document processing workflow clutter-free. These settings are vital for organizations needing to adhere to specific regulatory requirements about document retention.
These tests ensure that our FTP import system works correctly. We verify that we can add a new FTP import connection, test the connection, activate/deactivate it, and clean it up afterward.
Setup:
Environment Variables: Load necessary details like FTP server information and credentials from environment variables.
FTP Connection Tests:
Add New Connection:
Test Add New FTP Import Connection (test_add_new_ftp_import_connection):
Add a new FTP import connection with the given credentials and server details.
Expected Outcome: The connection should be added successfully.
Deactivate Connection:
Test Deactivate FTP Import Connection (test_deactivate_ftp_import_connection):
Deactivate the newly added FTP import connection.
Expected Outcome: The connection should be deactivated successfully.
Test Connection:
Test FTP Connection (test_test_ftp_connection):
Test if the FTP import connection can successfully connect to the FTP server.
Expected Outcome: The connection should be tested successfully.
Check Connection in List:
Test Check FTP Connection in List (test_check_ftp_connection_in_list):
Check if the newly added FTP import connection is present in the list of connections.
Expected Outcome: The connection should be found in the list.
Check Connection Deactivated:
Test Check FTP Connection Deactivated (test_check_ftp_connection_deactivated):
Verify that the FTP import connection is marked as inactive in the list.
Expected Outcome: The connection should be inactive.
Add Test Folder:
Test Add Test Folder to Connection (test_add_test_folder_to_connection):
Add a default directory (test folder) to the FTP import connection.
Expected Outcome: The default directory should be added successfully.
Reactivate Connection:
Test Reactivate FTP Import Connection (test_reactivate_ftp_import_connection):
Reactivate the previously deactivated FTP import connection.
Expected Outcome: The connection should be reactivated successfully.
Check Connection Reactivated:
Test Check FTP Connection Reactivated (test_check_ftp_connection_reactivated):
Verify that the FTP import connection is marked as active in the list.
Expected Outcome: The connection should be active.
Cleanup:
Test Cleanup FTP Import (test_cleanup_ftp_import):
Delete the FTP import connection to clean up after the tests.
Expected Outcome: The connection should be deleted successfully.
Setup and Initialization:
Initialize Shared Data: Prepare shared data for tests.
FTP Connection Tests:
Add New Connection: Add a new FTP import connection with the provided credentials and server details.
Deactivate Connection: Deactivate the newly added FTP import connection.
Test Connection: Test if the FTP import connection can successfully connect to the FTP server.
Check Connection in List: Verify that the new FTP import connection is present in the list of connections.
Check Connection Deactivated: Confirm that the FTP import connection is marked as inactive in the list.
Add Test Folder: Add a default directory (test folder) to the FTP import connection.
Reactivate Connection: Reactivate the previously deactivated FTP import connection.
Check Connection Reactivated: Ensure that the FTP import connection is marked as active in the list.
Cleanup: Delete the FTP import connection to clean up after the tests.
\
The header charge per unit is outside tolerance but has been approved.
The system processes the approved charge per unit, applying it to the transaction.
Purchase Order (PO):
Header Charge Per Unit: $2.50
Quantity: 2,000 units
Total Header Charge Amount: $5,000.00
Invoice Received:
Header Charge Per Unit: $3.00 (outside tolerance of 20%, approved)
Quantity: 2,000 units
Total Header Charge Amount: $6,000.00
Tolerance Levels:
Header Charge Per Unit Tolerance: ±5%
Since the header charge per unit ($3.00) exceeds the acceptable tolerance range of 5% but has been approved, the system will:
Accept the Approved Header Charge Per Unit: The system accepts the invoiced header charge per unit of $3.00 as it has been approved despite exceeding the tolerance limit.
Process the Header Charge: The system processes the invoice using the approved charge per unit and the quantity:
Total Header Charge Amount = Quantity × Approved Header Charge Per Unit
Total Header Charge Amount = 2,000 units × $3.00 = $6,000.00
Finalize the Invoice: The system processes the transaction with the approved charges, reflecting the total amount of $6,000.00.
This approach allows the system to accommodate approved variances in header charges, ensuring that the transaction is processed according to the approval while maintaining accurate financial records.
Both the quantity and unit price on the invoice are within an acceptable tolerance range compared to the purchase order.
The system accepts the invoice values and calculates the total amount based on the provided quantity and unit price.
Purchase Order (PO):
Quantity: 100 units
Unit Price: $10.00 per unit
Total Amount: $1,000.00
Invoice Received:
Quantity: 101 units (within tolerance of 1%)
Unit Price: $10.05 per unit (within tolerance of 0.5%)
Total Amount: $1,015.05
Tolerance Levels:
Quantity Tolerance: ±2%
Unit Price Tolerance: ±1%
Since the quantity (101 units) and unit price ($10.05) are both within the acceptable tolerance levels compared to the purchase order, the system will:
1. Accept the Invoice Values: The quantity and unit price on the invoice are accepted as valid because they fall within the defined tolerance limits.
2. Calculate the Total Amount: The total amount is calculated using the accepted values:
• Total Amount = Quantity × Unit Price
• Total Amount = 101 units × $10.05 per unit = $1,015.05
3. Process the Invoice: The invoice is processed with the total amount of $1,015.05, and the financial records are updated accordingly.
This approach ensures that minor discrepancies that fall within acceptable tolerance levels do not lead to invoice rejections or delays in payment, thus streamlining the financial process.
The quantity on the invoice is within tolerance, but the unit price is outside the acceptable tolerance range. However, this variance in the unit price has been reviewed and approved by the appropriate authorities.
The system adjusts the unit price to match the purchase order and applies any necessary line charges to account for the difference.
Purchase Order (PO):
Quantity: 100 units
Unit Price: $10.00 per unit
Total Amount: $1,000.00
Invoice Received:
Quantity: 100 units (within tolerance)
Unit Price: $11.00 per unit (outside tolerance of ±5%)
Total Amount: $1,100.00
Tolerance Levels:
Quantity Tolerance: ±2%
Unit Price Tolerance: ±5% (expected range: $9.50 to $10.50)
Approval:
• The $11.00 unit price is outside the tolerance range but has been manually approved by the appropriate department.
Since the quantity is within tolerance but the unit price is outside tolerance (yet approved), the system will:
1. Adjust the Unit Price: The system adjusts the unit price back to the PO’s unit price because the variance was approved:
• Adjusted Unit Price = $10.00 per unit
• Adjusted Total Amount = 100 units × $10.00 per unit = $1,000.00
2. Apply a Line Charge for the Difference: Since the approved unit price of $11.00 is higher than the PO unit price of $10.00, the system applies a line charge to account for this difference:
• Line Charge Amount = (Approved Invoice Unit Price - PO Unit Price) × Quantity
• Line Charge Amount = ($11.00 - $10.00) × 100 units = $100.00
3. Process the Invoice: The system processes the invoice with:
• Base Amount: $1,000.00
• Line Charge: $100.00
• Total Processed Amount: $1,100.00
This ensures that while the base PO values are maintained for consistency, the approved variance in the unit price is accounted for through an additional line charge, resulting in accurate financial processing and record-keeping.
TransactionConfig Pro Template is a powerful configuration tool designed for enterprise environments to manage the processing of financial documents, such as invoices, debit notes, and credit notes. The tool provides detailed mapping and field definitions that allow businesses to automate and customize their financial workflows with precision. Integrating seamlessly with existing Infor ERP systems, TransactionConfig Pro Template ensures accurate handling of complex transactions while maintaining compliance with global financial standards.
• Detailed Mapping: Allows for precise mapping of fields across various transaction types, ensuring data consistency and accuracy.
• Customization: Supports customization of financial document workflows to meet specific business needs.
• Automation: Automates the handling of financial transactions, reducing manual errors and increasing efficiency.
• Integration: Easily integrates with existing Infor M3/LN ERP systems, enhancing the overall financial processing capabilities of the organization.
• Compliance: Ensures compliance with international financial standards and regulations, helping businesses manage global transactions effectively.
TransactionConfig Pro Template includes a series of predefined rules to handle common discrepancies between invoice data and purchase order (PO) data. These rules are designed to automate decision-making when variances occur, ensuring consistency and accuracy in financial processing.
Scenario: Both the quantity and unit price on the invoice are within an acceptable tolerance range compared to the purchase order.
• Action: The system accepts the invoice values and calculates the total amount based on the provided quantity and unit price.
Scenario: The quantity on the invoice is within tolerance, but the unit price is outside tolerance, and this variance has been approved.
• Action: The system adjusts the unit price to match the purchase order and applies any necessary line charges to account for the difference.
Scenario: The quantity is within tolerance, but the unit price is below the acceptable range (negative tolerance) and is not approved.
• Action: The system rejects the unit price, adjusts it to match the purchase order, and generates a credit note for the difference. Additional header charges may be applied as necessary.
Scenario: The quantity is within tolerance, but the unit price exceeds the acceptable range (positive tolerance) and is not approved.
• Action: The system rejects the invoice unit price, adjusts it to match the purchase order, and may generate a debit note to account for the overcharged amount.
Scenario: The quantity on the invoice is outside the acceptable tolerance but has been approved, while the unit price remains within tolerance.
• Action: The system accepts the approved quantity and the unit price as per the invoice and processes the transaction accordingly.
Scenario: The quantity on the invoice exceeds the acceptable range (positive) and is rejected, but the unit price is within tolerance.
• Action: The system adjusts the quantity to the approved level, maintaining the unit price, and processes the transaction. Any excess quantity is rejected and not invoiced.
Scenario: The quantity is below the acceptable range (negative tolerance) and is not approved, though the unit price is within tolerance.
• Action: The system adjusts the quantity to match the approved level, keeping the unit price consistent. The transaction is processed accordingly.
Scenario: Both the quantity and unit price are outside the tolerance range but have been approved.
• Action: The system processes the transaction using the invoice values for both quantity and unit price, applying any necessary adjustments or line charges.
Scenario: Both the quantity and unit price are outside tolerance, and neither has been approved.
• Action: The system rejects the invoice data, adjusts the values to match the purchase order, and generates necessary debit or credit notes.
Scenario: The quantity exceeds the acceptable range (positive) and is rejected, and the unit price is also outside tolerance and rejected.
• Action: The system adjusts the quantity and unit price to match the approved levels from the purchase order, rejecting any excesses, and processes the transaction.
Scenario: The charge per unit on the invoice is within the acceptable tolerance range compared to the purchase order.
• Action: The system accepts the charge per unit as invoiced and processes the transaction without adjustments.
Scenario: The charge per unit is outside tolerance but has been approved.
• Action: The system accepts the charge per unit and applies the approved charges, processing the transaction accordingly.
Scenario: The charge per unit is outside tolerance and has not been approved.
• Action: The system adjusts the charge per unit to match the purchase order or approved levels, generating any necessary debit or credit notes.
Scenario: The header charge per unit is within the acceptable tolerance range compared to the purchase order.
• Action: The system processes the header charge as invoiced, applying it without adjustments.
Scenario: The header charge per unit is outside tolerance but has been approved.
• Action: The system processes the approved charge per unit, applying it to the transaction.
Scenario: The header charge per unit is outside tolerance and has not been approved.
• Action: The system adjusts the header charge to match the purchase order, processing the transaction accordingly, and generating any necessary notes.
Scenario: Handles discrepancies in tax amounts between the invoice and purchase order.
• Action: The system adjusts the tax lines according to the approved tax rates and amounts, ensuring compliance with applicable tax regulations.
The header charge per unit is outside tolerance and has not been approved.
The system adjusts the header charge to match the purchase order, processing the transaction accordingly, and generating any necessary notes.
Purchase Order (PO):
Header Charge Per Unit: $4.00
Quantity: 1,500 units
Total Header Charge Amount: $6,000.00
Invoice Received:
Header Charge Per Unit: $5.00 (outside tolerance of 25%, rejected)
Quantity: 1,500 units
Total Header Charge Amount: $7,500.00
Tolerance Levels:
Header Charge Per Unit Tolerance: ±5%
Since the header charge per unit ($5.00) exceeds the acceptable tolerance range of 5% and has not been approved, the system will:
Reject the Invoiced Header Charge Per Unit: The system does not accept the invoiced header charge per unit of $5.00 due to the variance exceeding the tolerance limit.
Adjust the Header Charge Per Unit: The system adjusts the charge per unit to match the original purchase order or the approved charge per unit:
Adjusted Header Charge Per Unit = $4.00 (from PO)
Recalculate the Total Header Charge Amount: The system recalculates the total charge amount based on the adjusted charge per unit:
Corrected Total Header Charge Amount = Quantity × Adjusted Header Charge Per Unit
Corrected Total Header Charge Amount = 1,500 units × $4.00 = $6,000.00
Generate a Credit Note: Since the original invoice total was higher than the corrected total, the system generates a credit note for the overcharged amount:
Credit Note Amount = Original Invoice Total - Corrected Total Header Charge Amount
Credit Note Amount = $7,500.00 - $6,000.00 = $1,500.00
Process the Invoice: The system processes the invoice with the corrected total charge amount of $6,000.00 and issues a credit note for $1,500.00 to account for the overcharged amount.
This approach ensures that the transaction is aligned with the original terms of the purchase order, maintaining accurate financial processing while correcting any overcharges.
The header charge per unit is within the acceptable tolerance range compared to the purchase order.
The system processes the header charge as invoiced, applying it without adjustments.
Purchase Order (PO):
Header Charge Per Unit: $3.50
Quantity: 1,200 units
Total Header Charge Amount: $4,200.00
Invoice Received:
Header Charge Per Unit: $3.55 (within tolerance of 1.43%)
Quantity: 1,200 units
Total Header Charge Amount: $4,260.00
Tolerance Levels:
Header Charge Per Unit Tolerance: ±2%
Since the header charge per unit ($3.55) is within the acceptable tolerance range of 2% compared to the purchase order, the system will:
Accept the Header Charge Per Unit: The system accepts the invoiced header charge per unit of $3.55 as it falls within the defined tolerance limit.
Process the Header Charge: The system processes the invoice with the total header charge amount based on the invoiced charge per unit and quantity:
Total Header Charge Amount = Quantity × Header Charge Per Unit
Total Header Charge Amount = 1,200 units × $3.55 = $4,260.00
Finalize the Invoice: The system processes the transaction without any adjustments, accepting the invoice as it is.
This approach ensures smooth and efficient processing of transactions when the header charges fall within the acceptable tolerance range, avoiding unnecessary rejections or delays.
Both the quantity and unit price are outside tolerance, and neither has been approved.
The system rejects the invoice data, adjusts the values to match the purchase order, and generates necessary debit or credit notes.
Purchase Order (PO):
Quantity: 150 units
Unit Price: $30.00 per unit
Total Amount: $4,500.00
Invoice Received:
Quantity: 140 units (outside tolerance of -6.67%, rejected)
Unit Price: $33.00 per unit (outside tolerance of 10%, rejected)
Total Amount: $4,620.00
Tolerance Levels:
Quantity Tolerance: ±5%
Unit Price Tolerance: ±2%
Since both the quantity (140 units) and unit price ($33.00) are outside the acceptable tolerance limits and neither has been approved, the system will:
Reject the Invoice Data: The system does not accept the invoiced quantity or unit price due to their deviation from the tolerance limits.
Adjust the Quantity: The system adjusts the quantity to match the original purchase order quantity.
Adjusted Quantity = 150 units (from PO)
Adjust the Unit Price: The system adjusts the unit price to match the original purchase order unit price.
Adjusted Unit Price = $30.00 per unit (from PO)
Recalculate the Total Amount: The system recalculates the total amount using the adjusted quantity and unit price:
Corrected Total Amount = Adjusted Quantity × Adjusted Unit Price
Corrected Total Amount = 150 units × $30.00 per unit = $4,500.00
Generate a Debit Note: Since the original invoice total was higher than the corrected total, the system generates a debit note for the overcharged amount.
Debit Note Amount = Original Invoice Total - Corrected Total Amount
Debit Note Amount = $4,620.00 - $4,500.00 = $120.00
Process the Invoice: The system processes the invoice with the corrected total amount of $4,500.00 and issues a debit note for $120.00 to offset the overcharged amount.
This approach ensures that the financial transaction is corrected to match the purchase order terms, maintaining accurate and fair billing practices.
The charge per unit on the invoice is within the acceptable tolerance range compared to the purchase order.
The system accepts the charge per unit as invoiced and processes the transaction without adjustments.
Purchase Order (PO):
Charge Per Unit: $5.00
Quantity: 500 units
Total Charge Amount: $2,500.00
Invoice Received:
Charge Per Unit: $5.10 (within tolerance of 2%)
Quantity: 500 units
Total Charge Amount: $2,550.00
Tolerance Levels:
Charge Per Unit Tolerance: ±3%
Since the charge per unit ($5.10) is within the acceptable tolerance range of 3% compared to the purchase order, the system will:
Accept the Charge Per Unit: The system accepts the invoiced charge per unit of $5.10 as it falls within the defined tolerance limit.
Process the Transaction: The system processes the invoice with the total charge amount based on the invoiced charge per unit and quantity:
Total Charge Amount = Quantity × Charge Per Unit
Total Charge Amount = 500 units × $5.10 = $2,550.00
Finalize the Invoice: The system processes the transaction without any adjustments, accepting the invoice as it is.
This approach allows the system to accommodate minor acceptable variances in charges, ensuring smooth and efficient processing of transactions without unnecessary rejections or delays.
The quantity exceeds the acceptable range (positive) and is rejected, and the unit price is also outside tolerance and rejected.
The system adjusts the quantity and unit price to match the approved levels from the purchase order, rejecting any excesses, and processes the transaction.
Purchase Order (PO):
Quantity: 200 units
Unit Price: $50.00 per unit
Total Amount: $10,000.00
Invoice Received:
Quantity: 220 units (outside tolerance of 10%, rejected)
Unit Price: $55.00 per unit (outside tolerance of 10%, rejected)
Total Amount: $12,100.00
Tolerance Levels:
Quantity Tolerance: ±5%
Unit Price Tolerance: ±2%
Since both the quantity (220 units) and unit price ($55.00) exceed the acceptable tolerance limits and neither has been approved, the system will:
Reject the Excess Quantity: The system does not accept the invoiced quantity of 220 units and adjusts it to match the original purchase order.
Adjusted Quantity = 200 units (from PO)
Reject the Invoice Unit Price: The system does not accept the invoiced unit price of $55.00 and adjusts it to match the original purchase order.
Adjusted Unit Price = $50.00 per unit (from PO)
Recalculate the Total Amount: The system calculates the total amount using the adjusted quantity and unit price:
Corrected Total Amount = Adjusted Quantity × Adjusted Unit Price
Corrected Total Amount = 200 units × $50.00 per unit = $10,000.00
Process the Invoice: The system processes the invoice with the corrected total amount of $10,000.00, rejecting the excess quantity and higher unit price.
This approach ensures that the transaction aligns with the original terms of the purchase order, maintaining consistent pricing and quantity controls while rejecting unapproved variances.
The charge per unit is outside tolerance but has been approved.
The system accepts the charge per unit and applies the approved charges, processing the transaction accordingly.
Purchase Order (PO):
Charge Per Unit: $4.50
Quantity: 1,000 units
Total Charge Amount: $4,500.00
Invoice Received:
Charge Per Unit: $5.00 (outside tolerance of 11.11%, approved)
Quantity: 1,000 units
Total Charge Amount: $5,000.00
Tolerance Levels:
Charge Per Unit Tolerance: ±5%
Since the charge per unit ($5.00) is outside the acceptable tolerance range of 5% but has been approved, the system will:
Accept the Approved Charge Per Unit: The system accepts the invoiced charge per unit of $5.00 as it has been approved despite exceeding the tolerance limit.
Process the Transaction: The system processes the invoice using the approved charge per unit and the quantity:
Total Charge Amount = Quantity × Approved Charge Per Unit
Total Charge Amount = 1,000 units × $5.00 = $5,000.00
Finalize the Invoice: The system processes the transaction with the approved charges, reflecting the total amount of $5,000.00.
This approach ensures that the system can accommodate approved variances in charges, allowing flexibility while maintaining accurate financial records.
The charge per unit is outside tolerance and has not been approved.
The system adjusts the charge per unit to match the purchase order or approved levels, generating any necessary debit or credit notes.
Purchase Order (PO):
Charge Per Unit: $6.00
Quantity: 800 units
Total Charge Amount: $4,800.00
Invoice Received:
Charge Per Unit: $7.00 (outside tolerance of 16.67%, rejected)
Quantity: 800 units
Total Charge Amount: $5,600.00
Tolerance Levels:
Charge Per Unit Tolerance: ±5%
Since the charge per unit ($7.00) exceeds the acceptable tolerance range of 5% and has not been approved, the system will:
Reject the Invoiced Charge Per Unit: The system does not accept the invoiced charge per unit of $7.00 due to the variance exceeding the tolerance limit.
Adjust the Charge Per Unit: The system adjusts the charge per unit to match the purchase order or the approved charge per unit:
Adjusted Charge Per Unit = $6.00 (from PO)
Recalculate the Total Charge Amount: The system recalculates the total charge amount based on the adjusted charge per unit:
Corrected Total Charge Amount = Quantity × Adjusted Charge Per Unit
Corrected Total Charge Amount = 800 units × $6.00 = $4,800.00
Generate a Debit Note: Since the original invoice total was higher than the corrected total, the system generates a debit note for the overcharged amount:
Debit Note Amount = Original Invoice Total - Corrected Total Charge Amount
Debit Note Amount = $5,600.00 - $4,800.00 = $800.00
Process the Invoice: The system processes the invoice with the corrected total charge amount of $4,800.00 and issues a debit note for $800.00 to account for the overcharged amount.
This approach ensures that financial transactions are consistent with the purchase order terms, rejecting unapproved variances and maintaining accurate billing practices.
The quantity on the invoice is outside the acceptable tolerance but has been approved, while the unit price remains within tolerance.
The system accepts the approved quantity and the unit price as per the invoice and processes the transaction accordingly.
Purchase Order (PO):
Quantity: 150 units
Unit Price: $12.00 per unit
Total Amount: $1,800.00
Invoice Received:
Quantity: 160 units (outside tolerance of 6.67% but approved)
Unit Price: $12.00 per unit (within tolerance)
Total Amount: $1,920.00
Tolerance Levels:
Quantity Tolerance: ±5%
Unit Price Tolerance: ±2%
Since the quantity (160 units) exceeds the acceptable tolerance limit but has been approved, and the unit price ($12.00) is within the acceptable range, the system will:
Accept the Approved Quantity: The system acknowledges that the quantity has been approved despite being outside the normal tolerance range.
Accept the Unit Price: The unit price of $12.00 per unit is within the acceptable tolerance, so it is accepted as invoiced.
Process the Transaction: The system calculates the total amount using the approved quantity and unit price:
Total Amount = Quantity × Unit Price
Total Amount = 160 units × $12.00 per unit = $1,920.00
Finalize the Invoice: The system processes the invoice with the total amount of $1,920.00, reflecting the approved quantity and accepted unit price.
This approach allows the system to accommodate approved variances in quantity while ensuring the unit price remains within the expected range, facilitating smooth transaction processing.
The quantity is below the acceptable range (negative tolerance) and is not approved, though the unit price is within tolerance.
The system adjusts the quantity to match the approved level, keeping the unit price consistent. The transaction is processed accordingly.
Purchase Order (PO):
Quantity: 150 units
Unit Price: $20.00 per unit
Total Amount: $3,000.00
Invoice Received:
Quantity: 140 units (outside tolerance of -6.67%, rejected)
Unit Price: $20.00 per unit (within tolerance)
Total Amount: $2,800.00
Tolerance Levels:
Quantity Tolerance: ±5%
Unit Price Tolerance: ±2%
Since the quantity (140 units) is below the acceptable tolerance limit (negative variance of -6.67%) and is not approved, but the unit price ($20.00) is within tolerance, the system will:
Reject the Lower Quantity: The system does not accept the lower quantity since it is outside the approved tolerance range.
Adjust the Quantity: The system adjusts the quantity to match the approved level specified in the purchase order.
Approved Quantity = 150 units (from PO)
Maintain the Unit Price: The unit price of $20.00 per unit is within tolerance and remains unchanged.
Recalculate the Total Amount: The system calculates the total amount using the approved quantity and the accepted unit price:
Total Amount = Approved Quantity × Unit Price
Total Amount = 150 units × $20.00 per unit = $3,000.00
Process the Invoice: The system processes the invoice with the adjusted total amount of $3,000.00, reflecting the approved quantity and unit price. The supplier is expected to invoice for the full approved quantity.
This approach ensures that the financial transaction aligns with the purchase order's terms, and prevents under-invoicing while maintaining accurate financial records.
The quantity is within tolerance, but the unit price is below the acceptable range (negative tolerance) and is not approved.
The system rejects the unit price, adjusts it to match the purchase order, and generates a credit note for the difference. Additional header charges may be applied as necessary.
Purchase Order (PO):
Quantity: 100 units
Unit Price: $10.00 per unit
Total Amount: $1,000.00
Invoice Received:
Quantity: 100 units (within tolerance of 0%)
Unit Price: $9.00 per unit (outside negative tolerance of -10%)
Total Amount: $900.00
Tolerance Levels:
Quantity Tolerance: ±2%
Unit Price Tolerance: ±1%
Since the quantity (100 units) is within the acceptable tolerance range but the unit price ($9.00) is below the acceptable tolerance and is not approved, the system will:
Reject the Unit Price: The system does not accept the invoiced unit price of $9.00.
Adjust the Unit Price: The system adjusts the unit price to match the original purchase order unit price.
Adjusted Unit Price = $10.00 (from PO)
Calculate the Corrected Total Amount: Using the adjusted unit price, the system recalculates the total amount.
Corrected Total Amount = Quantity × Adjusted Unit Price
Corrected Total Amount = 100 units × $10.00 per unit = $1,000.00
Generate a Credit Note: The system generates a credit note for the difference between the incorrect total amount on the invoice and the corrected total amount.
Credit Note Amount = Original Invoice Total - Corrected Total Amount
Credit Note Amount = $900.00 - $1,000.00 = -$100.00
The credit note will effectively reverse the undercharge.
Process the Invoice: The system processes the invoice with the adjusted total amount of $1,000.00 and applies the credit note for $100.00 to account for the undercharged unit price.
This approach ensures that the pricing aligns with the purchase order terms, even when an incorrect, lower price is invoiced.
The quantity on the invoice exceeds the acceptable range (positive) and is rejected, but the unit price is within tolerance.
The system adjusts the quantity to the approved level, maintaining the unit price, and processes the transaction. Any excess quantity is rejected and not invoiced.
Purchase Order (PO):
Quantity: 100 units
Unit Price: $8.00 per unit
Total Amount: $800.00
Invoice Received:
Quantity: 110 units (outside tolerance of 10%, rejected)
Unit Price: $8.00 per unit (within tolerance)
Total Amount: $880.00
Tolerance Levels:
Quantity Tolerance: ±5%
Unit Price Tolerance: ±2%
Since the quantity (110 units) exceeds the acceptable tolerance limit (positive variance of 10%) and is not approved, but the unit price ($8.00) is within tolerance, the system will:
Reject the Excess Quantity: The system rejects the quantity that exceeds the approved tolerance level.
Adjust the Quantity: The system adjusts the quantity to match the approved level specified in the purchase order.
Approved Quantity = 100 units (from PO)
Maintain the Unit Price: The unit price of $8.00 per unit is within tolerance and remains unchanged.
Recalculate the Total Amount: The system calculates the total amount using the approved quantity and the accepted unit price:
Total Amount = Approved Quantity × Unit Price
Total Amount = 100 units × $8.00 per unit = $800.00
Process the Invoice: The system processes the invoice with the adjusted total amount of $800.00, reflecting only the approved quantity and unit price. The excess quantity of 10 units is rejected and not invoiced.
This approach ensures that the invoiced amount aligns with the agreed terms in the purchase order, even when the supplier attempts to invoice for an excess quantity.
The quantity is within tolerance, but the unit price exceeds the acceptable range (positive tolerance) and is not approved.
The system rejects the invoice unit price, adjusts it to match the purchase order, and may generate a debit note to account for the overcharged amount.
Purchase Order (PO):
Quantity: 200 units
Unit Price: $15.00 per unit
Total Amount: $3,000.00
Invoice Received:
Quantity: 198 units (within tolerance of 1%)
Unit Price: $17.00 per unit (outside positive tolerance of 13.33%)
Total Amount: $3,366.00
Tolerance Levels:
Quantity Tolerance: ±2%
Unit Price Tolerance: ±1%
Since the quantity (198 units) is within the acceptable tolerance range but the unit price ($17.00) exceeds the acceptable tolerance and is not approved, the system will:
Reject the Invoice Unit Price: The system does not accept the invoiced unit price of $17.00.
Adjust the Unit Price: The system adjusts the unit price to match the original purchase order unit price.
Adjusted Unit Price = $15.00 (from PO)
Calculate the Corrected Total Amount: Using the adjusted unit price, the system recalculates the total amount.
Corrected Total Amount = Quantity × Adjusted Unit Price
Corrected Total Amount = 198 units × $15.00 per unit = $2,970.00
Generate a Debit Note: The system generates a debit note to account for the difference due to the overcharge.
Debit Note Amount = Original Invoice Total - Corrected Total Amount
Debit Note Amount = $3,366.00 - $2,970.00 = $396.00
This debit note represents the amount overcharged by the supplier.
Process the Invoice: The system processes the invoice with the corrected total amount of $2,970.00 and issues a debit note for $396.00 to offset the overcharge.
This approach ensures that any overcharging is corrected, aligning the transaction with the purchase order terms and protecting the financial interests of the business.
Both the quantity and unit price are outside the tolerance range but have been approved.
The system processes the transaction using the invoice values for both quantity and unit price, applying any necessary adjustments or line charges.
Purchase Order (PO):
Quantity: 200 units
Unit Price: $25.00 per unit
Total Amount: $5,000.00
Invoice Received:
Quantity: 220 units (outside tolerance of 10%, approved)
Unit Price: $27.00 per unit (outside tolerance of 8%, approved)
Total Amount: $5,940.00
Tolerance Levels:
Quantity Tolerance: ±5%
Unit Price Tolerance: ±2%
Since both the quantity (220 units) and unit price ($27.00) are outside the acceptable tolerance limits but have been approved, the system will:
Accept the Approved Quantity: The system accepts the invoiced quantity of 220 units as it has been approved despite being outside the tolerance range.
Accept the Approved Unit Price: The system accepts the invoiced unit price of $27.00 per unit as it has been approved despite being outside the tolerance range.
Calculate the Total Amount: The system calculates the total amount based on the approved invoice values:
Total Amount = Quantity × Unit Price
Total Amount = 220 units × $27.00 per unit = $5,940.00
Apply Necessary Adjustments or Line Charges: If applicable, the system may apply any additional line charges or adjustments based on the organization's policies for handling approved variances.
Process the Invoice: The system processes the invoice using the approved values for both quantity and unit price, finalizing the transaction at the total amount of $5,940.00.
This approach ensures that the transaction is processed according to the approved variances, allowing flexibility while maintaining accurate financial records.
Dit document biedt een diepgaande uitleg van de regels voor geschillenbeslechting die worden gebruikt in het DocBits factureringssysteem. Deze regels zijn ontworpen om automatisch om te gaan met discrepanties tussen factuurgegevens en inkoopordedata (PO), en zorgen voor een nauwkeurige financiële reconciliatie. Het systeem past deze regels toe om factuurregels, kosten en belastingen te verwerken en genereert indien nodig passende aanpassingen of notities.
• versie: Identificeert de versie van het mappingbestand.
• revisie: Revisienummer voor het bijhouden van wijzigingen.
• auteur: Geeft de maker van het mappingbestand aan.
• beschrijving: Een korte beschrijving van het doel van het bestand.
• created_at & updated_at: Tijdstempels voor wanneer het bestand is gemaakt en voor het laatst is bijgewerkt.
De exportconfiguratie-sectie definieert de mapping tussen de datavelden in het systeem en de overeenkomstige velden in de exportbestanden.
• Header: Definieert de headervelden voor de geëxporteerde factuurgegevens.
• Belastingregels: Specificeert de velden voor belastingregelitems in de export.
• Orderheaderkosten: Maakt velden gerelateerd aan extra kosten op het niveau van de orderheader.
• Ontvangstregels: Maakt velden voor individuele regelitems in een ontvangst.
• Orderregelkosten: Definieert de velden voor kosten gerelateerd aan specifieke orderregels.
• Kostenregels: Specificeert velden voor kostenallocatieregels.
• Debetnota & Creditnota: Definieert velden voor het genereren van debet- en creditnota's in geval van discrepanties.
Deze regels behandelen discrepanties tussen factuurgegevens en de overeenkomstige PO-gegevens. Elke regel bestaat uit verschillende componenten:
• Naam: De beschrijvende naam van de regel, die aangeeft welk type discrepantie deze behandelt.
• Sectie: Geeft aan welk deel van de factuur (bijv. ontvangst_regels, lijn_kosten) de regel van toepassing is.
• Actief: Booleaanse waarde (waar of niet waar) die aangeeft of de regel momenteel actief is.
• Matchcriteria: Voorwaarden die de regel activeren op basis van vergelijkingen tussen de werkelijke factuurgegevens en de verwachte PO-gegevens.
• Acties: Definieert wat het systeem moet doen wanneer de regel wordt geactiveerd, inclusief het aanpassen van waarden, het toepassen van kosten of het genereren van credit/debetnota's.
Deze operatoren definiëren hoe de werkelijke factuurwaarden worden vergeleken met de verwachte PO-waarden:
• gelijk
• groter dan
• groter dan of gelijk aan
• kleiner dan
• kleiner dan of gelijk aan
• binnen tolerantie
• buiten tolerantie
Geeft aan of een discrepantie goedgekeurd is of niet:
• goedgekeurd
• afgewezen
• elk
Definieert specifieke acties die moeten worden ondernomen wanneer een discrepantie wordt gedetecteerd:
• ontvangstregel
• kostenregel
• headerkosten
• lijnkosten
• belastingregel
• debetnota ontvangstregel
• debetnota kostenregel
• debetnota headerkosten
• debetnota lijnkosten
• creditnota ontvangstregel
• creditnota kostenregel
• creditnota headerkosten
• creditnota lijnkosten
• creditnota belastingregel
Geval 1, 2, 3: Hoeveelheid en Eenheidsprijs Binnen Tolerantie
• Doel: Behandelt scenario's waarin zowel de hoeveelheid als de eenheidsprijs op de factuur binnen de geaccepteerde tolerantielimieten liggen in vergelijking met de PO.
• Actie: Het systeem accepteert de factuurwaarden en berekent het totale bedrag.
Geval 4, 5: Hoeveelheid Binnen Tolerantie, Eenheidsprijs Buiten Tolerantie (Goedgekeurd)
• Doel: Van toepassing wanneer de hoeveelheid binnen tolerantie is, maar de eenheidsprijs buiten tolerantie ligt en is goedgekeurd.
• Actie: Het systeem past de eenheidsprijs aan om overeen te komen met de PO en past eventuele noodzakelijke lijnkosten toe.
Geval 6: Hoeveelheid Binnen Tolerantie, Eenheidsprijs Buiten Negatieve Tolerantie (Afgewezen)
• Doel: Behandelt gevallen waarin de eenheidsprijs lager is dan verwacht en buiten het tolerantiebereik ligt, wat leidt tot afwijzing.
• Actie: Het systeem past de eenheidsprijs aan om overeen te komen met de PO, genereert een creditnota voor het verschil en past headerkosten toe indien nodig.
• Regels onder deze categorie behandelen discrepanties in kosten per eenheid, met specifieke acties op basis van of de kosten binnen of buiten de tolerantie liggen en of deze zijn goedgekeurd of afgewezen.
• Deze regels beheren belastingdiscrepanties door de belastingregels aan te passen of overeenkomstige credit- of debetnota's te genereren op basis van de verschillen tussen factuur- en PO-belastinggegevens.
• Enums: Vooraf gedefinieerde lijsten van waarden die consistentie over de regels waarborgen (bijv. vergelijkingsoperatoren, goedkeuringssoorten).
• Opties: Vooraf gedefinieerde keuzes voor het omgaan met hoeveelheden of eenheidsprijzen, die flexibiliteit bieden in de definitie van regels.
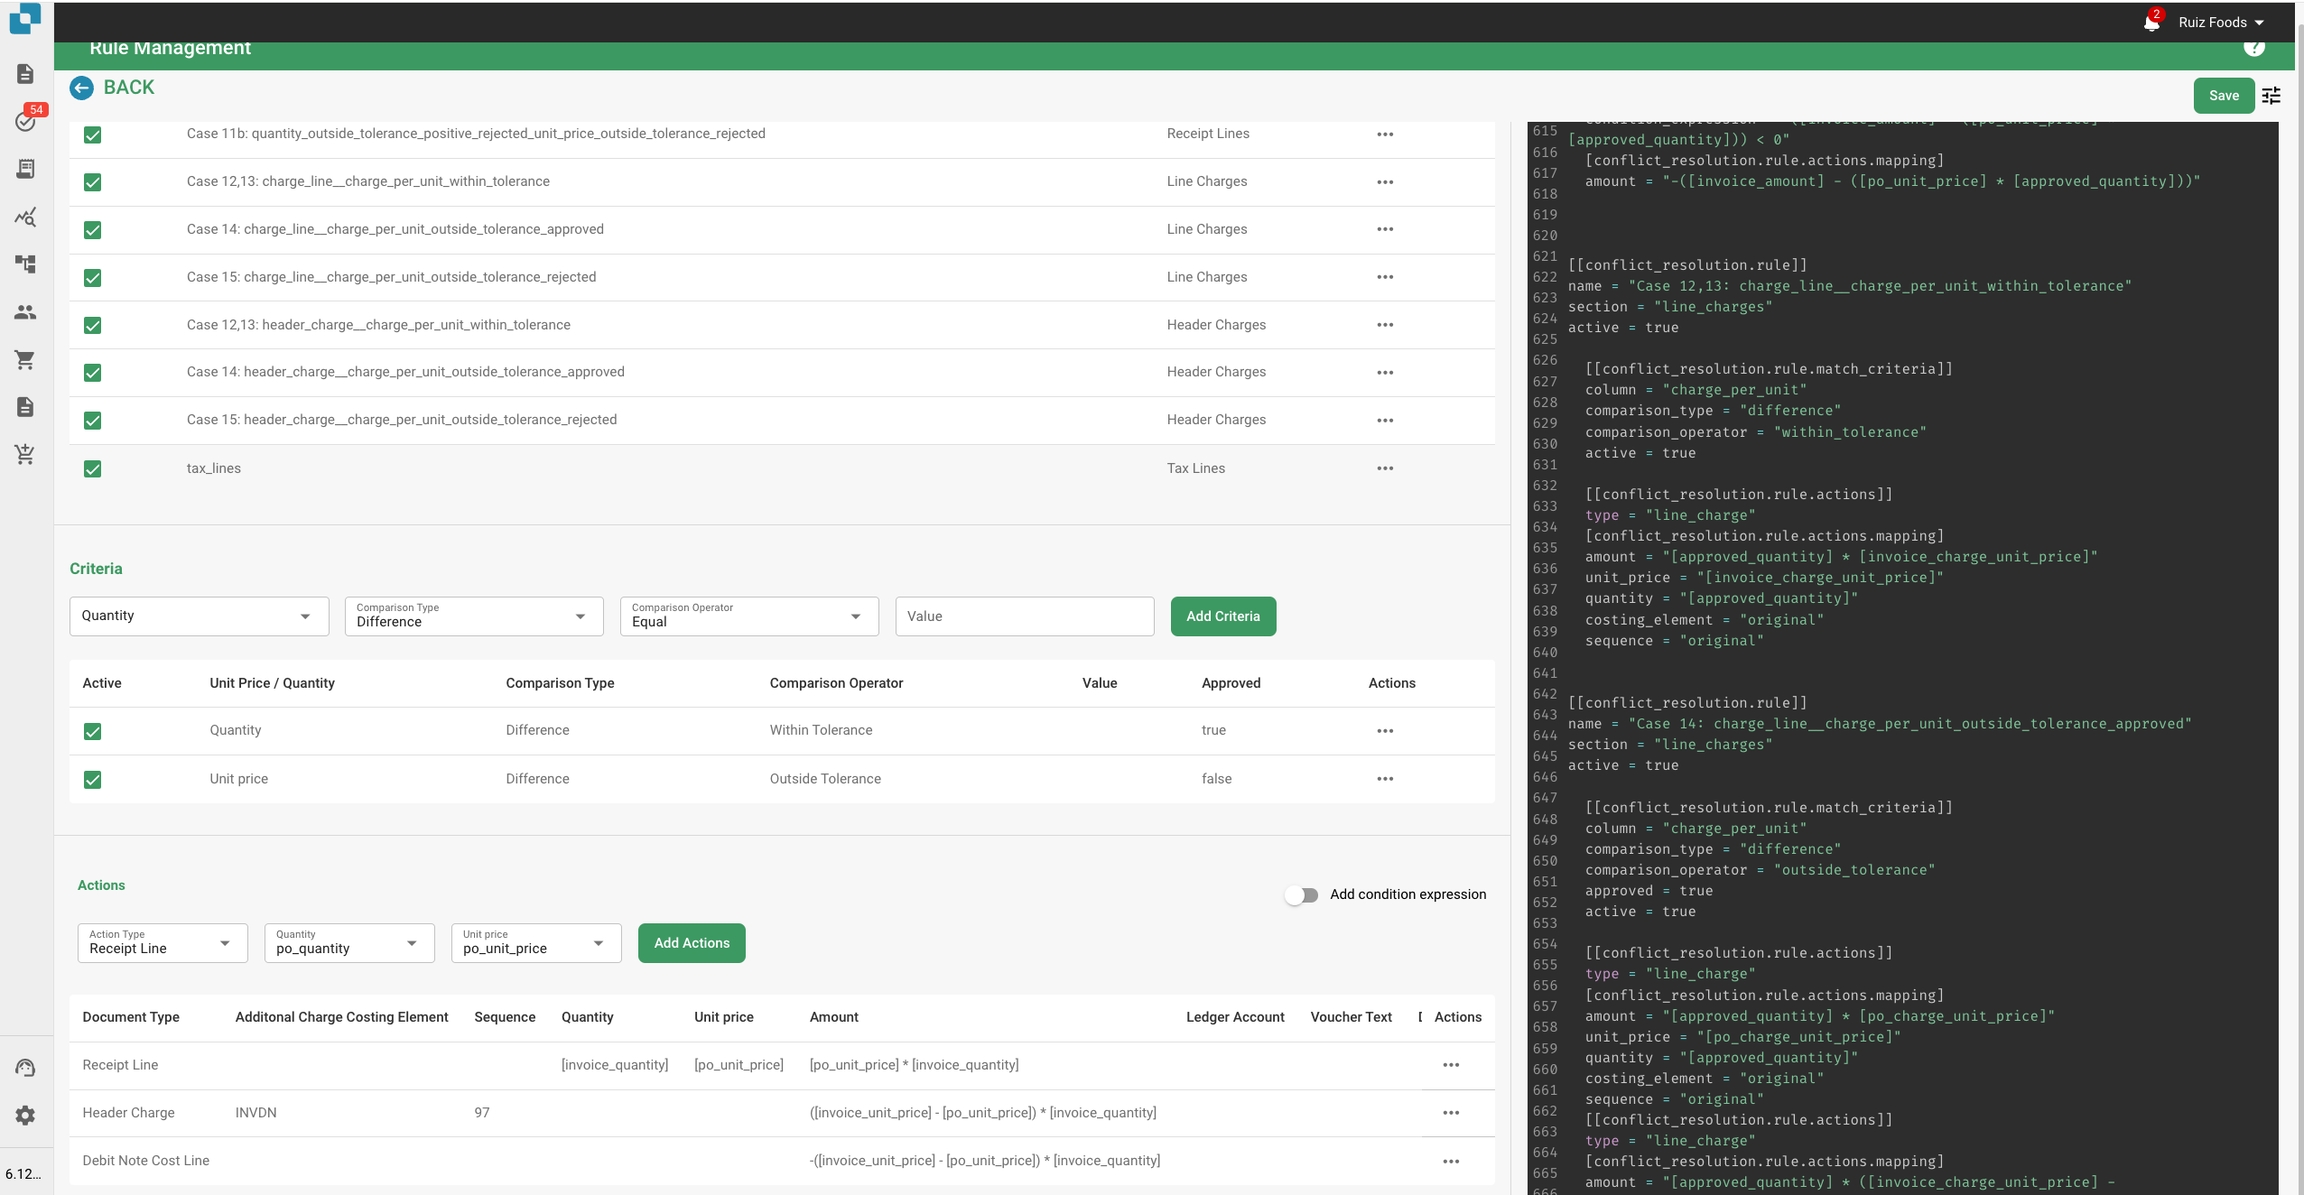
Deze screenshot toont de Regelbeheerinterface waar beheerders alle regels voor geschillenbeslechting kunnen bekijken en beheren. Belangrijke elementen zijn:
• Voeg Regel Toe Knop: Maakt het mogelijk om nieuwe regels toe te voegen.
• Lijst van Regels: Toont alle actieve regels met details zoals naam, sectie en actieve status.
• Sectie Dropdown: Filtert de regels op basis van de sectie waarop ze van toepassing zijn (bijv. Ontvangstregels, Lijnkosten).
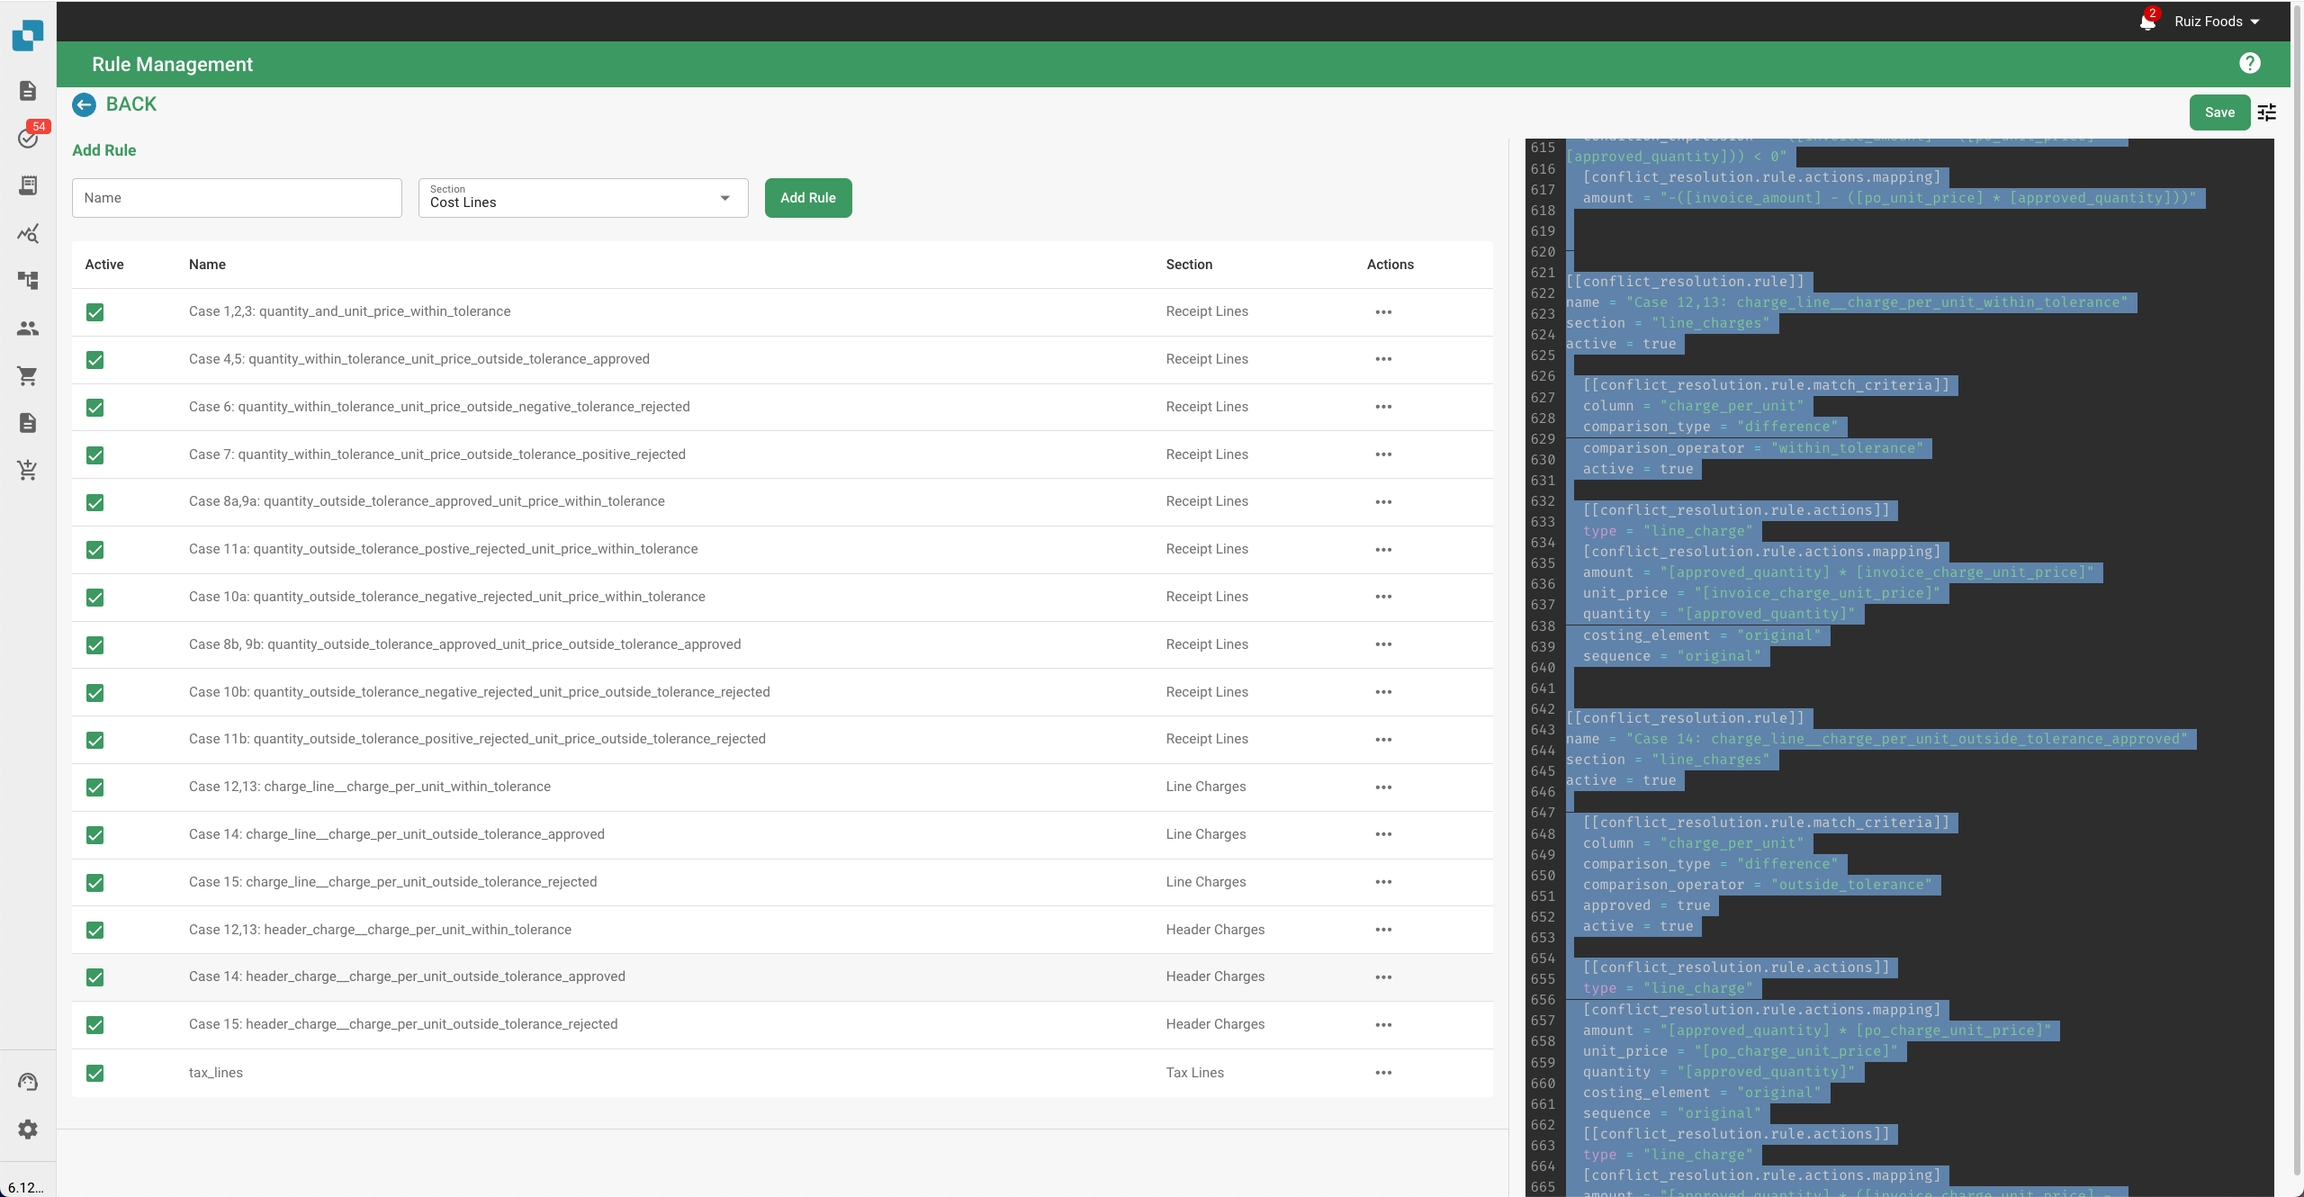
Deze screenshot illustreert het gedetailleerde overzicht van een specifieke regel die wordt bewerkt. Belangrijke elementen zijn:
• Criteria Sectie: Definieert de voorwaarden waaronder de regel wordt geactiveerd. Bijvoorbeeld, de criteria kunnen specificeren dat als de hoeveelheid en eenheidsprijs verschillen van de PO maar binnen tolerantie liggen, de regel moet worden toegepast.
• Acties Sectie: Specificeert welke acties moeten worden ondernomen wanneer aan de criteria wordt voldaan. Dit kan het aanpassen van de factuurregels, het genereren van credit- of debetnota's, of het toepassen van extra kosten omvatten.
• Documenttype en Kosten Elementen: Maakt het de beheerder mogelijk om specifieke acties te koppelen aan documenttypes en kostenelementen, wat flexibiliteit biedt bij het omgaan met verschillende scenario's.
De instellingen voor "Classificatie en Extractie" in uw documentverwerkingssysteem bieden opties voor het configureren van hoe documenten automatisch worden behandeld bij invoer:
Document Splitsen: Deze instelling stelt u in staat om te kiezen of documenten moeten worden gesplitst op basis van specifieke criteria of als één enkel document moeten worden behouden. Dit kan nuttig zijn bij het verwerken van documenten die meerdere verschillende secties hebben, maar als één bestand zijn geüpload.
Bedrag Formatteren: Hier kunt u opties inschakelen zoals het afronden van de totale bedragen in bestellingen. Dit zorgt ervoor dat de geëxtraheerde gegevens overeenkomen met verwachte financiële formaten en regels, waardoor fouten in financiële verwerking worden verminderd.
Tabel Extractie: Deze functie maakt geautomatiseerde extractie van gegevens uit tabellen binnen documenten mogelijk. U kunt specificeren of u alle tabellen wilt extraheren, alleen die relevant zijn voor kostprijsdoeleinden, of automatisch belastingcodes wilt identificeren en extraheren. Dit verbetert de nauwkeurigheid en efficiëntie van gegevensextractie uit gestructureerde formaten binnen documenten aanzienlijk.
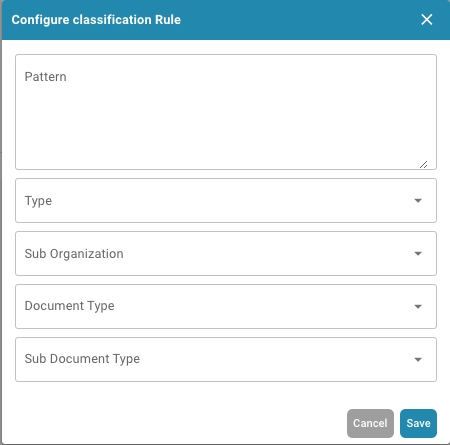
Configureer Classificatieregel: Deze optie stelt u in staat om specifieke patronen en criteria te definiëren die het systeem helpen om documenten automatisch te classificeren en te categoriseren terwijl ze worden verwerkt. Dit kan gebaseerd zijn op tekstpatronen, documenttypes of andere metadata die aan de documenten zijn gekoppeld.
The header charge per unit is outside tolerance and has not been approved.
The system adjusts the header charge to match the purchase order, processing the transaction accordingly, and generating any necessary notes.
Purchase Order (PO):
Header Charge Per Unit: $4.00
Quantity: 1,500 units
Total Header Charge Amount: $6,000.00
Invoice Received:
Header Charge Per Unit: $5.00 (outside tolerance of 25%, rejected)
Quantity: 1,500 units
Total Header Charge Amount: $7,500.00
Tolerance Levels:
Header Charge Per Unit Tolerance: ±5%
Since the header charge per unit ($5.00) exceeds the acceptable tolerance range of 5% and has not been approved, the system will:
Reject the Invoiced Header Charge Per Unit: The system does not accept the invoiced header charge per unit of $5.00 due to the variance exceeding the tolerance limit.
Adjust the Header Charge Per Unit: The system adjusts the charge per unit to match the original purchase order or the approved charge per unit:
Adjusted Header Charge Per Unit = $4.00 (from PO)
Recalculate the Total Header Charge Amount: The system recalculates the total charge amount based on the adjusted charge per unit:
Corrected Total Header Charge Amount = Quantity × Adjusted Header Charge Per Unit
Corrected Total Header Charge Amount = 1,500 units × $4.00 = $6,000.00
Generate a Credit Note: Since the original invoice total was higher than the corrected total, the system generates a credit note for the overcharged amount:
Credit Note Amount = Original Invoice Total - Corrected Total Header Charge Amount
Credit Note Amount = $7,500.00 - $6,000.00 = $1,500.00
Process the Invoice: The system processes the invoice with the corrected total charge amount of $6,000.00 and issues a credit note for $1,500.00 to account for the overcharged amount.
This approach ensures that the transaction is aligned with the original terms of the purchase order, maintaining accurate financial processing while correcting any overcharges.
Handles discrepancies in tax amounts between the invoice and purchase order.
The system adjusts the tax lines according to the approved tax rates and amounts, ensuring compliance with applicable tax regulations.
Purchase Order (PO):
Subtotal Amount: $10,000.00
Tax Rate: 8%
Expected Tax Amount: $800.00
Total Amount with Tax: $10,800.00
Invoice Received:
Subtotal Amount: $10,000.00
Tax Rate: 10% (discrepancy)
Invoiced Tax Amount: $1,000.00
Total Amount with Tax: $11,000.00
Since the tax rate on the invoice (10%) differs from the expected tax rate (8%) and is not approved, the system will:
Reject the Invoiced Tax Rate: The system does not accept the 10% tax rate because it does not match the approved rate in the purchase order.
Adjust the Tax Rate: The system adjusts the tax rate to match the approved rate from the purchase order.
Adjusted Tax Rate = 8% (from PO)
Recalculate the Tax Amount: The system recalculates the tax amount based on the adjusted tax rate:
Corrected Tax Amount = Subtotal Amount × Adjusted Tax Rate
Corrected Tax Amount = $10,000.00 × 8% = $800.00
Recalculate the Total Amount: The system recalculates the total amount including tax:
Corrected Total Amount with Tax = Subtotal Amount + Corrected Tax Amount
Corrected Total Amount with Tax = $10,000.00 + $800.00 = $10,800.00
Generate a Credit Note: The system generates a credit note to correct the overcharged tax:
Credit Note Amount = Original Invoice Tax Amount - Corrected Tax Amount
Credit Note Amount = $1,000.00 - $800.00 = $200.00
Process the Invoice: The system processes the invoice with the corrected tax amount of $800.00 and the total amount of $10,800.00, issuing a credit note for the $200.00 tax discrepancy.
This approach ensures that the invoice tax is consistent with the purchase order and complies with applicable tax regulations, preventing overpayment and ensuring accuracy in financial records.
M3 Integratie: Integratie met M3, een ERP-softwareoplossing, die naadloze interactie tussen DocBits en M3 mogelijk maakt voor verbeterd documentbeheer en -verwerking.
PO Dashboard: Een gecentraliseerd dashboard binnen DocBits dat specifiek is ontworpen om inkooporders te beheren en te monitoren, en inzichten en analyses biedt voor efficiënte tracking en besluitvorming.
Verzendings Order Dashboard: Vergelijkbaar met het PO Dashboard, richt deze functie zich op het beheren en monitoren van verzendorders, wat soepele logistieke operaties vergemakkelijkt.
Auto-boekhouding: DocBits biedt geautomatiseerde boekhoudfunctionaliteit, waardoor het proces van het afhandelen van financiële transacties in verband met inkooporders (PO's) en andere documenten wordt gestroomlijnd.
Advance Shipment Dashboard: Een gespecialiseerd dashboard voor geavanceerde monitoring en beheer van verzendgerelateerde activiteiten, dat diepere inzichten en functionaliteiten biedt.
Factuur Dashboard: Een gespecialiseerd dashboard voor geavanceerde monitoring en beheer van factuurgerelateerde activiteiten, dat diepere inzichten en functionaliteiten biedt.
Dashboards v2: Een bijgewerkte versie van de dashboardinterface, waarschijnlijk met een verbeterde gebruikerservaring en extra functies voor verbeterde bruikbaarheid.
SQL Directe toegang: Een directe toegang tot de database.
Leverancier Portaal: Een portaal binnen DocBits dat is gewijd aan leveranciers, waardoor zij kunnen interageren en samenwerken met het systeem, wat de communicatie en efficiëntie in de toeleveringsketen verbetert.
Workflow Builder: Een tool voor het creëren en aanpassen van workflows binnen DocBits, waarmee gebruikers specifieke processen kunnen definiëren en documentafhandeling kunnen automatiseren volgens hun unieke zakelijke vereisten.
Workflows uitvoeren in Celery: Deze functie stelt je in staat om workflows in Celery uit te voeren.
Layout Builder: Maakt het gebruikers mogelijk om de lay-out van documenten binnen DocBits te ontwerpen en aan te passen, zodat deze in lijn zijn met branding- en bruikbaarheidsnormen.
Annotatiemodus: Een functie die gebruikers in staat stelt om documenten direct binnen de DocBits-interface te annoteren en te markeren, wat samenwerking en feedback vergemakkelijkt.
Rapport tonen: Functionaliteit om rapporten binnen DocBits te genereren en weer te geven, met inzichten en analyses over verschillende aspecten van documentverwerking en -beheer.
Modellen en labels: Tools voor het definiëren en configureren van documentherkenningsmodellen en labels binnen DocBits, wat de nauwkeurigheid en efficiëntie van documentverwerking verbetert.
Documentscript: Waarschijnlijk een functie voor het scriptmatig automatiseren van specifieke acties of processen met betrekking tot documentafhandeling binnen DocBits.
Documenten scannen: Mogelijkheid om fysieke documenten te scannen en deze in DocBits te importeren voor digitale verwerking en beheer.
QR-Code extractie: Een functie voor het extraheren van informatie uit QR-codes die in documenten zijn ingebed, waardoor geautomatiseerde gegevensverzameling en -verwerking mogelijk wordt.
Aangepaste stamgegevens: Maakt het gebruikers mogelijk om aangepaste masterdatavelden en -attributen binnen DocBits te definiëren en te beheren, waardoor het systeem kan worden afgestemd op hun specifieke zakelijke behoeften.
Taken en meldingen: Functionaliteit voor het beheren van taken en het ontvangen van meldingen binnen DocBitsGBT, wat zorgt voor tijdige actie en communicatie met betrekking tot documentverwerkingsactiviteiten.
IDM ACL Updater: Deze module houdt zich waarschijnlijk bezig met het bijwerken en beheren van toegangscontrolelijsten (ACL's) binnen DocBits, wat zorgt voor de juiste machtigingen en beveiliging voor documenttoegang en -afhandeling.
The Auto Export if PO matched 100% setting is a feature within the Purchase Order (PO) module that automates the export process when a purchase order matches perfectly with its expected criteria. This functionality is designed to streamline the workflow by reducing manual intervention in the export process, ensuring that perfectly matched purchase orders are handled efficiently.
When this setting is enabled, the system automatically exports the purchase order as soon as it matches 100% with the expected data. This means that if all items, quantities, prices, and other relevant details in the purchase order align with the predefined criteria, the order is immediately processed and exported without requiring additional steps from the user.
Efficiency: By automating the export of perfectly matched POs, this feature saves time and reduces the workload on administrators and users.
Accuracy: Ensures that only those POs which have been verified to match 100% with the expected criteria are exported, reducing the risk of errors.
Speed: The immediate processing of matching POs allows for faster order handling and reduces delays in the supply chain.
Enable the Feature:
Navigate to the Purchase Order settings.
Locate the Auto Export if PO matched 100% toggle.
Turn on the toggle to enable the feature.
Monitoring:
Once enabled, the system will automatically export POs that match 100% with their expected criteria.
You can monitor the export activity through the PO dashboard or other related monitoring tools.
Considerations:
Ensure that your PO criteria are correctly defined and accurate to avoid any unwanted exports.
Regularly review the POs processed through this feature to ensure that the automation is functioning as expected.
High Volume Processing: Ideal for environments where a large number of POs are processed regularly, and there is a high confidence in the data matching.
Routine Orders: Useful for standard or routine orders where variations are minimal and accuracy is consistent.
Time-Sensitive Orders: Beneficial when time is of the essence, and you need to expedite the processing of matching POs.
OCR Kwaliteit:
Deze instelling stelt je in staat om het minimale vereiste OCR kwaliteitspercentage voor een document te definiëren om automatisch te worden verwerkt. Het bevat een schuifregelaar die je kunt aanpassen om de drempel in te stellen, zoals 75%, waaronder het systeem geen succesvolle extractie kan garanderen. Als de OCR-kwaliteit van een document onder deze drempel valt, kun je ervoor kiezen om het systeem specifieke acties te laten ondernemen, zoals het opnieuw uitvoeren van de OCR na handmatige bevestiging.
Algemene OCR-instellingen:
Gebruik E-Text indien beschikbaar: Deze optie, wanneer ingeschakeld, stelt het systeem in staat om elektronische tekst die is ingebed in PDF's of andere documenttypen te gebruiken om de nauwkeurigheid te verbeteren.
Gebruik DESKEW indien beschikbaar: Deze functie corrigeert de uitlijning van documenten, wat helpt om de OCR-nauwkeurigheid te verbeteren door scheve scans recht te trekken.
OCR-instellingen voor tabellen:
Gebruik AI-gegevens voor tabellen indien beschikbaar: Deze instelling maakt het gebruik van AI-technologieën mogelijk om tabellen beter te herkennen en te extraheren uit gescande documenten, waarbij gebruik wordt gemaakt van machine learning-modellen om tabulaire gegevens nauwkeurig te identificeren en te structureren.
OCR-instellingen voor de kopvelden:
Gebruik Regels Extractie: Wanneer ingeschakeld, stelt deze instelling het systeem in staat om vooraf gedefinieerde regels toe te passen om gegevens uit kopvelden te extraheren, wat cruciaal kan zijn voor het correct identificeren van documentsecties zoals factuurnummers, datums, enz.
Gebruik AI Extractie: Deze optie gebruikt AI-modellen om intelligent kopvelden te extraheren, wat beter kan inspelen op variaties in documentindelingen en -stijlen.
Ga naar Instellingen → Documentverwerking → Classificatie en Extractie.
Schakel Automatische Belastingcode Invulling in.
Wanneer ingeschakeld, vult het systeem automatisch het belastingcodeveld in het Validatiescherm in, op voorwaarde dat er een belastingcodeveld is ingesteld.
De logica die wordt gebruikt om de belastingcode te bepalen, is uiteengezet in de onderstaande tabel.
Cost Invoice
With Tax amount
NAGDH
LD + % (rounded to highest ABS amount)
empty
Can be the 2 first digits of the TaX Id or country of address of supplier tccom120.cadr --> tccom130.cadr field tcom130.ccty
When country is company country
Cost Invoice
Without Tax amount
NAGD0
LD + % (rounded to highest ABS amount)
empty
Can be the 2 first digits of the TaX Id or country of address of supplier tccom120.cadr --> tccom130.cadr field tcom130.ccty
When country is company country
Cost Invoice
Without Tax amount
EUDH
ED 0 %
empty
Can be the 2 first digits of the TaX Id or country of address of supplier tccom120.cadr --> tccom130.cadr field tcom130.ccty
When country is different from company country and EU country in country table (tcmcs010)
Order invoice
With Tax Amount
NAHGH
IG + % (rounded to highest ABS amount)
Not empty
Can be the 2 first digits of the TaX Id or country of address of supplier tccom120.cadr --> tccom130.cadr field tcom130.ccty
When country is company country
Order invoice
Without Tax Amount
NAHG0
IG + % (rounded to highest ABS amount)
Not empty
Can be the 2 first digits of the TaX Id or country of address of supplier tccom120.cadr --> tccom130.cadr field tcom130.ccty
When country is company country
Order invoice
With Tax Amount
EUGH
ED 0 %
Not empty
Can be the 2 first digits of the TaX Id or country of address of supplier tccom120.cadr --> tccom130.cadr field tcom130.ccty
When country is different from company country and EU country in country table (tcmcs010)
Cost Invoice
Without Tax amount
IMGD
ID 0 %
empty
Can be the 2 first digits of the TaX Id or country of address of supplier tccom120.cadr --> tccom130.cadr field tcom130.ccty
When country is different from company country and is not an EU member in the country table (tcmcs010)
Order invoice
With Tax Amount
IMHG
IG 0 %
Not empty
Can be the 2 first digits of the TaX Id or country of address of supplier tccom120.cadr --> tccom130.cadr field tcom130.ccty
When country is different from company country and is not an EU member in the country table (tcmcs010)
Wanneer ingeschakeld, kan DocBits kostenelementen uit tabellen op regelniveau extraheren en deze dienovereenkomstig classificeren.
Als het systeem een item niet classificeert of het verkeerd classificeert, verschijnt er een pictogram aan de linkerkant.
Door op dit pictogram te klikken, opent een lijst van alle geconfigureerde kostenelementen, waarmee je kunt:
De classificatie wijzigen als deze onjuist is.
Het item instellen op "Niet-geclassificeerd" als het een regulier item is en geen kostenelemen
Je kunt de handleiding voor het instellen van kostenelementen in DocBits hier vinden.
Ga naar Instellingen → Documentverwerking → Classificatie en Extractie → Tabelextractie.
Schakel Kostenelementextractie in.
Klik op het vakpictogram naast het item.
Een dropdownmenu met alle geconfigureerde kostenelementen verschijnt.
Selecteer het juiste type kostenelement.
De classificatie is nu dienovereenkomstig bijgewerkt.
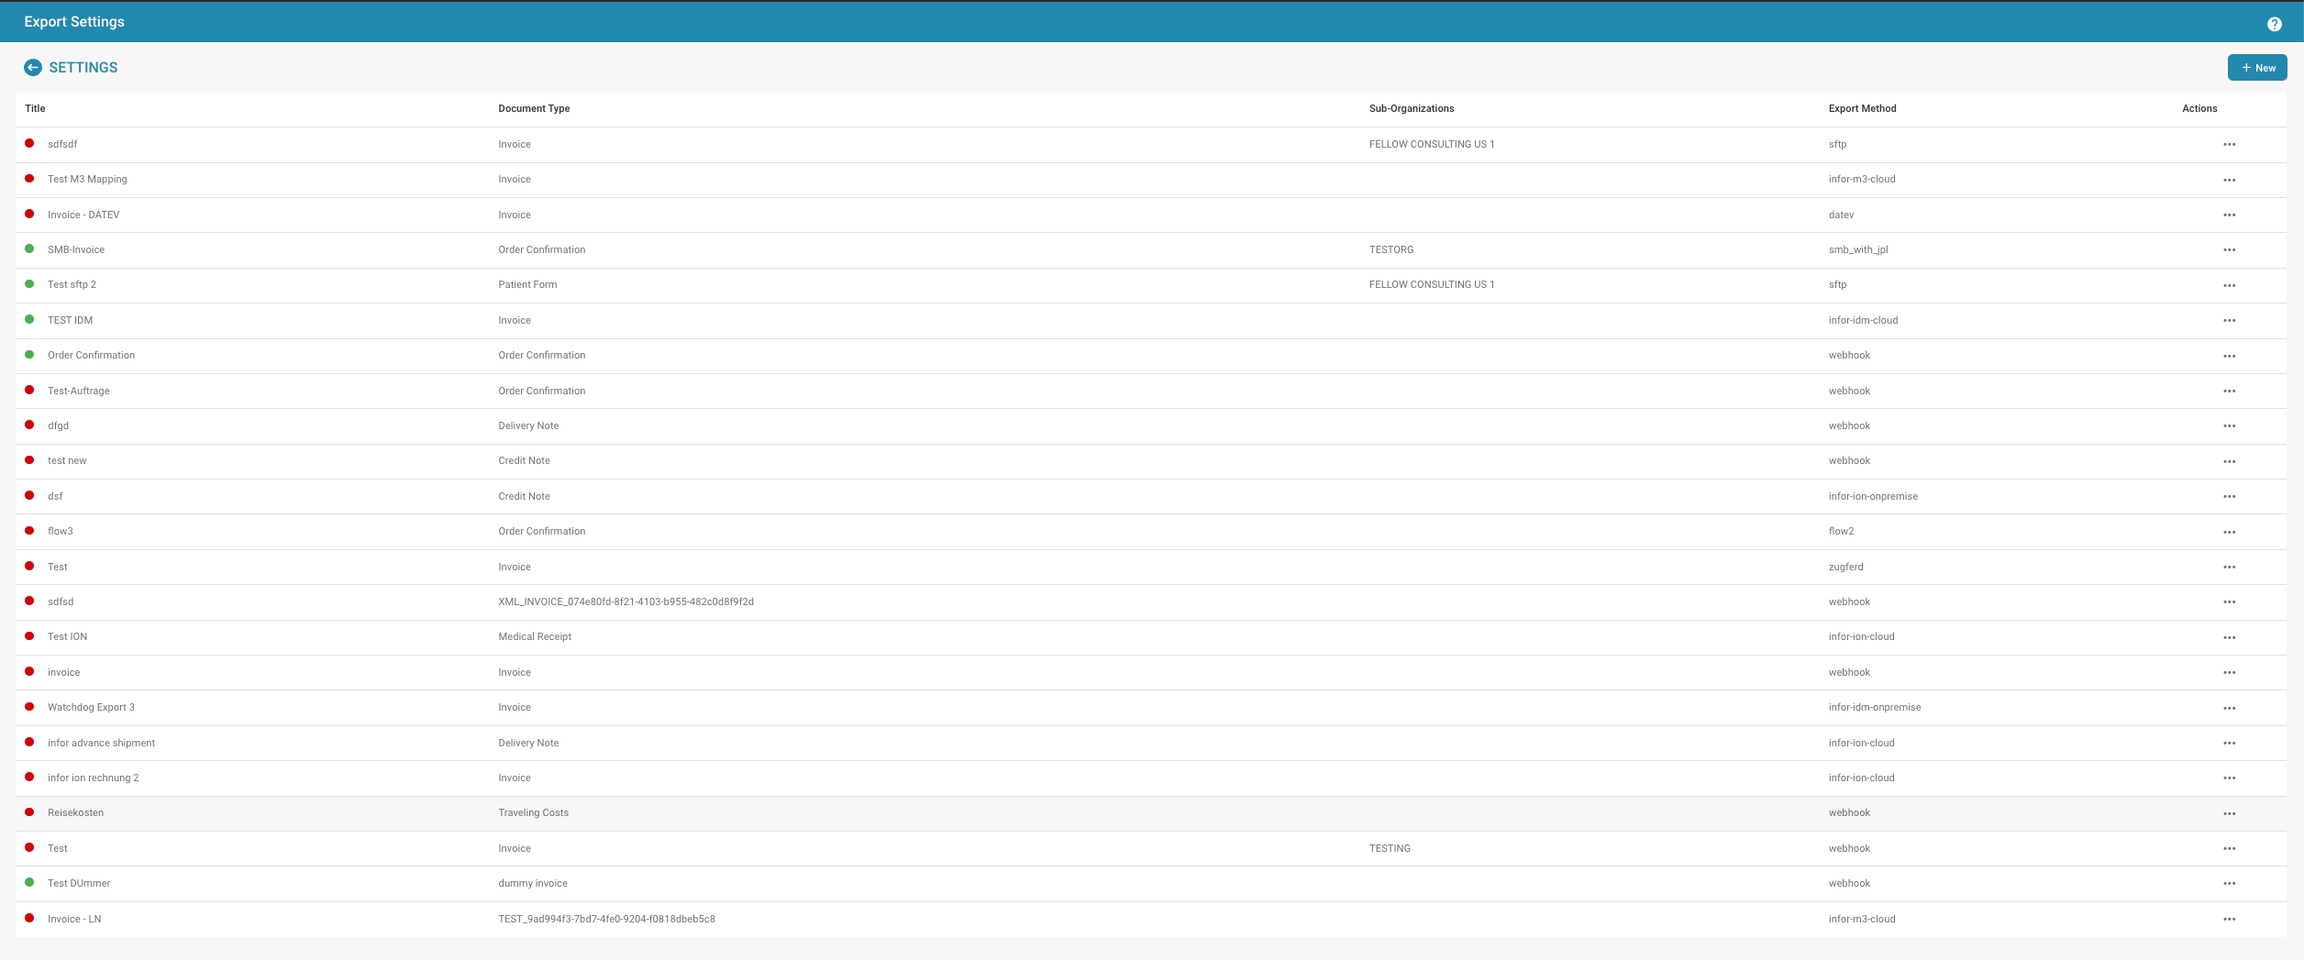
In de sectie "Exportinstellingen" van de Documentverwerkingsinstellingen beheer je hoe documenten worden geëxporteerd na verwerking. Dit omvat het configureren van verschillende exportmethoden die zijn afgestemd op specifieke behoeften, zoals directe bestandsoverdrachten of integratie met bedrijfsystemen zoals Infor. Hier is een overzicht van de opties en functionaliteit binnen deze instelling:
Selectie van Exportmethode: Je kunt kiezen hoe documenten moeten worden geëxporteerd. Veelvoorkomende methoden zijn SFTP, webhooks en directe integratie met systemen zoals Infor IDM (Infor Document Management), Infor ION (Intelligent Open Network) en andere Infor-gerelateerde opties. Elke methode ondersteunt verschillende soorten workflows en integratievereisten.
Configuratiegegevens:
Voor SFTP moet je doorgaans de server-URL, gebruikersnaam, wachtwoord en de doelmap opgeven waar de documenten zullen worden geüpload.
Voor Infor-integraties moet je mogelijk specifieke mappings configureren of API-sleutels verstrekken om ervoor te zorgen dat de documenten correct worden verwerkt en naar het Infor-ecosysteem worden verzonden, in overeenstemming met de bestaande datastructuur en -stromen.
Aanpassing: Afhankelijk van het documenttype (bijv. facturen, orderbevestigingen) en de suborganisatie kunnen verschillende exportinstellingen worden geconfigureerd om te voldoen aan variërende bedrijfsregels of compliance-eisen.
Integratieflexibiliteit: De interface staat meerdere integratie-instellingen toe die gelijktijdig actief zijn, waardoor gebruikers verschillende documenttypes en bestemmingen efficiënt kunnen afhandelen. Deze modulaire opzet zorgt ervoor dat verschillende delen van het bedrijf op maat gemaakte workflows kunnen gebruiken zonder elkaar te beïnvloeden.
Configuraties Toevoegen en Bewerken: Gebruikers kunnen nieuwe configuraties toevoegen of bestaande configuraties bewerken door details op te geven zoals documenttype, exportmethode en inloggegevens of instellingen die specifiek zijn voor de gekozen exportmethode.
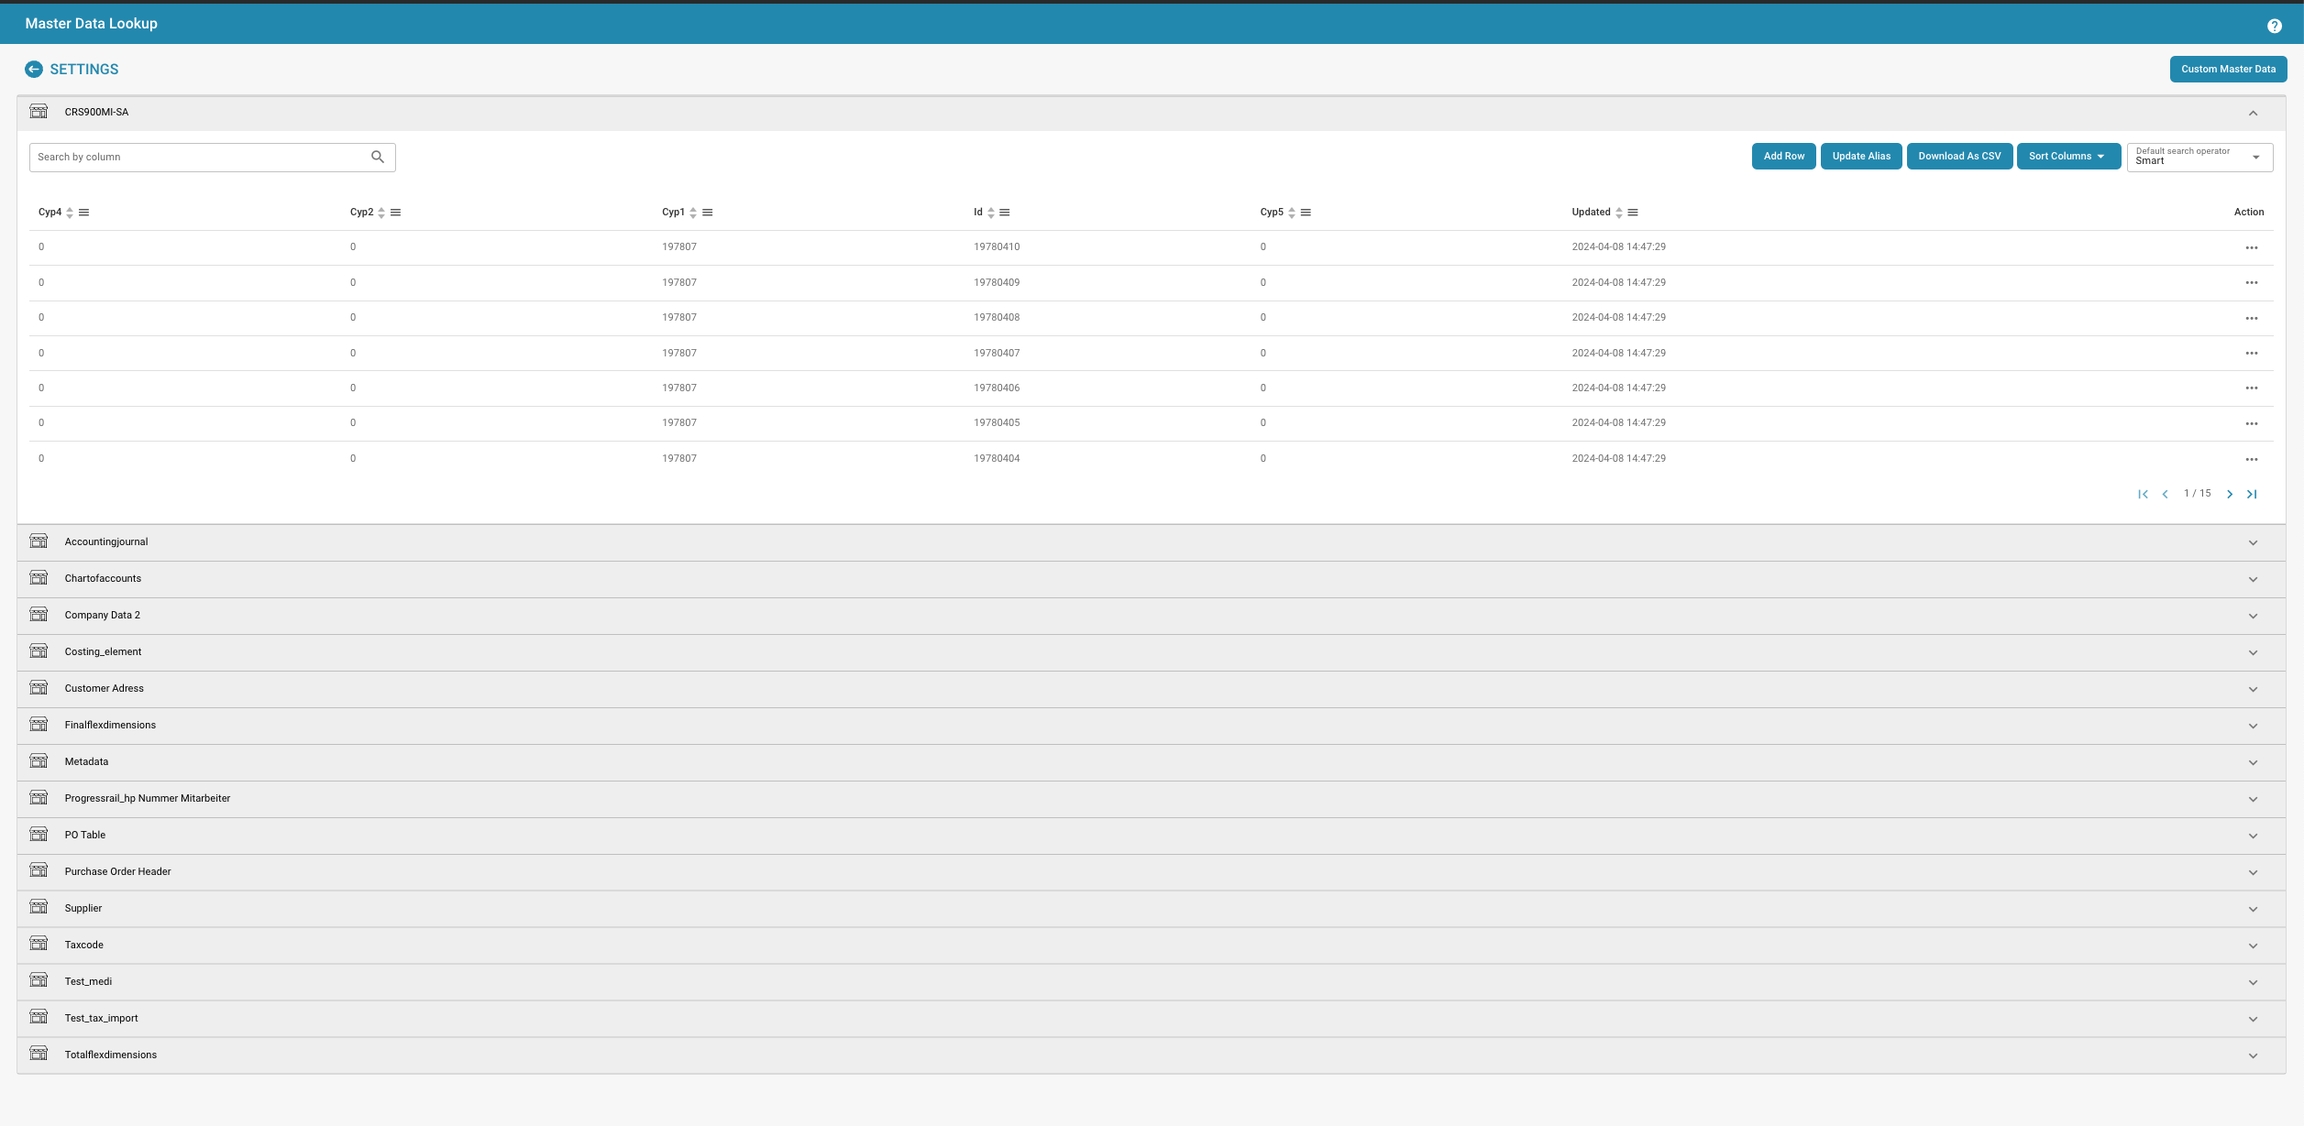
De "Master Data Lookup" in uw documentverwerkingsinstellingen biedt een uitgebreide en geïntegreerde benadering voor het beheren en valideren van uw documentgegevens door deze te synchroniseren met uw Infor ERP-systeem. Hier is hoe het helpt om de validatie en verbetering van documentverwerking binnen uw ERP-omgeving te stroomlijnen:
Gecentraliseerd Gegevensbeheer: Deze functie fungeert als een centrale opslagplaats waar gegevens van verschillende bronnen, zoals leveranciers, klantadressen, belastingcodes en meer, kunnen worden opgeslagen en beheerd. Het biedt een enkel referentiepunt voor alle masterdata, wat zorgt voor consistentie en nauwkeurigheid binnen uw organisatie.
Validatie Tegen ERP-gegevens: Door masterdata zoals leveranciersinformatie van Infor naar Docbits te synchroniseren, kunt u automatisch de gegevens die uit documenten zijn gehaald valideren tegen uw ERP-gegevens. Dit zorgt ervoor dat de verwerkte informatie (zoals leveranciersnamen, adressen en belastingcodes) overeenkomt met de gegevens die in uw ERP-systeem zijn opgeslagen, waardoor fouten en discrepanties worden geminimaliseerd.
Faciliteert Automatisering: Het hebben van een robuust masterdata lookup-systeem helpt bij het automatiseren van de verwerking van binnenkomende documenten. Bijvoorbeeld, inkooporders of facturen kunnen automatisch worden gecontroleerd op de juistheid van leveranciersgegevens, goedgekeurd als ze overeenkomen, of gemarkeerd voor beoordeling als er discrepanties worden gevonden.
Verbetert Gegevensintegriteit: Regelmatige updates van uw ERP-systeem naar de masterdata lookup zorgen ervoor dat de gegevens die voor documentverwerking worden gebruikt actueel zijn. Dit vermindert het risico op het verwerken van documenten op basis van verouderde informatie, waardoor de algehele integriteit van zakelijke transacties wordt verbeterd.
Efficiëntie in Documentverwerking: Met masterdata die direct zijn gekoppeld en voortdurend worden ververst, wordt documentverwerking efficiënter. Documenten kunnen automatisch worden geclassificeerd en gerouteerd op basis van de specifieke criteria die in de masterdata zijn ingesteld, zoals specifieke leveranciersvoorwaarden of belastingregels die van toepassing zijn op verschillende soorten transacties.
See here how to Import Master Data
De ACL-Updater module is verantwoordelijk voor het bijwerken en beheren van Access Control Lists (ACL's) binnen DocBits. Dit zorgt ervoor dat de juiste machtigingen en beveiligingsmaatregelen aanwezig zijn voor documenttoegang en -verwerking.
Om de ACL-Updater module te activeren, volg je deze stappen:
Navigeer naar Instellingen.
Selecteer Documentverwerking.
Selecteer Module.
Ga naar Documenttype.
Activeer de IDM ACL-Updater door de bijbehorende schuifregelaar in te schakelen.
Zodra de module is geactiveerd, kun je een ION Mapping File selecteren om te gebruiken.
Om ACL-informatie toe te voegen, klik je op de Toevoegen knop. Je kunt vervolgens de volgende details opgeven:
IDM Document Type
Current IDM ACL status
New IDM ACL status
De instelling "Lijst van Waarden" in uw documentverwerkingssysteem is in wezen een centrale repository voor het beheren van vooraf gedefinieerde waarden die kunnen worden gebruikt in verschillende formulieren en velden binnen het systeem. Deze instelling is bijzonder nuttig voor het standaardiseren van gegevensinvoer en het waarborgen van consistentie in documenten die door het systeem worden verwerkt.
Segmentatie op Type: Elke sectie, zoals "ISO_Currency", "Invoice_Sub_Type", "Invoice_Type" en "Test", vertegenwoordigt een andere categorie van vooraf gedefinieerde waarden. Deze categorieën worden gebruikt om verschillende soorten gegevensinvoer te beheren die relevant zijn voor hun specifieke contexten binnen het systeem.
Waarden en Synoniemen: Onder elke categorie kunt u meerdere waarden definiëren. Bijvoorbeeld, onder "Invoice_Sub_Type" worden waarden zoals "Cost Invoice" en "Purchase Invoice" vermeld. Bovendien heeft u de mogelijkheid om synoniemen aan deze waarden toe te wijzen, wat de flexibiliteit en reikwijdte van gegevensverzameling vergroot. Bijvoorbeeld, "Cost Invoice" heeft synoniemen zoals "Kostenrechnung" en "Cost Invoice".
Gebruik Over Sub-Organisaties: Deze waarden kunnen ook specifiek worden gemaakt voor bepaalde sub-organisaties binnen uw opzet, waardoor aanpassing en lokalisatie van documentverwerkingsworkflows mogelijk zijn.
Waarden Toevoegen en Beheren: Via de actie "Rij Toevoegen" kunt u nieuwe waarden en synoniemen aan de lijsten toevoegen, en "Acties" stellen u in staat om bestaande vermeldingen te bewerken of te verwijderen.
Doc Scan offers very easy Document creation via your local Scanner.
Click Scan Document on the DocBits Dashboard
As your scanner is not installed yet, you’ll get the following message
Depending on which operating system you use, press the appropriate button to download.
Open the installation file and you will see the following
Click on Continue, accept the Software License Agreement with Agree and continue to install the software.
Installing this software requires 33,6 MB of space. You can change the install location before clicking Install in the next step.
As soon as the following screen is displayed you’re almost done.
Open web browser to test if the app works by entering: https://local.polydocs.io:12500/ If you see this message on the screen, you must first configure some settings in your FritzBox network settings if you are using one.
When you see this screen you are ready to click on DocBits.
You will be redirected to the DocBits login page where you can enter your credentials to access your dashboard.
All you have to do now is activate Doc Scan in the settings under Modules.
If you get the following error after installing and calling up the url https://local.polydocs.io:12500/, here are the reasons:– DNS resolution of private IP addresses not possible.– DNS resolution for domain names that refer to private IP addresses in the FRITZ!Box home network is not possible via the FRITZ!Box. This means that server services in the FRITZ!Box home network cannot be accessed via the domain name. You may see one of the following error messages:“DNS timed out”“DNS request timed out” *Caused* For security reasons, the FRITZ!Box suppresses DNS responses that refer to IP addresses in your own home network. This is a security feature of the FRITZ!Box to protect against so-called DNS rebinding attacks. If you use a FritzBox, you must first make the following settings in the FritzBox menu:
In the FRITZ!Box user interface, click on `Heimnetz`.
`Heimnetz` Click in the menu `Netzwerk`.
Click on the tab `Netzwerkeinstellungen`.
In the Hostname exceptions `DNS-Rebind-Schutz section`, enter local.polydocs.io for which DNS rebind protection should not apply. Confirm with .`Übernehmen`
Run the following command to uninstall Doc2Scan Manager:
Copy
Legend:
Yes – device works perfectly
No – protocol not supported by device
? – device works with sane-airscan, but protocol is not reported by user
Space – author has no information on this mode/device combination
Definitions:
eSCL stands for Airscan is a SANE WebScan frontend that supports Apple’s AirScan protocol. The scanners are automatically detected and published via mDNS.
WSD stands for “Web Services on Devices” and is a network communication protocol used for printer discovery and management over a local area network. In WSD mode, printers can be automatically discovered and added to a computer system without requiring manual configuration or installing additional printer drivers. It enables easy setup and printing to compatible printers over a network. WSD mode is commonly used in Windows operating systems to discover and connect printers on the network.
Showing 1 to 10 of 151 entriesPreviousNext
Brother ADS-2700W
No
Yes
Brother DCP-7055W
No
Yes
Brother DCP-9020CDW
No
Yes
Brother DCP-J552DW
No
Yes
Brother DCP-L2540DW
No
Yes
Brother DCP-L2550DN / DCP-L2550DW
Yes
Brother HL-L2380DW series
No
Yes
Brother HL-L2395DW series
Yes
Brother MFC-7360N
No
Yes
Brother MFC-8710DW
No
Yes