Loading...
Loading...
Loading...
Loading...
Loading...
Loading...
Loading...
Loading...
Loading...
Loading...
Loading...
Loading...
First check which type of M3 your organization is currently using, V1 or V2.
De integratie-instellingen spelen een cruciale rol in de efficiëntie en functionaliteit van Docbits, omdat ze zorgen voor een naadloze interactie met andere tools en diensten. Hier zijn enkele redenen waarom het belangrijk is om de integratie-instellingen goed te configureren:
De integratie-instellingen spelen een cruciale rol in de efficiëntie en functionaliteit van DocBits, omdat ze zorgen voor een naadloze interactie met andere tools en diensten. Hier zijn enkele redenen waarom het belangrijk is om de integratie-instellingen goed te configureren:
Verhoogde efficiëntie: Integratie met andere tools en diensten kan workflows stroomlijnen en de efficiëntie verhogen. Bijvoorbeeld, documenten kunnen automatisch worden uitgewisseld tussen Docbits en een CRM-systeem, waardoor handmatige invoer wordt verminderd en de productiviteit toeneemt.
Gegevensconsistentie: Integratie maakt het mogelijk om gegevens naadloos uit te wisselen tussen verschillende systemen, wat de gegevensconsistentie en nauwkeurigheid verbetert. Dit voorkomt inconsistenties of dubbele gegevensinvoer die tot fouten kunnen leiden.
Realtime updates: Integratie maakt realtime updates mogelijk tussen verschillende platforms, zodat gebruikers altijd de meest actuele informatie hebben. Dit is vooral belangrijk voor kritieke bedrijfsprocessen die realtime informatie vereisen.
Taakautomatisering: Integratie maakt het mogelijk om routinetaken te automatiseren, wat tijd en middelen bespaart. Bijvoorbeeld, meldingen kunnen automatisch worden geactiveerd wanneer een bepaalde gebeurtenis zich in een ander systeem voordoet, zonder dat handmatige tussenkomst nodig is.
Verbeterde gebruikerservaring: Een goed geconfigureerde integratie zorgt voor een naadloze gebruikerservaring, aangezien gebruikers niet tussen verschillende systemen hoeven te schakelen om relevante informatie te verkrijgen. Dit verbetert de gebruikers tevredenheid en draagt bij aan de efficiëntie.
Om de integratie-instellingen goed te configureren, is het belangrijk om de vereisten van de organisatie te begrijpen en ervoor te zorgen dat de integratie naadloos wordt geïntegreerd in bestaande workflows en processen. Dit vereist grondige planning, configuratie en monitoring van de integratie om ervoor te zorgen dat deze soepel werkt en de gewenste waarde levert.
Configuring Single Sign-On (SSO) in DocBits requires a few steps to set up and configure. Here is a step-by-step guide:
Accessing SSO settings:
Log in to your DocBits account as an administrator.
Navigate to settings and look for Single Sign-On or SSO.
Configuring SSO parameters:
Enter the required SSO parameters such as the Entity ID, Single Log-Out (SLO) URL, and Single Sign-On (SSO) URL.
The Entity ID is a unique identifier for your service or application.
The SLO URL is the URL used for Single Log-Out to log users out of all services when needed.
The SSO URL is the URL that will redirect users to the Identity Provider for authentication.
Download certificates and metadata:
The identity provider (IdP) typically provides a certificate that DocBits uses to verify the SAML authentication response.
Download the certificate and store it securely.
The metadata download contains all the necessary configuration information for SSO integration. This includes information such as the entity ID, SSO URL, certificate information, and more.
Download the metadata and store it locally or provide it to the identity provider.
Identity provider (IdP) configuration:
Log in to the identity provider and configure the application or service for SAML integration.
Use the downloaded metadata or the manually entered SSO parameters to add DocBits as a trusted application or service.
Make sure the IdP's configuration matches the SSO parameters specified in DocBits.
Testing SSO integration:
After the configuration is complete, perform a test of the SSO integration to ensure that users can successfully log in to DocBits using SSO.
Also, verify that Single Log-Out is working properly by logging out of DocBits and ensuring that you are logged out of other connected services as well.
Setting up SSO properly allows users to seamlessly log in to Docbits using their existing credentials, improving the user experience and increasing security.
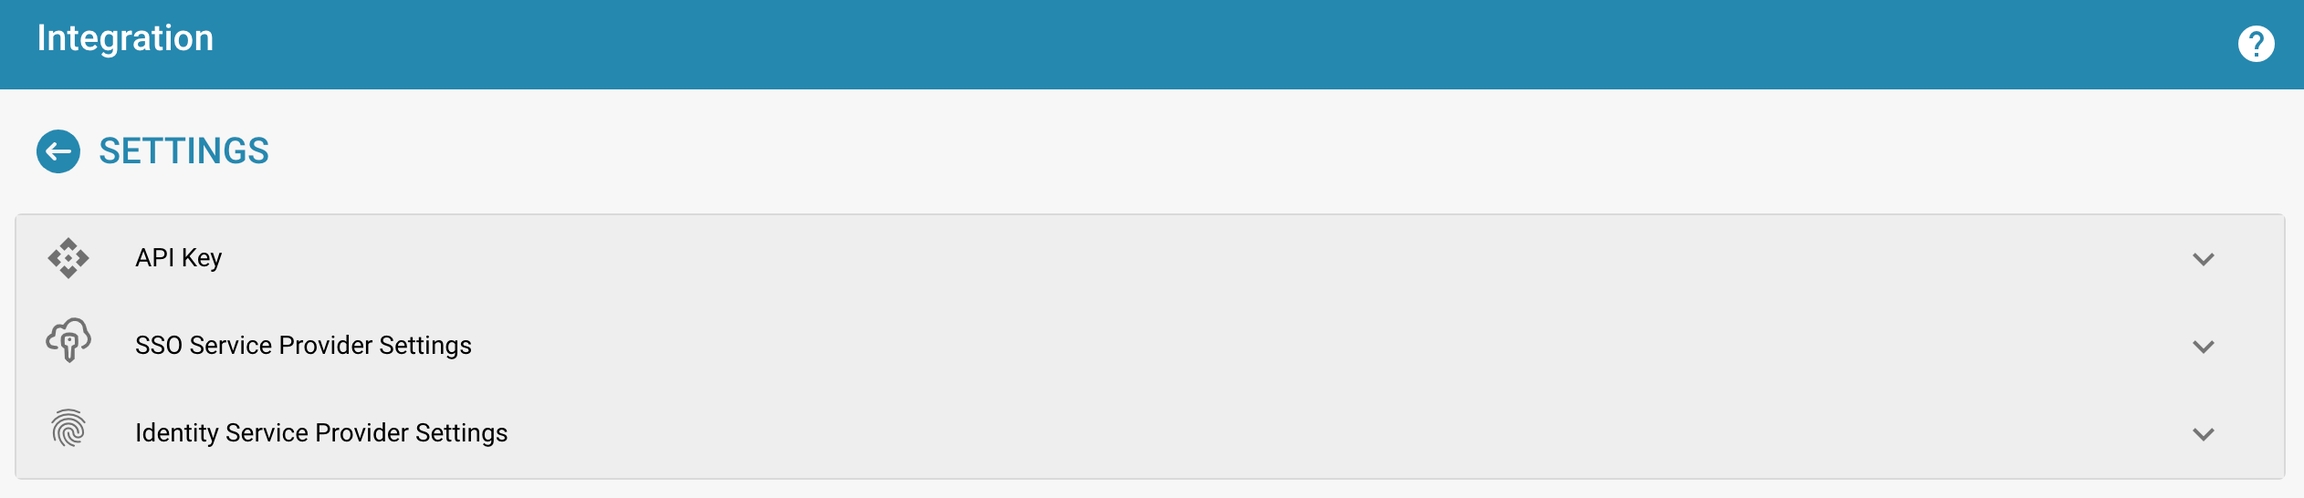
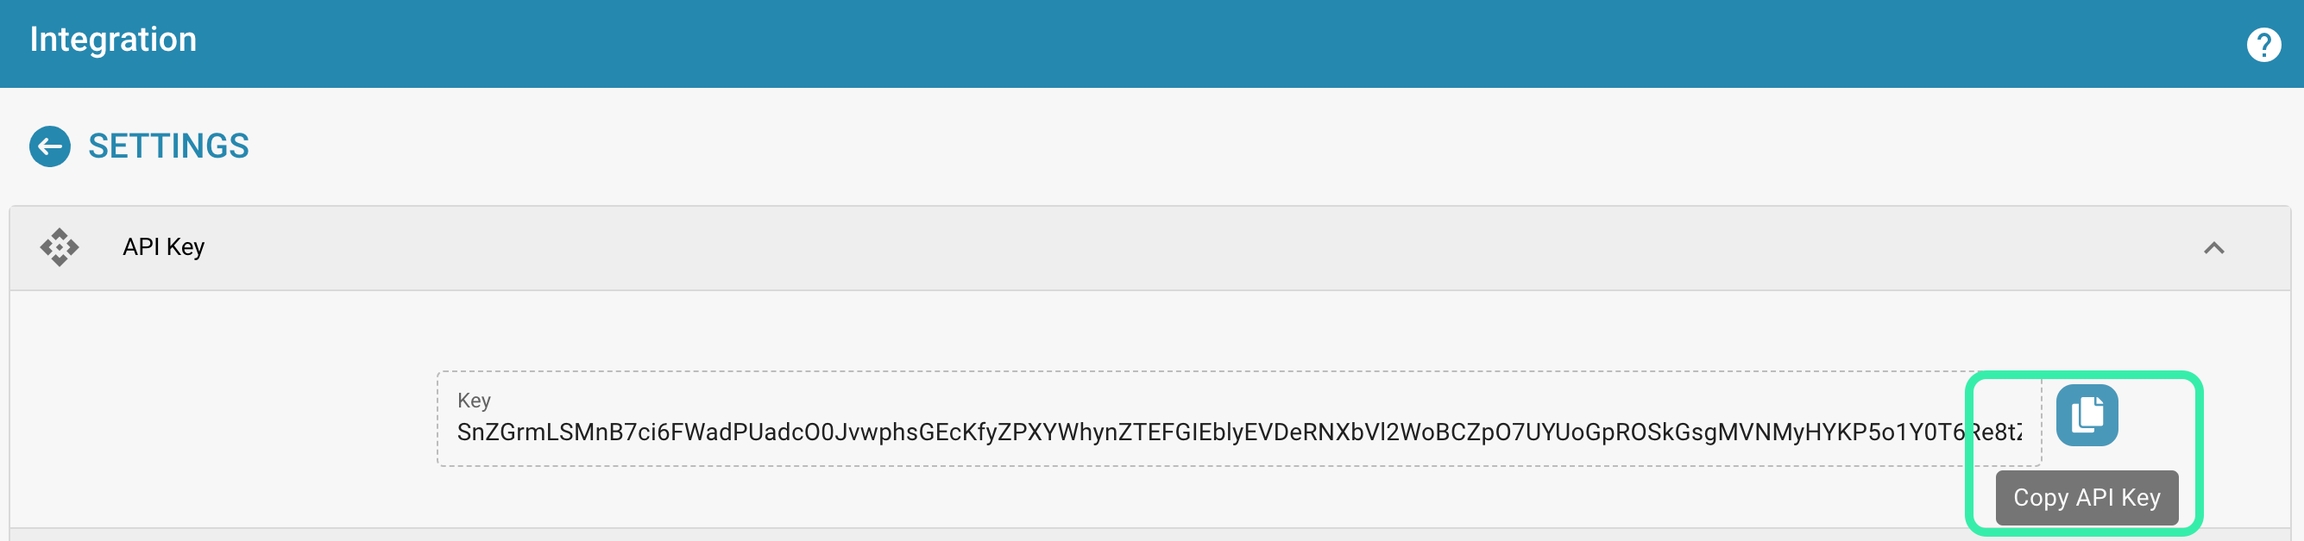
Key: This is the unique identifier used by external applications to access DocBits' API. It is crucial for authenticating requests made to DocBits from other software.
Actions such as view, regenerate, or copy the API key can be performed here, depending on the specific needs and security protocols.
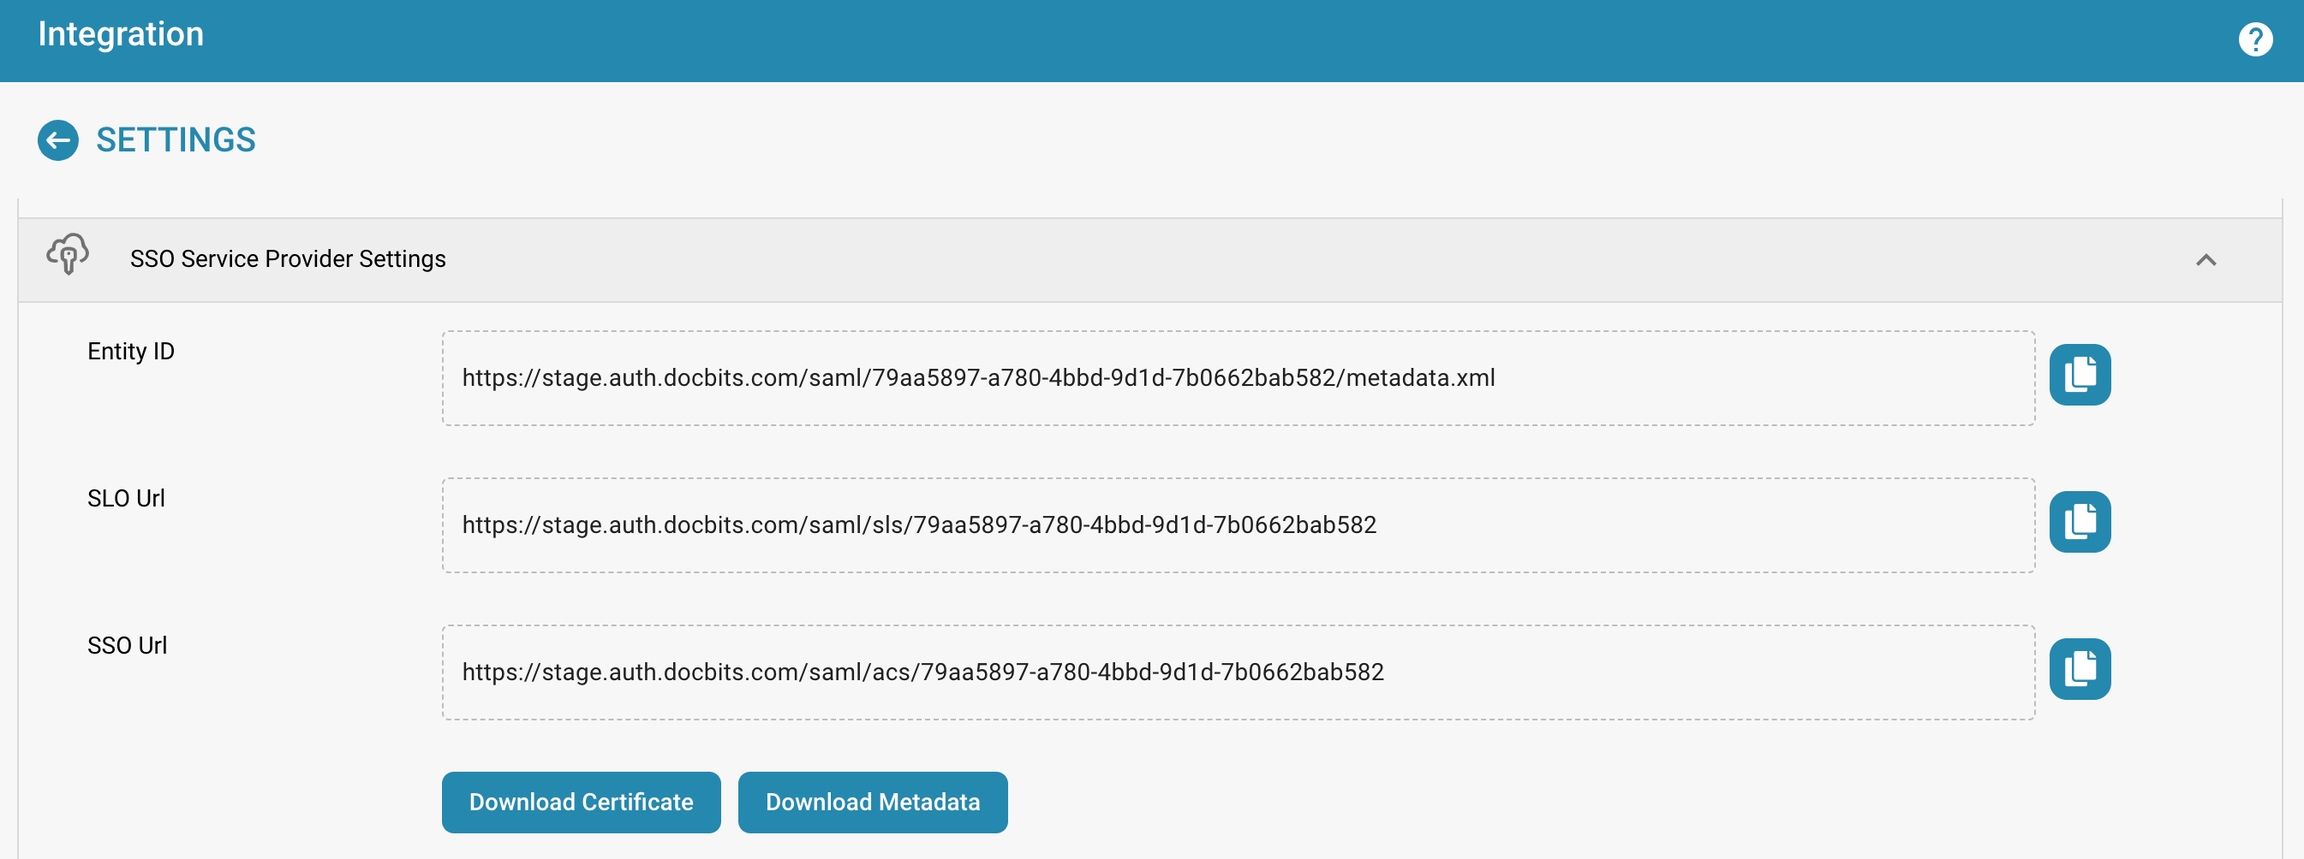
Entity ID: This is the identifier for DocBits as a service provider in the SSO configuration. It uniquely identifies DocBits within the SSO framework.
SLO (Single Logout) URL: The URL to which SSO sessions are sent to log out simultaneously from all applications connected via SSO.
SSO URL: The URL used for initiating the single sign-on process.
Actions such as "Download Certificate" and "Download Metadata" are available for obtaining necessary security certificates and metadata information used in setting up and maintaining SSO integration.
See Setup SSO
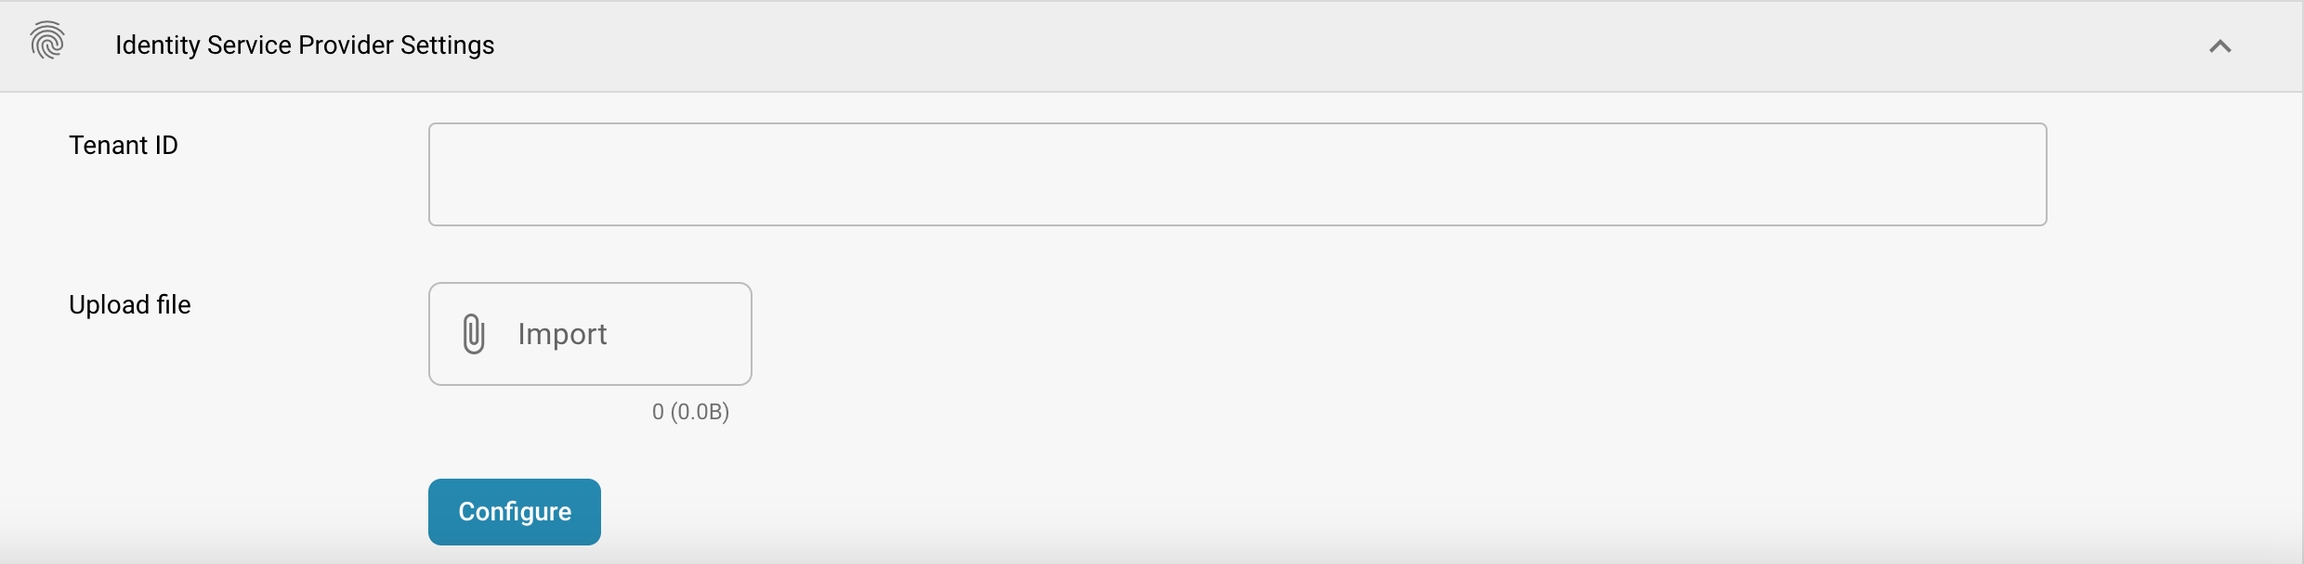
Tenant ID: This might be used when DocBits integrates with cloud services that require a tenant identifier to manage data and access configurations specific to the company using Docbits.
Upload file: Allows the admin to upload configuration files or other necessary files that facilitate integration with an identity provider.
Configure: A button to apply or update the settings after making changes or uploading new configurations.
Instructions for viewing, copying or regenerating the API key
API key management is an important aspect when it comes to the security of integrations and access to external services through APIs. Here are some steps to manage API keys and best practices for their security:
View and copy the API key:
Navigate to the API key settings in your DocBits account. Here you can find the API key, click "Copy" to copy the key.
Handling API keys with security in mind:
Treat API keys like sensitive credentials and never share them with anyone. Store API keys securely and use encryption if you need to store them locally. Update API keys regularly to ensure security and minimize the risk of unauthorized access. Avoid using API keys in public repositories or unsecured environments as they could potentially be intercepted by attackers.
Limit API key permissions:
Give API keys only the permissions required for the specific integration or service. Avoid excessive permissions to minimize the risk of abuse. Regularly review API key permissions and remove unnecessary permissions when they are no longer needed.
Logging and monitoring API calls:
Implement logging and monitoring of API calls to detect suspicious activity or unusual patterns that could indicate potential security breaches. Respond quickly to suspicious activity and, if necessary, revoke affected API keys to minimize the risk of further damage.
By carefully managing and securing API keys, organizations can ensure that their integrations and access to external services via APIs are protected and the risk of unauthorized access is minimized.
In document processing, APIs can be used to automate various tasks such as extracting text from documents, analyzing document contents, converting between different file formats, and more. Here are some examples of APIs in document processing:
OCR (Optical Character Recognition) API: This type of API allows you to extract text from images or scanned documents. For example:
NLP (Natural Language Processing) API: This API enables analysis of text content in documents, including keyword identification, entity recognition, sentiment analysis, etc. For example:
Conversion API: This type of API allows conversion between different file formats, for example from PDF to Word or from Word to PDF. For example:
Document Management API: This API allows you to upload, download and manage documents in a document management system. For example:
These examples show how APIs can be used in document processing to automate various tasks and improve efficiency. The exact functionality and syntax of the API depends on the particular API and its specific features.
Here are troubleshooting steps for common issues while integrating DocBits with an Identity Service Provider (IdP) or other services:
Verify configuration: Make sure the integration settings in DocBits are correctly configured and match your Identity Service Provider's requirements. In particular, check the SSO URL, Entity ID, and certificates.
Monitor logs: Monitor logs in both DocBits and on the Identity Service Provider's side to identify any error messages or warnings. These logs can provide clues as to where the problem lies.
Verify network connections: Make sure there are no network issues that could affect communication between DocBits and your Identity Service Provider. Check firewall settings, DNS configurations, and network access rules.
Test SSO processes: Perform test logins via Single Sign-On (SSO) to ensure users are successfully authenticated and redirected to DocBits. Be sure to note any error messages or redirection issues.
Checking permissions: Make sure users in DocBits have the required permissions to access the appropriate features or resources. Check the assignment of groups and roles.
Updating certificates: Make sure the SAML certificates and metadata are up to date on both sides. If a certificate has expired, you must update it and retest the integration.
Communicating with support: If you cannot identify the cause of the problem, contact DocBits support or your identity service provider. They can help you troubleshoot and provide specific guidance for your setup.
By following these troubleshooting steps, you can quickly identify and resolve the most common issues during the integration between Docbits and your identity service provider.
Best practices for configuring and maintaining integration settings help ensure the efficiency, security, and reliability of the integration between DocBits and your Identity Service Provider (IdP).
Here are some best practices:
Regularly review settings: Perform regular reviews of integration settings to ensure all configurations are correct and up-to-date. Changes to systems or policies may require updates to the integration.
Certificate and metadata updates: Monitor SAML certificate and metadata expiration dates and update them in a timely manner to avoid service disruptions. Use automated processes or reminders to ensure no expiration dates are missed.
Security-conscious credential management: Treat credentials such as API keys or certificates with the utmost confidentiality and protect them from unauthorized access. Use secure methods for storing and exchanging credentials to ensure the integrity of the integration.
Documentation and logging of changes: Record and log all changes to integration settings in detailed documentation. This allows you to track changes and revert to previous configurations when needed.
Training administrators: Ensure that the administrators responsible for configuring and maintaining integration settings have the necessary knowledge and skills. Provide training and resources to ensure they understand and can implement integration best practices.
Setting up alerts and notifications: Configure alerts and notifications for critical events such as certificate expiration dates or failed authentication attempts. This will allow you to identify potential issues early and proactively address them.
By following these best practices, you can ensure that the integration between DocBits and your identity service provider works smoothly, is secure, and meets the needs of your organization.
How to set up SSO with INFOR Portal V1 (LN and older M3 Interface)
Login Details to Cloud
Credentials are mandatory for accessing the Infor Cloud environment. The user should have the roles "Infor-SystemAdministrator" and "UserAdmin".
Config Admin Details (DocBits)
You should have received an email from FellowPro AG with the login details for the DocBits SSO Settings page. You will need a login and password.
Certificate
You can download the certificate in DocBits under SSO Service Provider Settings
URL starts with https://mingle-portal.eu1.inforcloudsuite.com/<TENANT_NAME> followed by your personal extension
Choose the option Cloud Identities and use your login details
After login you will have access to the Infor Cloud. In this case we enter this page, but on the burger menu you will find access to all applications.
On the right hand side of the bar menu, you will find the user menu and there you can access the user management
Then you need to select in the left hand side menu the option Security Administration and Service Provider.
You will see this window with the Service Providers.
Now click on the “+” sign and add our DocBits as Service Provider.
Log in on URL https://app.docbits.com/ with the login details you received from us.
Go to SETTINGS (on top bar) and select INTEGRATION, under SSO Service Provider Settings you will find all the information you need for the following steps.
Download the certificate
Filling the Service Provider with the help of SSO Service Provider Settings in DocBits
Application Type
DEFAULT_SAML
Display Name
DocBits
Entity ID
See Entity ID under SSO SERVICE SETTINGS
SSO Endpoint
Copy the SSO URL from SSO SERVICE SETTINGS and paste it in the SSO Endpoint field.
SLO Endpoint
Copy the SLO URL from SSO SERVICE SETTINGS and paste it in the SSO Endpoint field.
Signing Certificate
Upload the appropriate .cer file you have downloaded in step 3c) from SSO SERVICE SETTINGS
Name ID Format and Mapping
email address
When you have filled out everything remember to save it with the disk icon above Application Type
Enter the service provider DocBits again.
Click on view the Identity Provider Information underneath.
File looks like this: ServiceProviderSAMLMetadata_10_20_2021.xml
Import the SAML METADATA in the SSO Settings.
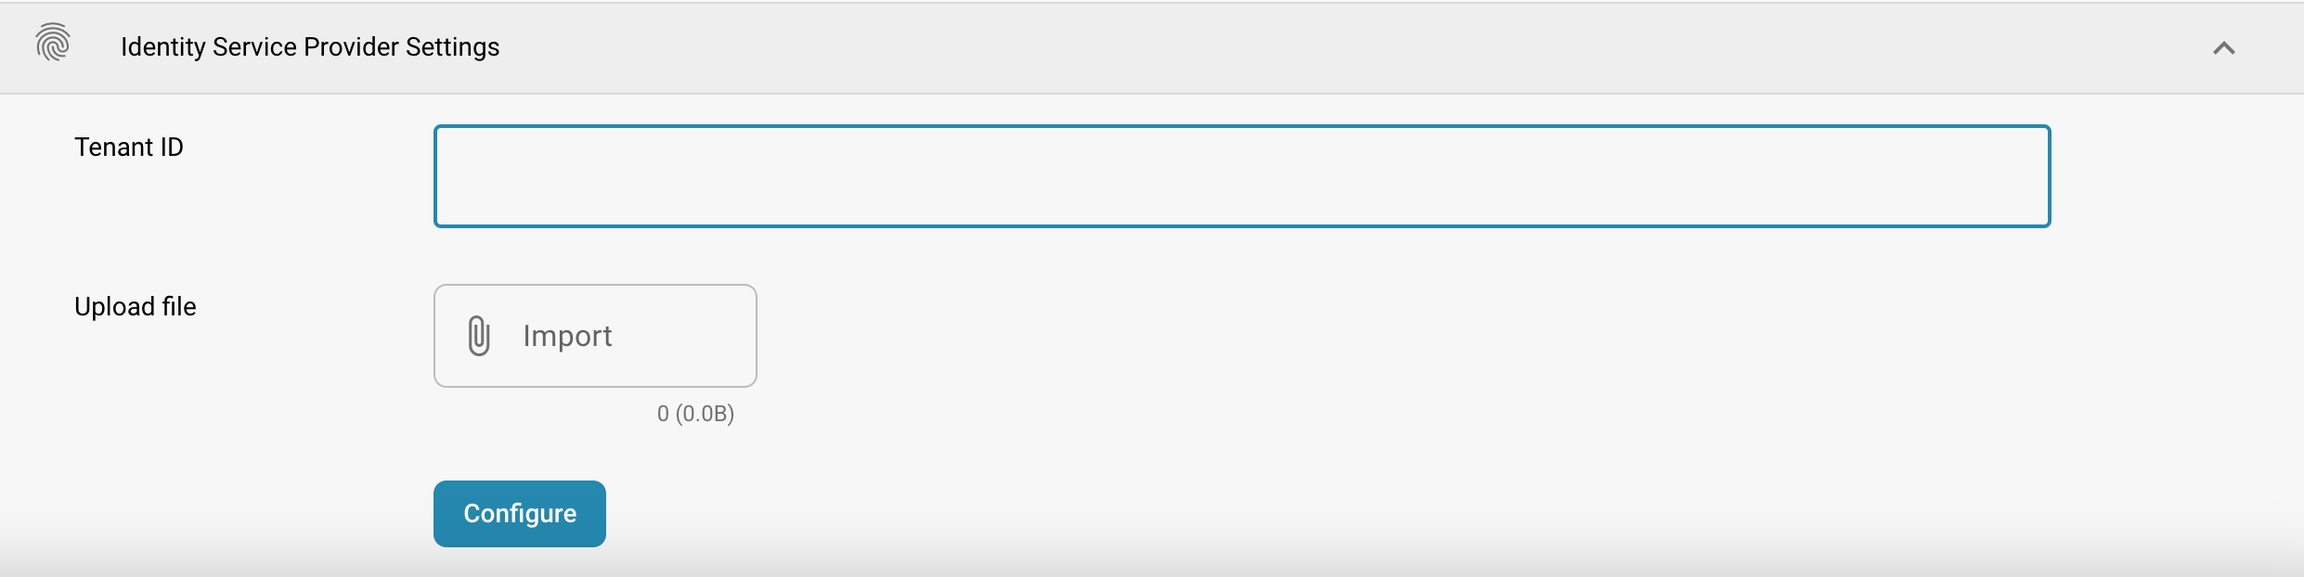
Go to IDENTITY SERVICE PROVIDER SETTINGS, which is located under INTEGRATIONS in SETTINGS. Enter your Tenant ID (e.g. FELLOWPRO_DEV) and underneath that line you see the Upload file and the IMPORT Button, where you need to upload the previously exported SAML METADATA file.
Click on IMPORT and then choose the METADATA file that you have already downloaded from the SSO SERVICE PROVIDER SETTINGS
Click on CONFIGURE
Go to Admin settings
Click on ADD APPLICATION in the top right corner
Fill out all fields like on the following image but with your own SSO Url, don’t forget to choose an icon and click on SAVE.
Final Step
Log out of DocBits.
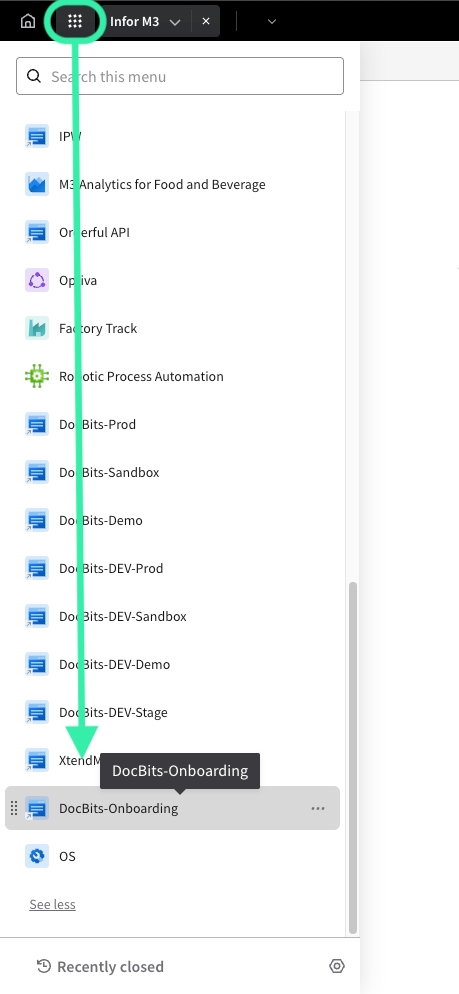
Go back to the burger menu in Infor and select the icon you just created.
And you will be taken to the Dashboard of DocBits.
Using DocBis with your Microsoft Login without using a (separate) password
Perform the following steps to add SAML SSO in Azure AD:
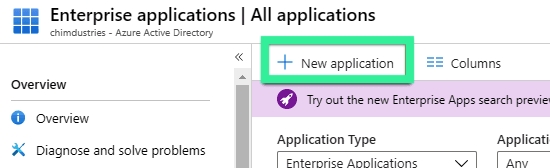
In Azure, go to your `Azure Active Directory` console
In the left panel, click `Enterprise applications`
Click `+ New application
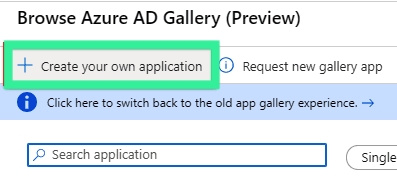
Click `+ Create your own application`
Enter a name for your application. Keep the remaining default selections.
Click on `Create`
Next, assign users or groups to the SSO configuration.
Important: You should already have created users and groups in Azure AD. If you don’t have any users or groups, create them now before proceeding.
Under `Getting Started`, click `Assign Users and Groups`.
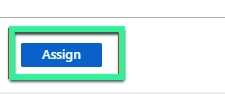
Click `+ Add user`
Select the users and groups you want to assign to this SSO configuration. These users will be able to authenticated in DocBits (using SSO).
Click `Select`
When you’re satisfied with your selection, click `Assign`
Go to the `Groups` view list and find the assigned groups.
Next, you need to finish setting up single-sign-on in Azure.
In the left panel, click `Single sign-on`
Click `SAML`
Click `Upload metadata file`
Upload the DocBits metadata.xml, which you can find in the Settings menu Integration under SSO Service Provider Settings of your DocBits account.
Edit the `Basic SAML Configuration`
Check if the `Entity ID`, `ACS URL`, `Sign on URL` and `Logout URL` are populated right.
Download the newly generated Federation Metadata XML.
Upload the FederationMetadata.xml into the Identity Service Provider Settings of your DocBits account which you can find in the Settings menu Integration.
How to set up SSO with INFOR Portal V2
Login Details to Cloud
Credentials are mandatory for accessing the Infor Cloud environment. The user should have the roles "Infor-SystemAdministrator" and "UserAdmin".
Config Admin Details (DocBits)
You should have received an email from FellowPro AG with the login details for the DocBits SSO Settings page. You will need a login and password.
Certificate
You can download the certificate in DocBits under SSO Service Provider Settings
URL starts with https://mingle-portal.eu1.inforcloudsuite.com/<TENANT_NAME> followed by your personal extension
Choose the option Cloud Identities and use your login details
On the new Portal, the way you access this menu now is by selecting the OS option in the left menu. If you do not see it in the menu, click on See More to view all applications.
Select Security, in the OS menu, to be taken to the area for adding a new service provider. The steps are the same from this point on.
Then you need to select in the left hand side menu the option Security Administration and Service Provider.
You will see this window with the Service Providers.
Now click on the “+” sign and add our DocBits as Service Provider.
Log in on URL https://app.docbits.com/ with the login details you received from us.
Go to SETTINGS (on top bar) and select INTEGRATION, under SSO Service Provider Settings you will find all the information you need for the following steps.
Download the certificate
Filling the Service Provider with the help of SSO Service Provider Settings in DocBits
Application Type
DEFAULT_SAML
Display Name
DocBits
Entity ID
See Entity ID under SSO SERVICE SETTINGS
SSO Endpoint
Copy the SSO URL from SSO SERVICE SETTINGS and paste it in the SSO Endpoint field.
SLO Endpoint
Copy the SLO URL from SSO SERVICE SETTINGS and paste it in the SSO Endpoint field.
Signing Certificate
Upload the appropriate .cer file you have downloaded in step 3c) from SSO SERVICE SETTINGS
Name ID Format and Mapping
email address
When you have filled out everything remember to save it with the disk icon above Application Type
Enter the service provider DocBits again.
Click on view the Identity Provider Information underneath.
File looks like this: ServiceProviderSAMLMetadata_10_20_2021.xml
Import the SAML METADATA in the SSO Settings.
Go to IDENTITY SERVICE PROVIDER SETTINGS, which is located under INTEGRATIONS in SETTINGS. Enter your Tenant ID (e.g. FELLOWPRO_DEV) and underneath that line you see the Upload file and the IMPORT Button, where you need to upload the previously exported SAML METADATA file.
Click on IMPORT and then choose the METADATA file that you have already downloaded from the SSO SERVICE PROVIDER SETTINGS
Click on CONFIGURE
Final Step
Log out of DocBits.
Go back to the left menu in Infor and select the application you just created.
You will be taken to the Dashboard of DocBits.
Configuring the Identity Service Provider (IdP) to integrate with DocBits requires a few specific steps.Here is a guide to doing that:
Accessing the IdP configuration interface
Log in to your Identity Service Provider (IdP) as an administrator.
Navigate to the settings or configuration interface dedicated to managing SAML integrations.
Entering the Tenant ID:
Look for the section that allows configuration for new SAML integrations.
Enter the DocBits tenant ID. This ID identifies your Docbits account to the IdP and enables secure communication between the two systems.
Importing the required files:
DocBits usually requires downloading metadata or adding specific configuration details. Check your IdP's documentation to see what steps are required.
Download the DocBits metadata file or import it into your IdP's configuration menu. Alternatively, you can manually enter the required configuration details, depending on what your IdP supports.
Configure integration settings:
Make sure the integration settings, such as the SSO URL, Entity ID, and SAML certificate, are correct.
Check that the Single Log-Out (SLO) URL and other required parameters are configured correctly. These are critical for smooth authentication and logout via SAML.
Verify configuration:
Take time to make sure all information entered is correct and that there are no typos or misconfigurations.
Run tests to ensure that users can successfully log into Docbits via SAML and that Single Log-Out is working properly.
Security considerations:
Make sure all transferred files and configuration details are handled securely to avoid data leaks or unauthorized access.
Protect sensitive information such as SAML certificates and credentials from unauthorized access and store them in a safe location.
Click on OS in the left menu (like before), you will be taken to a menu where you need to select Portal. Next, click on + Add Application on the right. Fill in the following information, the URL field is the SSO Endpoint URL from the Integration area in your DocBits settings. A Logical ID will also be generated for you, when done click save.