> For the complete documentation index, see [llms.txt](https://docs.docbits.com/llms.txt). Markdown versions of documentation pages are available by appending `.md` to page URLs; this page is available as [Markdown](https://docs.docbits.com/chinese/guan-li-yu-she-zhi/settings/document-processing/module/inbound-emails.md).

# 入站电子邮件

### 概述

DocBits 可以直接从电子邮件获取文档，无需手动上传。导入电子邮件文档有 **两种方式**，均在 **Settings → Document Processing → Import** 中管理：

| 方式                         | 工作原理                                                                                     | 适用场景                                        |
| -------------------------- | ---------------------------------------------------------------------------------------- | ------------------------------------------- |
| **Email Import 账户**        | DocBits 连接到您拥有的邮箱（**IMAP**、**OAuth Office365** 或 **OAuth Office365 – Tenant**），并导入找到的文档。 | 专门用于接收文档的邮箱（例如 `invoices@yourcompany.com`）。 |
| **转发电子邮件（Inbound Emails）** | DocBits 会为您提供一个唯一地址；您授权的任何人都可以将文档**转发**到该地址。                                             | 多个发件人临时转发文档，且无需共享邮箱凭据。                      |

您可以单独使用其中任一方式，也可以同时使用两种方式。

### 方式 1 — 连接邮箱（Email Import）

前往 **Settings → Document Processing → Import**，打开 **Email Import** 部分。点击 **New** 添加邮箱连接。

<figure><img src="https://1870485400-files.gitbook.io/~/files/v0/b/gitbook-x-prod.appspot.com/o/spaces%2FlPczlNw8zzYNLfjfispX%2Fuploads%2Fgit-blob-10cf1389bbde2f4f387ec4a2723e83c76e19ae6b%2Finbound_emails_email_import_entry.png?alt=media" alt="Email Import 部分及 New 按钮"><figcaption><p>在 Email Import 部分，点击 <strong>New</strong> 以连接邮箱。</p></figcaption></figure>

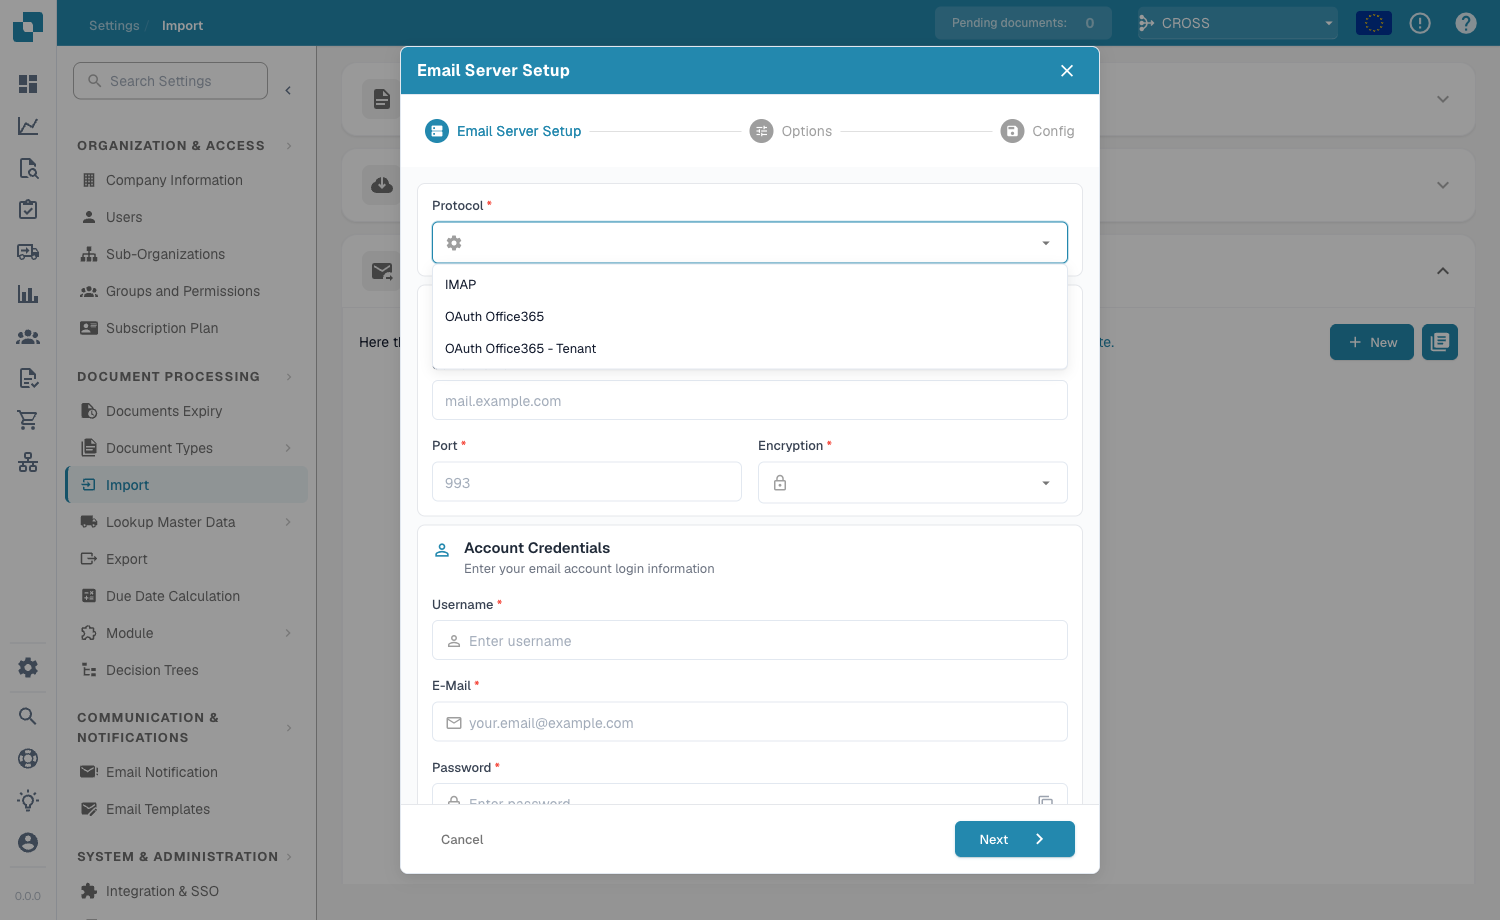
设置向导随即打开。第一个字段 **Protocol** 决定 DocBits 的连接方式 — 选择 **IMAP**、**OAuth Office365** 或 **OAuth Office365 – Tenant**。

<figure><img src="https://1870485400-files.gitbook.io/~/files/v0/b/gitbook-x-prod.appspot.com/o/spaces%2FlPczlNw8zzYNLfjfispX%2Fuploads%2Fgit-blob-655f454431c6517836367f019686226425b1adc1%2Finbound_emails_protocol_select.png?alt=media" alt="Protocol 下拉菜单，显示 IMAP、OAuth Office365 和 OAuth Office365 - Tenant"><figcaption><p><strong>Protocol</strong> 下拉菜单提供三种连接类型。</p></figcaption></figure>

#### IMAP

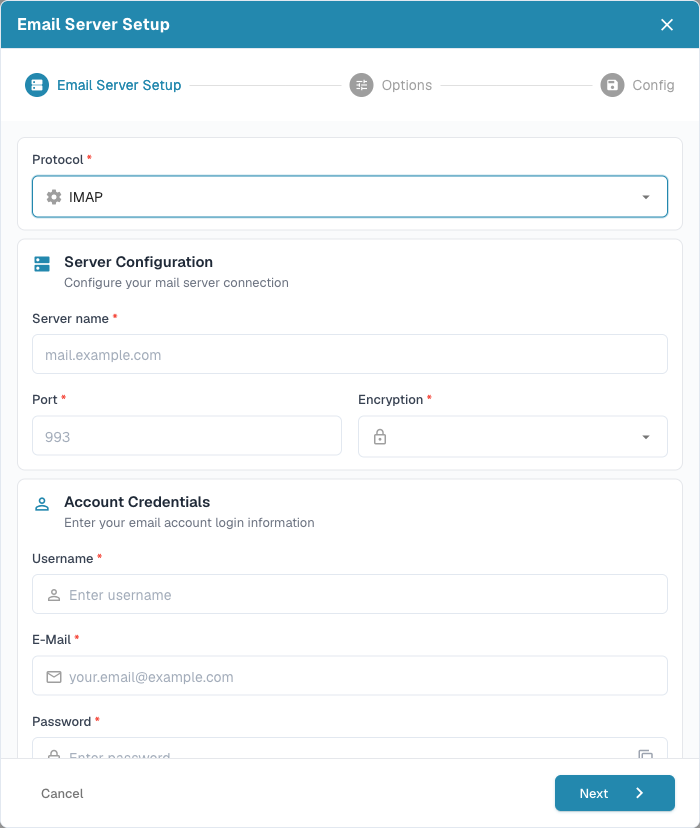
对于标准邮箱，选择 **IMAP** 并填写服务器详细信息和账户凭据：

* 邮件服务器的 **Server name** 和 **Port**（默认值为 `993`）。
* **Encryption** — `SSL`、`TLS` 或 `None`。
* 邮箱的 **Username**、**E‑Mail** 和 **Password**。

<figure><img src="https://1870485400-files.gitbook.io/~/files/v0/b/gitbook-x-prod.appspot.com/o/spaces%2FlPczlNw8zzYNLfjfispX%2Fuploads%2Fgit-blob-67dd3fd63ed5bda2b4674bf1e41551462df1c6e0%2Finbound_emails_imap.png?alt=media" alt="IMAP 连接表单，包含服务器、端口、加密方式和凭据"><figcaption><p>IMAP 表单：邮件服务器连接信息和邮箱凭据。</p></figcaption></figure>

#### OAuth Office365

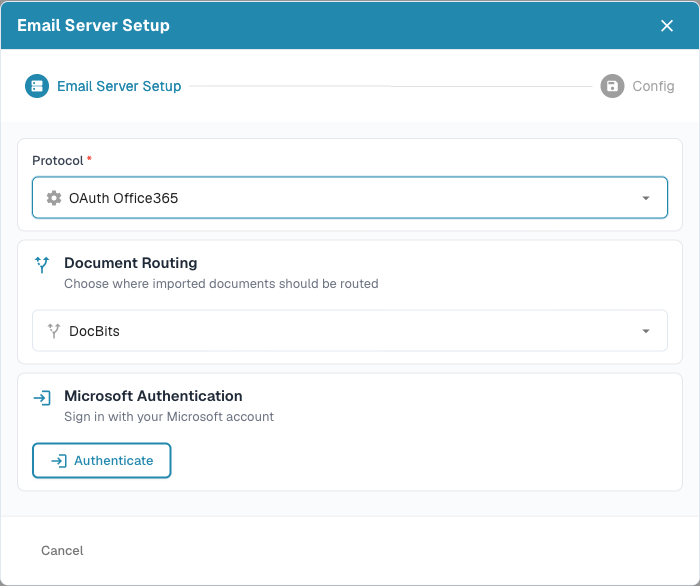
对于单个 Microsoft 365 用户邮箱，选择 **OAuth Office365**。您无需使用密码，而是通过 Microsoft 授权 DocBits：选择 **Document Routing** 目标，然后点击 **Authenticate** 并完成 Microsoft 登录。

<figure><img src="https://1870485400-files.gitbook.io/~/files/v0/b/gitbook-x-prod.appspot.com/o/spaces%2FlPczlNw8zzYNLfjfispX%2Fuploads%2Fgit-blob-76fbfae1ce5d920693cc0de8948ee6f0c7957f7c%2Finbound_emails_o365.png?alt=media" alt="OAuth Office365 表单，包含 Document Routing 和 Authenticate 按钮"><figcaption><p>OAuth Office365 通过 Microsoft 登录进行连接 — DocBits 不会存储密码。</p></figcaption></figure>

#### OAuth Office365 – Tenant

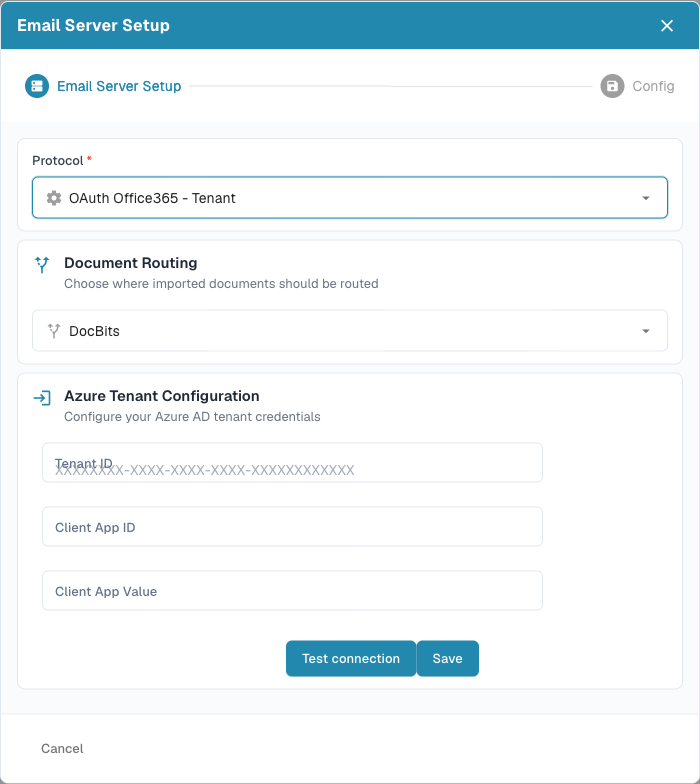
若要通过 Azure 应用注册在租户（组织）级别连接，请选择 **OAuth Office365 – Tenant** 并输入 Azure 凭据：**Tenant ID**、**Client App ID** 和 **Client App Value**（客户端密钥）。使用 **Test connection** 验证连接，然后点击 **Save**。

<figure><img src="https://1870485400-files.gitbook.io/~/files/v0/b/gitbook-x-prod.appspot.com/o/spaces%2FlPczlNw8zzYNLfjfispX%2Fuploads%2Fgit-blob-425efa102cd894979f94a976a1bd0fcd9bc16251%2Finbound_emails_o365_tenant.png?alt=media" alt="Azure Tenant Configuration，包含 Tenant ID、Client App ID 和 Client App Value"><figcaption><p>OAuth Office365 – Tenant 使用 Azure 应用注册（Tenant ID、Client App ID、客户端密钥）。</p></figcaption></figure>

{% hint style="info" %}
**Document Routing** 决定导入的文档将发送到哪里 — **DocBits**（标准仪表板）或 **AI Workforce**。连接后，向导的后续步骤会让您选择要从哪个邮箱**文件夹**导入、可选的**共享邮箱**，以及是否将已处理的电子邮件**移动**到其他文件夹。
{% endhint %}

### 方式 2 — 将电子邮件转发到 DocBits（Inbound Emails）

首先需要启用 **Inbound Email** 模块。前往 **Settings → Document Processing → Module**，打开 **Document Type** 部分，找到 **Inbound Email** 并启用开关。

<figure><img src="https://1870485400-files.gitbook.io/~/files/v0/b/gitbook-x-prod.appspot.com/o/spaces%2FlPczlNw8zzYNLfjfispX%2Fuploads%2Fgit-blob-8f81fa9c399504b8575d426551d6c46a7e3f8178%2Finbound_emails_1.png?alt=media" alt="启用 Inbound Email 模块"><figcaption><p>在 Settings → Document Processing → Module 下启用 <strong>Inbound Email</strong>。</p></figcaption></figure>

启用后，**Inbound Emails** 部分会显示在 **Settings → Document Processing → Import** 下。该部分提供接收转发文档所需的全部信息：

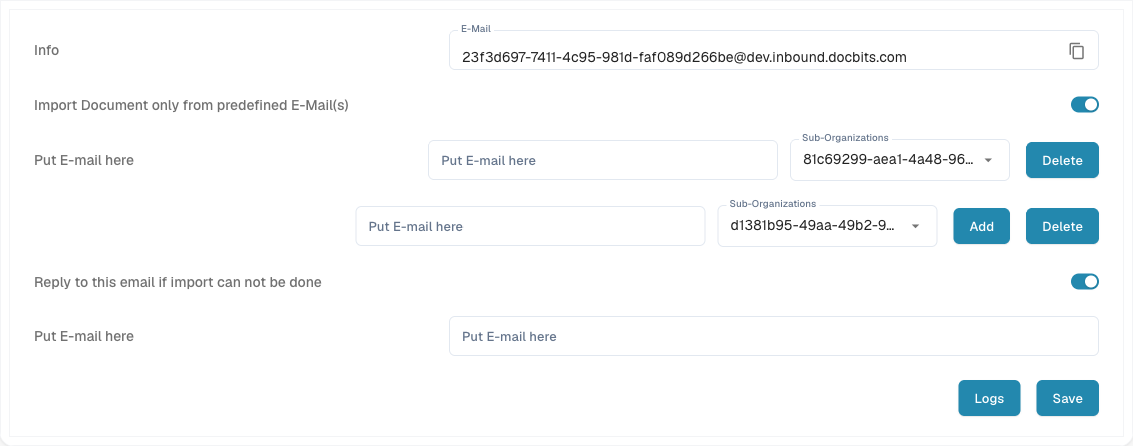
<figure><img src="https://1870485400-files.gitbook.io/~/files/v0/b/gitbook-x-prod.appspot.com/o/spaces%2FlPczlNw8zzYNLfjfispX%2Fuploads%2Fgit-blob-1c3434d811f5996f5a1107494839a02871229497%2Finbound_emails_forward.png?alt=media" alt="Inbound Emails 部分：导入地址、预定义发件人和失败回复地址"><figcaption><p>Inbound Emails 部分：您的导入地址、预定义发件人列表和失败通知地址。</p></figcaption></figure>

* **Import address** — 系统生成的唯一地址，格式为 `org_id@environment.inbound.docbits.com`。将文档转发或发送到此地址，DocBits 会自动导入。点击复制图标即可复制地址。
* **Import Document only from predefined E‑Mail(s)** — 启用后，只接受此处列出的发件人地址；其他人的电子邮件将被忽略。您可以为每个发件人选择一个 **Sub-Organization**（留空则分配给主组织）。使用 **Add** 添加更多发件人，使用 **Delete** 删除发件人。
* **Reply to this email if import can not be done** — 启用后，输入一个地址，以便在导入尝试失败时通知该地址，避免问题被忽略。

点击 **Save** 应用更改。

{% hint style="info" %}
**会导入哪些附件？** DocBits 会导入受支持的文档附件 — 完整文件类型列表请参阅 [Import → Email Import](/chinese/guan-li-yu-she-zhi/settings/document-processing/import.md#email-import) — 并解包转发的 `.eml` 邮件和 Outlook `winmail.dat`（TNEF）附件，以导入其中的文档。检测也基于**实际文件内容**，因此，即使转发邮件服务器将附件重新标记为通用类型（`application/octet-stream`），仍能正确导入。内嵌图片（签名徽标／嵌入式图形）会被忽略。
{% endhint %}

### 如何选择使用方式

* **使用 Email Import 账户**：适用于文档已进入专用邮箱，且您希望 DocBits 自动获取文档的情况 — 通用邮件服务器使用 IMAP，Microsoft 365 使用 OAuth Office365。
* **使用转发电子邮件**：适用于用户需要按需转发文档，或您不希望向 DocBits 提供邮箱凭据的情况。
* **两种方式结合使用**：适用于部分文档进入固定邮箱、其他文档由用户临时转发的情况。

{% hint style="info" %}
限制发件人（方式 2）并选择正确的 **Document Routing** 目标（方式 1），是保持入站流程整洁的两种常见方式 — 只接收您预期的文档，并将其发送到指定位置。
{% endhint %}


---

# Agent Instructions
This documentation is published with GitBook. GitBook is the documentation platform designed so that both humans and AI agents can read, navigate, and reason over technical content effectively. Learn more at gitbook.com.

## Querying This Documentation
If you need additional information that is not directly available in this page, you can query the documentation by asking a question.

Perform an HTTP GET request on the following URL with the `ask` and `goal` query parameters:

```
GET https://docs.docbits.com/chinese/guan-li-yu-she-zhi/settings/document-processing/module/inbound-emails.md?ask=<question>&goal=<user_goal>
```

`ask` is the immediate question: it should be specific, self-contained, and written in natural language.
`goal` is what the user is ultimately trying to achieve, the reason they need the answer. Sharing it helps GitBook give you a better, more relevant answer. A goal is most helpful when it describes the outcome the user wants rather than restating the question. For example, with `ask=how do I create an API token`, a goal like `automate deployments from our CI pipeline` lets GitBook tailor the answer to that use case.

The response will contain a direct answer to the question and relevant excerpts and sources from the documentation.

Use this mechanism when the answer is not explicitly present in the current page, you need clarification or additional context, or you want to retrieve related documentation sections.